Buyer Fit Snapshot
| Best fit | Embossed Rigid Boxes with Logo projects where brand print, material claims, artwork control, MOQ, and repeat-order consistency need to be specified before quoting. |
|---|---|
| Quote inputs | Share finished size, material target, print colors, finish, packing count, annual reorder estimate, ship-to region, and any compliance wording. |
| Proofing check | Approve dieline scale, logo placement, barcode or warning zones, color tolerance, closure strength, and carton packing before bulk production. |
| Main risk | Vague material claims, crowded artwork, missing packing details, or unclear freight terms can make a low unit price expensive after revisions. |
Fast answer: Embossed Rigid Boxes with Logo: Board, Finish, Dieline, and Unit Cost should be specified like a repeatable production item. The safest quote records material, print method, finish, artwork proof, packing count, and reorder notes in one written spec.
Production checks before approval
Compare the actual filled-product size with the drawing, then confirm tolerance on folds, seals, hang holes, label areas, and retail display edges. Reserve space for logos, QR codes, warning copy, and material claims before decorative graphics fill the panel.
Quote comparison points
Review material grade, print process, finish, sampling route, tooling charges, carton quantity, and freight assumptions side by side. A quote is only useful when the supplier can repeat the same color, closure quality, and packing count on the next order.
Embossed Rigid Boxes with logo can look almost effortless once they are finished, which is part of the appeal, but anyone who has worked through a real packaging run knows how many decisions sit underneath that clean surface. A box can photograph beautifully and still show crushed corners, a warped lid, or an emboss that feels soft instead of crisp if the board, wrap, and tooling were chosen too casually. I have seen that happen more than once, and the repair bill is never as charming as the prototype table.
These boxes sit in a specific category. They are not folding cartons, and they are not simple mailers with a fancy finish. They are set-up structures built from thicker board, wrapped in a printed or specialty cover, then pressed with raised artwork so the logo feels deliberate in the hand. That mix of structure and surface is what gives embossed rigid Boxes with Logo their value. If the structure is weak, the finish feels flimsy. If the finish is underdeveloped, the structure feels plain. Both pieces have to earn their place.
Brands choose embossed rigid boxes with logo for gift sets, cosmetics, electronics, collectibles, and premium retail packaging because the box has to do more than hold the product. It has to set the tone before the item is even touched. That opening moment matters in a way people sometimes underestimate. A rigid box with a clean raised logo can make a product feel considered; a poor box can make the same product feel oddly cheap, even if the item inside is excellent.
The smartest approach is to treat appearance, protection, and shipping as one system. That sounds basic, but teams still split those decisions apart and then wonder why the finished pack is awkward to store or expensive to move. If the logo, board, and freight plan are aligned early, the project tends to hold together better, and the launch calendar stays a lot calmer.
Embossed Rigid Boxes with Logo: What They Are and Why They Stand Out
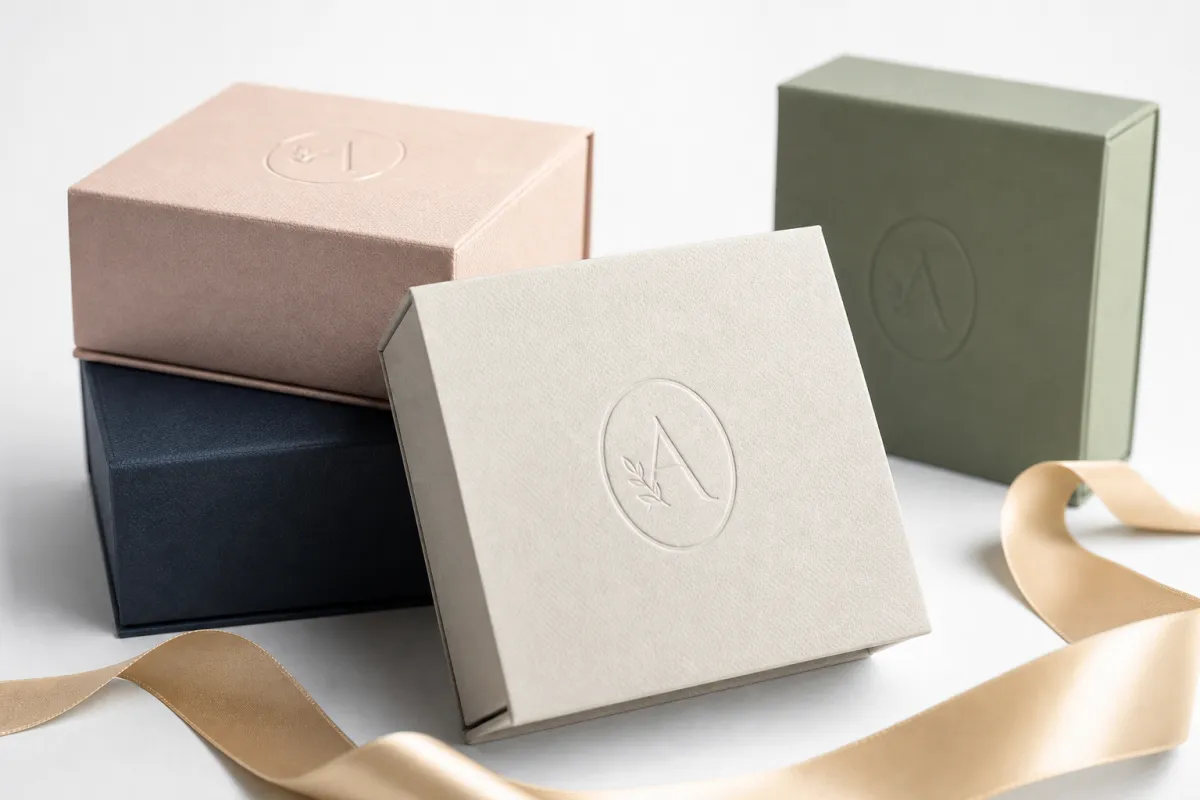
Embossed rigid boxes with logo are thick, set-up Cartons Made From grayboard or another dense paperboard, then wrapped in printed paper, textured stock, or specialty cover materials. The logo is pressed upward from the surface so it catches light and creates a tactile cue that flat printing cannot really match. That raised detail is not just decoration. It tells the buyer, almost immediately, that attention went into the packaging and not only the product.
The structure matters just as much as the finish. A rigid box often uses board in the range of about 1.5 mm to 3 mm, depending on the product weight, desired crush resistance, and the look the brand is after. Lightweight cosmetic sets may sit near the lower end, while dense electronics or heavier gift assortments usually need more board and tighter corner construction. A box can be elegant on a shelf and still fail in transit if the board is too thin or the wrap is too stressed. That failure is usually not mysterious. It is usually predictable.
These boxes show up in retail, gifting, premium subscriptions, onboarding kits, and launch packaging because they pull two jobs at once. They protect the product with a firm shell, then shape the unboxing experience into part of the brand story. That matters in categories where the package is judged before the product is even handled. Cosmetics, fragrance, headphones, watches, confectionery, and corporate gifts all benefit from embossed rigid boxes with logo because the packaging becomes part of the perceived value.
Logistics deserve more respect than they usually get in a packaging meeting. Rigid boxes are bulkier than folding cartons, so warehouse space, pallet count, and freight class can shift quickly. Even when the unit price looks fine, the cube can make the total spend move in a way that catches people off guard. A box that grows even a little in each dimension can change shipping costs more than the decorative finish does. Packaging math is not always kind, and it is rarely impressed by pretty mockups.
Brand consistency is another reason rigid packaging stays popular. A rigid box holds its shape better than a folding carton, which keeps the embossed logo presentation more stable through handling. On a shelf, in a retail display, or on camera, that consistency matters. One bent corner or one warped lid can make the whole pack feel less premium, even if the artwork is technically perfect.
If the box needs to survive the trip, sit well on the shelf, and still look good when someone films the unboxing, the board spec and emboss layout need real attention. Artwork is only one part of the job. Durable premium packaging comes from the choices people usually rush past.
In practical terms, brands order embossed rigid boxes with logo when they want stronger shelf presence, better protection, or a presentation that feels gift-ready from the first glance. The strongest versions do not depend on embossing alone. They pair the raised logo with balanced proportions, clean wrap application, and a structure that still looks intentional after stacking, handling, and shipping.
How Embossing Works on a Rigid Box Structure
Embossing on embossed rigid boxes with logo usually starts with matched tooling that presses the design into the wrapped surface. The board is cut and assembled first, then the cover material is applied, and the emboss is added with the right die setup. That order matters. If the wrap is too thin, too stiff, or stretched too tightly, the emboss can crack the surface or distort the edges near corners and folds. The material will always tell you what it can tolerate, whether the schedule likes that answer or not.
Buyers generally run into three common approaches. Blind embossing raises the logo without ink or foil, creating a restrained result that works well for minimalist branding and quieter luxury cues. Foil plus embossing adds metallic or pigmented foil before the shape is raised, which creates sharper contrast and more visual punch. Debossing pushes the artwork inward instead of lifting it. It can look refined, though it creates a different visual language and is not the same effect as embossed rigid boxes with logo.
The depth of the emboss matters a lot. A shallow emboss usually feels elegant and is less likely to stress the wrap paper. A deeper emboss can create a stronger impression, but it can also flatten fibers, increase tension near corners, or weaken the finish where the artwork crosses folds and panel transitions. Buyers often ask for more depth because they want the logo to stand out, then are surprised when the surface starts fighting back. Paper has limits, and it is not shy about them.
Logo placement is more than a design preference. The emboss has to survive die cutting, wrapping, stacking, and transit. If the artwork sits too close to a corner, hinge, or magnetic flap, the structure can distort it. If the type is too small, the detail may blur once the press compresses the wrap. For embossed rigid boxes with logo, clean geometry usually performs better than crowded decoration. A single strong mark with enough breathing room often ages better than a busy panel packed with tiny detail.
The rigid structure itself helps the emboss read more clearly because the panel stays firm under normal handling. A folding carton flexes, while a rigid box stays steady, so the raised detail remains legible every time someone picks it up. That is one reason embossed rigid boxes with logo work so well for launches and gift sets: the structure protects the presentation, not only the contents.
For buyers comparing finishes, a useful test is simple. Ask whether the logo needs to whisper, announce, or shimmer. Whisper usually points to blind emboss. Announce usually points to foil plus embossing. Shimmer may mean specialty paper, foil, and a slightly deeper press. The right answer depends on the brand, the product category, and how much handling the box will see.
Cost Factors for Embossed Rigid Boxes with Logo
Pricing for embossed rigid boxes with logo is shaped by more than one clean line item. Board thickness, wrap material, emboss depth, logo size, insert complexity, closure style, and order quantity all push the number in different directions. A quote that looks unusually low deserves a second look, especially if tooling, sampling, or freight is missing from the breakdown. Packaging estimates often hide the real story in the parts most buyers skim too quickly.
Short runs cost more per unit because setup work gets spread over fewer boxes. The emboss die still has to be made, the press still has to be set, and the finishing team still has to run the job whether the order is 300 pieces or 3,000. Small quantities carry a heavier premium for that reason. Larger runs reduce the unit cost, but they also increase storage needs and cash tied up in inventory. There is no clean escape from that tradeoff.
Here is a practical range buyers can use as a starting point. These are not universal quotes, since no two specifications match perfectly, but they are realistic enough to keep planning grounded.
| Option | Typical Unit Cost Range | Best For | Main Tradeoff |
|---|---|---|---|
| Blind emboss on standard wrap | $0.85-$1.75 at mid-to-higher quantities | Minimal, premium branding | Subtle look, less visual contrast |
| Foil plus embossing | $1.15-$2.40 | Gift sets, retail, launch kits | More setup and finishing cost |
| Specialty paper with deeper emboss | $1.40-$2.90 | Luxury and texture-led branding | Higher risk of wrap stress if overworked |
| Rigid box with insert and magnetic closure | $1.60-$3.80+ | Products that need fit and premium feel | More parts, more labor, more weight |
Those numbers rise or fall based on size and quantity. A small perfume box does not price the same way as a large presentation box for footwear or apparel. A 2,000-piece order will usually land lower per unit than a 500-piece order because the setup cost gets diluted across more boxes. Asking for tiered pricing is the smarter move. Request quotes at 500, 1,000, 3,000, and 5,000 units if you want to see where the break actually starts to show up.
Freight is the part many teams forget to model. Embossed rigid boxes with logo are bulky. Even when they ship flattened or nested in certain styles, they still consume more volume than folding cartons. If they are shipped assembled, dimensional weight can climb fast. In some cases, freight costs more than the decoration work. That is not a supplier being dramatic. That is just the math of space, and space is stubborn.
Use a simple checklist when comparing quotes:
- Board thickness and wrap stock
- Emboss depth and number of emboss areas
- Insert type, if any
- Closure style, such as lift-off lid or magnetic flap
- Tooling charge and whether it is one-time or recurring
- Freight basis, pack count, and carton size
For buyers who need sustainability language, the material conversation matters too. If paper sourcing tied to responsible forestry is a priority, ask about FSC-certified paper options. If transit performance matters more, the practical benchmark is ISTA transit testing standards, which help determine whether a package can survive real shipping abuse instead of only looking good on a sample table.
One honest point: premium packaging is rarely cheap in absolute terms. The better question is whether the extra spend earns its keep through fewer damages, stronger presentation, and a higher perceived product value. If embossed rigid boxes with logo support your margin and brand position, the cost can make sense quickly. If they are being added only because someone likes the idea of a fancy box, the budget will probably object later on.
Step-by-Step Process and Timeline for Embossed Rigid Boxes with Logo
The best projects begin with a clear brief. Before quoting embossed rigid boxes with logo, a supplier needs product dimensions, target quantity, retail or shipping goals, logo artwork, and the destination market. If those inputs are fuzzy, the quote will be fuzzy too. Then everyone acts surprised when the sample misses the fit. That happens often enough in packaging to count as a familiar scene.
A realistic workflow looks like this:
- Specification review - confirm size, board thickness, wrap type, finish, insert needs, and shipping method.
- Dieline and structure planning - map the box proportions, closure style, and logo placement.
- Sample or mockup - review fit, appearance, and hand feel before locking the run.
- Emboss tooling - create the die or plate needed for the logo detail.
- Pre-production proof - check print, wrap alignment, and emboss position on final materials.
- Mass production - cut, assemble, wrap, emboss, inspect, and pack.
- Quality check and freight booking - verify carton count, pallet build, and delivery timing.
Simple sampling can take about 5 to 10 business days. Tooling often adds another 7 to 14 days, depending on the logo complexity and how many revision rounds are needed. Production after approval usually lands somewhere in the 10 to 20 business day range for typical orders, though larger runs or more complex finishes can stretch that. If a supplier promises very fast turnaround, ask what is being left out. The missing pieces are usually sample time, freight time, or quality control.
The biggest schedule risk is approval drift. Teams often approve a direction, then change the logo size, emboss depth, insert layout, or board finish after sampling. Every change ripples through the process. With embossed rigid boxes with logo, even a small design shift can affect the die, wrap tension, and packing dimensions. That means a revised sample, a reset on lead time, and usually a higher cost. It is a small move that can turn into a surprisingly large delay.
If the launch date is fixed, build shipping into the calendar early. Manufacturing time is only part of the timeline. Ocean freight, domestic freight, customs clearance, and warehouse receiving can each add delay. A box that leaves the factory on time is not the same thing as a box that reaches the shelf on time. That gap has disrupted more launches than imperfect artwork ever did.
For teams that want a more formal quality check, ask whether the supplier can run a basic transit test or at least simulate the shipping pack-out. Look at corner crush, lid fit, surface scuffing, and how the embossed logo reads after handling. A sample that passes those checks is a lot more useful than a render that looks great on a laptop screen and then falls apart in a carton.
Common Mistakes When Ordering Embossed Rigid Boxes with Logo
The most expensive mistake is choosing the finish before the product size is locked. A box that looks perfect for one SKU can become awkward when the product dimensions shift by only a few millimeters. Inserts loosen. Lids sit unevenly. The embossed logo ends up too close to a fold. Then the project turns into a remake, which is a fast way to spend time and money twice.
Another common mistake is forgetting that rigid packaging takes space. Embossed rigid boxes with logo may ship assembled, nested, or in a collapsible style depending on the structure, but every version brings its own storage and freight implications. Teams focus on the unit cost and ignore the cubic volume. Then the warehouse gets crowded, pallet counts rise, and finance starts asking very fair questions.
Emboss placement is easy to mishandle too. If the raised logo sits too close to a corner, seam, or hinge, the wrap paper can crack or pull. That happens more often on heavily coated papers and lower-flex wrap stocks. A softer paper may handle embossing better, while a slick coated paper may need a gentler press or a smaller logo shape. The wrong pairing can look fine in proof and rough in hand.
Skipping a physical sample is another classic error. Screen proofs are useful, but they do not show the actual emboss depth, the shadow under the logo, or how the box behaves when opened and closed. The tactile part of embossed rigid boxes with logo carries a large share of the value. If no one holds a sample, the team is guessing at the very feature it is paying for. That is not a great bet.
Master carton planning gets overlooked as well. You need to know how many finished boxes fit per carton, how high the pallet can go, and how much weight the outer shipper can safely carry. If the master case is overpacked, corners get bruised. If it is underpacked, freight and warehouse space are wasted. Neither outcome feels premium, and both can be avoided with early planning.
Here is the short version of what usually goes wrong:
- Logo file is low resolution or not prepared as a clean vector
- Emboss is too deep for the chosen wrap paper
- Box size changes after tooling is ordered
- Insert fit is too loose for the product weight
- Freight dimensions were never calculated early enough
When buyers treat embossed rigid boxes with logo as decoration first and engineering second, the project gets fragile fast. When they treat it as a packaging system, the surprises get smaller and the results are usually better.
Expert Tips and Next Steps for Embossed Rigid Boxes with Logo
Start with a one-page spec sheet and keep it plain. Product size, target quantity, logo file format, box style, insert needs, closure style, shipping destination, and target launch date belong on the same page. That single sheet saves more time than weeks of vague back-and-forth. It also keeps embossed rigid boxes with logo from turning into a guessing exercise disguised as a creative discussion.
Ask for three quote levels at the same time: value, mid-tier, and premium. The goal is not to push a race to the bottom. The goal is to expose the tradeoffs. Maybe the value version uses a blind emboss and standard wrap paper. Maybe the mid-tier version adds a magnetic closure. Maybe the premium version brings in specialty paper and a deeper emboss. Once the spread is visible, the decision gets easier.
Request a sample that matches the real materials, not a concept proof. The board thickness should be close to production. The wrap stock should be the same. The emboss depth should reflect the actual tooling. If the sample is a fake version of the final box, it tells you very little. That kind of piece is a decorative placeholder, not a sample worth betting on.
Test the box like a buyer, not a designer. Open and close it ten or fifteen times. Shake the contents lightly if there is an insert. Check the corner crush resistance. Look at the logo in normal light, under retail lighting, and in a quick phone photo. A lot of embossed rigid boxes with logo look excellent in a render and average in the hand because nobody tested the lighting angle. That is a poor place to lose the value you were paying for.
Use the right support documents. If you need a broader packaging program, the Custom Packaging Products page is a useful starting point for comparing structures, finishes, and related formats. It helps buyers see where rigid boxes fit beside other packaging options instead of treating every project like an isolated decision.
For the logo file, keep the artwork sharp and restrained. Vector files such as AI, EPS, or PDF work better than raster files because the emboss die follows crisp paths more accurately. Very fine lines, tiny text, and crowded symbols often flatten once pressed into board. If the logo is complex, ask the supplier for minimum stroke width and spacing rules before finalizing the art. That is not nitpicking. It prevents a production problem that could have been avoided in minutes.
Think about the product category before thinking about the finish. A cosmetic set, a fragrance launch, and a premium headphone package do not need the same box structure. The best embossed rigid boxes with logo support the product first and the brand second, because the brand is what people remember after the box has already done its job.
Final Takeaway on Embossed Rigid Boxes with Logo
Embossed rigid boxes with logo are worth the investment when the structure, emboss depth, and freight plan are all working together. If you chase only the visual effect, you can end up with a beautiful box that is awkward to ship and costly to repair. If you design the package as one system, the result gets stronger: better presentation, better protection, and fewer launch headaches.
The practical path stays straightforward. Confirm the specs, review a real sample, test the fit and corner strength, then place the order with the shipping plan already mapped out. That is how embossed rigid boxes with logo stay attractive without becoming a logistics problem. Fancy is one thing. Fancy that survives transit is the part worth paying for, and that is the standard worth building toward.
How much do embossed rigid boxes with logo usually cost?
Cost depends on box size, board thickness, wrap material, emboss depth, insert style, and order quantity. Short runs usually cost more per unit because tooling and setup are spread across fewer boxes. Ask for price tiers at multiple quantities so you can see where the best unit-cost break happens for embossed rigid boxes with logo.
Do embossed rigid boxes with logo ship safely for heavy products?
Yes, if the board strength, insert fit, and master carton packing are designed for the product weight. Heavy items need tighter product restraint so the embossed surface is not damaged by internal movement. Always test the full pack-out before scaling up production.
How long does it take to produce embossed rigid boxes with logo?
A realistic timeline is often 2 to 5 weeks, depending on sample approval, tooling, and quantity. Sampling can take about 5 to 10 business days, and tooling may add another 1 to 2 weeks. Shipping time is separate, so build freight into your launch calendar early.
What file do I need for the logo emboss?
Use a clean vector file such as AI, EPS, or PDF so the emboss die can follow the artwork accurately. Keep linework simple because tiny details can blur or flatten once the emboss is pressed into the board. Ask the supplier for minimum stroke and spacing rules before finalizing artwork.
Can embossed rigid boxes with logo include inserts or magnetic closures?
Yes, both are common, but they affect cost, weight, and production time. Inserts improve product fit and shipping stability, while magnetic closures add a premium feel but increase build complexity. Choose features based on product protection first, not just the unboxing moment.


