Buyer Fit Snapshot
| Best fit | Freight Packaging Design for Safer, Cheaper Loads projects where brand print, material claims, artwork control, MOQ, and repeat-order consistency need to be specified before quoting. |
|---|---|
| Quote inputs | Share finished size, material target, print colors, finish, packing count, annual reorder estimate, ship-to region, and any compliance wording. |
| Proofing check | Approve dieline scale, logo placement, barcode or warning zones, color tolerance, closure strength, and carton packing before bulk production. |
| Main risk | Vague material claims, crowded artwork, missing packing details, or unclear freight terms can make a low unit price expensive after revisions. |
Fast answer: Freight Packaging Design for Safer, Cheaper Loads: Material, Print, Proofing, and Reorder Risk should be specified like a repeatable production item. The safest quote records material, print method, finish, artwork proof, packing count, and reorder notes in one written spec.
Production checks before approval
Compare the actual filled-product size with the drawing, then confirm tolerance on folds, seals, hang holes, label areas, and retail display edges. Reserve space for logos, QR codes, warning copy, and material claims before decorative graphics fill the panel.
Quote comparison points
Review material grade, print process, finish, sampling route, tooling charges, carton quantity, and freight assumptions side by side. A quote is only useful when the supplier can repeat the same color, closure quality, and packing count on the next order.
Freight Packaging Design Tips saved one of my clients from a $14,000 damage run, and I still remember the smell of hot tape in that Shenzhen packing room at 7:20 a.m. I was standing beside a stack of cartons with a plant manager who kept saying the box was "strong enough," right up until we flipped the pallet and found 18 mm of overhang on two sides and a crushed bottom corner on the third. That tiny miss became 42 rework cartons, a three-hour dock delay, and the kind of silence that makes finance people suddenly become very interested in their shoes.
Freight packaging is not just a box. It is the whole system around the shipment: product protection, pallet pattern, blocking and bracing, labels, stretch wrap, load balance, and the way people actually handle the unit in a warehouse, on a truck, and at the dock in places like Shenzhen, Dongguan, and the industrial parks around Monterrey. Good freight packaging design tips do not live on a pretty spec sheet alone. They live in the messy space between engineering assumptions and real-world handling. Less labor. Fewer claims. Fewer expensive surprises. Fewer moments where someone says, "But it looked fine on paper." Freight packaging design tips also have a way of exposing whether a team understands the lane or only the sample.
Most damage claims do not come from one giant disaster. They come from small design misses: weak corners, bad load balance, a pallet that hangs past the edge by 10 mm, or an insert that lets the product walk inside the carton on a six-hour lane from Chicago to Dallas. Freight packaging design tips matter because they force teams to look at those weak points before the first load leaves the building, not after the claims email lands and the warehouse starts pointing fingers. I have seen that blame game enough times to know it is never cute, and it is rarely useful. The better teams treat freight packaging design tips like a cost-control tool, not a decoration.
I have watched teams save $0.12 per carton and then spend $380 in dock labor to rebuild a load. I have also watched a buyer approve a cheaper board grade, only to discover the freight bill climbed because the packed carton grew by three inches on every side and crossed a carrier dimensional threshold. That tradeoff sits at the center of freight packaging design tips: protection, labor, cube, and shipping cost all tug in different directions. Ignore one, and the math gets rude fast. Honestly, freight packaging is where optimism goes to get audited. Freight packaging design tips are useful because they force the numbers to sit still long enough to be compared.
Freight packaging is different from retail packaging. Retail packaging sells the product, protects it on a shelf, and carries the brand with a 350gsm C1S artboard carton sleeve or a full-color shroud if the margin allows it. Freight packaging survives movement, stack pressure, forklift tines, and cross-dock handling from Savannah to Oakland. The rules change quickly once a shipment leaves the warehouse. Pretty still matters, especially for branded packaging and package branding, but in freight work, pretty has to prove it can hold its own weight. I have no objection to a good-looking box; I just refuse to worship one. Freight packaging design tips have to respect both the marketing side and the physics side, which is why the best specs are rarely the fanciest.
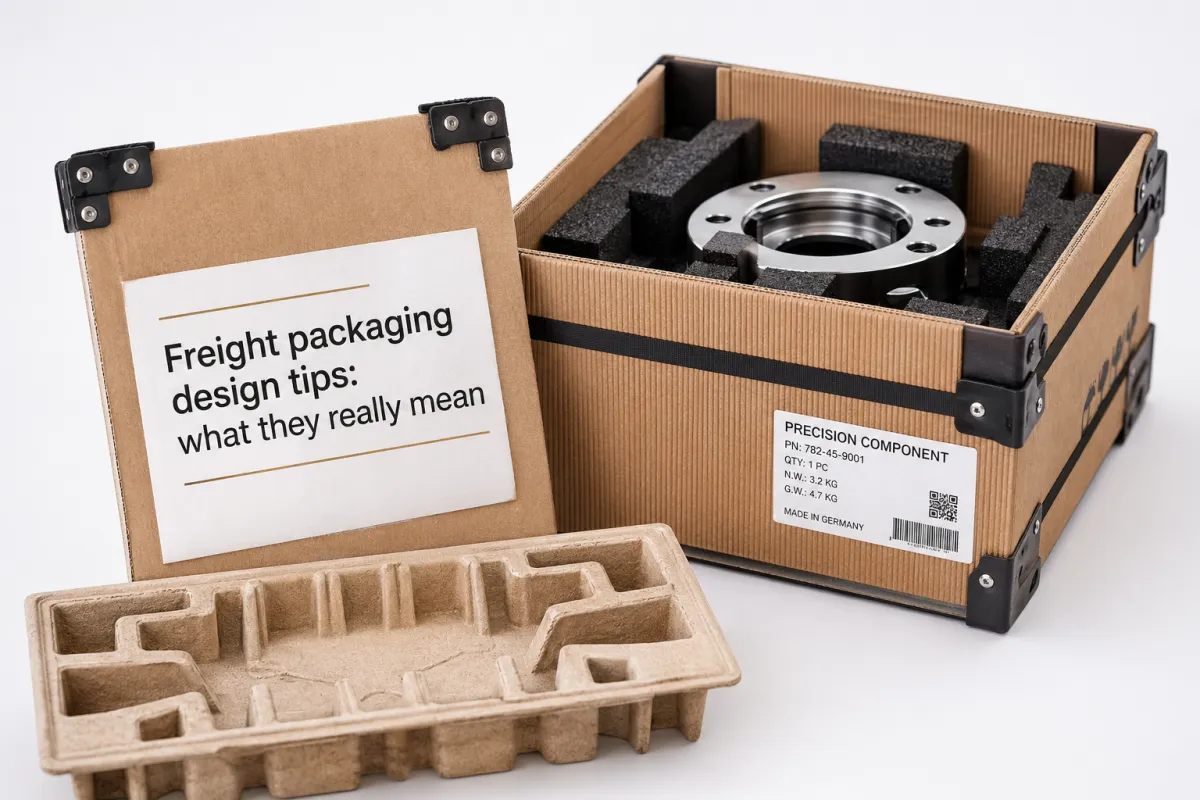
Freight packaging design tips: what they really mean
Freight packaging design tips begin with a blunt question: what is the package supposed to survive? Not "ship safely" as a slogan. The actual mechanics matter. Does the unit get stacked six high in a trailer? Does it get hand-carried across a cross-dock in Dallas at 4:45 p.m.? Does it move by forklift, pallet jack, or conveyor? Those answers decide whether you need a 32 ECT carton, a 44 ECT carton, doublewall BC flute, a wooden crate, or internal protection that actually locks the product in place. Freight packaging design tips are not about guessing harder; they are about asking better questions.
One factory visit in Dongguan taught me that lesson the hard way. A team had built what looked like a solid carton: clean print, crisp corners, decent tape, the whole thing. The product inside had 9 mm of side play because the insert was too loose and the die cut had drifted by 4 mm on the left panel. The box survived the lab drop. The shipment still failed in transit because the product shifted, punched the inside wall, and cracked a finish panel. Freight packaging design tips only work when the outer pack and the internal restraint are treated as one system. Otherwise you are just building a nicer-looking failure. That is why corrugated packaging and internal cushioning should be specified together, not in separate conversations.
The carrier gets blamed first because it is the easy story. The ugly truth sits closer to the design room. Weak corners, no edge protection, overhang, and poor pallet balance create a problem before the truck even starts moving. Freight packaging Design Tips That pay off start by assuming the shipment will be handled roughly, and by people moving fast. That is not cynicism. That is logistics. And, frankly, anyone who has watched a dock crew at 4:45 p.m. in July knows why that matters. Freight packaging design tips are most useful when they are written for the worst realistic handling, not the best possible day.
I usually break freight packaging into five parts: the primary product package, the secondary pack or shipper, the pallet pattern, the containment method, and the documentation. That last part gets ignored far too often. A clean carton can still fail if the stack limit is missing, the orientation arrows are wrong, or the carton count on the BOL does not match the physical load by even two units. Freight packaging design tips are really about reducing uncertainty at every touchpoint. Fewer surprises is the whole point; the rest is decoration.
If your team already thinks in terms of retail packaging, think of freight packaging as a different job with different winners. Retail packaging needs shelf presence and consumer appeal in a 12-inch aisle under LED lights. Freight packaging needs load stability and route survival. I have seen Custom Printed Boxes do a beautiful job on the marketing side and then fail because the corrugated spec was chosen for print quality instead of compression strength. Nice ink does not stop a crush test. No amount of branding will apologize to a split corner. Freight packaging design tips keep that distinction visible before the first pallet is built.
Practical rule: design the pack for the worst handling event, not the best one. That does not mean overbuilding every shipment into a wooden bunker. It means using freight packaging design tips to identify the actual risk profile, then spending money where it matters most. A lane with long dwell times in humid weather near Houston needs a different build than a local delivery run with one forklift lift and a straight shot to the customer. I know that sounds obvious, but obvious is not the same thing as common.
For teams that need a starting point, I keep a simple spec sheet template and a list of product packaging options on the shelf. If the pack is getting messy, I send people to our Custom Packaging Products page so they can compare cartons, inserts, and protective materials against one real shipment instead of three different guesses. It is amazing how quickly a debate improves once everyone is staring at the same dimensions, the same pallet footprint, and the same route from the same spreadsheet. Freight packaging design tips become easier to apply once the dimensions stop changing from one meeting to the next.
How do freight packaging design tips work in real transit?
Freight packaging design tips only matter if they match the forces a shipment actually sees. Compression is the first villain. Stack height in a trailer or warehouse can crush a weak carton fast, especially when the top load is not spread evenly across a 48 x 40 pallet. Vibration comes next. A package can look perfect at the dock and still wear itself apart after six hours of road vibration, especially if there is empty space inside. Impact shows up during loading, unloading, and sudden stops. Moisture and temperature swings arrive after that, because freight does not care that a material spec was chosen in a climate-controlled office at 72 degrees Fahrenheit.
I remember a client moving display components from Chicago to Phoenix on a 1,744-mile lane. Local route tests passed. The cross-country lane did not. The local route had fewer touches and shorter dwell. The longer route had more vibration, more transfer points, and a hot trailer that turned soft inserts into mush by the time the load hit Albuquerque. That shipment taught the team one of my favorite freight packaging design tips: a pack that survives a short trip is not automatically ready for a real lane. I wish that were less true, because it would save everybody time and a few gray hairs. Freight packaging design tips are a lot like weather forecasts; the short version can be accurate and still not help you prepare for the storm.
The components work together. The pallet carries the load and sets the footprint. The carton or crate shields the product from impact and dust. Internal cushioning controls movement. Wrap, straps, and corner boards keep the load together. One weak link punishes the others. A strong carton on a sloppy pallet is still a sloppy shipment. A perfect pallet pattern with loose internal fill still creates movement, and movement creates damage. This is why I get a little twitchy when someone says, "The carton passed, so we are good." Passed what, exactly? A 30-second inspection on a clean floor in Ningbo is not the same thing as 11 hours on a trailer. Freight packaging design tips have to cover the whole chain, not just the outer shell.
Freight packaging design tips also need to account for handling method. Forklifts can puncture a low pack. Pallet jacks can catch on poor pallet overhang. Conveyor transfers can jar the load in ways that show up later as corner failure. Cross-dock operations are especially unforgiving because speed beats gentleness every time. If a unit is going through multiple touches in Toronto, Atlanta, and Memphis, the design should expect more abuse. If it is a one-touch move from warehouse to truck to receiving dock, a lighter build may be enough. Route reality always wins over packaging theory. Always. Freight packaging design tips are strongest when they are tied to the route map and the actual touch count.
Handling methods change the spec
Designing for the product, not the handling chain, is one of the easiest mistakes to make. A 48 x 40 pallet pattern that works on a clean warehouse floor can still fail in a mixed-mode shipment if the receiving team uses pallet jacks with worn wheels and the driver tips the unit during unloading. Freight packaging design tips need to reflect those small but real events. Nobody writes them on a slide deck, but the freight network definitely remembers them, especially when the pallet has to be rebuilt at 6:10 a.m. Freight packaging design tips are often less about the product itself and more about what happens around the product.
- Forklift: Watch for tine punctures, especially on low cartons and thin boards like 32 ECT singlewall.
- Pallet jack: Protect the bottom deck and keep overhang tight to under 10 mm.
- Conveyor: Build for impact and vibration, not just compression.
- Cross-dock: Assume more touches and less patience in facilities with 20-minute turn windows.
- Multiple stops: Use stronger containment and better labels, including 4 x 6 shipping labels and orientation arrows on two panels.
That is why I always tell clients to test the shipment route, not just the pack. The same package can succeed on a regional lane and fail on a national lane because the handling profile changed. Freight packaging design tips work best when they are tied to route data, product weight, and touch count. That is the gap between an educated spec and a hopeful one. Hope is nice. It is not a testing method. Freight packaging design tips only earn their keep when they survive the route they were built for.
Freight packaging design tips that affect cost and pricing
Freight packaging design tips matter to finance because packaging cost is only one line item. The real bill includes board grade, die-cut tooling, pallet cost, labor, inserts, tape, labels, stretch wrap, crate hardware, and the cost of any rework when the first design misses. I have seen a team celebrate a lower box quote, then spend more on dock labor than they saved on the material. That is not savings. That is paperwork wearing a fake mustache. Freight packaging design tips are what make the hidden costs visible before they land in the ledger.
A cheaper box can absolutely be the expensive option. If it raises damage rates by even 2 percent, the total landed cost climbs fast. One extra repack, one claim, or one missed delivery window can wipe out months of material savings. Freight packaging design tips are about controlling the whole cost picture, not just the carton price. I have had more than one buyer discover that "cheap" was a very expensive adjective, especially after the second pallet was written off in Newark. The point is not to spend more; it is to spend in the right places.
Dimensional weight and freight pricing also matter. A package that grows by two inches in each direction can jump into a higher pricing bucket. I have watched a customer move from a clean parcel rate to a much uglier shipping cost because the package footprint was overbuilt by 14 percent. The freight team did not care that the insert looked elegant. They cared that the carton was oversized. A pretty box with bad cube discipline is still a problem. Freight packaging design tips that ignore dimensional weight are only solving half the equation.
| Option | Typical unit cost | Best for | Main risk |
|---|---|---|---|
| Stock corrugated setup | $12 to $18 per shipper | Fast moves, standard dimensions, lower volume | Poor fit can create movement and damage |
| Custom corrugated solution | $60 to $180 depending on size and volume | Odd dimensions, brand control, repeat shipments | Tooling and setup take more planning |
| Plywood or OSB crate | $95 to $240 | Heavy, high-value, or fragile freight | Higher labor and cube cost |
| Hybrid pack with foam or honeycomb | $28 to $110 | Sensitive products that need internal restraint | Material mix can push pricing up quickly |
The numbers above are not fantasy. They are the kind of ranges I hear from converters in Ohio, crate shops in Ho Chi Minh City, and fulfillment partners near Guadalajara when teams give them a real spec. A $12 stock corrugated setup looks cheap until the load needs to be repacked twice. A $140 crate looks expensive until the load is worth $18,000 and the route includes three transfers. Freight packaging design tips help you compare the right things. The wrong comparison is how budgets quietly get chewed up. Freight packaging design tips also make it easier to defend a stronger spec when the freight lane is not forgiving.
If you are comparing quotes, ask Uline, a local corrugator, a crate shop, and your fulfillment partner to price the same dimensions, same board grade, same insert spec, and same pallet pattern. Otherwise you are not comparing quotes. You are comparing guessing styles. I have seen a local corrugator in Dallas beat a national quote by 11 percent simply because the die line was cleaner and the board usage was tighter. There is nothing glamorous about that; it just works. Freight packaging design tips are often the difference between an honest quote and a misleading one.
Volume breaks matter too. A run of 500 pieces may land at a painful per-unit price, while 5,000 pieces can drop enough to justify tooling and custom fit. At one plant in Ningbo, a carton insert moved from $0.38 per unit at 500 pieces to $0.15 per unit at 5,000 pieces once the tool was dialed in and the cut waste dropped by 9 percent. That does not mean you should overspend on inventory. It means freight packaging design tips should be planned with MOQ, warehouse space, and reorder timing in mind. If you only ship 80 units a month, a giant custom run can create cash problems faster than it solves damage problems. And yes, I have watched that happen. It is as fun as it sounds.
For teams balancing packaging design, freight cost, and branded packaging, I usually suggest a two-step quote process. First, price the safe version. Second, price the leaner version that still passes basic route risk. The gap between those numbers tells you where the real cost pressure lives. That is usually more useful than arguing over one box sample in a conference room. Conference rooms are great for coffee; they are less reliable for physics. Freight packaging design tips are strongest when the quote process is disciplined and the inputs stay fixed.
Step-by-step freight packaging design tips process and timeline
The cleanest freight packaging projects follow a simple flow. Measure the product. Map the route. Define the handling risks. Choose the outer pack and internal protection. Then build a sample and test it before you commit to volume. Freight packaging design tips are not mysterious. They just become tangled when three departments work from three different versions of the dimensions. If you have ever watched procurement, engineering, and operations all swear they are looking at "the final spec," you know exactly what I mean. Freight packaging design tips work best when the project starts with one source of truth.
I had one client send me a product spec, a sales deck, and a warehouse photo, all with different dimensions: 312 mm in one file, 325 mm in another, and 318 mm in the picture if you measured the pallet grid. That sort of thing burns time. The warehouse team used the shipping carton size. Engineering used the product size. Procurement used the old supplier spec from a six-month-old email thread. We fixed it by building one sheet with the final numbers, and the process stopped eating itself. Funny how one page can do what ten meetings cannot. Freight packaging design tips turn from theory into action when the dimension set is locked.
Here is a timeline that works on straightforward corrugated projects, and it is realistic enough to use with a supplier in Shenzhen or Monterrey:
- Day 1 to 2: Capture product dimensions, weight, stack limit, and touch points.
- Day 3 to 5: Draft the spec, pallet pattern, and material choice, including flute and caliper.
- Day 6 to 8: Build a sample and confirm fit.
- Day 9 to 12: Run a test shipment or controlled drop and compression check.
- Day 13 to 15: Approve production and release the order, typically 12 to 15 business days from proof approval for standard corrugated work.
Custom crates, tooling, or unusual inserts can stretch that timeline. A more complex solution may need 2 to 4 weeks, sometimes 5 weeks if the supplier needs board samples, foam samples, or a second die line revision from a factory in Dongguan or Poland. I have seen teams lose a week because they waited to measure the product until after the sample was already built. That is avoidable pain. It is also the kind of delay that makes everyone start speaking in short sentences. Freight packaging design tips reduce that kind of schedule drift because they force the measurement work up front.
Freight packaging design tips become much easier to execute when the approval list is complete. I ask for product dimensions, weight, stack limit, drop height target, pallet pattern, label placement, moisture exposure, and temperature concerns. If the shipment includes export freight or long dwell time, I also ask whether the lane needs desiccants, moisture barriers, or stronger edge protection. Those details are not extras. They are the difference between an honest spec and a hopeful one. One of those gets you a quote. The other gets you a claim. Freight packaging design tips also help separate route-specific needs from habits carried over from the last project.
Best practice: send one clean spec sheet, not a thread with half the numbers missing. Every time. I have negotiated enough supplier quotes to know that the fastest projects are the ones where operations, procurement, and engineering sign off on the same document. Nothing kills freight packaging design tips faster than a team "aligning" after the sample is already in production. That is not alignment; that is a cleanup job in a blazer.
If you need a bridge between the design work and the buying work, our Custom Packaging Products page is a useful starting point for comparing materials and formats. It keeps the quote process less chaotic, which is a polite way of saying it keeps everyone from inventing their own version of the spec. Freight packaging design tips are easier to defend when the material options are visible in one place.
Freight packaging design mistakes that cause damage
The biggest freight packaging design mistake is the one that looks strong but hides movement. Empty voids, weak corners, and loose inserts are a nasty trio. I have opened plenty of cartons that looked solid from the outside and sounded like a maraca inside after a 300-mile truck ride. Freight packaging design tips are supposed to stop that nonsense before it leaves the building. If you can hear the product rattling, the design is already confessing. Freight packaging design tips should make movement obvious before the shipment moves.
Pallet overhang is another classic mistake. Even a small overhang of 12 mm can expose corners to impact and crush. Uneven weight distribution is just as bad because the load leans, the wrap loosens, and the whole pallet becomes unstable. I once saw a pallet lose its shape because the heavier cartons were stacked on one side to make loading "faster" at an Indianapolis dock. Faster, yes. Smarter, no. That pallet did not survive long enough to enjoy the efficiency gain. Freight packaging design tips are often just a disciplined way to stop shortcuts from becoming claims.
Skipping edge protection, corner posts, or proper stretch wrap discipline is asking for trouble. The carton can be technically strong and still fail if the containment is lazy. Freight packaging design tips need to include the full containment system: pallet, wrap, corners, straps, and any blocking or bracing. A good box with bad containment is like putting racing tires on a shopping cart. It may roll, but nobody should trust it. Freight packaging design tips that ignore containment usually end up costing more than the carton itself.
Route conditions matter too. A shipment moving through humid ports in Savannah, rough highways in Texas, or mixed-mode freight hubs in New Jersey needs different protection than a short metro delivery. Ignoring that is one of the fastest ways to create damage claims. I have seen export loads sweat through the corrugate because nobody planned for 18 hours of dwell time at the port. The cardboard did not lose an argument. It lost chemistry. Freight packaging design tips exist partly to stop that kind of avoidable mess. They also help teams think in terms of moisture, not just strength.
Documentation errors cause trouble as well. Missing orientation arrows, no stack limit, unclear carton counts, and label placement that gets buried under wrap all slow down receiving and increase handling mistakes. Freight packaging design tips should include the boring details, because boring details are usually the ones that save you. The glamorous stuff gets photographed; the boring stuff gets delivered. Freight packaging design tips are rarely glamorous, and that is precisely why they work.
And no, testing one sample and calling it done is not a strategy. It is a wish with a shipping label. A single successful sample proves almost nothing unless it matches the real product, real lane, and real handling sequence. If the lane changes, the pack should change too. I have no patience for "it passed once" as a shipping philosophy, because once is not a supply chain. Freight packaging design tips should always be tested against the lane, not the mood in the lab.
"We thought the box was the problem. It turned out the load pattern was lying to us the whole time." - operations manager after a failed pilot shipment
That line came from a client meeting I will not forget, and it happened after a 16-pallet pilot from Shenzhen to Long Beach. The team wanted a stronger carton, but the real issue was that the pallet pattern left too much flex at the top row. Freight packaging design tips are useful because they force you to look beyond the obvious scapegoat and fix the actual failure point. Usually, the fix is cheaper than the panic suggests. That part always annoys people a little, which is how I know it is true. Freight packaging design tips are often less dramatic than the crisis that exposes them.
Expert freight packaging design tips from the factory floor
One of my favorite freight packaging design tips is simple: standardize carton footprints wherever you can. Warehouse teams hate dealing with a new carton size every week. So do carriers. So does your sourcing team. A stable footprint makes palletizing easier, improves stack consistency, and cuts the number of weird edge cases that trigger labor delays. It also reduces the number of times someone mutters, "Who approved this?" under their breath. I have heard that exact sentence more than once, usually near a label printer that jammed for the third time. Freight packaging design tips are easiest to operationalize when the footprint stays consistent.
I learned that lesson on a factory floor where every SKU had its own box size. The line workers were spending more time hunting for the right carton than building the shipment. We trimmed the SKU count, unified the footprint, and shaved nearly 18 minutes off each pallet build. At $22 per labor hour, that saved about $6.60 per pallet and paid back a small tooling change in under 90 days. It also made the entire area feel less like a scavenger hunt. Freight packaging design tips like that are not theoretical; they show up in labor reports.
Another freight packaging design tip I use often: choose materials based on the worst part of the journey, not the nicest part. The warehouse is controlled. The truck trailer is not. The loading dock is not. The route may hit rain, heat, humidity, or a rough cross-dock in Minneapolis. If the pack only works in the clean part of the process, it is not really working. It is just behaving itself until the first hard day. Freight packaging design tips work best when the pack is designed for the dirtier half of the journey.
Route-specific upgrades can be small and smart. A moisture barrier can protect a sensitive shipment crossing humid regions like South Florida. Desiccants can help if the product is vulnerable to condensation. Corner posts can stabilize taller loads. A stronger flute or doublewall spec can make sense if the shipment is dense and stack pressure is high. Freight packaging design tips are rarely about one huge upgrade. They are usually about one or two smart changes that fit the lane. That is where palletization and load stability stop being buzzwords and start saving money.
Testing should match the risk. Compression checks matter for stack-heavy freight. Vibration testing matters for long-haul moves. Drop testing matters if the load gets hand-carried or transferred often. I keep the ISTA test methods close by because they help teams stop guessing. I also cross-check sustainability claims with FSC when clients want paper-based solutions that still meet sourcing goals. If you need public guidance on material stewardship and waste reduction, the EPA sustainable materials management hierarchy is a practical reference, not a marketing brochure. Freight packaging design tips and testing standards belong in the same conversation.
Here is a supplier-negotiation story that still makes me laugh. A corrugator in the Midwest quoted a build that looked expensive at first glance. I asked them to revise the die line so the carton locked with one fewer tape strip and a tighter score. That cut labor by 22 seconds per unit. At 8,000 units, that tiny change paid for the entire design revision. The supplier got the order, the plant got faster, and nobody had to wrestle with a useless spec. Freight packaging design tips like that are why I still bother to inspect die lines instead of just staring at quotes. The trick is not magic; it is paying attention. Freight packaging design tips often hide in the minutes nobody bothered to measure.
Good package branding and custom printed boxes can still live in freight work, but they need discipline. If the print layout interferes with orientation marks, or if the visual layer distracts from the actual handling instructions, the design has failed. I like a clean balance: enough branding to keep the shipment recognizable, enough structure to keep the product safe, and enough restraint to keep the dock team from ignoring the important labels. I am not saying freight has to be ugly. I am saying it should behave. Freight packaging design tips should support the brand, not fight the shipment.
If you are sourcing from multiple vendors, keep the print, die line, and pallet pattern locked before a large run starts. I have seen a last-minute print shift force a carton panel change that threw off the stack pattern by 14 mm. That is the sort of nuisance that looks small until you are reworking 600 units on a Thursday afternoon. Nobody has ever told me they were thrilled to discover that particular surprise. Freight packaging design tips help prevent those late-stage revisions that consume time and morale.
Next steps: turn freight packaging design tips into your spec
The fastest way to make freight packaging design tips useful is to pick one high-risk SKU and audit it first. Do not try to redesign the whole warehouse in one pass. Start with the shipment that creates the most claims, the most repacking, or the most dock drama. Freight packaging design tips work better when they hit the painful spots first. Pain is a very efficient prioritization tool, whether we like it or not. Freight packaging design tips also tend to win faster when the first fix is visible to the people doing the lifting.
Measure the product, the packed unit, the pallet footprint, the stack limit, and the handling touches. Put those numbers into one spec sheet. If you can, add photos of the current pack, the pallet pattern, and the labels. That gives the supplier a real target instead of a guessing game. A good spec sheet is not fancy. It is just complete. I would rather have plain and accurate than polished and wrong, especially if the lane runs from Ningbo to Chicago in winter. Freight packaging design tips become practical once the spec gets specific.
Then request two or three comparable quotes using the same packaging design requirements. Same dimensions. Same board grade. Same insert spec. Same pallet pattern. That is the only way to know whether a price gap is real. I have seen a $28 quote look attractive until the buyer realized the other supplier included a stronger board and proper edge protection. Apples to apples saves everyone from pretending. It also saves everyone from a very annoying second meeting. Freight packaging design tips are much easier to defend when the comparison is clean.
Run a pilot shipment before scaling up. Inspect the returned pack. Look at the corners, the wrap, the labels, the pallet edges, and the internal movement. If anything looks tired, fix it before you buy volume. Freight packaging design tips only become valuable when they turn into a repeatable shipping standard, not a one-time nice idea. The standard should survive the bad week, not just the good demo.
The honest version is this: freight packaging design tips are about making the shipment safer, cheaper, and easier to handle without chasing perfection that never shows up in real freight. I have seen too many teams overpay for strength they did not need and underbuy protection they clearly did. The sweet spot lives in the middle, and it is built one spec, one test, and one lane at a time. If you want freight packaging design tips that actually hold up, make them part of the standard, not a last-minute rescue. That is the difference between a package and a plan. Freight packaging design tips are most valuable when they become routine.
What freight packaging design tips work best for fragile products?
Freight packaging design tips for fragile products usually start with rigid outer walls, corner protection, and enough internal cushioning to stop movement. I usually push for a pack that passes a lane-matched drop, vibration, and compression check, not a random lab test in a clean room with 68-degree air. Keep the load centered on the pallet so one impact does not turn into a full-stack failure. If the product can rattle, it probably will, usually on the first turn out of the depot. Freight packaging design tips work best here when they reduce motion first and add strength second.
How do freight packaging design tips reduce shipping costs?
Freight packaging design tips reduce shipping costs by cutting damage claims, repacking labor, and dock delays, which often cost more than the material itself. They also help control dimensional weight and freight pricing by avoiding oversized or sloppy packs, such as a carton that adds 2.5 inches in one direction. Faster loading matters too, because a truck clock does not care about your packaging spreadsheet. Neither does a claims department, for that matter. Freight packaging design tips are a cost tool because they affect cube, labor, and claims at the same time.
How long does freight packaging design take from quote to shipment?
Simple corrugated packaging can move quickly if measurements are ready and the supplier responds on time. In many cases, proof approval to production release takes 12 to 15 business days for standard cartons, or closer to 3 weeks if the factory is in Dongguan or Monterrey and the schedule is busy. Custom crates, foam inserts, tooling, or testing usually add more time because samples and approvals come first. The fastest projects happen when procurement, operations, and engineering sign off on one spec sheet. If those three groups agree without a fist fight, celebrate quietly. Freight packaging design tips help the schedule by cutting the number of revision loops.
Should I use pallets, crates, or corrugated boxes?
Use pallets when the product needs stackability and easy forklift handling, especially on 48 x 40 footprints. Use crates when the load is heavy, high-value, or sensitive to impact and shifting. Use corrugated boxes when the product is lighter, the route is cleaner, and you can control internal protection well. I would not pick any of them based on habit alone, and I would especially not choose based on whatever was cheapest last quarter. Freight packaging design tips should be route-driven, not habit-driven.
How do I know if my freight packaging is strong enough?
Check whether the pack matches the product weight, stacking load, and shipping route conditions. Look for movement inside the pack, crushed corners, pallet overhang, or failed labels after transit. Run a pilot shipment before full rollout so you can fix weak points before they become claims, and compare the result against the original spec, not memory. If the results make you nervous, that is usually your signal to keep testing. Freight packaging design tips are strongest when the evidence is physical, not verbal.
Practical takeaway: pick one SKU, lock one spec sheet, and test it on the real lane before you scale. That single move catches most of the expensive mistakes early, and it gives your team a clean baseline for every future freight packaging decision.