Buyer Fit Snapshot
| Best fit | Brand Poly Mailers projects where brand print, material claims, artwork control, MOQ, and repeat-order consistency need to be specified before quoting. |
|---|---|
| Quote inputs | Share finished size, material target, print colors, finish, packing count, annual reorder estimate, ship-to region, and any compliance wording. |
| Proofing check | Approve dieline scale, logo placement, barcode or warning zones, color tolerance, closure strength, and carton packing before bulk production. |
| Main risk | Vague material claims, crowded artwork, missing packing details, or unclear freight terms can make a low unit price expensive after revisions. |
Fast answer: Brand Poly Mailers: Material, Print, Proofing, and Reorder Risk should be specified like a repeatable production item. The safest quote records material, print method, finish, artwork proof, packing count, and reorder notes in one written spec.
Production checks before approval
Compare the actual filled-product size with the drawing, then confirm tolerance on folds, seals, hang holes, label areas, and retail display edges. Reserve space for logos, QR codes, warning copy, and material claims before decorative graphics fill the panel.
Quote comparison points
Review material grade, print process, finish, sampling route, tooling charges, carton quantity, and freight assumptions side by side. A quote is only useful when the supplier can repeat the same color, closure quality, and packing count on the next order.
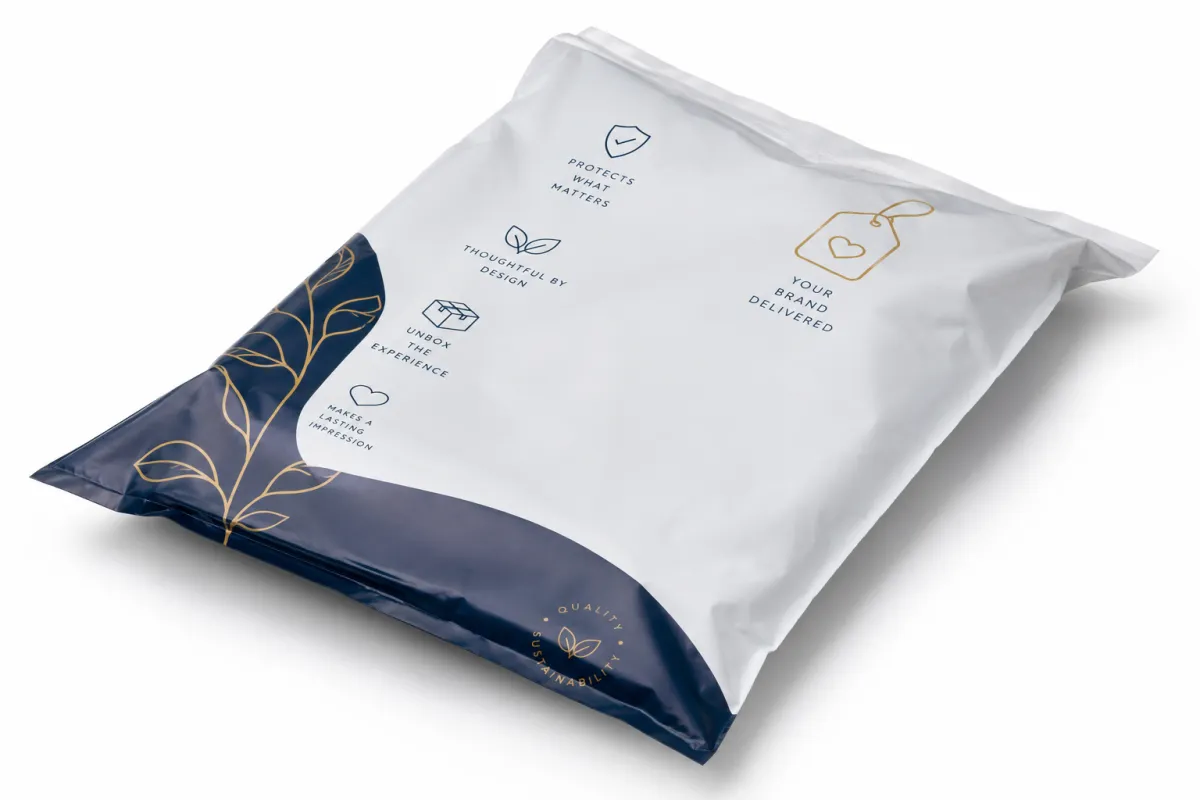
If you are sorting out how to brand poly mailers, the smallest design choice can change how a package feels in someone’s hand before they even see the product inside. I still remember standing beside a packing line in a Shenzhen facility where a plain 10 x 13 white mailer became a matte black printed bag with a one-color logo, and the warehouse team laughed because the same hoodie suddenly looked like it belonged to a far pricier brand. The order was only 2,000 pieces, the film was 2.5 mil LDPE, and the print was a single Pantone 426C plate, yet the shift in perception was immediate. Honestly, that moment says almost everything: how to brand poly mailers is not just a packaging task, it is brand identity, customer perception, and the last 12 inches of the buying experience, which is a very crowded place to win attention.
Put simply, Branded Poly Mailers are printed plastic shipping bags, usually made from polyethylene film, that protect products during transit while carrying a brand mark, a pattern, or a short message. They show up everywhere: e-commerce apparel, subscription boxes, beauty kits, cosmetics refills, pet supplies, and small-batch accessories. I have seen a 9 x 12 mailer do more for recognition than a $6 insert card, because the bag is what the customer sees first, then feels, then remembers. A 3.0 mil bag made in Dongguan with a 2-color flexo print can do the same job as a thicker carton for some products, which is why how to brand poly mailers matters for brands that want packaging to do more than just hold the item and close the seam.
A good mailer becomes part of the unboxing experience before the box opener even gets involved. It tells the buyer, often in one glance, whether the brand feels playful, minimal, luxury, eco-conscious, or loud in a way that works. Apparel labels shipping one to three garments, beauty brands sending 2 oz jars, and subscription programs moving 500 to 5,000 orders a month all get the same advantage: the mailer leaves the warehouse, rides through a parcel network, and lands on a doorstep with your name on it. A 12 x 15 mailer in recycled-content film, for example, can raise the perceived value of a $24 sweatshirt without adding more than $0.20 to landed packaging cost, and that kind of visual branding can make a $1.50 order feel like a much larger brand moment.
I think a lot of companies overcomplicate how to brand poly mailers. They start by asking for foil, gradients, and five ink colors, when the better question is whether the mailer should feel bold at 10 feet away and trustworthy at arm’s length. If the print reads cleanly, the size fits the product, and the film feels substantial instead of flimsy, the package usually does its job. A one-color print on a 3.0 mil black mailer produced in Guangzhou can outperform a busy four-color design on thinner 2.0 mil film, and the best runs I have seen were not the fanciest; they were the ones that matched the product, the margin, and the shipment path without waste. The math gets kinda boring, but it matters.
Here is the practical route through the topic: the production flow, the decisions that can swing pricing by $0.02 to $0.15 per unit, the artwork steps that keep the proof honest, and the planning details that stop a brand from running out of mailers before a promotion. If you want examples of finished packaging families while you read, the Custom Packaging Products page and our Case Studies page are useful reference points. You will also see where the tradeoffs live, because there is always a tradeoff. By the time you finish here, You Should Know how to brand poly mailers with fewer surprises and a lot more control, whether your first run is 1,000 pieces or 15,000 pieces.
How to brand poly mailers: what they are and why they matter
When people ask how to brand poly mailers, I usually start with the simplest definition: it is a printed shipping bag, made from film that is strong enough to move through sorting belts, carton drops, and courier bins without splitting at the seam. Most of the bags I see in commercial runs are 2.0 mil to 3.0 mil thick, and the better ones are chosen for a specific use case, not just for appearance. A 2.5 mil mailer works well for folded apparel; a 3.0 mil version makes more sense for sharp-cornered boxes or anything with a little extra abrasion risk. In factories in Shenzhen, Ningbo, and Ho Chi Minh City, that thickness decision often shows up as a $0.03 to $0.07 difference per unit, which is small on paper and loud in the freight budget.
The reason these bags matter is that they sit at the intersection of logistics and marketing. A plain mailer says, “We shipped your order.” A branded mailer says, “We planned this order.” That difference shapes customer perception in a very direct way. I have sat in client meetings where the marketing team focused on Instagram photos while operations cared only about seals and transit damage, and the winning solution was the one that satisfied both sides with a clean one-color print, a 12 x 15 size, and a reliable adhesive strip. A $0.18 mailer from a supplier in Dongguan can communicate more consistency than a $6 postcard insert if the pack opens with a clean tear and the logo sits squarely in the center panel.
One of my favorite examples came from an apparel brand moving from clear polybags and generic mailers to a custom one-color design on a soft gray film. Their monthly order volume was only 4,000 units, but after the switch their customer service team told me returns started including compliments about the packaging. The project used 2.75 mil film, a matte finish, and a print area of 7 x 4 inches, so the branding was restrained rather than loud. That kind of comment matters because it shows how to brand poly mailers affects brand recognition without needing a bigger ad budget; the package itself does a little bit of the selling every day.
Subscription boxes, beauty brands, and DTC apparel companies get a lot of value from this format because the mailer is light, quick to pack, and cheaper to ship than a carton. A mailer also gives you an easy surface for visual branding: a logo on the center panel, a pattern on the back, a return address block, or a small message near the seal. When the dimensions are right, the result feels intentional rather than improvised, and that is a large part of brand consistency. A 10 x 13 mailer with a 1-inch seal margin and a 2-inch label zone can save a packer 15 to 20 seconds per order, which matters when a 3PL in Dallas or Jersey City is shipping 2,500 units a week.
There is a practical side too. Poly mailers usually save storage space because 5,000 flat bags can take up a fraction of the room of corrugated cartons for the same monthly order count. That matters for small warehouse teams and 3PLs where every pallet position has a cost attached, especially in Los Angeles, Chicago, and Atlanta where warehousing rates can run $18 to $28 per pallet per month. So when people ask how to brand poly mailers, I tell them to think like a brand manager and a shipping supervisor at the same time. The bag has to look good, but it also has to stack, seal, and survive the carrier network without forcing a reorder every other week.
How branded poly mailers work in production
The production path for how to brand poly mailers is more straightforward than most people expect. It usually starts with artwork, then moves to film selection, plate or digital setup, color approval, printing, sealing, slitting, inspection, and final packing. On a standard flexographic run, the factory mounts printing plates on cylinders, feeds a polyethylene film roll through the press, dries the ink, folds or cuts the bag to size, and packs the finished mailers into cartons. A common order in a Guangdong factory might be 8,000 pieces of 12 x 15 bags with a 2-color print and 3.0 mil film, and that whole process can run smoothly if the artwork and dieline are right on the first pass.
Flexographic printing is the method I see most often for larger mailer runs, especially when a brand wants one to three solid colors and lower unit cost at quantities like 5,000 or 10,000 pieces. It handles bold logos, text blocks, and simple line art very well. Digital printing is useful when the order is smaller, the design changes often, or the brand wants more color variation without paying for plates. The tradeoff is that digital usually brings a higher unit cost and sometimes a narrower choice of film types, so how to brand poly mailers depends heavily on volume and design complexity. I have seen digital pricing land around $0.52 per unit for 1,500 pieces, while a flexo run of 10,000 pieces could drop closer to $0.21 per unit with the same one-color logo.
Flexo versus digital
In a factory review I did for a beauty client, the team wanted a rose-gold look on a 9 x 13 mailer, but the real choice was not foil versus no foil. It was whether flexo with a spot color would give enough contrast, or whether a digital approach would justify the higher cost on a 3,000-piece order. We ended up choosing a 2-color flexo setup at $0.24 per unit because the artwork was simple, the logo was large, and the shipment schedule needed a 12-business-day turn from proof approval. That is the kind of decision that defines how to brand poly mailers in production: not abstract design, but actual constraints like unit cost, film thickness, and the factory calendar in Jiangsu or Guangdong.
There are three common product paths. Stock mailers are pre-made sizes with custom print on a standard construction, which is the easiest route for a first run. Custom-printed mailers are built from standard film but adjusted for size, color count, or adhesive format. Fully bespoke constructions go further, with custom dimensions, special finishes, or unique seal features. If a brand ships a 10 oz sweatshirt in winter and a single T-shirt in summer, a good supplier may suggest two sizes rather than forcing one oversized bag for both seasons. That is especially useful when freight from a supplier in Xiamen or Ningbo is calculated by carton volume and every extra inch shows up in the quote.
Before production starts, the buyer usually approves a dieline, a print proof, the exact logo placement, and any compliance marks or return instructions. I have seen projects stall for five days because the proof showed a barcode too close to the edge, or because the safe area was not large enough for the text on the back panel. A typical proof package might include a PDF at 100% scale, a Pantone callout, and a 3 mm bleed. That is why the cleanest answer to how to brand poly mailers is not “make it pretty”; it is “make the file accurate, the dimensions real, and the proof signed only after the details match.”
At the factory level, the interesting part is how a flat design file turns into thousands of repeatable packages. A press operator is watching ink density, registration, film tension, and seal consistency every few minutes, because a 2 mm drift on a logo can create a visible shift across 20,000 bags. Good production teams check the first articles, confirm the color against a target swatch, and then keep the run stable through the full order. In a well-run plant, that rhythm might mean a first-article signoff at 9:30 a.m., a color check at 11:00 a.m., and carton packing by 4:00 p.m. That discipline is what keeps how to brand poly mailers from becoming an expensive guessing game.
Key factors that affect how you brand poly mailers
Artwork is the first big decision in how to brand poly mailers. The logo needs to sit where the eye naturally lands, usually the center or upper third of the bag, and the contrast has to hold up on film that may reflect light differently than paper. A white logo on black matte film looks crisp because the contrast is high; a pale gray logo on frosted film can disappear under store lighting. I usually recommend keeping 20% to 40% of the surface open so the bag feels designed, not crowded. Too much copy and the whole thing starts looking like a ransom note, which is not exactly the energy a premium order is trying to project.
Film choice matters just as much. A 2.0 mil film may be fine for soft goods, but a 3.0 mil bag is safer for products with hard edges or anything that will travel through a rough parcel network. If moisture protection is a priority, a well-sealed polyethylene mailer usually does the job better than a paper-based sleeve. Recycled content can be added in some constructions, but it should be tested for tear resistance and seal quality before a brand commits to a large order. A factory in Dongguan or Taizhou can usually quote a 30% PCR option, but the real test is whether the seal still holds after a 24-hour compression trial and a 1-meter drop. That honesty is part of how to brand poly mailers responsibly.
Sizing is where a lot of brands lose money. A 7 x 10 mailer for small accessories might look efficient on paper, but if the product needs tissue, a barcode card, and a return insert, the finished pack becomes too tight and the seal area gets crowded. A 12 x 15 mailer can cost a little more, but it may reduce wrinkles, protect the corners, and save packing time at the station. I have seen a brand cut packing labor by 18 seconds per order simply by moving from one undersized mailer to a better-fitting format. On 6,000 monthly orders, that is nearly 30 labor hours saved, which is real money in any warehouse in Dallas, Sydney, or Manchester.
Pricing depends on quantity, number of colors, film thickness, print complexity, and freight. The cleaner the artwork and the larger the run, the better the unit economics usually get. That is why people who ask how to brand poly mailers should think in tiers: a one-color run at 5,000 pieces, a 2-color run at 10,000 pieces, and a fully custom project if the brand really needs it. A 5,000-piece order might come in at $0.15 per unit for a simple one-color 10 x 13 bag, while the same design on a 12 x 15 3.0 mil bag with a matte finish might sit closer to $0.23 per unit. The same logo on the same size bag can move a surprising amount in price just because one version needs more setup time or a heavier film.
Operational factors matter too. If your warehouse ships three SKUs a week, one mailer size may be enough. If you have eight SKUs, returns, and seasonal gift sets, you may need two or three sizes to keep packs efficient and reduce waste. Reorder consistency is important because a brand that changes film shade or print placement every quarter can lose visual branding continuity. I once watched a buyer reject a second run because the black film shifted to a slightly warmer tone, and that is the sort of detail customers may not name but definitely feel. In a competitive category, a 5% variance in shade can be as noticeable as a typo on a billboard.
Here is a practical pricing snapshot from the kind of projects I see most often. These numbers move with size, freight, and market conditions, but they give a useful range for how to brand poly mailers without overpromising.
| Option | Typical Quantity | Print Style | Typical Unit Cost | Best Fit |
|---|---|---|---|---|
| Stock size, 1-color logo | 5,000 pieces | Flexographic | $0.15 to $0.28 each | Apparel basics, subscription kits, first branded run |
| Custom size, 2-color logo | 10,000 pieces | Flexographic | $0.21 to $0.36 each | Brands wanting stronger visual branding and better fit |
| Short-run, full-color design | 1,000 to 3,000 pieces | Digital | $0.38 to $0.75 each | Launches, seasonal drops, artwork testing |
| Heavy film, custom finish | 10,000 pieces | Flexographic or hybrid | $0.30 to $0.52 each | Premium apparel, fragile boxed goods, high-touch brands |
I once negotiated with a supplier over a 3.0 mil upgrade that added $0.03 per unit on a 12,000-piece order. The buyer hesitated because the quote looked higher, but after we looked at the damage reports from the previous quarter, the extra thickness saved more in returns than it cost on the purchase order. That kind of calculation is central to how to brand poly mailers well: unit price is only one line item, and not always the most important one. A single damaged return on a $68 jacket can erase the savings from dozens of cheaper bags.
It also helps to think about what the bag has to do after it leaves the warehouse. If a carrier label goes on the front, the design needs a clear label panel. If returns matter, the back may need a second address block or a tear strip instruction. If the brand cares about sustainability messaging, it may want a small note about material content or recycling guidance. For packaging and recycling references, I often point clients to EPA recycling guidance, because packaging claims need to be accurate, not just attractive. That keeps how to brand poly mailers grounded in real operations, not only on a mood board.
How do you brand poly mailers step by step?
Start with the brand goal, because that shapes every later decision in how to brand poly mailers. A bold streetwear label might want high-contrast black-and-white graphics, a skincare brand may want soft neutrals and one small logo, and a sustainability-minded company may want restrained copy with recycled-content messaging. I ask clients to describe the bag in three words, such as “clean, durable, premium” or “fun, friendly, fast,” because that gives the design team a useful direction before any file work begins. It also keeps the conversation from drifting into the vague swamp of “make it pop,” which has wasted more conference calls than I care to count.
Choose the format next. If you ship mostly folded apparel, a standard 10 x 13 or 12 x 15 mailer may be enough. If you sell books, rigid boxes, or bundled items, you may need a wider side seam and a stronger adhesive strip. This is a practical part of how to brand poly mailers that people sometimes skip, but the product size determines whether the branded bag looks sharp or awkward once packed. A design that looks great flat can feel cramped after the first item goes inside, especially if the item is a 1.25-inch-thick knit sweater or a box with sharp corners.
Then prepare the artwork correctly. Vector logos are the safest choice because they stay sharp at any size, and the factory can scale them without losing edges. Set a safe margin of at least 5 mm on key text, build the layout to the actual dieline, and confirm the ink colors before proofing. If you want a white logo on a dark bag, make sure the proof shows the background shade clearly, not a generic gray placeholder. I have seen too many projects where how to brand poly mailers got delayed because the art file was built for a screen, not for a press. A printer in Xiamen or Shenzhen can usually catch that quickly, but only if the client sends the file before production is already booked.
Pro tip: Ask for a sample pack before signing off on the whole order. One sample can show how a 2.5 mil bag feels compared with a 3.0 mil bag, how a matte finish reads under warehouse lighting, and whether the adhesive strip closes cleanly after 3 or 4 seconds of pressure. If your supplier can show side-by-side samples, you can judge seal performance, print clarity, and hand feel much faster than by staring at PDFs all day. That is a simpler, more reliable route to how to brand poly mailers. In a real sample kit, I like to see at least three constructions: 2.0 mil gloss, 2.75 mil matte, and 3.0 mil recycled-content film.
Once the proof looks right, approve production only after confirming the timeline, quantity, freight method, and the exact version that should go to press. If your team is comparing packaging lines, the Custom Poly Mailers page can help you match bag style to project scope, and the Custom Packaging Products page is useful if you are planning a matching carton or insert card at the same time. I have found that how to brand poly mailers works best when packaging decisions are made together, not one at a time. A mailer paired with a 350gsm C1S artboard thank-you card, for example, can create a stronger brand story than either item alone.
For brands that want a little more confidence before a pilot order, I often recommend reading a couple of finished projects on the Case Studies page and then building a simple internal checklist. The checklist should include logo files, bag dimensions, proof approval, quantity, and a deadline for the first delivery window. That way, how to brand poly mailers stays organized across marketing, operations, and procurement instead of getting lost in email threads with six different versions of the artwork, which somehow always seems to happen right before lunch.
Process timeline, approvals, and production planning
A typical timeline for how to brand poly mailers starts with the brief, then moves into artwork review, proofing, production, inspection, and freight transit. For a standard flexo run, I usually tell clients to expect 12 to 15 business days from proof approval to shipment readiness, then another 3 to 6 business days for domestic freight depending on distance and carrier service. If the order ships overseas, sea freight can add 2 to 5 weeks, which changes the planning conversation completely. A factory in Ningbo shipping to Los Angeles via ocean freight, for example, may need a 28-day buffer, especially if the order is moving during peak season.
Delays usually come from the same places. Artwork revisions take time when the logo is not in vector format, dieline details are missing, or the buyer decides to change the slogan after the proof is already under review. Color approval can slow things down if a brand wants a very exact Pantone match on a film that reflects light differently from paper stock. Last-minute size changes can reset tooling or packing plans. I have watched a six-day project become a sixteen-day project because the team moved the bag width by 1 inch after approval, which is the sort of thing that makes how to brand poly mailers harder than it needs to be. A 1-inch change can also alter how many bags fit per carton, which then changes freight charges by the pallet.
Rush orders do happen, but they change the rules. A factory can sometimes compress proofing, prioritize a job on the press, and ship early, but that typically means higher pricing and fewer finishing options. If you want a 2-color digital sample in 4 business days, that is very different from a 20,000-piece flexo run with a custom adhesive strip. Good planning for how to brand poly mailers means Choosing the Right tradeoff early so the rush fee does not become the default solution. In practical terms, a rush job might add 12% to 20% to the quote, especially if it has to jump ahead of a larger order in a plant near Guangzhou.
For transit testing, I like to think about how the package will behave in a real distribution chain, not just how it looks on a table. Packaging test guidance from ISTA is useful because it reminds brands to consider drops, vibration, compression, and handling, especially if the mailer contains boxed goods or fragile inserts. A bag that looks perfect in the studio can still fail if the seal peels open after the second conveyor transfer. That is why how to brand poly mailers should always include a shipping test mindset, even if the first test is as simple as a 1.2 kg dummy load dropped from 36 inches onto concrete.
Inventory planning is another area where experience saves money. If your monthly volume is 4,000 units, a reorder at 1,500 pieces can leave enough buffer for a second run, while a reorder at 200 pieces can create a stockout if the factory needs 10 days for production and 5 more days for freight. I suggest a safety stock of at least 20% for growing brands and 30% if your sales are seasonal or promo-driven. That simple habit turns how to brand poly mailers from a one-off project into a repeatable supply process, especially when sales spike in Q4 or around a product launch.
Common mistakes when you brand poly mailers
The first mistake is overcrowding the design. A logo, a website, a tagline, a QR code, a return message, and three social handles may fit on a laptop screen, but they rarely feel elegant on a flexible 12 x 15 bag. I have seen a brand add so much copy that the mailer looked more like a flyer than packaging, and the customer instantly lost the premium impression the team wanted. Good how to brand poly mailers work leaves enough negative space for the eye to rest, usually at least 30% of the front panel on a small-to-medium bag.
The second mistake is chasing the lowest quote without reading the fine print. A low unit price can hide a higher setup fee, a minimum order of 10,000 pieces, or freight that adds 18% to the landed cost. That is why pricing on how to brand poly mailers needs a full landed-cost view, not just a unit number from a sales email. I have watched teams save $0.02 per bag and then spend far more on emergency freight because they under-ordered by one pallet. Cheering over the cheapest quote and then getting hit with surprise fees is, frankly, a special kind of pain.
Another common error is choosing the wrong thickness or a weak seal structure. A soft 1.5 mil film may be fine for lightweight accessories, but it can feel cheap and split more easily on sharper items. A thicker bag can be overkill for small garments and may raise cost without improving performance. I remember one brand that had returns from broken seams because the back seal was too narrow by about 3 mm; after moving to a stronger construction, their damage rate dropped within the next 2,000 units. That kind of detail matters in how to brand poly mailers, because the difference between 2.0 mil and 3.0 mil is often the difference between a clean delivery and a customer complaint.
“The bag looked fine on screen, but the logo vanished after the fold.” That was a line I heard from a warehouse lead during a proof review, and it stuck with me because it describes the exact problem that can ruin a run of how to brand poly mailers if nobody checks the actual pack geometry. I have never forgotten it, probably because it sounded like a warning and a complaint rolled into one.
Proofing mistakes are easy to make and expensive to fix. A screen proof may look close enough, but if the art is 7% smaller than intended or the Pantone reference is not clearly stated, the finished bags can drift away from the intended result. Compliance and shipping details are another area to respect. If you need barcodes, returns information, or space for a carrier label, build that into the layout before approval. Good how to brand poly mailers protects the brand message while still giving operations the space they need, whether the label lands on the front panel or a 2-inch blank strip is needed for scanning.
Expert tips and next steps for your first branded run
If this is your first order, start with one hero size and one or two design variants. A single 10 x 13 mailer in white or black can cover a surprising amount of monthly volume, and one alternate version can help you test whether a louder print or a softer look performs better. I have seen brands waste six weeks debating a packaging family before they had even tested a 5,000-piece run. A narrow first step is usually the smarter answer to how to brand poly mailers, especially when the first shipment needs to leave a warehouse in Brooklyn, Austin, or Manchester by the end of the month.
Ask the factory for a sample set that shows material options, print quality, and seal performance side by side. If the supplier can send a 2.5 mil matte sample, a 3.0 mil glossy sample, and a printed version with the actual logo, you will make better decisions in one afternoon than in six email rounds. I also recommend asking whether the supplier can support reorders from the same spec sheet so the second run matches the first. That is a quiet but important part of how to brand poly mailers well over time. A supplier in Guangzhou or Ningbo that tracks job numbers and ink formulas can save you from shade drift on the next 20,000-piece order.
Build a simple supplier checklist before you request formal quotes. The checklist should cover artwork support, dieline availability, proofing process, minimum order quantity, lead time, freight options, and reorder reliability. If you need a repeatable packaging family, ask whether the supplier can match the film shade on future runs and whether they keep production records by job number. Brands that do this reduce surprises and make how to brand poly mailers easier to scale across seasons. I would also ask for the factory address, because a plant in Shenzhen can turn samples faster than a partner 600 miles inland, and that affects every deadline.
If you are still defining the project, finalize the logo file, confirm the exact dimensions, and map out the first shipment date before you ask for pricing. That will help you compare quotes apples to apples, instead of comparing a 2-color 3.0 mil bag against a 1-color 2.0 mil bag and calling them equivalent. Once the numbers are in hand, review the proof, check the order quantity, and place a pilot run that matches real sales volume. That is the cleanest way I know how to brand poly mailers without overcommitting, especially if the pilot is only 1,000 pieces and the full roll-out may later hit 10,000.
The best next step is practical: gather your specs, compare two or three proofs, review landed pricing, and place a pilot order that can be tested in real shipments. If you want to see how other brands approached their packaging mix, the Case Studies page is a useful place to start, and the Custom Poly Mailers page gives you a direct view of the product family. Once those pieces are in place, how to brand poly mailers becomes less about guesswork and more about controlled execution. A clean pilot, a 12- to 15-business-day production window, and a realistic freight plan are usually enough to tell you whether the concept works.
In my experience, the brands that get the best results treat how to brand poly mailers as part of a larger packaging system, not an isolated order. They match the bag to the product, keep the print simple enough to read at a glance, and plan reorders before the last carton leaves the dock. That approach protects budget, supports brand consistency, and gives customers a package that feels deliberate from the first touch. It also makes future matching easier, whether the next add-on is a 350gsm C1S artboard insert, a label in Toronto, or a seasonal mailer run out of Dongguan.
FAQ
How do I brand poly mailers without making them look cluttered?
Use one strong logo placement, keep supporting copy to one short line, and leave at least 25% to 40% of the surface open so the film does not feel busy. I usually suggest testing the design on the actual 10 x 13 or 12 x 15 bag, because a screen mockup can hide spacing issues that show up the second the bag is folded or sealed. That simple check is a big part of how to brand poly mailers with a premium feel, especially on a matte black or soft white film made in Shenzhen or Guangzhou.
What is the cheapest way to brand poly mailers for a small business?
Start with a single-color print on a standard stock size, such as a 9 x 12 or 10 x 13 mailer, because that keeps plates, setup, and color matching simpler. Keep the artwork to one logo or one line of text, and compare minimum order quantities carefully since a slightly higher unit price can still cost less overall if it cuts unused inventory by 2,000 pieces. For small budgets, that is often the smartest path for how to brand poly mailers, and in some factories a 5,000-piece one-color run can land near $0.15 to $0.20 per unit before freight.
How long does it take to produce custom branded poly mailers?
Most standard runs take 12 to 15 business days from proof approval to production completion, then 3 to 6 business days for domestic freight. Digital short runs can be faster, while larger flexo orders or overseas freight can stretch the schedule by several weeks. If your launch date is fixed, build in at least 2 extra weeks so how to brand poly mailers does not become a last-minute scramble, especially if the factory is in Ningbo and the shipment needs to reach a U.S. warehouse by a Monday.
What file do I need to send to print poly mailers with my logo?
Vector artwork is the safest format because it keeps edges sharp on film and scales cleanly across different sizes. Include the correct dieline, bleed, safe margins, and any Pantone references or color notes, then ask the factory to confirm the printable area before you finalize the layout. That is the cleanest way to handle how to brand poly mailers without losing detail, and it is the same workflow many factories in Dongguan and Xiamen use for 2-color and 3-color flexo jobs.
Are branded poly mailers worth it for ecommerce shipping?
Yes, especially when package visibility, unboxing, and repeat recognition matter to the customer experience. A well-made mailer can make a shipment feel more professional without changing the product itself, and the strongest returns usually come when the design is simple, the size is correct, and the order quantity matches real sales volume. That is why how to brand poly mailers can be a practical marketing choice, not just a visual upgrade, and why a $0.18 bag can sometimes do the work of a much pricier packaging stack.
If you are ready to move from idea to first sample, the most useful sequence is simple: lock the bag size, keep the print to one or two colors, request a physical sample, and test it with a real packed order before you approve volume. That is the cleanest, least glamorous answer to how to brand poly mailers, and it is usually the one that saves the most money once the orders start moving.


