Buyer Fit Snapshot
| Best fit | Create Unboxing Experience That Feels Premium projects where brand print, material claims, artwork control, MOQ, and repeat-order consistency need to be specified before quoting. |
|---|---|
| Quote inputs | Share finished size, material target, print colors, finish, packing count, annual reorder estimate, ship-to region, and any compliance wording. |
| Proofing check | Approve dieline scale, logo placement, barcode or warning zones, color tolerance, closure strength, and carton packing before bulk production. |
| Main risk | Vague material claims, crowded artwork, missing packing details, or unclear freight terms can make a low unit price expensive after revisions. |
Fast answer: Create Unboxing Experience That Feels Premium: Board, Finish, Dieline, and Unit Cost should be specified like a repeatable production item. The safest quote records material, print method, finish, artwork proof, packing count, and reorder notes in one written spec.
Production checks before approval
Compare the actual filled-product size with the drawing, then confirm tolerance on folds, seals, hang holes, label areas, and retail display edges. Reserve space for logos, QR codes, warning copy, and material claims before decorative graphics fill the panel.
Quote comparison points
Review material grade, print process, finish, sampling route, tooling charges, carton quantity, and freight assumptions side by side. A quote is only useful when the supplier can repeat the same color, closure quality, and packing count on the next order.
People often assume the answer to how to create unboxing experience begins with a logo or a striking finish, yet the real moment starts earlier, the instant a customer feels the parcel weight, hears the seal give way, or lifts the lid and senses whether the package was made with care. That first touch carries real meaning because the unboxing experience is a sequence of cues: fit, texture, sound, protection, reveal order, and the way the product rests inside the box. When those details work together, the package supports brand identity and brand recognition in a way that feels deliberate rather than staged.
For ecommerce brands, gifting programs, and premium launches, the box has an important job. It needs to protect the item in transit, carry visual branding, and still feel thoughtful in hand. That is why how to create unboxing experience decisions should be made with production reality in view, not only from a mood board. A simple structure can still feel elevated when the dimensions are correct, the insert fits tightly, and the printed details are handled with restraint.
The practical side is easy to miss. How to create unboxing experience details that look polished, ship safely, and stay within budget usually come down to a few controllable variables. Material choice, structural format, print coverage, and assembly time shape the result more than most teams expect. A package does not need to be elaborate to feel premium. It needs a few smart decisions and enough consistency to make the whole thing read as one story.
After enough sample reviews, one thing becomes pretty clear: the best packages rarely depend on one flashy feature. They depend on a chain of small decisions that all point in the same direction. If the customer has to fight the box, the premium feeling is kinda gone, no matter how nice the artwork looks.
How to Create Unboxing Experience That Feels Bigger Than the Box
The simplest way to understand how to create unboxing experience is to stop treating packaging as decoration and start treating it like choreography. What does the customer touch first? What appears next? How much resistance does the closure give? How does the product sit when the lid comes off? Small details like these shape customer perception quickly, often before the product itself is even visible.
That is why packaging buyers tend to get better results when they define the emotional goal first. Should the package feel calm and minimal, luxurious and giftable, or energetic and promotional? Each direction leads to different materials and structures. A rigid setup box with a lift-off lid says something different from a corrugated mailer with an insert and tissue wrap. Neither is automatically better, but one will fit the brand story more naturally.
How to create unboxing experience also depends on proportion. An oversized carton with too much void space feels wasteful, while an overly tight pack feels cheap or frustrating to open. The strongest packages usually feel balanced in every direction: dimensions that protect the item, an insert that holds the product in place, and printed artwork that reinforces the same message on both the exterior and the interior. That kind of brand consistency makes a box feel premium even when the materials are not the most expensive option.
There is a sensory layer that often gets overlooked. The sound of a tear strip, the drag of a matte coating, the weight of a rigid lid, and the pause created by layered reveal steps all shape the experience. The best packages do not try to impress in every direction at once. They place emphasis where it will actually be noticed. A soft-touch exterior, a clean interior print, and a snug insert can do more for brand identity than a long list of embellishments.
If the first ten seconds feel cramped, noisy, or confusing, the package reads as cheaper than it is, even when the print quality is excellent.
That is why how to create unboxing experience should be framed around the full reveal rather than the outside of the box alone. Customers remember how the package opened, how the product was held, and whether the inside felt like part of the same story. Once those pieces line up, the box feels bigger than its footprint.
For teams that want stronger brand recognition without pushing cost too high, a few small cues can carry real weight: a printed interior message, a colored reveal panel, custom tissue wrap, or a simple insert that matches the product silhouette. These details do not need to be expensive to feel premium, but they do need to be built into the structure instead of added later as decoration.
I have seen more than one beautiful concept lose impact because the reveal order was never tested. A sleeve that tears too early, a lid that shifts during opening, or a product that rattles inside the cavity can flatten the whole moment. The fix usually is not more decoration. It is better fit, cleaner sequencing, and a little restraint.
How to Create Unboxing Experience Through the Process and Timeline
How to create unboxing experience becomes much easier to manage once the packaging process is mapped clearly. A typical project moves from brief to concept, then to dieline, proof, sample, production, packing, and fulfillment. That sequence looks simple on paper, though each stage affects the next one. If the brief leaves out the insertion method, or the product dimensions are approximate, the design team may end up solving structural problems late in the schedule, and that usually raises cost and slows launch.
Accurate measurement data is not optional. The finished product size, secondary components, shipping method, and desired opening order all need to be known before the layout is locked. A box that ships by parcel faces different stress points than one that is hand-delivered for a gift set. Fragile items, multi-piece sets, and packs that must open in a specific sequence all need their own approach. How to create unboxing experience is partly about emotion, but it is also about fit engineering.
Brief, proof, and sample
The cleanest approval workflow usually keeps decisions visible. A concise creative brief should define the brand mood, target audience, quantity, product dimensions, and budget range. From there, the structural designer builds the dieline, the artwork team applies the graphics, and the proof is checked for both content and construction. Once the proof is approved, a sample or prototype should be reviewed with the real product inside the package.
That sample review is where the project gets honest. Does the lid close without bowing? Does the insert hold the item at the right height? Can the pack be opened without ripping the board or scuffing the finish? Those are the questions that matter. This is also where teams get a clearer read on brand consistency, because a good package has to feel the same in a prototype cart as it will on the customer's desk.
What affects the schedule
Several variables change lead time. Tooling is one. Specialty finishing is another. A simple print-and-fold carton may move faster than a rigid box with foil, embossing, and a custom insert. Order quantity matters too, because setup time gets spread differently across small and large runs. If the materials are standard stock and the artwork is ready, the process can move fairly quickly. If the design needs special board, a new cutting tool, or multiple sample rounds, the schedule stretches.
As a planning rule, many packaging projects need about 7 to 10 business days for early proofing, another 5 to 10 business days for sample review and revisions, and 10 to 20 business days for production after final approval, depending on material availability and factory load. That is not a universal promise, but it is a realistic way to think about how to create unboxing experience without promising a launch date the supply chain cannot support.
When the schedule needs to stay tight, a short sign-off list saves time: dimensions, material, print coverage, insert style, finish, pack-out method, and ship test approval. That single page prevents more delays than most people expect. It also reminds everyone that how to create unboxing experience is not one decision, but a chain of connected approvals that need to stay in step.
For teams that want more formal test guidance, it helps to look at industry references such as the ISTA test methods and general packaging best practices from organizations like packaging.org. Those resources keep the conversation grounded in transit performance instead of appearance alone. That balance matters when the package has to look good and survive the carrier network.
Key Factors That Shape a Memorable Unboxing Experience
How to create unboxing experience successfully usually comes down to five things: material, structure, print, interior rhythm, and protection. The strongest packages make those five parts work together so the customer feels one coherent message rather than a stack of unrelated choices. That is what separates a nice-looking box from a package that actually strengthens brand identity.
Material choice has more influence than many teams realize. A rigid board box feels dense and premium, which is why it is common for cosmetics, apparel accessories, and gift sets. Folding cartons are lighter and more economical, and they work well for products that already have a primary container. Corrugated mailers bring strength and shipping confidence, and they can still feel polished with the right print and insert. Specialty wraps, such as paper sleeves or custom tissue, are less about structure and more about the reveal sequence. Each option changes the tactile feel, durability, and cost profile.
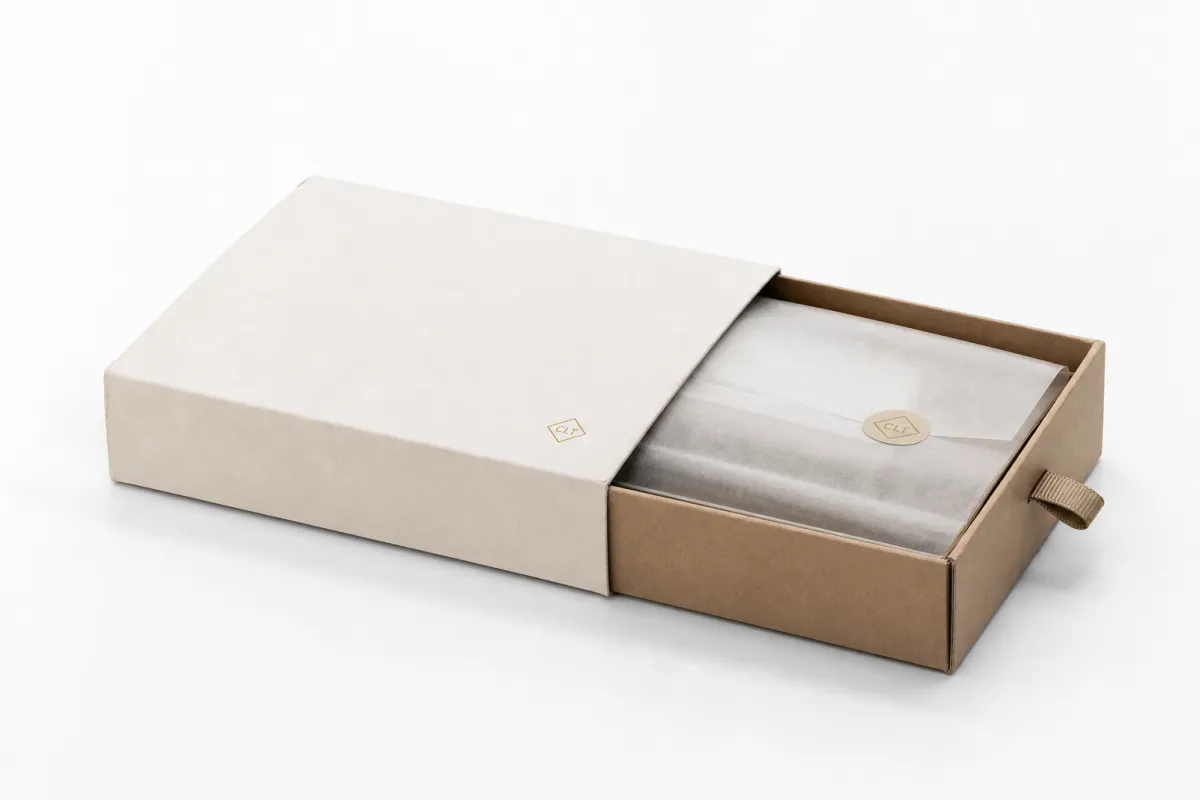
Structure matters just as much. A drawer box builds suspense because the product appears only after the sleeve is removed. A lift-off lid creates a ceremonial opening moment. A tuck-top carton is efficient and clean, while a mailer box is practical and ship-ready. If you are thinking seriously about how to create unboxing experience, pay close attention to the opening motion. People remember motion. They remember whether the package opened with a lift, slide, pull, or peel.
Print and finish choices set the mood. Uncoated paper can feel warm and natural. Soft-touch coating gives the surface a velvety feel. Foil can highlight a logo or border without covering the entire box in shine. Embossing creates depth that customers notice when they run a finger across the surface. Spot UV works well for contrast, though it should be used carefully so it does not feel busy. Interior print can be especially effective because it turns the inside of the box into part of the experience rather than a blank afterthought.
Color, copy, tissue, seals, and reveal order all shape the rhythm. A branded message on the inside flap, a simple tissue fold, or a custom sticker can create a moment of pause before the product appears. That pause matters. It gives the package a little theater without making it clumsy. In practice, the inside of the box often carries more emotional weight than the outside, because that is where the customer feels the brand speaking directly.
Protection and sustainability should be discussed together. Right-sized packaging reduces void fill, which lowers shipping waste and often improves transit performance. Recycled content can support environmental goals, but it still needs to be matched with the right board strength and print behavior. The EPA's sustainable packaging guidance is a useful reminder that less excess and better material efficiency often work hand in hand. FSC-certified paperboard can also support sourcing goals when the supply chain needs a documented fiber standard, and that can be especially useful for brands that talk openly about materials.
The better question is not whether a package looks premium enough. It is whether every choice supports the same emotional goal. That is the core of how to create unboxing experience without drifting into overdesign. Once the material, structure, print, and protection all point in the same direction, the package feels purposeful and memorable.
| Format | Typical Feel | Common Use | Approx. Unit Cost at 5,000 pcs | Notes |
|---|---|---|---|---|
| Folding carton | Light, efficient, retail-friendly | Cosmetics, supplements, small consumer goods | $0.18-$0.45 | Best when the product already has primary packaging |
| Corrugated mailer | Sturdy, practical, shipping-first | Ecommerce, subscription, direct-to-consumer sets | $0.45-$1.10 | Can still feel premium with strong graphics and inserts |
| Rigid setup box | Heavy, giftable, premium | Luxury, presentation kits, launch boxes | $1.20-$3.75 | Higher labor and material content, often worth it for high-touch brands |
| Drawer box | Interactive, reveal-driven | Jewelry, accessories, curated bundles | $1.50-$4.25 | Good for a memorable opening motion, but more complex to assemble |
If you are deciding how to create unboxing experience details on a budget, this table is a useful reminder that you can choose where the money goes. You do not have to maximize every line item. Sometimes the best result comes from a modest structure with one strong finishing decision and a well-fitted insert.
How to Create Unboxing Experience Step by Step
There is no single formula for how to create unboxing experience, but there is a repeatable process that keeps teams from wandering. Start with the audience, the product, and the feeling you want the box to create. A package for a bridal gift set will not follow the same logic as one for rugged outdoor accessories, and pretending they should creates weak results. The most effective packages match the product category, price point, and customer expectation.
Step 1: Define the goal. Decide whether the package should feel elegant, playful, technical, minimal, or giftable. Pick one primary emotional goal and one secondary goal. That discipline helps keep the design from becoming cluttered. It also keeps visual branding cleaner, because every line, color, and material has a clear job.
Step 2: Choose the structure. Select the box format and insert style based on product size, fragility, and shipping method. A snug insert with a paperboard cradle may be enough for a lightweight item, while a heavier product may need corrugated support or a denser board build. This is where how to create unboxing experience gets practical, because the reveal sequence needs to work with the product's actual shape, not an abstract mockup.
Step 3: Build and test a prototype. Make a sample with the real product inside and open it the way a customer would. Watch for resistance, shifting, awkward lifts, or scuffing. Does the product come out cleanly? Does the package close again if needed? Does the insert hold the item firmly without making it hard to remove? Small friction points become memorable, and not in a good way.
Step 4: Refine the artwork and finish. Once the structure works, tighten the message hierarchy. The outside should tell the brand story clearly, but not crowd the eye. The interior should continue that story with restraint. This is where you decide whether foil belongs on the logo, whether the finish should be matte or glossy, and whether a simple inside print might do more good than another decorative layer. For many teams, this is the stage where how to create unboxing experience improves the most.
Step 5: Approve and lock the production sample. Confirm the approved color, board grade, insert thickness, and packing method. Then make sure the fulfillment team understands how the product should be packed and in what sequence. A beautiful design can still fail if the pack-out process is inconsistent. That is especially true when the order mix changes or when multiple shifts are involved.
Step 6: Validate shipping performance. Test the packed box under realistic transit conditions. It does not have to be a full laboratory program every time, but it should be more than a desk check. Look for corner crush, movement, edge wear, and finish scuffing. If the package is intended to ship widely, the testing should be aligned with real carrier handling rather than ideal conditions.
These steps are simple, but they work because they force decisions in the right order. Instead of asking how to make the box look better after the fact, you are asking how to create unboxing experience details that hold up from sample to shipment. That is a different mindset, and it usually leads to better results.
One more practical point: if the package is part of a launch, build a little time into the plan for internal review. Marketing, operations, and fulfillment all tend to have different priorities, and a short review window often surfaces issues before they become expensive. The strongest projects treat brand consistency as an operational standard rather than a last-minute visual tweak.
Cost, Pricing, MOQ, and Quote Factors to Plan For
How to create unboxing experience within a realistic budget starts with understanding what actually drives cost. The biggest variables are box size, board grade, print coverage, finish complexity, insert construction, and order quantity. Each one affects material use, setup time, and labor. If the design is larger than needed, uses multiple finishes, or requires hand assembly, the unit price rises quickly.
MOQ matters because setup costs are spread across the run. A small batch of custom packaging often carries a higher per-piece price than a larger order because the press setup, cutting, gluing, and finishing all have fixed components. That is not a hidden trick; it is simply how production economics work. Buyers who understand this can make smarter tradeoffs, especially if they only need a limited launch run or seasonal kit.
If the goal is to keep costs under control, there are good places to save without flattening the experience. Standard dimensions are usually cheaper than fully custom sizing. A simplified insert can work better than a highly engineered one if the product is not fragile. Premium finishes can also be reserved for high-touch areas, such as a logo panel, reveal flap, or inner message, instead of covering every surface. That is often enough to support brand recognition while keeping the project practical.
Here is a useful rule: ask the supplier for the total picture, not just the box price. How to create unboxing experience decisions influence sampling, tooling, freight, storage, hand assembly, and even pack-out labor. A low unit price can become expensive if the package takes too long to assemble or requires extra handling. The accurate quote should include dimensions, product weight, quantity, material preference, artwork coverage, finishing, insert details, and shipping method.
To keep quotes comparable, provide a clear brief with the same data for every supplier. That way you can compare apples to apples instead of getting one number for a stock mailer and another for a fully assembled custom kit. It also helps to ask about lead time by stage: sample approval, production, and freight. A quote that looks cheap but misses the schedule is not really cheap.
Another place teams get caught is freight class. A rigid box may look similar to a lighter carton in photos, but the shipping math is different once weight, cube, and pack-out density are factored in. If your packaging will move through ecommerce fulfillment, ask how the finished shipper behaves in a master carton, because that can change the economics more than the decoration does.
| Cost Factor | Lower-Cost Choice | Higher-Cost Choice | Why It Changes Price |
|---|---|---|---|
| Board style | Stock folding carton | Rigid setup board | More material and manual assembly increase cost |
| Print coverage | One-color or limited coverage | Full-coverage print with multiple panels | Ink usage, setup, and press time rise |
| Finish | Standard matte varnish | Soft-touch, foil, embossing, spot UV | Extra tooling and finishing steps add labor |
| Insert | Simple paperboard insert | Multi-piece custom fit insert | More die cuts, folds, and assembly time |
| Quantity | Small run | Higher volume | Setup costs are spread over fewer or more units |
For many brands, the smartest path to how to create unboxing experience is to spend money where the customer actually notices it first. The opening surface, the insert fit, and the first reveal often matter more than a fully wrapped exterior. That is where the package feels premium, and that is where the customer forms the strongest opinion.
One final note on sourcing: if your brand has sustainability requirements, ask specifically about recycled content, FSC options, and material recovery claims. Certifications are only useful if the actual specification and documentation match the statement you plan to make. That protects trust, which matters as much as visual impact.
Common Mistakes That Flatten the Unboxing Experience
The most common mistake in how to create unboxing experience planning is focusing on the outside of the box and forgetting that the memory is usually formed inside the box. Customers may admire the exterior for a second, but they tend to remember the reveal, the fit, and the ease of removal. If the opening sequence feels awkward, the premium effect fades fast.
Another problem is overbuilding the package. More layers do not automatically create a better experience. Too much tissue, too much copy, too many inserts, or too many decorative elements can make the package feel fussy. You want a sense of occasion, not clutter. In practical terms, the opening should feel like a short, well-paced sequence, not a scavenger hunt.
How to create unboxing experience also means testing for shipping reality instead of assuming the prototype will behave well in transit. A sample on the table may look beautiful and still fail when it sees vibration, compression, or corner impact. Fragile products need a real protection plan, and that may mean a stronger carton, a tighter insert, or less decorative empty space.
Assembly issues are another silent problem. A package that takes too long to build can create labor bottlenecks, especially when fulfillment volumes rise. If the box requires precise lining, multiple folds, or a tricky closure, the packaging may look elegant on paper but cost too much to pack at scale. The best designs respect both the customer and the production team.
There is also a trust issue around sustainability. Customers can tell when a package talks about reduced waste but arrives with oversized components, excessive filler, or unnecessary layers. If the packaging feels excessive, the message weakens. Better to choose one right-sized structure and one well-planned insert than to stack on eco-friendly language that the physical pack does not support.
Packaging standards can help here. Good teams often compare transit expectations against recognized methods such as ISTA protocols and use material guidance from sources like FSC when fiber certification matters. Those standards do not design the box for you, but they help keep the work honest. That is a useful filter when a beautiful design needs to perform in real shipping conditions.
Here is the shorter version: if you want how to create unboxing experience results that feel premium, avoid excess, test the package, and make sure the inside does as much brand work as the outside. Most weak packages fail because the design was attractive but the logic was incomplete.
Expert Tips and Next Steps for a Better Unboxing Experience
The strongest advice I can give on how to create unboxing experience is simple: pick one hero moment and make it excellent. That hero moment might be the lid lift, the sleeve pull, the interior message, the product cradle, or the texture of the outer wrap. If you try to make every surface dramatic, the impact gets diluted. Choose one moment and support it well, and the whole package feels more expensive and more memorable.
It also helps to match the package personality to the product category. A technical product should feel precise. A gift set should feel generous. A luxury accessory should feel restrained and refined. That alignment protects brand identity because the packaging does not fight the product; it frames it. When the structure, graphics, and materials all point in the same direction, the result feels intentional rather than assembled from trends.
How to create unboxing experience becomes much easier once you prototype early and get real feedback. A designer may love a certain reveal order, but a customer may find it confusing. A brand team may prefer heavy foil, but the product story may be stronger with a quieter surface and a better insert. Early samples reveal those gaps before production locks them in.
For the final decision, use a short checklist:
- Product dimensions and weight are confirmed.
- Insert fit is tested with the actual product.
- Print coverage matches the brand goal and budget.
- Assembly time is realistic for fulfillment.
- Lead time includes proof, sample, production, and freight.
- The package passes a basic ship test or transit review.
That checklist sounds basic, but it keeps the process anchored. If one item fails, the whole experience can feel off. If all of them line up, the package feels polished from the first touch to the final reveal. That is the practical side of how to create unboxing experience without drifting into unnecessary complexity.
If you are still deciding where to begin, start small. Measure one SKU carefully, request one sample, and test the shipper before scaling the design across the full line. That sequence protects budget and gives you real data about what customers actually feel. It also keeps the project moving in a way that supports brand consistency instead of guessing through revisions.
In the end, how to create unboxing experience is less about adding more layers and more about Choosing the Right layers in the right order. A clear reveal, a solid structure, a believable finish, and a product that sits exactly where it should can make even modest packaging feel premium. Start with one hero moment, verify the fit with the real product, and let the opening sequence do the heavy lifting. That is the clearest path to a package that strengthens customer perception, reinforces brand recognition, and earns its place beyond transport.
FAQ
How do you create an unboxing experience on a small budget?
Focus on one high-impact moment instead of upgrading every surface. For how to create unboxing experience on a tighter budget, a custom insert, a printed inner message, or a better closure usually gives more visible return than expensive finishing across the whole box. Using stock sizes and simpler assembly can also keep the unit price controlled while still feeling intentional.
What packaging elements matter most when creating an unboxing experience?
The opening sequence matters most: what the customer sees first, what they touch first, and how easily the product lifts out. If you are thinking about how to create unboxing experience that feels premium, fit and protection need to come before decoration. Graphic hierarchy, inserts, and interior messaging should all support one clear brand impression.
How long does it take to create an unboxing experience with custom packaging?
The timeline depends on concept, artwork approval, sampling, production, and freight. For how to create unboxing experience projects, simple structures can move faster once dimensions and graphics are approved, while custom tooling, special finishes, or multiple sample rounds extend the schedule. It helps to define each stage early so the team can track approval points without last-minute changes.
How do you create an unboxing experience that also protects the product?
Choose a structure that holds the product firmly and reduces movement during transit, even if that means the insert is a little less decorative. How to create unboxing experience and how to protect the product should be planned together, not separately. Testing the package with real shipping conditions is the best way to catch damage risk before production.
How can you tell if the unboxing experience is working?
Look for repeat purchase behavior, customer comments, social sharing, and fewer damage-related complaints or returns. If you are evaluating how to create unboxing experience improvements, ask whether the package supports the brand story and whether the first opening moment feels smooth, memorable, and easy to repeat. Prototype feedback is usually the clearest indicator before scale-up.
Closing thought: how to create unboxing experience that feels premium is really about discipline. Choose the Right structure, keep the reveal clear, test the fit, and spend where the customer will feel it first. Do that well, and the package will strengthen the brand without wasting material or budget.

