Buyer Fit Snapshot
| Best fit | design subscription box packaging decision review for packaging buyers comparing material specs, print proof, MOQ, unit cost, freight, and repeat-order risk where brand print, material, artwork control, and repeat-order consistency matter. |
|---|---|
| Quote inputs | Share finished size, material target, print colors, finish, packing count, annual reorder estimate, and delivery region. |
| Proofing check | Approve dieline scale, logo placement, barcode or warning zones, color tolerance, and any recyclable or compostable wording before bulk production. |
| Main risk | Vague material claims, crowded artwork, or missing packing details can create delays even when the unit price looks attractive. |
Fast answer: Design Subscription Box Packaging Decision Review: Dieline, Finish, Proof, and Buyer Review should be specified like a repeatable production item. The safest quote includes material, print method, finish, artwork proof, carton packing, and reorder notes in one written spec.
What to confirm before approving the packaging proof
Check the product dimensions against the actual filled item, not only the sales mockup. Ask for tolerance on folds, seals, hang holes, label areas, and retail display edges. If the package carries a logo, QR code, warning copy, or legal claim, reserve that space before decorative graphics fill the panel.
How to compare quotes without losing quality
Compare board or film grade, print process, finish, sampling route, tooling charges, carton quantity, and freight assumptions side by side. A lower quote is only useful if the supplier can repeat the same color, closure quality, and packing count on the next order.
If you are figuring out how to Design Subscription Box packaging, the first trap is easy to miss: a box can look polished in a rendering and still feel flat, or even disappointing, once a real product lands inside it. The difference usually comes down to fit, structure, and the sequence of the unboxing experience, not just graphics on the outer panels.
A subscription package has to work as a shipping container, a brand touchpoint, and a repeatable fulfillment format. That is a much tougher brief than a one-time retail carton, which is why smart brands treat how to design subscription box packaging as a system rather than a single box choice.
How to Design Subscription Box Packaging That Surprises on Arrival
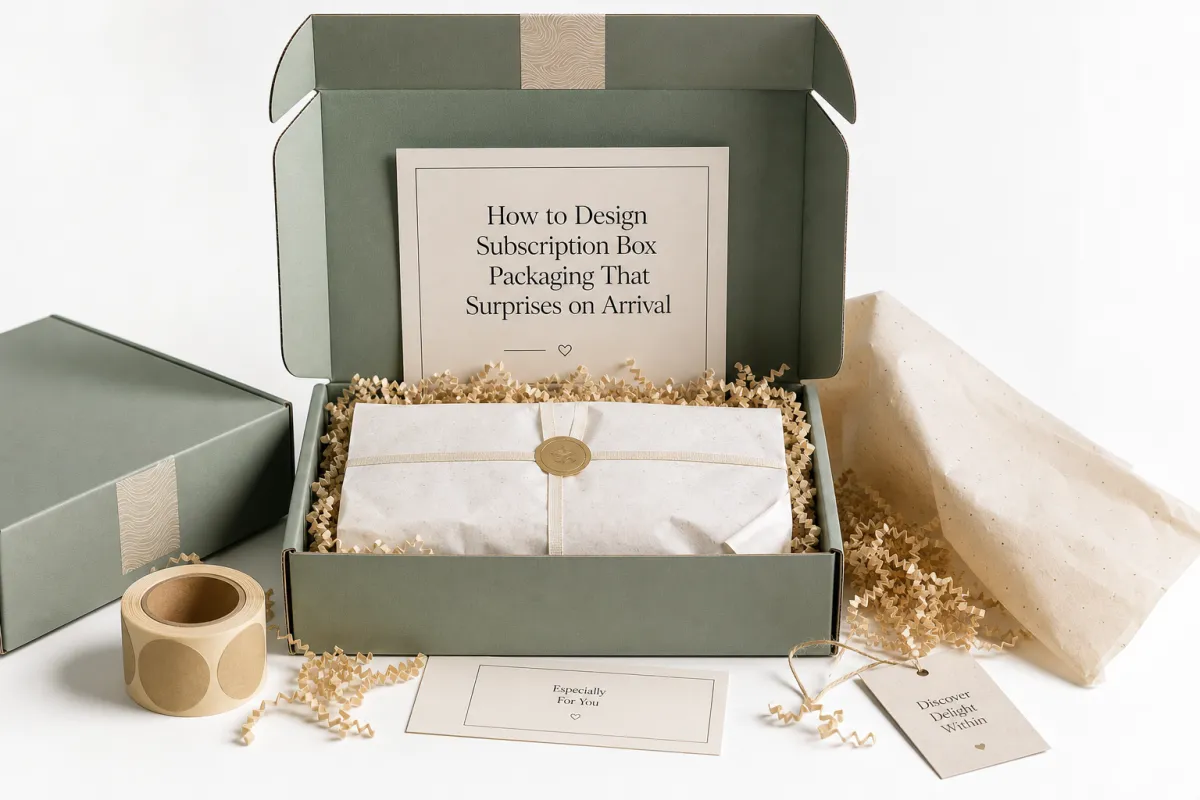
A subscription box begins making an impression before anyone lifts the lid. The courier leaves it on a porch, a stack of parcels presses against it in transit, and the customer notices the outer mailer first, not the product inside. If the box dents too easily, the print scuffs, or the structure feels flimsy in hand, the brand moment weakens before the reveal even starts. That is why how to design subscription box packaging starts with the shipping journey, not with a design board.
What separates subscription packaging from one-off retail packaging is repetition. A direct-to-consumer shipment might be packed hundreds or thousands of times with the same sequence, but a subscription program keeps returning month after month, often with new inserts, new products, or seasonal creative. That means the box has to handle recurring changes, dimensional weight, and fulfillment speed without breaking down or pushing labor costs too high. A pretty mockup is not enough; the box has to survive the real world.
The best unboxing experiences usually build anticipation in layers. There is the outer print, then the tape reveal, then the tissue or seal, then the first glimpse of the product or insert card. If any one of those layers feels sloppy, the whole package feels less intentional. In a practical sense, how to design subscription box packaging is about choreographing that sequence so the customer gets a small, controlled reveal instead of a loose assortment of items sliding around in a carton.
It also helps to keep in mind that the box is doing two jobs at once. It must protect the contents, but it also has to communicate identity quickly and clearly. A playful beauty box, a minimalist coffee club, and a premium home goods subscription all need different visual languages, but each of them still has to meet the same physical requirements: adequate crush resistance, sensible interior fit, easy packing, and a clean closure. If the outer shell looks great and the fit is wrong, the package is still failing.
From a packaging buyer’s point of view, the smartest projects usually start with the shipping conditions and work backward. How far will the box travel? How many times will it be handled? Is it stacking with other cartons in a warehouse? Does it need to arrive shelf-ready or porch-presentable? Those answers shape how to design subscription box packaging far more than trends do.
What a Subscription Box Does for Brand, Product, and Retention
A subscription box is part shipping structure, part merchandising system, and part marketing asset. The outer board, the insert, the print finish, and the interior sequence all work together toward the same goal: keep the customer excited enough to stay subscribed. That is why how to design subscription box packaging is really about aligning the physical package with the brand promise.
For a playful brand, the carton might use bold color, a simple one-color interior, and a small surprise under the lid. For a luxury brand, the same package may need softer tactile cues, tighter registration, matte coating, and an interior layout that feels deliberate and restrained. For an eco-conscious program, the design may lean on kraft corrugated board, low-ink coverage, and clear material choices that are easier to recycle. The goal is not to chase one style; it is to make the box feel honest to the product and to the audience.
Common subscription box formats each have a place. Mailer boxes work well for DTC shipping because they close securely and give plenty of print area. Corrugated shippers are a practical choice for heavier items and longer transit lanes. Folded cartons can work for lighter products when presentation matters more than high crush resistance. Rigid boxes bring a premium feel, but they usually cost more and need more careful planning around freight and assembly. A good packaging partner will help you decide which structure fits the program instead of forcing every brand into the same format.
Retention matters here more than many teams expect. Customers remember consistency. If month one arrives in a sturdy, well-printed box and month two shows up loose, overfilled, or difficult to open, the emotional experience drops. I have watched teams spend weeks fine-tuning the artwork and then miss the way a lid catches on the insert; that tiny friction can kinda erase the polish they worked so hard to create. That is why how to design subscription box packaging should include repeatability from the start. The process has to hold up when the product mix changes, when the warehouse gets busy, and when the packaging has to be reordered quickly.
A subscription box is not just a carton. It is a recurring brand handshake, and if the handshake feels rushed, the customer feels it immediately.
Industry standards matter too. For transit testing, many teams look to ISTA procedures to simulate drops, vibration, and compression, while material sourcing can be aligned with responsible forestry goals through FSC certified board where appropriate. For teams building with sustainability in mind, the EPA’s packaging and waste guidance at epa.gov/recycle is also worth a look. Those references do not replace real testing, but they do help keep the project grounded in practical standards.
Subscription Box Process and Timeline: From Dieline to Delivery
The production path usually starts with the product itself. Measure the packed product, not just the bare item, because sleeves, labels, pumps, sample cards, and protective wraps all add real thickness. Then map the interior arrangement: one item, several items, a seasonal kit, or a mix that changes every month. If you do not know the full packed size, how to design subscription box packaging becomes guesswork, and guesswork is expensive.
Once the dimensions are clear, the dieline comes next. This is where the structural logic is set: flap sizes, tuck direction, glue areas, board thickness, and insert geometry. A clean dieline saves time later because artwork can be built around the actual folds instead of fighting them. In real projects, the smallest errors often come from ignoring the dieline early and discovering too late that a logo disappears into a fold or a barcode lands too close to a seam.
Artwork setup and proofing should happen after the structure is stable, not before. The most common delay I see is a brand changing copy, product claims, or panel art after the files are already in proof. Another slowdown is missing compliance information, especially when a subscription box includes cosmetics, food, supplements, or battery-powered items. If the box needs ingredient copy, lot code placement, or country of origin details, those decisions need to be settled before production. That is a core part of how to design subscription box packaging without running into avoidable rework.
Sampling is where reality finally checks the concept. A plain sample shows structure, fit, and closure. A printed sample shows color, finish, and registration. A packed-out sample shows whether the product shifts, whether the insert holds, and whether the opening sequence feels good in hand. For a recurring program, I would rather see a slightly slower sample cycle than a rushed approval that creates a problem in every future shipment.
Lead time depends on several variables:
- Simple mailer box with one-color print: often 10-15 business days after approval, depending on quantity and board availability.
- Custom printed mailer with insert: often 12-18 business days, especially if the insert needs die-cutting or glue assembly.
- Rigid or specialty box: often 15-25 business days, sometimes longer if hand assembly or specialty finishes are involved.
- Repeat run with the same spec: usually faster than the first run because the dieline, setup, and approvals are already in place.
That timeline still leaves room for freight, warehouse receiving, and a small buffer for damage or last-minute count adjustments. In practice, a working schedule might look like this: one to two weeks for concept and dimensional confirmation, one week for structural review and sample approval, one to three weeks for production depending on complexity, and several days for freight or receiving. If the launch date is fixed, how to design subscription box packaging should include that buffer from the beginning, not as an afterthought.
For teams managing multiple SKUs, the most efficient process is usually to lock the structure first and swap artwork or internal inserts as needed. That keeps the core packaging stable while still allowing monthly variation. It also makes reorders easier, which matters a lot once the subscription starts to scale.
How to Design Subscription Box Cost and Pricing Without Guesswork
Cost is where packaging theory meets margin reality. The main drivers are material type, board caliper, print coverage, finish choices, insert complexity, quantity, and shipping size. If you are working through how to design subscription box packaging on a budget, the first thing to understand is that size influences nearly everything else. A slightly oversized carton can quietly increase board usage, freight charges, warehouse cube, and dimensional weight.
Here is a practical way to think about common options for subscription programs:
| Packaging option | Typical use | Approx. unit cost at medium volume | Strength | Brand feel |
|---|---|---|---|---|
| Mailer box | DTC subscription kits, beauty, lifestyle, apparel add-ons | $0.65-$1.40 | Good shipping protection, easy branding | Clean, modern, flexible |
| Corrugated shipper | Heavier products, longer transit, higher stacking loads | $0.80-$1.60 | Very good protection, practical closure | More utilitarian unless printed well |
| Folded carton | Lighter items, retail-style presentation, smaller contents | $0.35-$0.95 | Moderate protection, compact footprint | Retail-oriented, tidy, efficient |
| Rigid box | Premium gifting, luxury subscriptions, high perceived value | $2.40-$5.50 | Strong presentation, less efficient freight | High-end, tactile, memorable |
Those numbers are only reference points, because print coverage, custom inserts, and order size can move them a lot. A heavily printed box with soft-touch lamination, foil, and a die-cut insert will price very differently from a simple one-color corrugated mailer. That is why how to design subscription box packaging should always begin with a clear spec sheet. If two suppliers are quoting different board grades, different finishes, or different box depths, the quotes are not truly comparable.
Oversizing deserves special attention. A box that is one inch too large in each direction can create more empty space, which then requires more filler or a custom insert. That extra volume can also trigger higher freight class or dimensional weight charges. From a buyer’s point of view, the package may look harmless on paper, but over thousands of shipments it can erode margin fast. Thoughtful how to design subscription box work keeps those hidden costs in view.
MOQ planning matters too. Smaller subscription brands often need a stock structure with custom print to keep unit cost manageable. Larger programs may justify full custom tooling, especially if the box repeats often enough to spread setup costs over a bigger run. A common mistake is chasing the lowest quote without checking whether the structure is actually right for the product. A cheap box that causes damage or slows packing is not cheap for long.
If I were comparing proposals, I would want the same details on every line: exact outer dimensions, board grade, print colors, finish, insert type, quantity, and shipping destination. Without that, one quote may look lower simply because it leaves out a coating, uses thinner board, or assumes a different packing method. The cleaner the spec, the easier how to design subscription box packaging becomes from both a creative and financial standpoint.
How to Design Subscription Box Packaging Step by Step
Start with the product, not the artwork. Measure the tallest, widest, and deepest packed version of every item that might go in the box, then add a buffer for movement, inserts, and closure. If the contents vary by month, size the box around the largest likely configuration and design flexible interior support around that core. That simple habit prevents a lot of wasted samples and redesigns, and it is one of the most reliable parts of how to design subscription box packaging well.
Next, choose the structure based on how the box will actually move through fulfillment. Will it ship as a mailer, ride inside a master carton, or need to look polished on arrival without extra wrapping? A mailer with an integrated lid may be better than a separate lid-and-base setup if packing speed matters. A corrugated shipper may be better than a premium rigid build if the product is heavy or fragile. The structure has to serve the warehouse as much as the customer.
Then build the interior around the customer journey. Decide what should be seen first. Some brands want a message card on top, followed by the hero item, followed by supporting products underneath. Others want a reveal sequence that starts with tissue, then a branded insert, then the contents arranged like a small retail display. Good how to design subscription box planning treats the inside layout as a story, not just a packing grid.
After that, place the graphics. Logos, seasonal art, copy, legal text, and barcodes all need to respect the folds, glue tabs, and closure lines. If the box will be packed on a line, the open direction should also be easy for staff to understand at a glance. A smart layout makes the packaging look refined while still being practical at speed, which matters when the warehouse is building hundreds of units per hour.
A useful design workflow looks like this:
- Measure the product and confirm the packed dimensions.
- Choose the box structure and board strength.
- Map the insert or filler strategy.
- Build the dieline and place the artwork around the folds.
- Review a plain sample, then a printed sample, then a packed-out sample.
- Test for closure, shake, stack pressure, and opening sequence.
- Approve production only after the real setup behaves well.
That sequence sounds simple, but it prevents some of the most expensive packaging mistakes. For example, a box can look elegant in a render and still fail if the insert crushes the product corners, the closure flap pops open, or the item slides side to side during transit. That is why how to design subscription box packaging is rarely just a design task; it is a structural and operational decision too.
One more detail that gets overlooked: packing order. If the team has to place six different components in a box, the sequence needs to be intuitive and fast. The best programs often use a top layer for the welcome moment, a middle layer for the core items, and a bottom layer for heavier or less fragile pieces. Good packaging does not just look organized. It makes the fulfillment team faster and the customer happier, which is the right combination.
Common Mistakes in Subscription Box Design and How to Avoid Them
One of the biggest mistakes is designing around mockup art instead of real product dimensions. A render can hide a lot of problems, especially with inserts. If the actual bottle is 2 mm taller than expected, the lid may not close cleanly, or the item may sit too high and crush the interior print. That is why how to design subscription box packaging should always start with real samples, not just digital visuals.
Another common issue is overprinting and overfinishing. Foil, soft-touch, spot UV, embossing, and multiple ink hits can look impressive, but too many effects can crowd the design and raise cost without improving the experience. A lot of subscription brands try to do too much on the first run. The box becomes busy, the message gets buried, and the customer sees decoration instead of a clear brand story. Simpler often works better.
Fulfillment detail is another area where teams get tripped up. If the box is hard to pack, the warehouse slows down. If the insert orientation is unclear, workers make mistakes. If the closure requires too much force, the flaps crease or the adhesive fails. These sound like small issues, but they become expensive quickly across a monthly program. Practical how to design subscription box work always includes the pack line in the conversation.
Testing under real shipping conditions is non-negotiable. A box that looks perfect on a desk may fail when stacked, dropped, or vibrated. I would test at least a basic drop sequence, a shake check, and a compression check before approving production. For more demanding shipments, ISTA-style testing is even better because it simulates the stress of transit instead of assuming all will be well. That is one of the clearest ways to keep how to design subscription box decisions grounded in reality.
Here are a few mistakes worth avoiding:
- Choosing the box size before the product dimensions are final.
- Ignoring the weight of inserts, fillers, and closure hardware.
- Assuming one design will work forever, even as the product mix changes.
- Skipping the packed-out sample and going straight to bulk production.
- Comparing quotes without checking board grade, finish, or tooling details.
One small correction can save a lot of pain. If the subscription has variable contents, build modularity into the insert system instead of forcing every SKU into the same cavity layout. That gives the brand room to change the mix without redoing the entire box. It is a practical way to keep how to design subscription box packaging flexible while still making it feel custom.
Expert Tips and Next Steps for a Better Subscription Box Launch
Before placing an order, I like to see a simple checklist. Final product dimensions, fill count, artwork files, insert needs, shipping method, budget ceiling, and launch date should all be written down. That sounds basic, but it keeps the project from drifting. Clear inputs make how to design subscription box packaging much easier to manage, especially when several teams are involved.
Ask for three stages of samples if the program allows it: a plain sample for structure, a printed sample for visual review, and a packed-out sample for performance. Those three views tell you almost everything you need to know about fit, finish, and protection. If the sample feels off in any of those stages, fix it before the production run. That is cheaper than discovering the issue after thousands of units are in the field.
It also helps to think about scale from day one. A box that works for 500 subscribers should still make sense at 5,000 if the program grows. That may mean choosing a structure that is easy to reorder, keeping the artwork system modular, or selecting an insert design that can adapt to minor product changes. Good how to design subscription box planning leaves room for growth instead of locking the brand into a one-off solution.
Here is the practical order I would follow for a launch or redesign:
- Audit the current box for fit, damage, and packing speed.
- Compare two or three structural options against the product and budget.
- Request exact-spec quotes from suppliers so pricing can be compared cleanly.
- Review samples with the fulfillment team, not just marketing.
- Run a shipping test and make one round of corrections if needed.
- Approve production only after the package behaves well in real conditions.
That process may feel slower than jumping straight to print, but it usually saves time later. A subscription box is repeated many times, so any flaw multiplies quickly. Strong how to design subscription box work pays off because it lowers packing friction, reduces damage, and helps the customer feel that each delivery was planned carefully.
If you are working toward a new launch, start with the current box and ask what is actually wrong with it. Is it too large? Too expensive? Too plain? Too hard to pack? Once the problem is clear, it becomes easier to Choose the Right structure, finish, and insert. That is the real path to better packaging, and it is usually more effective than chasing a dramatic redesign for its own sake.
In the end, how to design subscription box packaging comes down to three things: fit, protection, and experience. Get those right, and the subscription feels thoughtful every time it lands on the customer’s doorstep. Get them wrong, and the brand spends money trying to fix a problem that was built into the box from the start.
FAQ
How do I design subscription box packaging for different product sizes?
Measure the largest packed product first, then build around that dimension so smaller items can still be stabilized with inserts or filler. Modular insert layouts work well for changing product mixes because they keep the box flexible without making it sloppy. Before production, shake, tip, and close the packed box several times to see whether anything shifts.
What material is best for a subscription box?
Choose corrugated board for shipping strength, folded carton stock for lighter retail-style presentation, and rigid board when premium presentation matters most. The best material depends on transit distance, product weight, and how much protection the contents need during stacking and handling. Ask for samples in the actual board thickness so you can judge stiffness and closure feel accurately.
How much does it cost to design subscription box packaging?
Cost depends on size, material, print coverage, inserts, finish choices, and order quantity, so two boxes that look similar can price very differently. Smaller runs usually carry a higher unit cost, while larger orders spread setup and tooling across more units. A detailed spec sheet gives you a cleaner quote and makes comparisons fair.
How long does the subscription box packaging process take?
Simple projects can move fairly quickly once the dieline and artwork are approved, while more complex builds need extra time for samples and revisions. Lead time grows when specialty finishes, multiple approval rounds, or custom inserts are involved, so build in buffer time early. Plan for proof review, packed testing, and freight timing so the box arrives before your fulfillment deadline.
Do I need a custom insert for my subscription box?
If items shift, break, or need a reveal sequence, a custom insert usually improves protection and presentation. If the product set is very light and consistent, a simpler stock solution may work, but it should still control movement. The right answer depends on product weight, fragility, and the look you want during unboxing.
What should I ask a packaging supplier before I order?
Ask for board grade, exact dimensions, finish options, lead time, minimum order quantity, and whether samples are plain, printed, or packed-out. You should also confirm how the quote handles inserts, freight, and reorders so there are no surprises later. Those details matter a lot more than a polished sales deck.
If you are still sorting out how to design subscription box packaging for a real launch, I would start with the product dimensions, choose the structure that matches fulfillment, and ask for a sample before you commit to production. That sequence keeps the project grounded, protects your margin, and gives the customer a better first impression every month.


