Buyer Fit Snapshot
| Best fit | Optimize Packaging Inserts for Better Results projects where brand print, material claims, artwork control, MOQ, and repeat-order consistency need to be specified before quoting. |
|---|---|
| Quote inputs | Share finished size, material target, print colors, finish, packing count, annual reorder estimate, ship-to region, and any compliance wording. |
| Proofing check | Approve dieline scale, logo placement, barcode or warning zones, color tolerance, closure strength, and carton packing before bulk production. |
| Main risk | Vague material claims, crowded artwork, missing packing details, or unclear freight terms can make a low unit price expensive after revisions. |
Fast answer: Optimize Packaging Inserts for Better Results: Material, Print, Proofing, and Reorder Risk should be specified like a repeatable production item. The safest quote records material, print method, finish, artwork proof, packing count, and reorder notes in one written spec.
Production checks before approval
Compare the actual filled-product size with the drawing, then confirm tolerance on folds, seals, hang holes, label areas, and retail display edges. Reserve space for logos, QR codes, warning copy, and material claims before decorative graphics fill the panel.
Quote comparison points
Review material grade, print process, finish, sampling route, tooling charges, carton quantity, and freight assumptions side by side. A quote is only useful when the supplier can repeat the same color, closure quality, and packing count on the next order.
How to Optimize Packaging Inserts for Better Results
A change of 3 mm inside an insert pocket can be the difference between a quiet shipment and a carton that rattles like loose cutlery in a sink. I have seen that happen on a pack line, and the fix was not glamorous: tighten the cavity, adjust the fold, retest. The result was better product protection, fewer complaints, and faster pack-out. How to optimize packaging inserts is rarely about adding more material. It is about controlling movement, reducing waste, and making the box feel deliberate from the first touch.
Packaging inserts are the interior structures that keep products in place, separate accessories, and prevent fragile surfaces from scraping the carton or each other. They can be made from paperboard, molded pulp, corrugated board, foam, or a hybrid combination. For brands using branded packaging, Custom Printed Boxes, and retail packaging, the insert is not hidden from the customer. It shapes the unboxing moment, and customers notice when the product arrives secure, centered, and easy to remove.
The impact goes well beyond presentation. Inserts affect damage rates, return rates, carton fill efficiency, labor time, and freight cost if the inner structure allows a smaller shipper to do the same job. Anyone asking how to optimize packaging inserts should resist the instinct to start with the thickest material on the shelf. The sharper question is which structure protects the product, keeps packing repeatable, and avoids paying for extra weight, extra void fill, or a fussy assembly step.
A practical way to think about inserts is simple: they should hold, separate, absorb, and guide. They should hold the product steady, separate delicate surfaces or accessories, absorb shock from drops or vibration, and guide both the packer and the customer through a predictable workflow. When those four jobs are balanced, how to optimize packaging inserts gets a lot less mysterious.
What follows is the version I wish more teams used from the start: fit, protection, cost, timing, and the mistakes that quietly eat margin. There is no magic trick here, just disciplined packaging work and a few hard-won lessons.
How do you optimize packaging inserts for protection and cost?
You optimize packaging inserts by matching the structure to the product's real movement, not the leftover empty space in the carton. Start with the failure mode: rattling, rubbing, stack pressure, accessory drift, or a product leaning into a panel corner. Then choose the lightest insert that controls that motion, verify the fit with drop testing and pack-line trials, and compare the result against damage rates and assembly time. That is usually faster than testing three materials at random and hoping one behaves.
In practice, right-sizing the cavity and trimming unnecessary void fill often saves more money than shaving a few cents off the material quote. The best answer to how to optimize packaging inserts balances protection, throughput, and brand presentation in one pass. That is also why a well-made insert often feels almost invisible. It is doing most of the work without asking for attention.
How to Optimize Packaging Inserts: Why Small Changes Matter
One mistake shows up over and over in how to optimize packaging inserts: people assume the insert only matters after the outer carton has done its job. In reality, the insert often decides whether the carton can do its job at all. A box may survive a rough delivery route with no visible crush, yet the product inside can still arrive scratched, tilted, or broken because the insert allowed too much movement. The carton stayed intact, but the shipment still failed.
That is why tiny structural changes matter so much. A slightly tighter cavity may keep a glass item from walking across the box during vibration. A cleaner fold line may stop a cosmetic jar from leaning into a panel corner. A small retention tab can shorten pack-out time because the product drops into place the same way every time. None of those changes looks dramatic on paper, yet they improve both product packaging and operations.
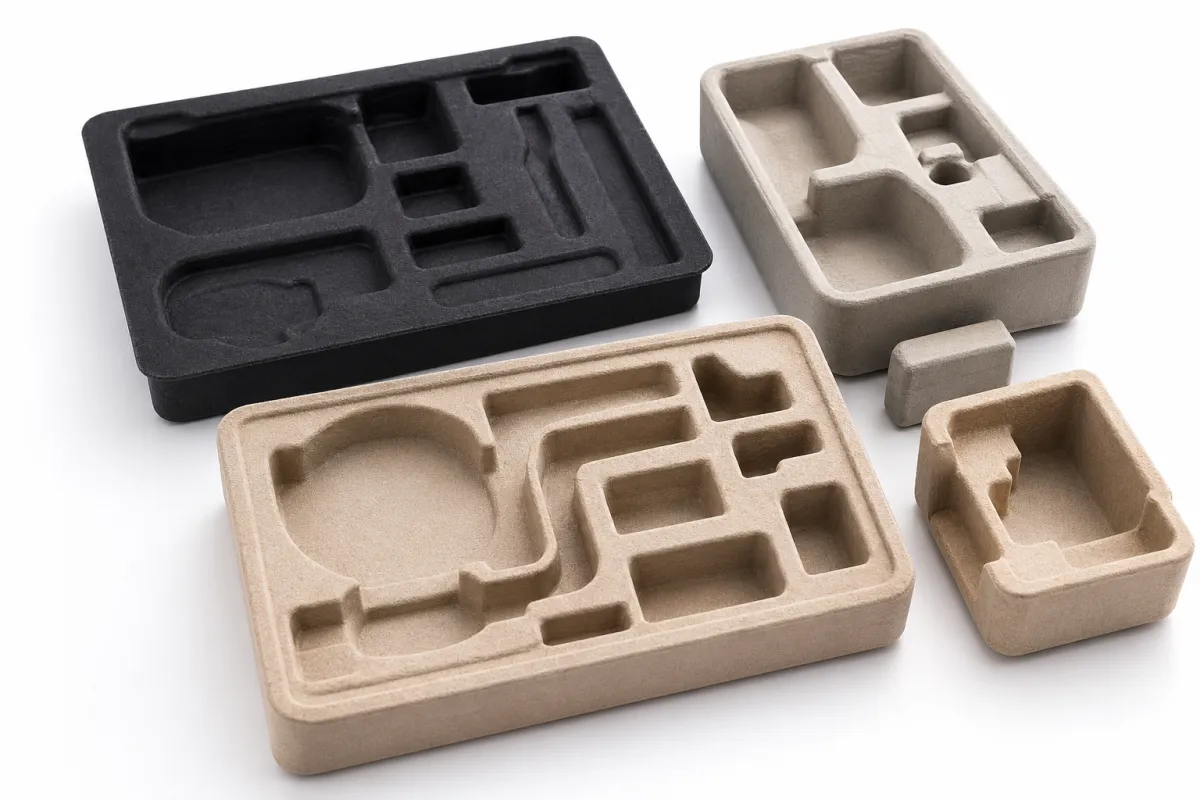
Packaging inserts are interior supports, but they are not all built for the same job. Some are simple die-cut paperboard trays. Some are molded pulp end caps. Others use corrugated layers, foam blocks, or nested forms that hold multiple components in one carton. Each style solves a different problem. Some are built for immobilization, where the goal is to stop movement. Others focus on cushioning, where the goal is to soften impact. Others are there for separation, keeping parts from touching in transit.
That distinction matters because the insert is not supposed to solve every packaging problem at once. A protein jar, a ceramic candle, and a pair of wireless earbuds need different internal logic. Start with the wrong assumption and the package can look more expensive while becoming less effective. How to optimize packaging inserts starts with understanding the job before choosing the material.
From a business standpoint, the insert touches several cost centers at once. Damage claims fall when movement is controlled. Packing speed rises when the insert is easy to use. Freight efficiency improves when the insert helps right-size the carton. Customer satisfaction improves when the product feels polished instead of improvised. That is why packaging teams often revisit inserts even after the outer box looks finished. The insert is doing more work than many teams realize.
"If the insert looks great on a desk but slows down the packing line, the line will tell you the truth within a day."
That is the practical side of how to optimize packaging inserts. You are not only protecting a product. You are protecting throughput, consistency, and the first impression that starts the second the box opens.
Fragile Goods
Fragile goods usually need the most careful balance of support and clearance. Glass, ceramics, and polished surfaces may require soft contact points, corner control, or enough stiffness to resist flex under stack pressure. For many of these products, a well-designed paperboard or molded pulp insert is enough if the item is not especially heavy. I have seen a 2 mm change in a corner support save a run of glass jars; it was not fancy, just correct.
Cosmetic Kits
Cosmetic kits often combine several components with different shapes, closures, and surface finishes. In this kind of retail packaging, the insert must keep bottles upright, stop caps from loosening, and leave enough room for the customer to remove each piece without tearing the interior. This is a clear case where how to optimize packaging inserts depends on layout as much as material.
Electronics
Electronics can be deceptively tricky because many problems are not obvious at first glance. A device may survive a normal drop but still fail because a cable, screen edge, or accessory shifted just enough to stress a connector. Good insert design keeps components centered and often uses a layered approach that combines cavity control with surface protection. If a team says the unit "looks fine," I usually ask what happened after vibration, not before.
Subscription Boxes
Subscription boxes need speed, repeatability, and presentation in equal measure. Inserts for this category have to be simple enough for quick pack-out, yet structured enough to make the unboxing feel intentional. That balance is a large part of how to optimize packaging inserts for brands shipping mixed contents month after month.
Key Factors That Affect Insert Design and Performance
If you want to get serious about how to optimize packaging inserts, start with the product instead of the carton. The carton sets the outer dimensions, but the product sets the real design rules. Weight, finish, center of gravity, fragility, accessory count, and shipping method all shape the structure that makes the most sense.
Product weight and fragility usually come first. A 120 gram accessory can often sit in a light paperboard cradle, while a 2.5 kilogram device may need a stronger corrugated or molded structure with higher compression resistance. The heavier the item, the more important it becomes to think about load paths rather than surface fit alone. If the insert bows under stack pressure, the product can shift even when the cavity looked perfect during prototyping.
Package size and tolerance matter just as much. In insert work, a millimeter can be a real decision. Too loose, and the product rattles. Too tight, and the pack line fights the insert or damages the finish during insertion. A lot of how to optimize packaging inserts comes down to closing the gap between theoretical dimensions and the real dimensions coming off the production line. Glass, molded plastic, and coated surfaces often vary more than buyers expect, especially once accessories are included.
Material choice changes everything. Paperboard gives a clean look, good printability, and straightforward recycling in many markets. Corrugated board adds structure and can be tuned for higher load-bearing needs. Molded pulp is often chosen for a fiber-forward, natural appearance that fits sustainability goals. Foam can deliver excellent cushioning and a precise feel, although it does not fit every brand direction or disposal expectation. Hybrid systems use two or more materials together, which is often the most practical route when a product needs more than one type of protection.
That is also where package branding comes in. A good insert should feel like part of the same design language as the outer carton, especially in branded packaging or direct-to-consumer kits. A plain interior can still work, but a considered interior often communicates care in a way customers notice within seconds. For brands selling premium custom printed boxes, the insert becomes part of the visual and tactile rhythm.
Sustainability is another major factor. Many buyers now want inserts that use less plastic, more fiber, or recyclable materials that match local disposal habits. That does not mean every foam piece is wrong, and it does not mean every paper structure is right. It depends on product risk, distribution environment, and how the package will actually be handled after delivery. For paper-based routes, fiber sourcing and certification can matter too; the FSC framework is one standard many teams use when they want traceable forest-based materials.
Technical teams usually test for more than "does it fit." They ask whether the insert limits movement under vibration, whether the product survives compression, whether assembly is repeatable, and whether the end customer can remove the item without confusion. The best design is not always the most expensive one. Often, how to optimize packaging inserts means trimming waste from the structure until only the support that matters remains.
Use this comparison as a starting point when teams are choosing between common insert materials:
| Material | Typical Use | Approx. Unit Cost at 5,000 Units | Strengths | Tradeoffs |
|---|---|---|---|---|
| Paperboard | Light consumer goods, cosmetic kits, retail packaging | $0.08-$0.22 | Clean look, print friendly, easy to die-cut, widely recyclable | Less cushioning than molded or foam options |
| Corrugated board | Heavier products, component separation, shipping inserts | $0.12-$0.28 | Good stiffness, reliable structure, efficient for multi-part forms | Can look bulkier inside premium packages |
| Molded pulp | Electronics, household goods, fiber-forward branded packaging | $0.18-$0.45 | Strong fiber story, decent cushioning, natural appearance | Tooling and texture may limit fine cosmetic detail |
| Foam | Higher-impact protection, sensitive devices, premium transit needs | $0.20-$0.60 | Excellent shock absorption, precise fit, low movement | Recycling and brand perception may be concerns |
| Hybrid build | Mixed-content kits, fragile items with accessories, high-value sets | $0.25-$0.70 | Flexible performance, can combine cushioning and presentation | More complex to engineer and assemble |
If you are comparing structure ideas alongside exterior package formats, our Custom Packaging Products page is a useful place to review options that support both protection and presentation. That comparison matters because how to optimize packaging inserts is rarely an isolated decision; it affects the full pack structure.
For test methods, many teams look at the ISTA series for distribution testing and then match the package to the roughness of the shipping lane. A lab test is not a replacement for field experience, but it gives a practical baseline when you are comparing designs. In packaging work, the strongest answer usually comes from combining structure, testing, and a clear view of actual transit risk.
How to Optimize Packaging Inserts: Process and Timeline
Good insert work starts with a clear brief. If you want to know how to optimize packaging inserts without wasting weeks on avoidable revisions, collect the product details early: dimensions, weight, center of gravity, finish sensitivity, accessory list, closure style, and the shipping environment. A product shipping ground in a single carton has different needs than a product that moves through regional hubs or retail replenishment.
The first stage is product discovery. This is where teams should document what the product actually does in transit, not what they hope it does. Are corners rubbing? Is the top surface getting marked? Are accessories arriving scattered? Are customers opening the box and finding components shifted out of position? Those details show whether the insert needs more restraint, more cushioning, or simply a better fit. It is one of the fastest ways to understand how to optimize packaging inserts without a pile of assumptions.
Next comes the design workflow. A strong structural designer will move from concept to dieline to prototype, then to fit testing, and then back to revision if needed. If the insert is a simple paperboard part, the first sample may be close enough to learn quickly. If the insert is a multi-part form with folds, tuck tabs, or mixed materials, expect more than one round. A common mistake is rushing past the sample stage because the drawing looks correct on a screen. Paper does not behave like a flat file once it is folded, locked, and packed into a real carton.
The timeline depends on complexity, but a practical schedule often looks like this:
- Brief and intake: 1-3 business days to gather specs, photos, and pack requirements.
- Engineering review: 2-5 business days to confirm structure, fit, and material options.
- Prototype or sample run: 5-10 business days for most straightforward inserts, longer for complex multi-part builds.
- Testing and revision: 3-7 business days depending on how many changes are needed.
- Production approval: usually 1-2 days once the final sample is signed off.
- Manufacturing lead time: often 12-20 business days, depending on volume and material availability.
That timeline is realistic, but it can stretch. Multiple SKUs slow things down. So do late design changes, especially if the product dimensions keep shifting or the branding team asks for a structural revision after the sample has already been built. Material sourcing can also affect the schedule, particularly if you are trying to match a specific fiber content or print requirement. If you are working on custom printed boxes alongside the insert, coordinate both projects early so you do not end up adjusting one to rescue the other.
Approval discipline matters here. Fast feedback on samples keeps the project moving. Slow feedback creates a chain reaction because die lines, tool setup, and production scheduling all depend on the final decision. If the team knows how to optimize packaging inserts but waits a week for every sign-off, the whole process becomes more expensive than it needs to be.
Process tip: give the sampling team a single decision-maker or a clearly defined approval path. A lot of packaging delays come from internal confusion, not technical difficulty.
Another practical move is to keep a record of each sample version. Even a simple note such as "Version B reduced accessory movement but increased insertion force" helps future projects. Over time, that record becomes a useful reference for how to optimize packaging inserts across product families instead of treating every launch as a fresh experiment. I have watched teams save a full week on a new launch simply because they reused a cavity dimension that had already passed pack-line testing.
Cost and Pricing Considerations for Packaging Inserts
Price is always part of the conversation, but it should not be the only conversation. If you want to understand how to optimize packaging inserts in a way that supports the business, you need to look at total landed packaging cost, not just the line item for the insert. The cheapest part can become expensive if it raises returns, slows packing, or forces larger cartons.
Several factors drive pricing. Material thickness is the obvious one. So is die-cut complexity, because a simple folded tray costs less to produce than a form with multiple locks and tight nested cavities. Print coverage matters too, especially if the insert is being used as part of a premium reveal. Quantity changes the number as well, because setup costs get spread across more units at higher volumes. Assembly labor can matter more than people expect, especially if the insert arrives flat but takes several folds and tabs to build.
There is also a tradeoff between tooling or sample spend and long-term savings. A custom insert might require upfront engineering effort, but that can pay off through fewer damages and faster pack-out. A brand shipping 10,000 units a month does not need a perfect theoretical insert. It needs one that works consistently enough to lower rework and keep fulfillment moving. That distinction matters, and it is where a lot of packaging budgets go sideways.
That is why overpacking is such an expensive habit. Extra material adds direct cost. It can also raise freight dimensions if the inner structure forces a larger carton than necessary. Slower packing adds labor cost, and unnecessary filler adds waste and handling time. How to optimize packaging inserts often means reducing all of those hidden costs at once rather than chasing the lowest unit price on a quote sheet.
Here is a practical rule from the factory floor: if a slightly simpler insert cuts line time by 10 to 15 seconds per unit, the annual savings can be larger than the material difference itself. That is especially true in high-volume product packaging programs where every small delay repeats thousands of times. I have seen buyers fixate on a three-cent material difference and miss a labor loss that was ten times larger. That is not a rare mistake.
If you are comparing packaging systems, think about the whole stack:
- Insert cost: what the component costs per unit.
- Assembly cost: how long it takes to build and load.
- Damage cost: how often products need replacement or refund.
- Freight cost: whether the insert helps keep the carton smaller and lighter.
- Brand cost: whether the package feels coherent, premium, and easy to open.
That last item gets ignored more than it should. For many consumer brands, the insert is part of the same impression the exterior carton makes. A good insert can support the overall package branding even when nobody says it out loud. If you are building a retail-ready kit or a gift-oriented package, that detail matters.
To make pricing decisions more grounded, ask for quotes on multiple structures and compare them at the same shipping outcome. A package that costs less per insert but forces a larger corrugated shipper may not win on total cost. In other words, how to optimize packaging inserts is a systems question, not just a buying question.
Step-by-Step Guide to Optimize Packaging Inserts
There is no shortcut that replaces testing, but there is a clean path. If you want a usable framework for how to optimize packaging inserts, work through the process in order and do not skip validation because the render looks polished. The steps below are simple, yet they remove most avoidable problems.
-
Audit the current package. Start by measuring damage rate, pack-out time, customer complaints, and material waste. Look for patterns. Are products moving in one direction, rubbing a single panel, or collapsing under stack pressure? A short audit usually reveals the real problem faster than a redesign session does.
-
Identify the actual protection need. This is where many teams save money. If the product only needs immobilization, do not design for heavy cushioning. If the product needs separation, do not add unnecessary bulk. The strongest answers in how to optimize packaging inserts usually come from identifying the failure mode correctly.
-
Choose the Right structure and material. Match the material to the product and the brand. Paperboard works well when presentation matters and the item is not overly fragile. Molded pulp often works when fiber-based sustainability is a priority. Foam may still be the right choice for certain high-risk products. The point is to choose based on the real distribution problem, not habit.
-
Prototype and test. Build the sample, then check fit, drop behavior, vibration response, and pack-line usability. A desk test is not enough. Run the carton in the actual orientation it will travel, and if possible, test more than one packer so you can see how consistency holds up with different hands and different speeds.
-
Refine for production. Once the sample works, look at ease of assembly, tolerance repeatability, and material yield. A design that performs well but wastes sheet area can still be improved. A design that protects well but slows the line by 20 percent may not be the right final answer. That is the balancing point in how to optimize packaging inserts for real operations.
It also helps to validate against recognized test methods. Many packaging teams use a mix of drop, compression, and vibration checks based on ASTM procedures and ISTA-style distribution testing. That does not mean every project needs to be over-engineered. It does mean the result is more honest than a visual inspection alone. If a design passes in the lab and then fails on a real lane, the test protocol was probably incomplete, not useless.
Useful habit: test the insert in the carton size that will actually ship, not in a larger temporary box. Small differences in headspace and board stiffness can change the result in ways that are easy to miss.
For teams that want to stay organized, a simple approval checklist helps:
- Product dimensions and weight confirmed
- Accessory count confirmed
- Prototype fit approved
- Drop or vibration test completed
- Assembly time measured on the pack line
- Final art or branding requirements signed off
That checklist sounds basic, but it is one of the best answers to how to optimize packaging inserts without losing control of the schedule. It keeps the conversation focused on fit, function, and repeatability, which is where the real gains usually live.
Common Mistakes and Expert Tips for Better Inserts
Most insert problems are not dramatic. They are small choices that pile up. If you are learning how to optimize packaging inserts, it helps to know where teams usually go wrong so you can avoid the same traps.
Mistake one: designing around the box instead of the product. The insert should begin with the product's shape, fragility, and movement. Too many teams start with the carton dimensions and then force the product into the leftover space. That usually creates awkward cavities, loose corners, or unnecessary filler. A better insert keeps the product centered first and uses the carton only as the outer boundary.
Mistake two: assuming more material equals more protection. Extra thickness can help in some cases, but geometry often matters more than bulk. A well-placed rib, a smarter fold, or a better retention tab can outperform a heavier structure. That is one of the most useful lessons in how to optimize packaging inserts: structure can beat weight.
Mistake three: ignoring assembly time. A slightly faster insert can save real money at scale. If a team packs 20,000 units a month and each insert saves even 8 seconds, the labor savings become meaningful quickly. The smartest packaging design is not the one that looks most elaborate. It is the one that performs well without slowing people down.
Mistake four: skipping real-world testing. A fit check on a table is only the first step. Shipping conditions add vibration, stack pressure, temperature changes, handling variation, and rough treatment that no desk test can recreate. If the package is valuable enough to protect, it is valuable enough to test properly. This is one place where the how to optimize packaging inserts process earns its keep.
Mistake five: overlooking the customer experience. Customers should not have to fight the insert to get the product out. If the item is secure but difficult to remove, the design has gone too far. The best inserts protect during transit and still feel intuitive during unboxing. That matters for retail packaging, gifts, and premium direct-to-consumer orders where the first touchpoint sets the tone.
Here are a few expert tips that usually help:
- Use a small amount of extra clearance only where product tolerances actually demand it.
- Keep sharp edges away from printed or coated surfaces unless there is a protective layer in between.
- Reduce the number of loose parts that the packer has to align manually.
- Match the insert finish to the brand mood so the interior feels deliberate, not improvised.
- Check whether a single folded structure can replace multiple separate pieces.
If you are building a new packaging program, it can help to review the insert alongside the outer box rather than as a separate job. That is where a lot of branded packaging decisions become clearer. The exterior, insert, and contents should work together as one experience. If you need to compare package components or explore options for a broader system, our Custom Packaging Products catalog can help you think through the relationship between structure and presentation.
My bias is toward ongoing improvement. The strongest teams treat how to optimize packaging inserts as a living process. They do not wait for a major damage issue to force a change. They watch packing times, review returns, listen to customer service notes, and make small adjustments before problems become expensive. That habit keeps packaging reliable over time, especially when product lines expand or seasonal demand changes the packing rhythm. And yes, it is a bit unglamorous. It works anyway.
FAQ and Next Steps for Packaging Insert Improvements
The fastest way forward is to focus on the variables that matter most: product movement, material choice, line speed, and total packaging cost. If you are serious about how to optimize packaging inserts, start with current damage data, gather the product specs, test one revision, and compare the result against the full cost of the current package.
For many brands, that first round of changes is enough to reveal a clear path. Maybe the insert needs a tighter cavity. Maybe it needs better retention at one corner. Maybe it needs a less expensive material because the product is not as fragile as people assumed. The point is to make the insert work harder and the process run cleaner, not to chase complexity for its own sake.
If you are planning the next step, use this short checklist:
- Review current damage and return records
- Confirm product weight, dimensions, and accessory count
- Compare two or three insert structures side by side
- Test for fit, movement, and pack-line speed
- Compare unit cost against labor and damage savings
That is the practical answer to how to optimize packaging inserts: balance protection, cost, timing, and presentation until the package works as one system. Do that well, and the insert stops being an afterthought and starts acting like a quiet advantage in product packaging, retail packaging, and the overall customer experience.
How do I know if my packaging inserts are too large or too loose?
Look for movement, corner rubbing, rattling, or accessories shifting during handling and transit. A good fit holds the item securely without making insertion or removal frustrating for the packing team or the customer, which is a core part of how to optimize packaging inserts.
What material is best when learning how to optimize packaging inserts?
The best material depends on product weight, fragility, branding, and sustainability goals, not just price. Paperboard and molded pulp work well for many consumer goods, while foam or hybrid designs may suit higher-impact protection needs when the shipment is more sensitive.
How long does it usually take to develop custom packaging inserts?
A simple insert can move quickly if dimensions are clear and approvals are fast, while complex multi-part designs take longer. Timeline usually depends on sampling, testing, revisions, material availability, and production scheduling, so it helps to keep decisions tight from the start.
Can packaging inserts reduce shipping damage enough to justify the cost?
Yes, if the insert reduces movement, prevents surface damage, and lowers the rate of returns or replacements. The real comparison is total packaging cost versus damage savings, not insert price alone, which is why how to optimize packaging inserts should always include a full cost review.
What is the most common mistake when optimizing packaging inserts?
The most common mistake is designing for the box shape instead of the product's actual protection needs. Another frequent issue is failing to test the insert in real packing and shipping conditions before final production, especially when the package is meant for branded packaging or retail packaging.


