Buyer Fit Snapshot
| Best fit | package products for retail display for packaging buyers comparing material specs, print proof, MOQ, unit cost, freight, and repeat-order risk where brand print, material, artwork control, and repeat-order consistency matter. |
|---|---|
| Quote inputs | Share finished size, material target, print colors, finish, packing count, annual reorder estimate, and delivery region. |
| Proofing check | Approve dieline scale, logo placement, barcode or warning zones, color tolerance, and any recyclable or compostable wording before bulk production. |
| Main risk | Vague material claims, crowded artwork, or missing packing details can create delays even when the unit price looks attractive. |
Fast answer: Package Products for Retail Display: Material, Print, MOQ, and Cost should be specified like a repeatable production item. The safest quote includes material, print method, finish, artwork proof, carton packing, and reorder notes in one written spec.
What to confirm before approving the packaging proof
Check the product dimensions against the actual filled item, not only the sales mockup. Ask for tolerance on folds, seals, hang holes, label areas, and retail display edges. If the package carries a logo, QR code, warning copy, or legal claim, reserve that space before decorative graphics fill the panel.
How to compare quotes without losing quality
Compare board or film grade, print process, finish, sampling route, tooling charges, carton quantity, and freight assumptions side by side. A lower quote is only useful if the supplier can repeat the same color, closure quality, and packing count on the next order.
A product can survive a 48-inch drop test, ride through three distribution centers from Atlanta to Kansas City, and still lose its chance in the aisle if the package does not read under 3,000-lux store lighting. I have watched that happen more than once, and it always feels a little unfair. Retail is not grading on effort; it is grading on what the shopper notices in roughly two seconds, usually while standing 4 to 6 feet away. That is the real answer behind how to package products for retail display: the package has to perform under fluorescent glare, price tags, shelf lips, and the noise of a crowded aisle. A retail shelf display is part engineering, part salesmanship, and part street-level psychology.
Retail display packaging has to do three jobs at once: protect the product, help the retailer restock quickly, and give the shopper a reason to stop. That is a lot to ask from a tray, a shipper, a carton, or a counter unit, especially when marketing wants "premium" and operations wants "cheap" in the same meeting. A shelf-ready tray, peg-ready box, display shipper, window carton, or counter unit can all serve that purpose, but the board grade, glue pattern, and tear-open design change the outcome by the millimeter. Learning how to package products for retail display means designing for the aisle, not for a presentation deck in Chicago or New York. It also means treating point-of-purchase displays as a selling system, not a decorative afterthought.
"If the package is strong but invisible, it failed. If it is beautiful but a pain to stock, it failed. The sweet spot is the package that does both jobs on the first try, with a score line that opens cleanly in under 10 seconds."
I remember one corrugated tray for a snack line that lost half its shelf presence because the front lip sat 3 mm too low. Three millimeters. That was all it took for the logo to disappear behind the shelf edge like it was avoiding accountability. We raised the lip by 3 mm, changed the perforation score from 9 points to 11 points, and the tray opened cleaner, stacked better, and showed the brand mark right where shoppers could see it. The line supervisor liked it because pallet damage dropped by 14 percent. The buyer liked it because the display looked more intentional. And I liked it because nobody had to pretend a tiny structural mistake was a "brand story." That is what how to package products for retail display looks like in practice: one small decision can change the shelf story and the factory output at the same time.
Many brands start in the wrong place. They ask for color first, then shape, then structure, and only later wonder where the package will live, how it will open, and whether the retailer wants the case to become the display. Honestly, I think that order is backward. Shelf dimensions first. Product behavior second. Store labor third. If the shelf opening is 280 mm and the carton is 286 mm wide, no amount of foil stamping will solve it. Once those pieces are on the table, how to package products for retail display becomes much less mysterious and a lot less expensive to fix.
How to Package Products for Retail Display: What It Really Means
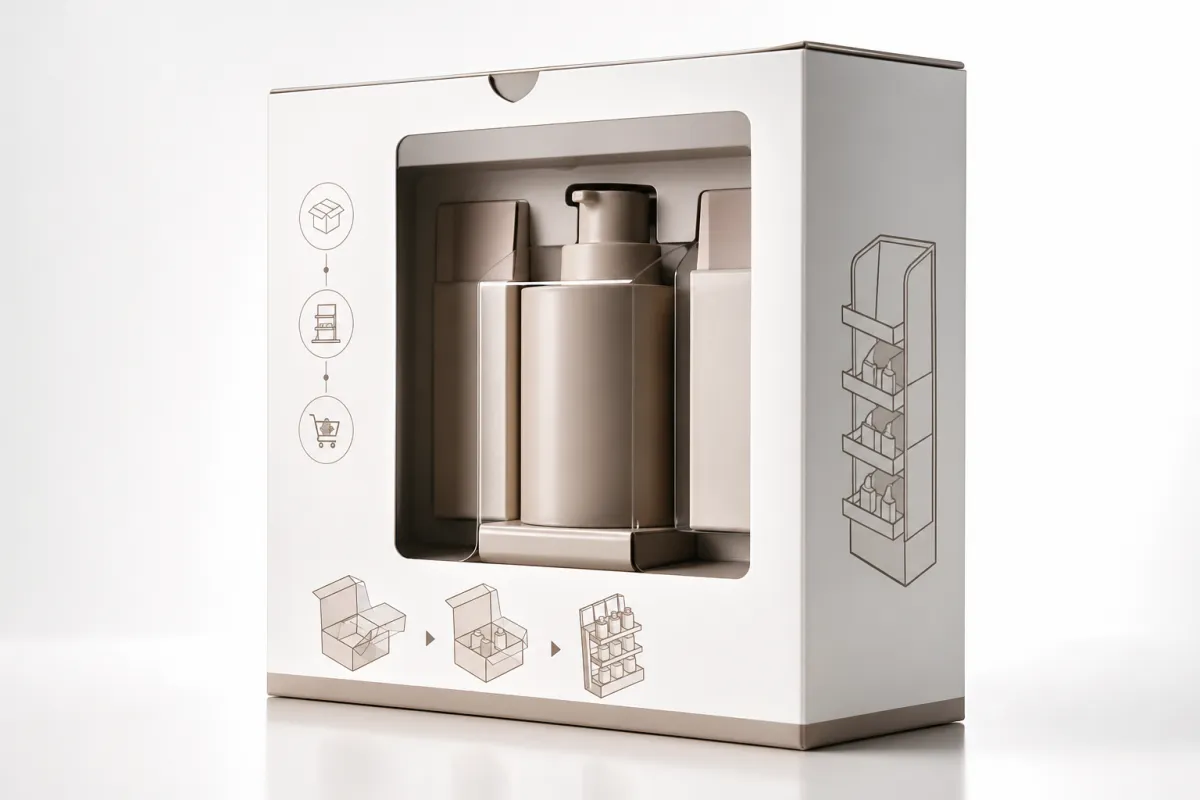
How to package products for retail display means designing packaging that earns its place in the store and keeps earning it after the first stock. That might be a printed tray, a club-store shipper, a shelf-ready corrugated display, a counter unit, or a folding carton with a window. The job stays the same: make the product easier to see, easier to shop, and easier to replenish. A carton can protect a product through 1,200 miles of freight and still lose the sale if the branding sits too low, the opening points the wrong way, or the package disappears into the fixture behind it. In practice, retail shelf display packaging has to support both the shipment and the sell-through.
Transit-first packaging and display-first packaging are not the same thing. Transit-first packaging chases compression strength, cube efficiency, and pallet stability. Display-first packaging still needs those things, but it also pays attention to shelf height, color contrast, tear-away access, barcode location, and how fast a store associate can convert a shipper into a display without a tool kit and a short temper. Anyone learning how to package products for retail display has to make that shift early: the package is both container and merchandiser, and a 22-second conversion is very different from a 4-second one.
I still remember a buyer meeting for gourmet sauces in a narrow specialty grocery aisle in Boston. The original carton looked elegant on screen, with a dark burgundy field and a low-contrast logo. Under fluorescent store lighting, it nearly disappeared. We changed the top band to warm cream, moved the logo up 22 mm, and added a die-cut window that showed the glass shoulder of the bottle. Sales moved because shoppers could see the product at a glance, not because the recipe changed. That kind of detail sits at the center of retail display packaging, and it is why I get suspicious whenever someone says "the design is already strong" before they have stood it next to a competitor on a shelf.
Club stores ask the package to do another job entirely. A 6-pack or 12-pack may need to stand as its own shelf unit, and the face has to stay readable from a forklift lane or from the back of a 48-inch pallet. Mass retail often wants the display to convert quickly and disappear into a secondary tray while still carrying a strong promotional message. Specialty retail asks for a different kind of signal, often with tactile finishes or a premium paper feel like 350gsm C1S artboard or 18 pt SBS. How to package products for retail display depends on the store format, the staffing model, and the way shoppers move through the space.
The best programs I have seen balance branding, protection, speed to pack out, and retailer compliance. Miss one of those and the whole package weakens. That is why how to package products for retail display is rarely solved by graphics alone. Strong retail packaging starts with engineering and finishes with merchandising, and the handoff between those two teams often happens in the first 72 hours after the brief lands. It sounds obvious, but obvious things are where projects go to get tripped up.
How Do You Package Products for Retail Display?
The shortest useful answer is this: measure the product, match the store fixture, Choose the Right format, then prove it with a prototype before you commit to full production. That is the core of how to package products for retail display, whether you are building a shelf-ready tray, a peg hook carton, a counter display, or a floor display shipper. The package has to fit the shelf, survive transit, and present the product at the moment the shopper decides.
If you want a practical sequence, start with the retail shelf display dimensions, the case pack, the shipping route, and the retailer's compliance sheet. Then decide whether the job needs a corrugated tray, a folding carton, a display shipper, or a countertop point-of-purchase display. After that, test the mockup under real store lighting and real warehouse handling. That workflow is the difference between a package that looks good in a meeting and one that earns repeat placement in the aisle.
How the Retail Display Packaging Process Works
The process usually begins with a brief, though the useful briefs include more than logo files and a quantity target. I want product dimensions to the millimeter, carton weight, fragility notes, shelf depth, and the retailer's case-packing rules. A 180 g jar, a blister card, and a 32-ounce bottle each push the structure in a different direction. That is why how to package products for retail display should start with a product audit, not a mood board that looks lovely and says almost nothing.
After the audit comes the structural concept, then dieline development. The converting plant looks at board grade, score direction, glue flap size, and how the package will open on the sales floor. The print shop checks image area, ink limits, and whether a matte aqueous varnish will survive under 3,000-lux retail lighting better than gloss. The fulfillment team looks at pack-out speed, because a design that takes 14 extra seconds per case becomes expensive when the run reaches 18,000 units. That cross-functional rhythm is where how to package products for retail display becomes useful or stalls out completely.
Sample making and proofing come next. On corrugated jobs, I like to see a white sample, a printed prototype, and a packed test before approval. Folding carton work needs press proofs, because a screen preview will not show how coated SBS or 350gsm C1S artboard responds to ink density or varnish. A carton that looks rich in RGB can flatten on press if the black is weak or the cyan is too heavy. I have been burned by that once in a plant outside Milwaukee, and honestly, once was enough. Real samples matter more than polished renders. That is one of the hardest lessons in how to package products for retail display.
A clean timeline might look like this: concept and structural development in 3 to 5 business days, artwork revisions in 2 to 4 days, proofing in 2 to 3 days, then production in 7 to 15 business days after approval depending on finishing and print complexity. In many factories in Dongguan, Shenzhen, or Ho Chi Minh City, a standard shelf-ready tray can move through production in 12 to 15 business days from proof approval if the structure is simple and the inks are already locked. Rush work can move faster when the art is final and the structure is simple. I have seen one tiny SKU change burn an entire week because someone altered a callout after the die had already been ordered. Projects involving how to package products for retail display punish late decisions with almost comic enthusiasm.
Retailer requirements shape the workflow from the start. Some chains require case labels on two adjacent panels. Some want the barcode at a very specific height, often around 1.25 inches from the bottom of the label zone. Club programs may demand a tray that converts without tools, while other retailers want a front panel that tears cleanly and leaves no ragged flap. For transport testing, I keep ISTA protocols in view, and for sourcing questions I look at FSC guidance. That is part of how to package products for retail display when the package has to survive both the dock and the aisle.
Production is not linear once the job reaches the plant. A change in a score line can affect glue performance. A change in graphics can shift die registration. That can raise press waste and slow the folder-gluer. I have seen a plant in Ohio lose 12 percent efficiency because the glue flap was 2 mm too narrow for the equipment. The plant manager said it with a sigh that could have powered a small lightbulb. How to package products for retail display has to account for manufacturing constraints from day one, or the system starts fighting itself.
Key Factors That Shape Retail Display Packaging Decisions
Product behavior comes first. Weight, fragility, center of gravity, and stack performance decide more than most teams admit. A 90 g cosmetic tube and a 1.8 kg household refill bottle do not belong in the same structural family, no matter how much the mood board wants harmony. If a product crushes under 45 pounds of top load, board grade, flute profile, and internal support all change. That is why how to package products for retail display begins with physics, not decoration.
Shelf geometry comes next. Shelf height, peg hooks, endcap depth, and face-out visibility decide whether the display should stand upright, lie flat, or open toward the shopper. A package that works on a 16-inch shelf may fail on an 11-inch shelf because the top panel blocks the price rail. Club-store pallet rules often matter more than individual facings, and in a specialty aisle the package may need to read clearly from 4 to 6 feet away. Anyone serious about how to package products for retail display measures the retail environment before choosing the format.
Branding details still matter, but they need discipline. Typography has to stay readable at arm's length; support copy on a small carton often should not fall below 7 to 8 pt, depending on panel size and print process, while the main product name may need 24 pt or larger. Window placement matters too. A 38 mm by 52 mm window can outperform a fully printed face if shoppers want to verify texture, color, or fill level before buying. That is a practical truth about how to package products for retail display: sometimes a clear view sells faster than a polished illustration, which annoys designers just enough to keep them honest.
Compliance and logistics can sink the job if they are treated as afterthoughts. Retailers want barcodes that scan cleanly, lot codes that stay legible, and case labels that survive transit moisture. If the carton ships flat, the glue seam has to hold through temperature swings from 55 to 95 degrees Fahrenheit and pallet compression. Tear strips need to open cleanly without shredding into jagged fibers that make the display look careless. A package that fails receiving is not a bargain. In my experience, how to package products for retail display sits halfway between branding and paperwork, which is a strange place to live, but there it is.
Sustainability matters, but only when it survives the route. Recycled-content corrugated board, FSC-certified paper, water-based inks, and mono-material structures all help, yet the package still has to protect the product. There is no value in a display that looks environmentally clean and then collapses after a drop from 30 inches onto a concrete dock in Dallas. The honest target is the most recyclable structure that still holds up in distribution and on the floor. That balance sits near the center of how to package products for retail display.
I remember a supplier discussion over 32 ECT versus 44 ECT corrugated for a high-volume food tray in North Carolina. The 32 ECT option was about $0.04 cheaper per unit at 8,000 pieces, which sounded attractive until vibration testing showed edge crush on the bottom row. We moved to a slightly heavier board with a cleaner score profile, and freight damage dropped enough to pay for the change. That tradeoff appears again and again in how to package products for retail display: a small paper savings can cost much more in spoilage, labor, and shelf confidence.
| Display Option | Typical Cost at 5,000 Units | Best Use | Main Tradeoff |
|---|---|---|---|
| Printed Folding Carton | $0.18 to $0.42 each | Cosmetics, supplements, small hardware | Lower crush resistance than corrugated |
| Shelf-Ready Corrugated Tray | $0.24 to $0.68 each | Food, household, club packs | Bulkier cube than a flat carton |
| Counter Display | $0.31 to $0.90 each | Checkout lanes, small impulse items | Needs clean tear-open performance |
| Floor Display Shipper | $1.10 to $3.50 each | Launches, seasonal promos, high-velocity items | Higher tooling and freight cost |
Those numbers shift with quantity, print coverage, and finishing. Soft-touch laminate, spot UV, and window patches all raise the price. They can also lift shelf appeal if the job deserves them. A soft-touch sleeve on a 5,000-unit run may add $0.07 to $0.12 per unit, while a window patch can add $0.03 to $0.06 depending on size. How to package products for retail display is rarely about the most elaborate material. It is about picking the one that earns back its cost in the aisle and does not make the warehouse crew mutter your name under their breath.
How to Package Products for Retail Display Step by Step
The strongest way to approach how to package products for retail display starts with a blunt audit. Measure the product, weigh it, check whether it leaks, dents, or scuffs, and write down the retailer's shelf dimensions. If the unit is 125 mm tall and the shelf opening is only 130 mm, there is not much room for decorative top flaps or optimistic thinking. If the store team restocks from the front, the access point needs to be obvious. That is where the project stops being theoretical and becomes operational.
- Document the product specs, retail environment, and shipping method.
- Choose the display format: tray, carton, wrap, counter unit, club pack, or shipper.
- Create a structural mockup using the real board grade, not just a printout.
- Review the mockup with operations, sales, and production together.
- Test the prototype for shelf fit, tear-open behavior, and vibration resistance.
- Lock the artwork only after the structure passes the handling test.
- Confirm pack-out instructions, case count, and warehouse labeling before production.
I like that order because it protects the budget. A mockup made from 18 pt SBS or 32 ECT corrugated shows quickly whether the package opens too slowly, collapses on the corner, or hides the logo behind a shelf strip. I once watched a beauty display go through three artwork revisions before anyone checked whether the front lip blocked the product name. A 15-minute mockup review would have caught it. Structural testing should come before final graphics in how to package products for retail display. I know that sounds almost insultingly practical, but practical is what gets the job out the door.
Prototype testing should be real, not polite. Ship the sample through a vibration test that matches the route, whether that means a local truck lane in Texas or a longer distribution path from Savannah to Denver. Check whether the box opens cleanly after 48 hours in a hot dock. Place the package on the shelf under store lighting, then step back 2 meters and see what the eye catches first. ISTA 3A, ASTM D4169, and similar methods matter because they expose failures before the retailer does. Anyone trying to master how to package products for retail display needs those tests, even if a few people in the room would rather trust instinct and hope.
For a simple launch, I would usually budget 7 to 10 working days for structure, 2 to 4 days for artwork revisions, 2 days for prototype review, and 10 to 15 business days for production after approval. A more complex program with embossing, foil, or multi-SKU inserts can stretch to 18 to 24 business days because every finish creates another chance for misalignment. Rush schedules happen, but the cleanest way to move fast is to keep the structure simple and the approvals tight. That is true in how to package products for retail display almost every time.
One factory-floor lesson still stays with me. A snack display packed 24 units per tray looked fine in CAD, then the tear tab snapped halfway down because the score was too shallow for recycled board content. We changed the perforation pattern, raised the glue land by 2 mm, and the line ran cleanly through 16 pallets without a single open-flap complaint. That kind of fix is why how to package products for retail display works best when the prototype gets handled by people with sticky hands, not just designers with clean screens.
Before launch, lock the artwork, add merchandising instructions, and confirm the pallet pattern. If the package is a shelf-ready tray, the instructions should say exactly where the tear strip starts, how many units go in each compartment, and whether the front panel faces left or right on the shelf. Store teams can waste 20 minutes per bay when no one tells them which side is intended for display. Small instruction gaps can undo a lot of work in how to package products for retail display.
How Much It Costs to Package Products for Retail Display
Cost starts with material. A basic folding carton on 18 pt SBS costs very differently from a shelf-ready tray in 32 ECT corrugated with high-coverage print. At 1,000 units, setup charges loom large, so the per-piece cost looks high. At 10,000 or 25,000 units, tooling and make-ready spread more evenly and the unit price drops. If you are planning how to package products for retail display, quantity is one of the biggest drivers of the final quote.
Printing method changes the math too. Digital printing works well for short runs, pilot programs, and fast SKU changes. Offset or flexographic printing often makes more sense at higher quantities. Coatings matter as well. A matte aqueous finish usually costs less than a soft-touch film laminate, while spot UV or foil stamping can raise shelf impact and cost at the same time. That is why how to package products for retail display should be costed with a full bill of materials, not one line item and a hopeful estimate.
Structure is another major cost lever. A simple wraparound tray with one die cut is cheaper than a multi-panel floor display with inserts, glue points, and tear-away windows. Tight tolerances raise setup time and waste. If the design needs a custom paperboard insert to keep a glass bottle upright, the price climbs quickly. I have found that how to package products for retail display stays more affordable when the package does fewer jobs very well instead of many jobs badly. That sounds harsh, but packaging is not a charity project.
Here is the rule I use with clients: spend where the shopper touches, looks, and decides. Save where the carton only supports transport. That usually means putting budget into the front panel, the shelf-facing edge, and the main branding zone, while keeping hidden panels clean and simple. A retailer may never inspect the bottom flap of the shipper, but they will notice muddy ink or weak contrast on the face. That distinction matters in how to package products for retail display.
Hidden costs deserve a line of their own. Rework on the folder-gluer, slower pack-out in the warehouse, freight cube losses, and rejected deliveries can outrun the original packaging quote. I have seen a program save $0.06 per unit on paper and lose nearly $4,000 in labor because the display took too long to convert. That is the kind of math that makes everyone at the table go quiet for a second. If you want how to package products for retail display to help margin, the whole chain has to be in the budget conversation.
For a working range, a simple shelf-ready corrugated display might land around $0.24 to $0.68 per unit at 5,000 pieces, while a finished folding carton can sit around $0.18 to $0.42 per unit depending on size and coverage. A floor display shipper can reach $1.10 to $3.50 per unit if it includes heavy graphics, multiple die cuts, and specialty finishing. A run in the Carolinas or in Monterrey may price differently because labor, freight, and board sourcing vary by region. Those are practical numbers, not promises, but they give you a good lens for how to package products for retail display without underbidding the job.
Common Mistakes When You Package Products for Retail Display
The most common mistake is designing for the render instead of the shelf. A package can look dramatic in a studio with controlled light and a white background, then fail in a store aisle packed with yellow sale tags, competing brands, and overhead glare. Teams fall in love with a mockup that has no chance of standing out at 6 feet away. That is a fast way to miss the point of how to package products for retail display.
Oversizing is another trap. If the carton is 12 mm wider than it needs to be, you may lose facings, raise freight cube, and make replenishment awkward for store staff. A few extra millimeters on each side add up across a pallet, especially when the retailer wants an exact face count. In one warehouse visit in Pennsylvania, oversized club packs cut pallet efficiency by 9 percent, enough to trigger a complaint from the buyer. Good how to package products for retail display work respects shelf economics, and it respects the people who have to move the cases at 6 a.m. before the store opens.
Unreadable copy causes more damage than many brands expect. Tiny legal text, low-contrast barcode placement, and dark text on a dark background all slow the shopper down. Under bright retail LEDs, some blues and purples flatten in ways that make text hard to read. I prefer testing the package at actual shelf distance instead of on a monitor, because a design that reads at 400 percent zoom can still fail on the aisle. That is a core lesson in how to package products for retail display, and no amount of confidence can outvote that.
Weak construction is another expensive mistake. Poor glue seams, shallow scores, and corners that crush under stack pressure show up quickly after shipping. Displays that collapse on the receiving dock are not minor defects; they are trust problems. A retailer who sees one failed tray remembers it. If the package is meant to support a 4-foot endcap, the board, glue, and score need to match that load. There is no shortcut around that part of how to package products for retail display.
"The buyer does not care that the carton looked great in the render if it failed in receiving. They care that the shelf is full, the barcode scans, and the display stays upright for the weekend promotion."
Ignoring retailer specs is the last mistake I see too often. A chain can reject a shipment for barcode placement, pallet pattern, master carton labeling, or the wrong corrugate grade. Rework can cost more than the packaging itself, especially if the goods are already at the distribution center. Every serious project for how to package products for retail display needs the retailer's instruction sheet on the table before artwork approval. I wish that were dramatic. It is just true.
Lighting deserves more attention than it usually gets. A package that looks rich in daylight can look flat under warm fluorescent fixtures or harsh LED strips. A matte black carton can read luxurious in a studio and dusty in the store. Sample viewing matters because shelf conditions change everything. The stronger your how to package products for retail display process, the fewer surprises you meet at retail.
Expert Tips and Next Steps for How to Package Products for Retail Display
Start with the retailer specs, pallet rules, and shelf measurements before you finalize artwork. Not after. If the product needs a 12-inch shelf bay and the retailer allocates 10.5 inches, good design cannot fix the math. I have seen one late measurement change save a full reprint because the team caught it before plates were made. That kind of discipline makes how to package products for retail display work in the real world, where math is rude but useful.
Bring sales, operations, and production into the sample review at the same time. Sales cares about shelf presence. Operations cares about speed and damage. Production cares about tolerances, glue performance, and run speed. If those groups do not agree early, the package usually gets compromised later. A 30-minute sample review can prevent a 3-week delay, and that is a fair trade in how to package products for retail display.
Ask for a pilot run or a small pre-production test whenever the launch matters. Even 250 to 500 units can expose a weak score line, a barcode that scans at the wrong angle, or a window patch that scratches too easily in transit. I like to see one small batch move through real warehouse handling before the full order. That is how you learn whether how to package products for retail display is ready for volume, not just for the presentation room.
Make the store team's life easier. Clear opening points, obvious count markings, and simple merchandising instructions do more for sell-through than hidden features nobody can find. If the display needs a knife to open, the package probably asks too much of the store. If it refills in under 60 seconds, you are on the right track. That rule holds up in how to package products for retail display, and it saves a lot of small headaches that never make it into the meeting notes.
If you need a short action list, use this one: measure the shelf, confirm the retailer requirements, choose the display format, approve the prototype, and test the shipper. Then confirm the artwork, the barcode placement, and the pack-out method. That sequence keeps the project grounded. It also makes how to package products for retail display easier to explain to everyone from the brand manager to the plant supervisor.
The cleanest takeaway is simple: measure honestly, Choose the Right board or carton stock, test under real conditions, and keep the instructions obvious enough for a store associate who is moving fast and probably juggling three other tasks. Get those pieces right, and the package can hold its own in a factory, in a warehouse, and in the aisle. Miss them, and the prettiest box in the room will still end up invisible.
How to package products for retail display comes down to a few nonnegotiables: measure honestly, Choose the Right board or carton stock, test under real conditions, and keep the package honest about what it is doing on the shelf. Get those pieces right, and the package can hold its own in a factory, in a warehouse, and in the aisle.
What is the best way to package products for retail display?
The best method depends on where the item will sit: shelf, peg, counter, endcap, or floor display. I always start with visibility, easy replenishment, and structural strength, because those three factors usually matter more than decorative extras in how to package products for retail display. If the item is a 250 g jar in a 14-inch bay, the best package is rarely the prettiest one; it is the one that fits, scans, and survives handling in a store like Kroger, CVS, or a regional chain in the Midwest.
How long does retail display packaging usually take to develop?
Most projects move through concept, prototype, approval, and production in stages, so the timeline depends on revisions and print complexity. A simple program can move in 2 to 3 weeks after artwork is final, while a more complex one with inserts or specialty finishes can take 4 to 6 weeks. Clean approvals shorten how to package products for retail display more than almost anything else, and proof approval usually starts the production clock at 12 to 15 business days for standard jobs.
What drives the cost when you package products for retail display?
Material choice, print coverage, finishing, structural complexity, and order quantity are the biggest cost drivers. Tighter tolerances, custom inserts, and specialty coatings can raise the price quickly, so cost control in how to package products for retail display usually starts with simplifying the structure where the shopper will not notice. A 5,000-piece run in 350gsm C1S artboard costs very differently from a 25,000-piece corrugated shipper in 32 ECT board, especially if the job moves through a plant in Wisconsin or Guangdong.
Do I need testing before I package products for retail display?
Yes. A package can look excellent in a render and still fail in shipping or on the shelf. Test fit, tear-open behavior, stack strength, and retailer compliance before full production, because that is the fastest way to avoid expensive surprises in how to package products for retail display. Even a simple 48-hour compression test and a shelf check under 3,000-lux lighting can expose problems that would cost thousands to fix after launch.
How do I make retail display packaging easier for store staff to use?
Design for fast opening, clear labeling, and easy replenishment so staff can stock it without tools or guesswork. Keep the count obvious, the access point obvious, and the shelf presentation consistent after each refill, since that is what makes how to package products for retail display useful on a busy sales floor. A display that converts in under 60 seconds and holds 12 to 24 facings usually gets a better response from staff in Denver, Miami, or Toronto than one that looks clever but takes two minutes to assemble.