Two beanies can look almost identical in a product mockup and feel completely different once they land on a desk. That gap is exactly why a jewelry logo patch Beanies Material Sample guide matters. The sample is where a brand finds out whether the knit feels premium, whether the patch sits cleanly, and whether the whole piece reads as intentional instead of patched together by committee.
A proper sample is more than a color swatch. It is the physical reference for the yarn, the knit gauge, the cuff structure, the patch face, the backing, and the way all of those parts behave under stretch. If the beanie is meant to support a jewelry brand, the bar is higher than “looks fine in a photo.” The finish has to hold up in the hand.
The market still rewards good basics, but buyers are less forgiving than they used to be. A logo patch that feels stiff, a cuff that twists, or a knit that pills too early can make the entire item feel cheap. None of that shows up well in a render. It shows up in the sample. Convenient, really. Annoying too.
Jewelry logo patch beanies material sample guide: what to notice first
The first review should answer one question: does this beanie match the brand’s level of polish? If the answer is fuzzy, that is already useful information. The sample is doing its job by exposing weak points before bulk production turns them into expensive weak points.
Start with the knit. A loose gauge can feel soft and relaxed, but it may also make the body lose shape after repeated wear. A tighter knit usually supports a patch better and gives the hat a cleaner retail profile. It can feel firmer at first, though, so the buyer has to decide whether softness or structure matters more for the line.
Then inspect the cuff. Roll it once, unroll it, and roll it again. A good cuff should return to shape without looking warped or stretched out at the edges. If the cuff twists or the rib starts to flare, the beanie will look tired before it has even been worn.
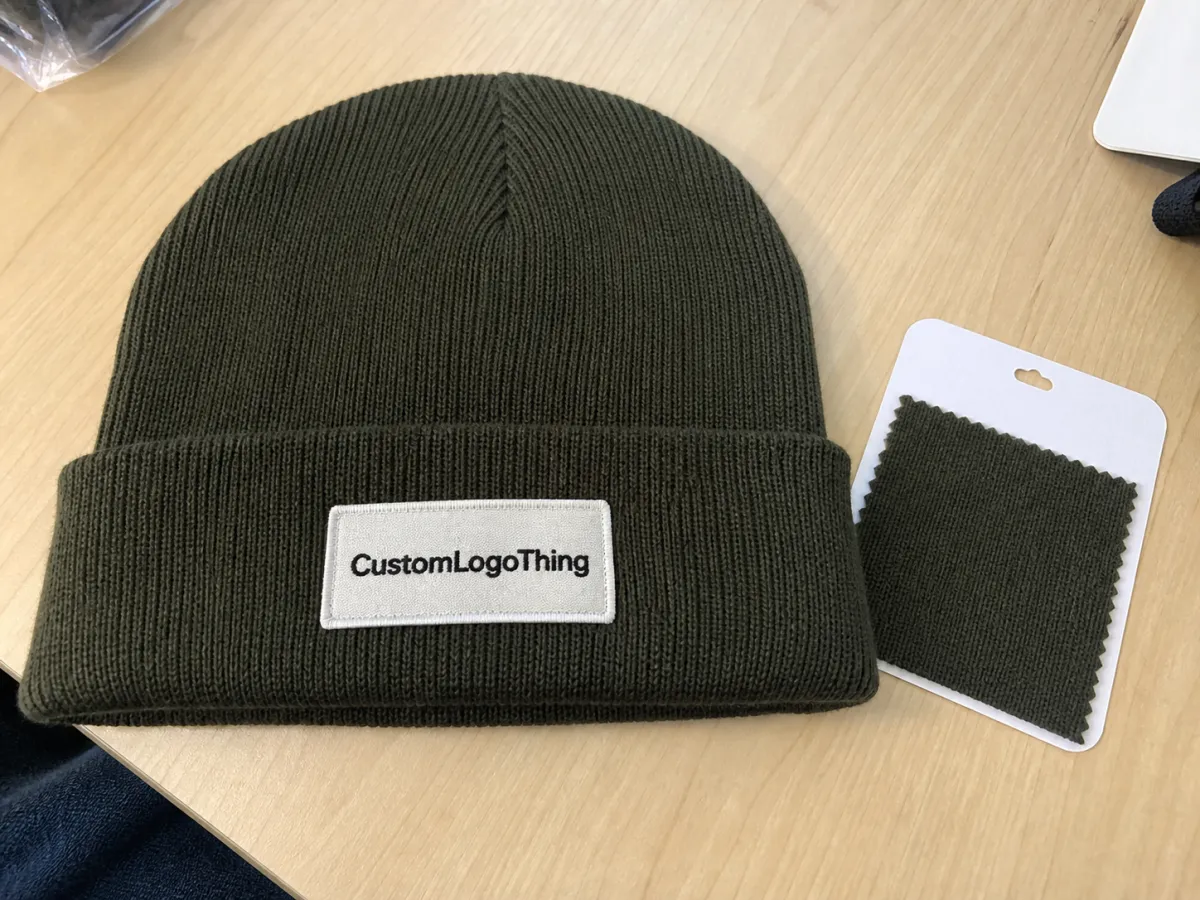
Patch interface matters just as much. Check whether the logo patch lies flat, whether the edges lift after bending, and whether the back side feels comfortable against skin. A patch can look excellent on a flat table and still create a ridge at the forehead. That is not a minor detail. That is the difference between “nice” and “why is this bothering me all day?”
- Shell fabric: Check softness, density, stretch recovery, and whether the knit shows gaps under tension.
- Patch face: Look for edge cleanliness, logo definition, and consistency across the surface.
- Backing: Confirm the patch is not scratchy, brittle, or too thick for the cuff.
- Cuff: Test how it recovers after folding, wearing, and gentle pulling.
Distance matters too. Review the sample from the same range a customer will see in a store or on a product page. Small type may look crisp at arm’s length and disappear at a normal viewing distance. That is a common miss, especially on beanies intended for premium jewelry branding where the logo needs to feel understated, not noisy.
There is also the question of proportion. On a cuff beanie, a patch that is too large can dominate the design and make the knit feel secondary. Too small, and the logo loses presence. The right answer usually sits somewhere in the middle, which is not a thrilling sentence, but production rarely rewards thrill. It rewards restraint and repeatability.
How patch construction changes fit, feel, and logo clarity
Patch construction changes more than the look of the front panel. It affects weight, flexibility, warmth, and how the beanie sits once it stretches over a head. That is why the patch type should be chosen with the final use in mind, not just the artwork.
Woven patches are the sharpest option for fine lines and small text. They stay flat, they stay light, and they usually photograph well. Embroidered patches bring more texture and depth, which can feel richer if the logo is simple. Leather-look patches create a cleaner fashion finish, though tiny copy can get lost. Silicone and PVC patches have stronger dimensional definition and work well for modern branding, but they need careful sizing so they do not feel bulky on the cuff. Stitched appliques give a softer, more textile-forward look and can be a good fit for casual or heritage-leaning products.
| Patch type | Hand feel | Logo clarity | Sample note | Typical unit impact |
|---|---|---|---|---|
| Woven | Light, flat, flexible | Very sharp for small type | Best for fine lines and compact logos | Usually lower to mid |
| Embroidered | Textured, slightly raised | Good, but tiny details can soften | Feels premium if the mark is simple | Mid |
| Leather-look | Smooth, structured | Clean, not ideal for small copy | Useful for a refined fashion finish | Mid to higher |
| Silicone or PVC | Thicker, grippier, molded | Strong shape definition | Needs size control on folded cuffs | Mid to higher |
| Stitched applique | Softer, more textile-like | Moderate, depends on contrast | Works well for casual or heritage looks | Lower to mid |
Thickness is where many samples get judged too late. A thick badge can make a fitted beanie feel firmer at the forehead, and a heavy patch on a cuff can pull the knit slightly off center. Stitch density matters too. Dense stitching sharpens the image, but crowding too many details into a small patch often makes the surface stiff and the logo harder to read. More thread is not automatically better. Factories love to say yes to detail. Buyers pay for that yes later.
Placement is another quiet variable with a loud effect. Centered badges give a direct, retail-friendly read. Side placement feels more discreet. A folded-cuff position can look cleaner in a photo but disappear once the beanie stretches in real wear. For jewelry brands, where the product usually needs to feel precise and controlled, smaller and cleaner often works better than louder and larger.
A patch that looks perfect flat but twists on the head is not approved. It is only photographed.
That is the point of the sample. It shows whether the patch and knit are working together or whether one part is dragging the other down.
Fiber blends, finishes, and sample approvals that matter most
Shell material is the next major decision. Acrylic is common because it holds color well, keeps costs under control, and gives repeatable results across larger runs. Wool blends usually feel warmer and more premium, especially for cold-weather retail, but they often require better pilling control and cost more. Cotton is softer and more breathable, though it does not always give the same structure as wool or acrylic. Recycled yarns can fit a sustainability-led brand story, as long as the claim is accurate and the supply chain supports it.
Surface finish changes the mood fast. Rib knit feels classic and stretches well. Heathered yarn softens the visual texture and hides small variations. A brushed finish feels cozy but may fuzz sooner. Matte surfaces read quieter and more refined, while slightly polished yarns catch light and look sharper in product photography. If the buyer wants a jewelry-adjacent aesthetic, the safer choice is usually the cleaner surface, not the fluffier one.
Packaging should be part of the same conversation. Sample mailers do not need to be fancy. A corrugated cardboard box with a kraft wrap or insert is usually enough to protect the item and keep it tidy. If the brand wants to talk about sustainability, verify the actual materials rather than relying on nice-sounding descriptions. Check whether outer packaging includes FSC certified paper, whether it uses post-consumer waste content, and whether any claim about recycled materials can be backed up in writing. If the packaging is supposed to be biodegradable, make sure it still protects the product during transit. Pretty packaging that arrives crushed is not a brand asset.
Some useful sample checks are simple and repeatable:
- Stretch the cuff three times and watch for recovery.
- Rub the knit lightly to see whether pills appear early.
- Wear the beanie for a few minutes to check forehead comfort.
- Rotate the patch under daylight and indoor light to compare visibility.
- Check color against the actual brand palette, not a screen image.
Good approvals are based on how the beanie behaves, not how politely the sample sheet reads. That means checking the sample in daylight, on the head, and after a few folds. A material that looks premium in one condition and sloppy in another is a problem, not a flexible design.
Shipping protection matters too. Samples should arrive in the same condition they left. A carton spec aligned with ISTA-style test thinking is enough for most orders. No one needs a dramatic packaging science project for a knit cap. They do need a sample that has not been crushed into a shape only a steam press could forgive.
Cost, pricing, MOQ, and unit cost drivers to compare
Price differences usually come from a few predictable inputs: yarn blend, patch material, number of colors, artwork complexity, custom labeling, finishing, and packaging. A basic woven patch on an acrylic beanie sits near the lower end of the pricing ladder. Add thick molded material, mixed yarns, custom labels, or more detailed finishing, and the unit cost climbs fast. There is no mystery here. It is mostly setup, labor, and the factory charging for things that take time.
MOQ changes the math. At lower quantities, setup cost gets spread across fewer units, so the unit price rises. Small runs can also carry higher sample pressure because every mistake is more visible and harder to absorb. Larger orders usually lower the cost per piece, but only if the spec is already settled. If the spec keeps moving, the “lower” price disappears in revision fees and delays.
These rough ranges are useful starting points, not promises:
| Item | Typical range | What pushes it higher |
|---|---|---|
| Simple sample | $35-$75 | Basic patch, standard yarn, no revisions |
| Complex sample | $80-$180 | Custom patch tooling, detailed logo, premium yarn |
| Bulk unit price | Often $2.50-$8.50+ | Material blend, patch finish, quantity, and labeling |
Use those figures as a filter, not a decision. A quote that looks cheap may exclude sample freight, revisions, or attachment costs. A quote that looks high may include clean artwork setup, closer color work, and better packaging. Ask what is actually inside the number. That saves everyone time, including the people who hate re-quoting.
Watch for hidden costs. Rush production often adds a premium. Extra revisions can delay approval and increase fees. Replacement samples, custom hangtags, specialty cartons, and secondary packaging all add up. If the order needs branded outer cartons, ask whether the pack-out uses kraft paper fillers, recyclable inserts, or other packaging details that affect both presentation and cost. A small print line on a quote can hide a lot of labor.
Process and timeline: from request to approved production sample
The best sample process starts with a brief that is painfully clear. Send the artwork, target size, intended fit, color references, approximate quantity, and the patch style you want. If the beanie is for a jewelry brand and the look needs to stay refined, say that directly. Otherwise the factory may assume you want a louder streetwear finish, because “premium” means different things to different people and everyone is pretending that is not true.
- Send the logo file, preferred patch style, target color, and any must-have details.
- Confirm the first proof for layout, proportions, and placement before physical work starts.
- Approve the sample build so the factory can knit, patch, and finish the beanie.
- Review the sample in daylight, on-head, and from normal viewing distance.
- Request one revision round only if the sample is close but needs correction.
- Lock the approved spec sheet and save the physical sample as the production reference.
Typical timelines are reasonable if the brief is clean. Proofing may take 1-3 business days when the artwork is ready. Sample build often takes 5-10 business days. Shipping can add another 3-7 business days depending on location and carrier. Custom tooling or complicated patch construction adds more time. Missing files and vague comments add even more. The knit is rarely the real bottleneck. The inbox is.
Sample packaging should be practical rather than decorative. A corrugated cardboard mailer is usually enough. A kraft wrap or insert keeps the piece tidy without wasting material. If the program uses post-consumer waste paper, say so only if the packaging actually includes it. If the claim is biodegradable packaging, confirm the whole shipping setup still protects the beanie and does not rely on wishful thinking.
Approval should happen in the same conditions the product will face in real life. Check the sample with the cuff folded, then worn, then refolded. View it under the same lighting used for product photography if that lighting will shape expectations. The approved sample should survive handling and still look like the item the buyer intended to order, not a nicer version that only exists under perfect light.
Common mistakes when signing off on beanie samples
Approving from photos alone is the biggest trap. Camera angle, compression, and lighting can hide knit openness, patch texture, and small color shifts. A silicone patch can look flatter in a photo than it really is. A wool blend can look smoother than it feels. A woven logo can look cleaner on screen than it does in hand. The screen is a liar with good posture.
The second mistake is checking only the flat sample. A beanie changes once it stretches over a head. The logo shifts, the cuff rolls differently, and the patch may sit slightly off center. That is normal, but it should be seen before production. A good sample is not just flat and tidy. It still works worn.
The inside finish matters too. Seam alignment, loose threads, patch backer edges, and scratchy trims are easy to miss if the buyer only looks at the front. Those details touch the skin. They also shape the customer’s sense of quality. If the inside feels sloppy, people assume the outside was rushed too. They are usually not wrong.
Another common problem is audience mismatch. A jewelry-led line usually wants quiet confidence, not bulky decoration. A patch style that works for streetwear can feel too heavy for a premium accessory brand. The sample should fit the audience and the product story, not some generic idea of what a beanie should be.
If the inside feels rushed, the customer assumes the outside was rushed too.
The fix is slower review, not more guessing. The best approvals happen when the buyer handles the sample like a customer would, not like someone trying to clear a checklist before lunch.
Next steps for a cleaner sample, faster approval, and smoother bulk run
Keep the direction tight. Send one reference image, one must-have list, and one do-not-do list. That gives the sample team enough information to land close on the first try without turning the process into a long chain of revisions. If the logo uses small type or fine lines, say so. Those details usually decide whether woven or embroidered is the better path.
Ask for two photos before the sample ships: one close-up and one in daylight. The close-up catches stitch issues, edge problems, and alignment mistakes. The daylight shot shows color mismatch and surface sheen that indoor lighting can hide. If the sample looks good in both, you are in better shape.
If feel matters more than price, compare two material options. If consistency matters more than anything else, compare two colorways. Side-by-side review gives evidence instead of guesses. That is boring, and it works.
For the bulk run, keep the approved sample, the spec sheet, and the final color references together. Record patch type, knit gauge, label placement, packaging choice, and any exceptions approved during sampling. Production drifts when this information gets scattered. It stays cleaner when the sample becomes the reference, not just the thing everyone forgot after approval.
The point of a jewelry logo patch Beanies Material Sample guide is not to make the process fancier. It is to help the buyer catch problems early, reduce revision loops, and approve a beanie that feels finished the first time around. Clean spec, clean sample, clean bulk run. Nothing magical. Just fewer regrets.
FAQ
How do I request a jewelry logo patch beanies material sample?
Send the logo file, target size, color references, and the patch style you want. Include notes on softness, logo clarity, and the level of polish you expect so the first sample is built around the right priorities. Ask for a physical sample and a close-up photo, since one shows texture and the other helps with layout checks.
What should I expect to pay for a patch beanie sample?
Sample pricing is usually separate from bulk pricing, especially if the order needs custom patch tooling, digitizing, or special materials. Simple samples tend to sit in a lower range, while detailed logos and premium yarns push the cost up. Ask for a line-by-line quote so you can see what is included instead of guessing from the headline number.
How long does the sample process usually take?
Simple samples can move quickly, but custom patches, color matching, and revision rounds add time. A clean proofing stage is often the fastest part. Delays usually come from missing artwork, unclear feedback, or waiting on approval, not from the knitting itself.
Which beanie material feels best for a premium jewelry brand?
Wool blends usually feel the most upscale, while fine-gauge acrylic can still give a clean retail look at a lower cost. Cotton is softer and more breathable, but it does not always hold the same cold-weather shape. The right choice depends on whether the brand wants warmth, structure, or a softer hand feel.
Can I approve a sample from photos instead of a physical beanie?
Photos are useful for checking layout and color direction, but they do not fully show texture, stretch, or patch depth. A physical sample is safer when fit and comfort matter. Use photos as a checkpoint, not as the final word, especially if the logo finish is part of the product’s appeal.


