Buyer Fit Snapshot
| Best fit | Lamination for Custom Product Boxes projects where brand print, material claims, artwork control, MOQ, and repeat-order consistency need to be specified before quoting. |
|---|---|
| Quote inputs | Share finished size, material target, print colors, finish, packing count, annual reorder estimate, ship-to region, and any compliance wording. |
| Proofing check | Approve dieline scale, logo placement, barcode or warning zones, color tolerance, closure strength, and carton packing before bulk production. |
| Main risk | Vague material claims, crowded artwork, missing packing details, or unclear freight terms can make a low unit price expensive after revisions. |
Fast answer: Lamination for Custom Product Boxes: Board, Finish, Dieline, and Unit Cost should be specified like a repeatable production item. The safest quote records material, print method, finish, artwork proof, packing count, and reorder notes in one written spec.
Production checks before approval
Compare the actual filled-product size with the drawing, then confirm tolerance on folds, seals, hang holes, label areas, and retail display edges. Reserve space for logos, QR codes, warning copy, and material claims before decorative graphics fill the panel.
Quote comparison points
Review material grade, print process, finish, sampling route, tooling charges, carton quantity, and freight assumptions side by side. A quote is only useful when the supplier can repeat the same color, closure quality, and packing count on the next order.
Lamination for custom product boxes sounds like a finish choice. It is really a durability decision wearing a design jacket. A box can look perfect on a monitor and still arrive at the warehouse with rub marks, softened color, and fingerprints all over it. That is usually the moment someone realizes lamination for custom product boxes was never the “nice-to-have” line item. It was protecting the print, the brand, and the profit margin.
At its simplest, lamination for custom product boxes is a thin film bonded to the printed surface of the carton, usually on the outer panels that get touched most. It helps resist abrasion, slows down fading under harsh light, and gives the packaging a more deliberate feel on shelf and during unboxing. Gloss, matte, soft-touch, and anti-scratch films each push the box in a different direction, so the real decision is not only visual. It is about packaging performance, handling behavior, and how much abuse the box needs to survive before it reaches the customer.
For custom packaging teams, the useful question is not “Do we want lamination?” It is “What job does this box actually have?” A display carton, a subscription mailer, and a luxury rigid-style presentation box all need different lamination for custom product boxes. The finish should support package branding, not wrestle it. That means looking at the film, the print method, the board, and the route from packing line to customer hands.
Lamination for Custom Product Boxes: Why It Matters
Lamination for custom product boxes matters because packaging almost never gets handled gently. It gets stacked, rubbed against other cartons, dragged across conveyor lines, touched with damp hands, and sometimes crushed into a master shipper that does not care one bit about your brand story. A printed box without protection can look great on press and still show up tired by the time it lands in retail packaging or e-commerce fulfillment. Lamination for custom product boxes adds a protective layer that helps the printed surface stay presentable through that everyday abuse.
The film does more than block scratches. It can keep deep blacks from looking dusty, make color blocks feel more solid, and reduce the visual noise that shows up around corners and score lines. It changes the brand impression too. Gloss feels brighter and more energetic. Matte feels calmer and more restrained. Soft-touch has that velvety, high-contact feel people notice right away, sometimes before they notice the logo. That tactile response matters because Custom Printed Boxes are not just containers. They are part of the product packaging experience.
Blunt version: if the box has to sit on a shelf, move through distribution, or be opened in front of a customer, lamination for custom product boxes is doing real work. It is not decorative fluff. It is part of the package branding system. Without it, the printed surface is more vulnerable to rub marks from die cutting and folding, abrasion from packing, and dulling from repeated handling. With it, the box usually looks cleaner longer, and that buys you more perceived value per unit.
If the box is going to be handled more than twice, spec the finish for abuse, not just aesthetics. Pretty packaging that falls apart visually is just expensive disappointment.
The choice also shapes how people read the brand. A luxury skincare carton, a supplement box, and a tech accessory box all send different signals through finish alone. Lamination for custom product boxes lets you tune those signals with more precision than artwork alone can deliver. The finish is part of packaging design. Ignore it, and the artwork ends up doing a job it was never built for.
People sometimes treat finish like the last line item. That is backwards. Lamination for custom product boxes should be decided alongside structure, board grade, and print coverage. If the design uses full-bleed solids, heavy ink coverage, or bold photography, the finish changes both the look and the risk profile. The right lamination for custom product boxes is usually a mix of visual preference and practical abuse testing.
I have seen beautifully printed boxes get rejected for one dumb reason: the finish looked good in a flat proof, then cracked at the folds after production. That is not a design problem. That is a planning problem. The sample did not tell the full story because the sample was never asked to survive the real world.
How Lamination for Custom Product Boxes Works
The basic process is straightforward. Printed sheets are dried or cured first, then a clear film is applied with heat, pressure, or adhesive, depending on the production method. After that, the laminated sheets go through die cutting, scoring, folding, and gluing. Lamination for custom product boxes has to survive that mechanical sequence without cracking at the folds or lifting at the edges. If the film is weak or the setup is sloppy, the finish can split right where the carton flexes most.
Three common methods show up most often. Thermal lamination uses heat to activate the bonding layer. Pressure-sensitive lamination uses a sticky adhesive layer and pressure to bond the film. Cold lamination usually relies on adhesive and pressure without heat, which can work better for certain materials or for print surfaces that do not love heat. The exact method depends on the shop, the film, the board, and the run speed. Not every printer offers the same approach, which is why lamination for custom product boxes can vary more than buyers expect.
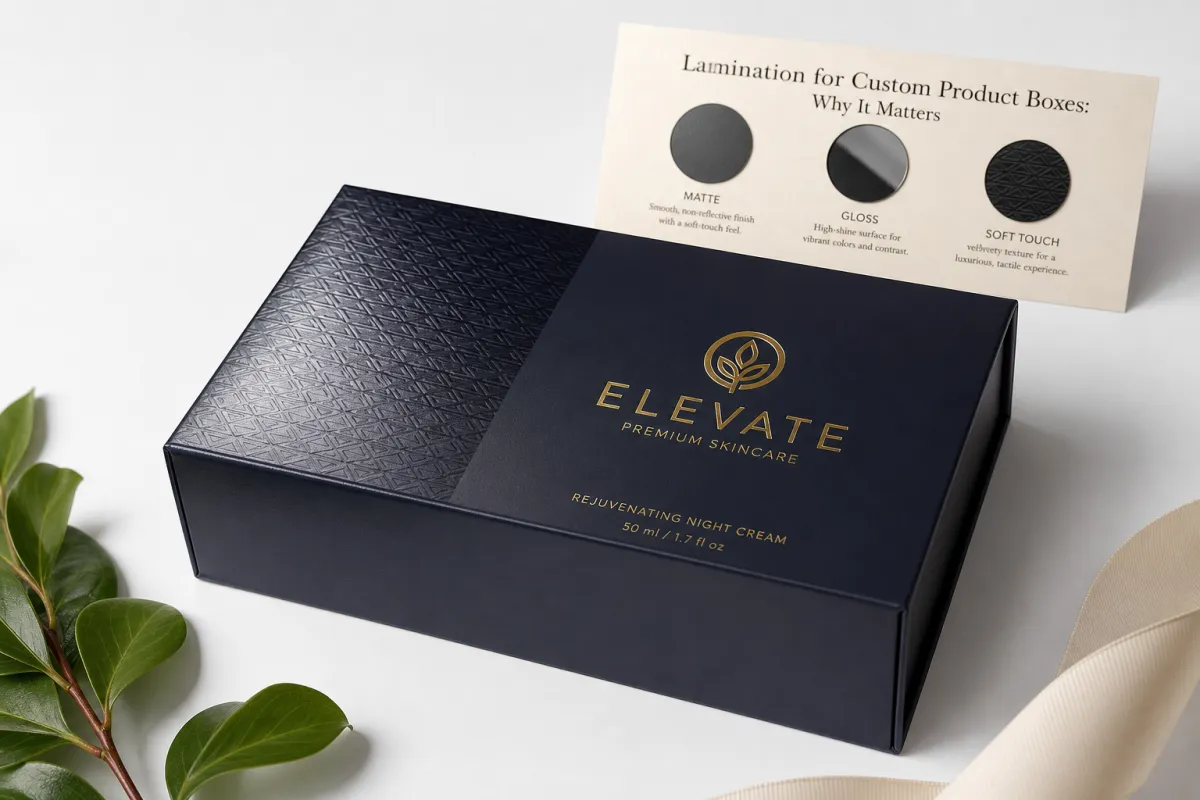
The film itself is usually a thin plastic layer, though paper-based or specialty options exist in niche production. Common choices include standard gloss, standard matte, soft-touch, and scuff-resistant or anti-scratch films. Each one changes the way the artwork reads. Gloss tends to boost saturation. Matte lowers glare and gives the box a quieter appearance. Soft-touch adds a tactile premium feel, while anti-scratch films are built for harsher handling. That is the practical side of lamination for custom product boxes: the finish is both a visual treatment and a performance layer.
One detail gets missed a lot. Lamination usually happens before die cutting, which means the finish has to tolerate the blade, the score, and the fold. If the print file has weak bleeds, poor registration, or a dieline that does not account for the film, the problems show up only after production starts. That is an expensive time to learn that lamination for custom product boxes does not rescue bad layout work. It only protects good work more effectively.
It also sits next to other effects. Foil stamping, embossing, spot UV, and textured coatings can all be layered into the same project, but the combination is not automatic. Some combinations need testing because the film can affect adhesion or change how sharply details register. A glossy laminated surface may make foil look brighter. A matte film may mute spot UV contrast. Lamination for custom product boxes does not replace those effects; it changes how they behave.
For buyers trying to sanity-check the finish stack, industry references help. Packaging performance testing often draws on methods discussed by organizations like ISTA, which is useful if the boxes will ship through rough distribution. The point is not to turn packaging into a lab report. It is to make sure the finish matches the real abuse path, not the mood board.
Key Factors That Affect Lamination Cost and Pricing
Pricing for lamination for custom product boxes comes down to a few practical variables, and none of them are mysterious. Film type, box size, coverage area, run length, board thickness, and finishing complexity all push the number up or down. A small tuck-end carton with light coverage is much easier to finish than a large display box with full-bleed graphics, foil accents, and a textured surface. That difference shows up in setup time and material waste, which is why one quote can look suspiciously cheap until the production details show up.
As a rough buying guide, standard gloss lamination is often the lowest-cost option, matte usually lands in the middle, soft-touch sits at the premium end, and anti-scratch or extra-scuff-resistant films can add more again. For a typical 5,000-piece run of moderate-size custom printed boxes, standard gloss might add about $0.03-$0.07 per unit, matte about $0.04-$0.09, soft-touch about $0.07-$0.16, and specialty anti-scratch film about $0.08-$0.18, depending on board and coverage. Short runs can be a different story because setup costs do not shrink just because the quantity does.
| Finish | Typical Use | Approx. Added Cost per Unit | Main Tradeoff |
|---|---|---|---|
| Gloss | Bright retail packaging, bold color graphics | $0.03-$0.07 | Shows glare and fingerprints more easily |
| Matte | Minimal, premium, editorial-style packaging design | $0.04-$0.09 | Less color pop than gloss |
| Soft-touch | Luxury product packaging, gift boxes, higher-touch unboxing | $0.07-$0.16 | Usually costs more and can mark differently under abuse |
| Anti-scratch | Boxes exposed to shipping rub, stacking, and retail handling | $0.08-$0.18 | Premium protection, premium price |
That table helps, but it still leaves out the sneaky charges. Compatibility testing with foil, embossing, or spot UV can add cost. Special adhesives may cost more. Extra proofing can cost more. Even the board choice matters, because a thin stock and a heavy board do not take film in exactly the same way. Lamination for custom product boxes is never priced in a vacuum. It sits inside the whole structure of the box.
There is also a practical way to save money without making the packaging look cheap. Reserve the premium finish for hero SKUs, retail packaging, launch kits, and gift sets. Use a simpler finish on internal packs, inserts, or boxes that live inside a shipping master. That keeps the budget focused where the customer actually sees it. A lot of brand owners overspend by giving the same finish to every carton in the line, even when only two of them matter from a package branding standpoint.
If budget is tight, ask for two quote versions: one with standard matte or gloss and one with premium soft-touch or anti-scratch. Compare them with the same artwork, same dieline, and same quantity. That is the only honest comparison. A cheaper-looking quote often hides lower film quality or a longer lead time. Lead time is part of cost too. If the finish choice pushes shipping out by a week, that has a price attached.
A quick reality check: a lower per-unit price is not always the better deal. If the finish scuffs in transit or the supplier has to re-run the job, the “savings” disappear fast. I would rather pay a few cents more for a box That Holds Up than explain why a launch run looks tired before it even gets opened. Kind of a bad look, honestly.
A glossy finish is not “cheap” and a soft-touch finish is not automatically “luxury.” The right answer depends on the brand story, the product margin, and how much punishment the box will take.
Step-by-Step Lamination Process and Timeline
The safest lamination for custom product boxes workflow starts before production. The box needs a real-life use case before anyone picks the finish. Will it be shelf-displayed, mailed directly, stacked in a warehouse, or handed over in a boutique? That answer drives the finish. A box that ships in bulk needs more scuff resistance than one that sits behind glass. A box that gets handled often may need a finish that hides fingerprints. Lamination for custom product boxes should be chosen around use case, not just color preference.
Next comes artwork review. The dieline, bleed, score lines, and glue areas need to be locked before print. Lamination can hide a lot of small surface flaws, but it cannot fix bad structure. A logo can still land on a fold. A weak border can still disappear in trimming. If the art file is wrong, the film only makes the mistake more expensive. This is the stage where packaging design and production need to talk to each other, not work in separate little silos.
After proof approval, the shop prints, dries, and laminates the sheets. The laminated sheets then move to die cutting, scoring, folding, and gluing. Each step can introduce small stresses, so finish quality matters. If the film is too brittle, the score line can whiten. If the adhesive layer is inconsistent, edges may lift. If the board is too light for the structure, the laminated face may still show stress around corners. Lamination for custom product boxes has to survive the whole sequence, not just the first glance.
Timeline depends on the finish stack. A simple gloss or matte laminated run may move in about 7-12 business days after proof approval. More complex jobs with soft-touch, foil, embossing, or extra samples may need 12-18 business days or more, especially if the plant has to test adhesion or revise the dieline. That is not a delay in the dramatic sense. It is just production reality. Complex custom printed boxes take longer because there are more things that can go wrong.
Simple planning rule: if the finish matters to the sale, approve it early. Waiting until the last minute turns lamination for custom product boxes into a bottleneck, and bottlenecks are how launch dates get annoying. If the project includes transport testing, pair the spec with an actual distribution test plan or an ISTA-style transit profile before final sign-off. That keeps durability discussions grounded in real criteria instead of wishful thinking.
Common Mistakes When Choosing Box Lamination
The most common mistake is choosing matte just because it sounds premium. Matte can be beautiful, but it is not automatically right. If the artwork needs strong contrast, vivid color, or a brighter shelf presence, matte may flatten the design more than you want. Lamination for custom product boxes should support the graphics, not suppress them. Some brands want a soft, editorial mood. Others need the package to punch through a crowded retail wall. Those are different jobs.
Another mistake is ignoring what happens at the folds. A cheap film can look fine on a flat sample and then crack at the corners once the board is scored and folded. You will usually see this as whitening, edge lift, or tiny stress lines near the joint. That is where low-cost lamination for custom product boxes gets expensive fast. A finish that cannot survive die cutting and folding is not a bargain. It is a future complaint.
Then there is the classic problem of assuming lamination fixes bad print. It does not. If the artwork is muddy, the images are low-resolution, or the structural layout is weak, the film only seals in the problem. A laminated box with poor ink coverage still looks poor, just slightly shinier or slightly softer. Buyers sometimes hope finish will rescue production errors. It will not. Clean files, accurate dielines, and sensible material choices still matter more than any film.
Testing is another missing step. If the box will be shipped through rough handling, packed tightly in a shipper, or displayed under harsh lighting, test the finish under those conditions. A sample held under office lights tells you almost nothing. Real retail packaging lives under bright LEDs, repeated touch, and transport vibration. That is why lamination for custom product boxes should be judged in context, not in a vacuum.
Finally, some brands over-spec the finish. They put premium soft-touch on every carton even when the box is an internal pack that spends most of its life hidden. That is money leaking out of the project for no meaningful gain. Better to use premium lamination where the customer sees and feels it, then simplify the rest. Good branded packaging does not waste budget trying to look fancy everywhere.
- Do not choose a finish from a swatch alone.
- Do not ignore score lines and corners.
- Do not assume more shine means more quality.
- Do not spec premium lamination for invisible packaging components.
- Do not skip a real sample on the actual board.
Expert Tips for Better Custom Box Lamination
Start with category fit. Gloss often works well for beauty, candy, electronics accessories, and other retail packaging that needs color pop. Matte tends to fit luxury, wellness, and minimalist packaging design because it softens glare and feels more restrained. Soft-touch is strongest when the customer is meant to notice the surface in hand. That makes lamination for custom product boxes part of the tactile story, not just a print protectant.
Ask for side-by-side samples on the same artwork. Not a random swatch. Same ink. Same box size. Same board. That is the only comparison that tells the truth. You may like matte in theory and hate it on your actual color palette. You may think gloss will look cheap and then discover it makes the logo read better from six feet away. Lamination for custom product boxes is a visual decision, but only real samples show the final effect.
Request rub and scuff testing if the boxes will ship through a chain with rough handling. This is especially smart for e-commerce, club retail, and subscription programs. Packaging groups and test labs often refer to distribution methods tied to Packaging Association resources and transport protocols, which gives you a framework for comparing one spec against another. You do not need a lab coat. You do need to know whether the finish will survive being stacked under other cartons.
Check compatibility before combining finish effects. Foil, embossing, aqueous coating, and lamination all influence each other. On some jobs, the film creates a slightly different edge condition for embossing. On others, spot UV grabs better on one surface than another. Lamination for custom product boxes is rarely a one-effect decision. It is a stack of decisions, and one bad layer can make the others look worse.
Use finish to support price point. A low-cost commodity item with soft-touch packaging can feel mismatched. A premium skincare line in flimsy, uncoated stock can feel underbuilt. The box has to match the product promise. That is package branding in plain English. If the finish says “premium” but the structure says “temporary,” customers notice the contradiction faster than you think.
For sustainability-minded buyers, material choice matters too. If recyclability is a priority, talk to the printer before production. Some laminates are harder for local recycling systems to process than simpler paperboard structures. FSC-certified paperboard may be a better fit for certain branded packaging programs, and the standards at FSC help buyers understand the chain-of-custody side. No finish choice is universal. The right answer depends on end-of-life goals, local facilities, and the product category.
One more practical point: if a supplier cannot explain the finish in plain language, keep looking. A shop should be able to tell you how lamination for custom product boxes affects rub resistance, lead time, and folding behavior. If the answer sounds like a sales brochure, that is a clue. Clear specs beat vague promises every time.
Next Steps for Lamination for Custom Product Boxes
Start with the box’s actual job. Is it there to ship safely, stand out on shelf, improve unboxing, or do all three? The right lamination for custom product boxes depends on that use case. A direct-to-consumer mailer does not need the same finish as a luxury retail carton, and a promotional sample box does not need the same durability as a year-round SKU. The more honest the use case, the easier the finish decision becomes.
Then list your priorities in order. Durability first? Visual impact first? Tactile feel first? Lowest price first? Sustainability first? There is no magic finish that wins every category, which is annoying but also useful because it forces a real tradeoff discussion. If you are not sure, ask for two or three options and compare them side by side under the lighting your customer will actually see.
For sourcing, gather the full spec sheet before asking for quotes. Include board thickness, box dimensions, print coverage, quantity, finishing stack, and whether the line includes die cutting, embossing, foil, or spot UV. That is how you get apples-to-apples pricing for lamination for custom product boxes. If you are building a broader packaging lineup, start with Custom Packaging Products and lock the finish into the same conversation as the structure.
Compare complete quotes, not just finish names. A supplier may quote a cheaper film but add more setup. Another may quote higher on paper but include better proofing or a more reliable schedule. Lead time matters too. A quote that misses your launch window is not really cheaper. It is just late, which has its own cost category.
Before signing off, put the finish into the spec sheet, the quote, and the purchase order. If the lamination for custom product boxes is only mentioned in email, somebody will forget it. That is not cynicism. That is how packaging handoffs work. The finish should be written down clearly enough that no one can “interpret” it later.
For most brands, the best move is simple: choose the finish that protects the box, supports the artwork, and fits the margin. Lamination for custom product boxes should not be the most glamorous part of the project. It should be the part that quietly makes the whole package look more expensive, last longer, and behave better from production through delivery.
Frequently Asked Questions
What is the best lamination for custom product boxes?
There is no universal best choice, which is annoying but true. Matte is often the safest option for a soft, upscale look with less glare. Gloss is usually better for brighter color and stronger shelf presence. Soft-touch makes lamination for custom product boxes feel more premium in hand, but it usually costs more and can show handling marks differently. The right answer depends on the product category, the artwork, and how the box will be handled.
Is matte or gloss lamination better for custom product boxes?
Matte tends to suit luxury, minimalist, and editorial-style packaging design because it reduces reflection and softens the overall look. Gloss is usually better for bold graphics, saturated colors, and retail packaging that needs visual punch. If fingerprints, glare, or harsh lighting are a concern, matte is often the safer pick. If the goal is high-energy branded packaging, gloss usually gives you more color pop.
How much does lamination add to custom product box pricing?
The biggest cost drivers are film type, box size, quantity, and coverage area. Standard gloss or matte usually stays in the lower range, while soft-touch and anti-scratch finishes cost more. For mid-volume runs, the added cost is often measured in cents per unit rather than dollars, but short runs can get expensive fast because setup charges are spread across fewer boxes. That is why lamination for custom product boxes should be quoted with the full production spec attached.
How long does laminated custom product box production take?
Simple runs can move quickly once artwork and dielines are approved, often within a normal packaging production window. Special films, extra samples, foil, embossing, or complex die cutting can add several days. The safest move is to lock the finish early so lamination for custom product boxes does not become the last-minute bottleneck. If a supplier cannot give you a realistic schedule, ask for one before you commit.
Can laminated custom product boxes be recycled?
It depends on the paperboard, the film type, and what your local recycling facility accepts. Simpler paperboard structures are usually easier to process than heavily finished cartons. If recyclability matters, ask before production instead of guessing later. For many brands, the practical answer is to balance durability and end-of-life goals instead of chasing a perfect answer that does not exist. Lamination for custom product boxes can be planned responsibly, but it has to be designed that way from the start.
Bottom line: the right lamination for custom product boxes is the one that survives handling, supports the artwork, and fits the job without wasting money. That sounds simple, and in theory it is. In practice, the boxes that perform best are usually the ones where finish was treated as part of the product packaging spec, not a decorative afterthought. Start there, and the rest gets a lot easier.

