Logo Patch Beanies Logo Placement Guide Basics
A patch that sits only 1 inch off-center can make a beanie look intentionally styled or cheaply rushed. That is why a useful logo patch Beanies Logo Placement guide starts with visibility, balance, and how the hat sits on an actual head, not a clean flat mockup that hides the way knit fabric bends, stretches, and shifts.
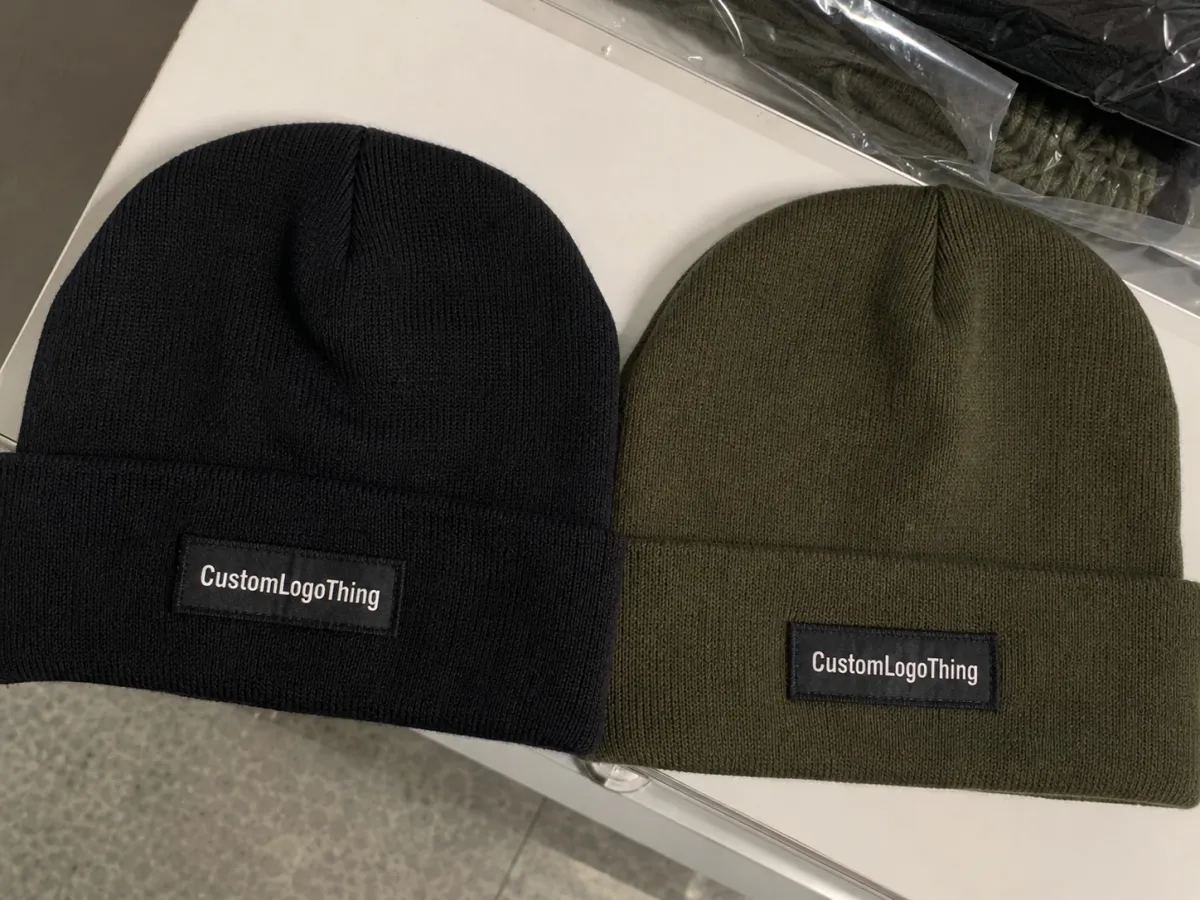
Most buyers are deciding three things at once: the beanie style, the patch position, and the tone of the branding. A cuffed beanie gives you a natural label zone, usually about 2.5 to 3.5 inches tall after folding. An uncuffed or slouch beanie gives you more surface area, but less control, because the knit does not land the same way on every wearer.
The main placement choices are straightforward: center front, slightly above the fold, left or right side, and near the back seam. The better choice depends on whether the patch should read as a bold brand hit or a quieter trim detail. A 2.5-inch faux leather patch centered on the cuff feels like visible merch. A 1.25-inch woven label on the side feels closer to retail finishing.
Logo shape matters early. A wide horizontal logo may need a front cuff position with a 3 x 1.25 inch patch. A tall icon may work better as a 1.75-inch square patch, slightly offset. Thin text, tiny icons, and complex crests need flatter space and more border than buyers often expect. If the logo turns into a gray smudge from 6 feet away, placement alone will not save it.
Buyer rule: approve logo patch placement on a worn beanie silhouette, not only on a flat proof. Knit fabric changes the whole read.
How Patch Placement Works on Different Beanie Styles
Different beanie styles treat patches differently. A placement that looks clean on a ribbed cuffed beanie can sit too low on a slouch style or pull sideways on a tight acrylic knit. The style needs to be part of the placement decision from the first proof, not added after the patch has already been sized.
Centered on the front cuff is the safest commercial choice. It keeps the logo visible in product photos, event handouts, staff uniforms, and cold-weather giveaways. For most cuffed beanies, the patch centerline lands near the middle of the folded cuff, with at least 0.375 inch of breathing room from the top and bottom fold edges. Thicker patches may need more space so the edges stay flat.
Slightly above the fold can work when the cuff is short or the logo is taller than average. This position needs careful checking because the patch sits close to the transition between the cuff and crown. Too high, and the top edge can wrinkle into the crown. Too low, and the fold line can bend the patch every time the beanie is adjusted.
Side placement is common for retail, ski shops, coffee brands, breweries, outdoor groups, and brands that want less of a billboard effect. Left-side patches often photograph well because a front three-quarter angle still catches the mark. Right-side placement can work just as well, but it must be named clearly on the spec sheet. “Side patch” is not a production instruction; it is a future email chain.
Back seam placement is subtle and polished when it is scaled correctly. It works best with small woven labels, debossed faux leather patches, or simple rubber patches around 1 to 1.5 inches wide. Check the seam thickness before approval. A raised seam can tilt a patch, interrupt the stitch path, or make one side look slightly lifted even when the sewing is secure.
Knit stretch changes the final read after wear. Ribbed knits stretch more visibly than flat knits, and a 1x1 rib acrylic beanie may pull at the patch edge more than a tighter gauge cotton blend. That does not make ribbed acrylic a poor choice; it simply means the proof should show the beanie worn, folded, and photographed at a normal viewing distance.
Key Factors That Decide the Best Placement
Start with patch dimensions. Most logo patches for beanies land between 1.25 and 3 inches wide, with common retail-friendly sizes around 2 x 1 inch, 2.5 x 1.25 inches, or 1.75 inches square. Bigger is not automatically better. Oversized patches can overpower the knit, stiffen the forehead area, and make a soft beanie feel more like a badge holder than a wearable item.
Logo detail is usually the limiting factor. Simple marks tolerate more placement flexibility because they stay readable even when the knit flexes. Text-heavy logos need a larger patch, higher contrast, and a flatter zone. If the artwork uses thin strokes under about 0.5 mm, ask whether the patch type can hold that detail before debating the exact position.
Contrast is the inexpensive upgrade buyers sometimes skip. A black faux leather patch on a charcoal beanie may sound tasteful, but it can disappear in indoor light or outdoor shade. Tan leatherette on black knit, white woven label on navy, or black rubber patch on oatmeal acrylic usually reads faster. For brand compliance, request a material swatch or digital color proof, then leave room for the reality that textile color matching is rarely exact unless tighter controls are built into the order.
Knit gauge and cuff height set the usable zone. A tall 3.5-inch cuff can support a larger front patch. A short 2-inch cuff may need a smaller rectangle or a side label. Leave space before seams, folds, and crown shaping. A practical minimum is 0.25 to 0.5 inch from fold lines and seams, though heavy PVC or thick leatherette patches often need the higher end of that range.
Use case should steer the final decision. A retail fashion beanie often benefits from a smaller side patch, a refined material, and clean negative space. A sponsor giveaway needs front visibility because people want photos where the mark is readable. A winter work beanie needs durability first, so the patch should avoid high-stress stretch zones and use secure stitching with enough edge margin.
There is no universal perfect placement. The best answer depends on logo shape, patch construction, knit behavior, wearer habits, and how the finished beanie will be photographed, packed, and used.
Patch Materials and Placement Behavior
Woven patches are good for fine detail and small type, often better than embroidery for tiny letters. Faux leather patches look strong with debossing, engraving, or printed detail, but they need clean edges and enough stitch margin. PVC or rubber patches feel modern and durable, though they can be heavier, so placement on a loose slouch beanie deserves extra checking. Embroidered patches have familiar texture and depth, but small text can fill in quickly if the art is not simplified.
Attachment method also affects placement. Sewn patches need enough border for a clean stitch path, usually with thread color specified in advance. Heat-applied patches can reduce visible stitching, but the knit content and surface texture must be compatible with the adhesive. If the beanie is fleece-lined, extra bulk may affect how the patch sits and how easily the operator can keep it aligned during sewing.
Cost, Pricing, and MOQ for Logo Patch Beanies
Pricing depends on quantity, patch material, patch size, number of colors, stitch method, packaging, and whether the placement requires extra handling. A universal price for custom logo patch beanies is usually an oversimplification. The same patch may cost differently on a standard front cuff than it does on a side position that needs slower alignment.
For basic acrylic cuffed beanies with a standard front patch, small runs often land around $7.50-$14.00 per unit at 50-100 pieces. At 250-500 pieces, buyers may see $5.25-$9.50 per unit, depending on patch type and artwork. Larger runs around 1,000+ pieces can move into the $3.75-$7.25 range for common builds. Premium knits, custom dye colors, retail hangtags, FSC-certified paper belly bands, or individual polybagging add cost.
Patch cost can swing sharply. A small woven label may add roughly $0.35-$0.90 per unit in bulk. Faux leather patches may add $0.60-$1.50. PVC patches can run $0.90-$2.25, especially with multiple colors or molded detail. Setup fees commonly fall between $35 and $150 per patch style, though supplier policies vary. Samples may cost $25-$100 each, sometimes credited back after bulk approval.
| Patch Option | Best Use | Typical Size Range | Common Cost Impact | Placement Notes |
|---|---|---|---|---|
| Woven label patch | Small text, retail trim, clean detail | 1-3 inches wide | Low to moderate | Works front, side, or back; light and flexible |
| Faux leather patch | Bold logos, outdoor brands, premium feel | 1.5-3 inches wide | Moderate | Needs enough cuff space so edges stay flat |
| Embroidered patch | Classic merch, clubs, teams | 1.75-3 inches wide | Moderate | Avoid tiny type and very low cuff placement |
| PVC or rubber patch | Modern look, weather-resistant branding | 1.25-2.5 inches wide | Moderate to high | Check weight on slouch styles and side placements |
MOQ means minimum order quantity. Lower quantities usually cost more because setup, proofing, sampling, and machine time get spread across fewer pieces. The price drop after the first break point can be meaningful. Moving from 72 to 144 pieces may save $1-$3 per unit on some orders. Moving from 250 to 500 pieces may save another $0.50-$1.50 per unit.
Ask for a quote that lists the exact patch size, patch material, placement location, sample cost, setup fee, bulk unit price, and packing method. Also ask whether pricing changes if the patch moves from the front cuff to the side. Side patches sometimes require slower manual handling, especially if the supplier uses alignment jigs rather than fully automated placement.
For sustainability claims, be specific. If you request recycled yarn, paper belly bands, or responsible fiber sourcing, ask for documentation instead of accepting vague “eco” language. The Forest Stewardship Council is a useful reference for paper-based tags and packaging, while shipping performance testing can be checked against resources from ISTA if cartons will move through parcel networks.
Process and Timeline for Logo Patch Beanies
The production process is not complicated, but sloppy inputs slow everything down. A clean placement plan should include artwork, patch type, patch size, placement proof, sample approval, bulk production, quality inspection, and packing before the first sample is made.
Start with vector artwork if possible. AI, EPS, or editable PDF files usually save time. PNG files can work for mockups, but they are not always enough for woven patches, debossed leatherette, or molded PVC. If the logo includes small text, provide a simplified version too. A full legal company name wrapped around a detailed mountain icon may look polished on a website header; on a 1.5-inch patch, it becomes visual noise.
Proofing often takes 1-3 business days once artwork and beanie style are confirmed. A physical sample often needs 7-14 business days, depending on patch material and production queue. Bulk production can run 10-25 business days after sample approval for common quantities, while larger or more custom orders may need longer. Shipping adds another 2-10 business days for domestic movement, or several weeks if ocean freight is involved.
Delays usually happen in ordinary places: missing artwork, vague placement notes, five people marking up one proof, or a buyer approving a flat digital image without checking how the patch looks on a head. None of that is dramatic, but it is where schedules slip.
Quality control should check three practical items: placement tolerance, patch attachment, and visual consistency. A reasonable tolerance for patch placement might be plus or minus 0.125 to 0.25 inch, depending on beanie stretch and manual sewing. If you need tighter control, say that before production. A complaint after cartons arrive is harder to solve than a tolerance note on the approved spec.
Production sanity check: approve one worn-view photo, one flat-view photo, and one close-up of the patch edge before bulk production starts.
Step-by-Step Placement Checklist for Buyers
Start with the end purpose. Who will wear the beanie: staff on a jobsite, customers buying retail, runners at a winter event, or sales reps handing them out in January? A retail piece can afford subtle placement. A sponsor giveaway needs visible branding from 6-10 feet away.
- Choose the beanie style. Cuffed, uncuffed, slouch, pom, ribbed, fine gauge, recycled knit, or fleece-lined. The style determines the usable patch zone.
- Measure the available area. On a cuffed beanie, measure cuff height after folding, not before. Mark the safe zone with 0.25-0.5 inch margins from folds and seams.
- Select the patch shape. Match the logo to a rectangle, square, oval, circle, or custom die-cut shape. Do not force a horizontal logo into a tiny circle unless reduced readability is acceptable.
- Pick the patch size. Test common sizes like 2 x 1 inches, 2.5 x 1.25 inches, and 1.75 x 1.75 inches. Print them at scale on paper and hold them against a real beanie.
- Compare placement zones. Review center front, side offset, above fold, and back seam options at arm's length. Phone photos help because they show what customers will actually see.
- Approve a physical or pre-production sample. Check logo readability, edge stitching, color contrast, and whether the patch pulls the knit.
Do not choose artwork first and hope placement will work later. That is how buyers end up with a polished 3.5-inch badge and a 2.25-inch cuff. Measure first, then design within the real space.
A good spec sheet should include beanie style, knit color, patch material, patch size, exact placement, thread color, attachment method, packing method, approved proof date, and tolerance. For example: “2.5 x 1.25 inch tan faux leather patch, centered on front cuff, patch bottom 0.5 inch above lower cuff edge, black stitching, plus or minus 0.2 inch tolerance.” That is a workable spec. “Put logo on front” is not.
A shared placement guide is especially useful for teams with multiple decision makers. It gives marketing, purchasing, and operations the same reference point before money is spent, which reduces late-stage changes and keeps the sample round focused.
Common Logo Patch Placement Mistakes
The most common mistake is placing the patch too close to the fold, seam, or cuff edge. On the table, it may look crisp. On a head, the fold can push into the patch, the seam can tilt it, or the lower edge can rub awkwardly against the forehead. Leave room. Fabric needs space to behave.
Oversized patches are next. A 3-inch patch can work on a tall cuff, but it can look clunky on a narrow beanie or stiff on a soft knit. Tiny patches create the opposite problem. They disappear in photos and make the order feel cheaper than it was. Judging size on a laptop screen is a trap; print the patch at actual scale.
Poor contrast causes quieter but equally frustrating problems. Dark gray on black may satisfy a minimal brand board, but customers may not see the logo in real lighting. If subtle branding is the goal, fine. If visibility matters, choose contrast that survives indoor lighting, outdoor shadows, and product photography.
Complex artwork can also break down. Small text, thin strokes, gradients, distressed effects, and detailed mascots do not always translate to patches. Woven labels can hold more detail than many patch styles, but even they have limits. Ask for minimum line thickness and minimum text height. A practical minimum for readable small text is often around 5-6 mm tall, though the exact threshold changes by material and production method.
The classic proofing mistake is approving the digital proof without checking scale on the real beanie body. That is where many surprises appear. The patch may be technically centered but visually low. The logo may fit the patch but feel cramped. The side placement may look balanced flat and hidden when worn. The fix is simple: request a worn-view proof or sample photo.
Packaging matters more than it seems. If thick rubber or leatherette patches are packed face-to-face under heavy compression, they can mark softer knits. For bulk orders, ask how the beanies are folded, counted, bagged, and boxed. If retail presentation matters, belly bands, hangtags, or individual bags should be part of the quote from the start, not added after the unit price has already been approved.
Next Steps: Measure, Mock Up, and Approve
Smart buying starts with a measuring tape, not a mood board. Choose the beanie style, measure the cuff or front panel, decide the logo zone, then request a placement proof that shows the patch on a worn silhouette. If the supplier can only send a flat template, ask for a photo sample before bulk production.
Use a simple approval flow. First, approve the logo version. Second, approve the patch material and size. Third, approve placement. Fourth, approve the sample or pre-production photo. That order prevents the usual mess where the patch looks right but the logo is too small, or the logo looks good but the position is wrong.
If your logo has small text, sharp edges, thin outlines, gradients, or an intentionally off-center layout, get a sample. Paying $40-$100 for one sample is cheaper than receiving 500 beanies with a patch that looks like it slid downhill. Not every issue is avoidable, but most placement problems show up early if the sample is checked on a real form.
A clean request sounds like this: “I need custom logo patch beanies with a centered front cuff patch, 2.5 x 1.25 inches, woven and faux leather options, proof shown flat and worn, plus pricing at 100, 250, and 500 pieces.” That gives the quoting team enough detail to respond with useful numbers instead of a vague estimate.
Use this logo patch Beanies Logo Placement guide to lock the spec sheet early. Clear placement decisions save money, reduce sample rounds, and cut the back-and-forth that makes a simple beanie order feel larger than it should.
FAQ
What does a logo patch beanies logo placement guide recommend for cuffed beanies?
The safest choice is usually centered on the front cuff because it stays visible when the beanie is worn and gives the logo a flatter, readable surface. If the logo is wider or more detailed, adjust the patch size or move the placement slightly above the fold so the design does not get bent by the cuff line.
How big should a patch be on custom logo patch beanies?
Most buyers should match patch size to logo complexity. Simple marks can often work at 1.25-2 inches wide, while text-heavy logos may need 2.5-3 inches of width. Leave enough border so stitching, heat application, debossing, or embroidery detail does not crowd the edge.
How much do logo patch beanies usually cost?
Pricing depends on quantity, patch material, patch size, knit quality, packing, and placement complexity. Small runs often have higher unit costs, while larger quantities spread setup and sample costs across more pieces. Ask for price breaks at 100, 250, 500, and 1,000 pieces if your budget has room to compare.
How long does production take for logo patch beanies?
Proofing can take 1-3 business days, samples often need 7-14 business days, and bulk production commonly runs 10-25 business days after approval. Timing depends on order size, patch type, artwork condition, and production queue, so confirm the schedule before promising an event date.
Can a logo patch go on the side or back of a beanie?
Yes. Side and back placement work well when the brand wants a quieter retail look or when the front is reserved for another decoration method. Always check how the beanie folds and stretches in wear, because a side patch that looks balanced on a table can end up hidden on a head.
What files are best for logo patch artwork?
Vector files such as AI, EPS, or editable PDF are usually best. High-resolution PNG files can help with mockups, but they may not be enough for woven patches, debossed faux leather, or molded PVC. If the logo has tiny type, provide a simplified version before sampling.
Should I approve a digital proof or a physical sample?
Use both if the order matters. A digital proof is fine for checking layout and spelling, but a physical sample or pre-production photo shows scale, contrast, patch edge quality, and how the placement behaves on the actual beanie. That is the real test.


