Pom Pom Beanies Logo Placement Guide: What Buyers Get Wrong First
A beanie logo has less room than most buyers expect. A flat mockup can make the placement look generous, but once the cuff folds, the knit stretches, and the wearer shifts the hat back on the head, the same logo can feel crowded or oddly hidden. That is the first trap.
On a pom pom beanie, the logo is never working alone. It is competing with cuff depth, crown stretch, seam movement, hair volume, and the visual weight of the pom itself. A design that looks centered on screen can read too high, too low, or slightly off once it is sewn or stitched into real knitwear.
Logo placement means more than choosing a general area. It includes the exact position, size, decoration method, orientation, and spacing around the mark before production starts. After digitizing, label weaving, patch cutting, or embroidery setup has begun, moving the logo is no longer a simple change.
A one-inch shift on a T-shirt may not matter much. On a cuff that is only 2.5 to 3.25 inches tall, that same shift can push the logo into the fold, crowd the crown, or make the branding look crooked in photos. Small error, visible result.
Different buyers are also trying to solve different problems. Retail buyers usually want something that feels considered and stylish, often a woven label or small patch. Event buyers want the logo to read quickly from a distance, which usually means cleaner front visibility and less detail. Neither approach is wrong, but they do not call for the same placement.
The best placements are chosen as production decisions, not design preferences. Good placement affects the quote, the sewing plan, the reject rate, and how the beanie looks after it has been packed, shipped, and worn in winter conditions.
Buyer reality check: if the logo only works on a flat mockup, the placement is not ready yet.
That is also why packaging should be considered early. A beanie that is folded tightly for retail display, tucked into a polybag, or shipped with a hang tag can reveal placement problems that were easy to miss in the art file. If you want a broader production checklist, it helps to compare placement decisions with a custom beanie packaging guide and a general embroidery digitizing guide before approving the first sample.
How Logo Placement Works on Pom Pom Beanies
The beanie itself sets the rules. Cuffed styles offer the most reliable branding zone because the folded band gives the decorator a stable surface and a defined height. Uncuffed beanies provide more vertical space, but they move more and distort faster. Pom pom styles add another layer of visual competition at the top, so the eye is naturally pulled upward before it lands on the logo.
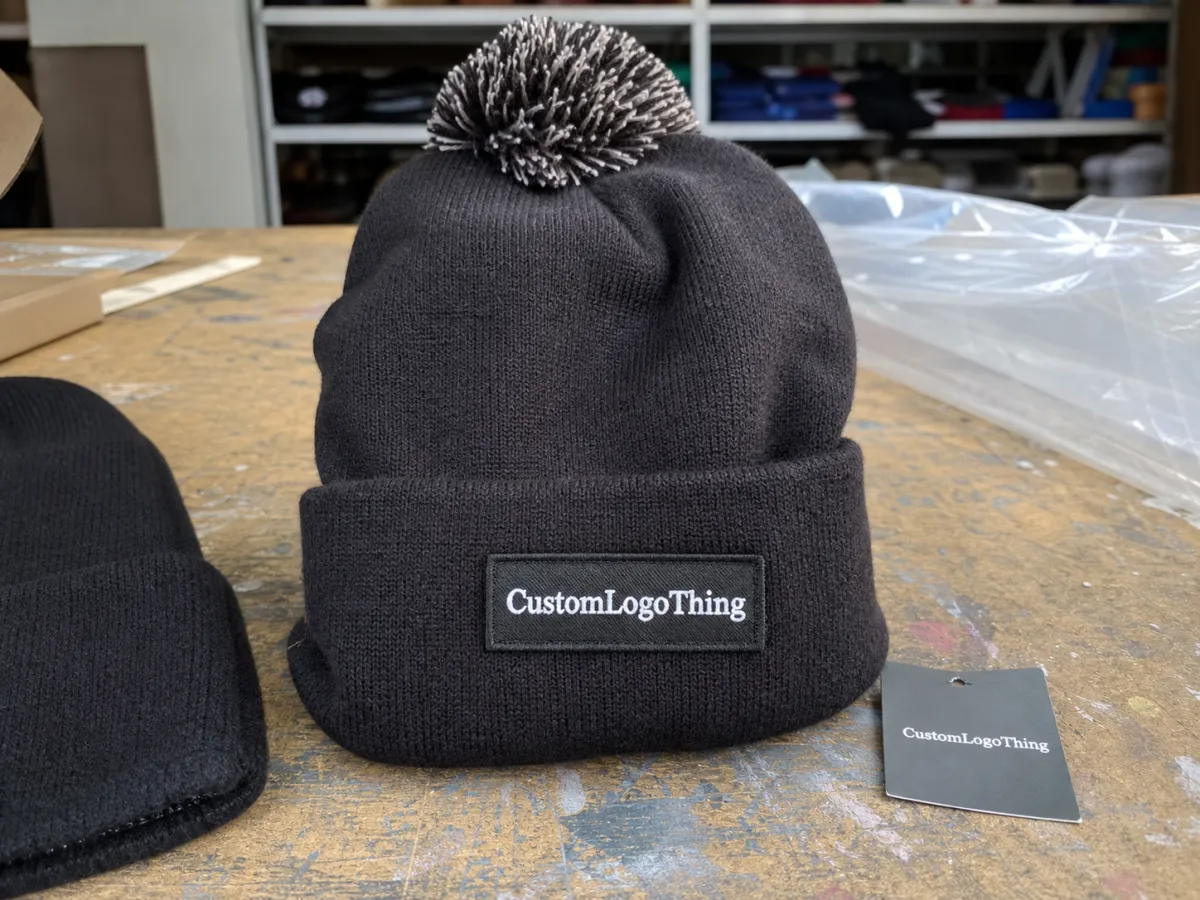
The most common placement zones are center front cuff, off-center cuff, side cuff, back cuff, vertical side seam, woven label at the edge, and patch on the fold. Center front is still the default for a reason. It photographs well, reads quickly on team wear, and suits staff uniforms or giveaway programs. It also leaves the least room for error.
The pom pom changes the balance. A 3 to 4 inch faux fur pom can make a beanie feel top-heavy if the front logo is too large or too close to the crown. Even a technically correct mark can look crowded if the cuff height, logo width, and pom size are fighting for attention. Smaller marks often look more premium because they leave breathing room.
Decoration method matters as much as the position itself. Direct embroidery is a strong choice for initials, simple icons, block text, and clean shapes. Woven labels handle small text and fine detail better because the artwork is built into the label structure before attachment. Leather and faux leather patches add texture and a more retail finish. Rubber or PVC patches create a bolder, weather-ready look that holds up well for trail groups, breweries, ski shops, and winter staff uniforms.
There is also a difference between what looks centered and what is actually centered on a curved knit surface. Production teams work from measurements: logo width, logo height, offset from the cuff edge, seam reference, and whether the cuff is fixed or foldable. That repeatability matters more as quantities rise. A slight inconsistency on 50 beanies may pass. The same inconsistency on 1,000 units becomes a quality issue.
Most factories and decorators will work within a practical placement window rather than a single exact point. On common cuffed Pom Pom Beanies, the front logo is often placed roughly 0.25 to 0.75 inch above the lower edge of the cuff, with enough distance from the top fold so the design does not disappear when the cuff is worn higher. The exact range depends on knit gauge, cuff depth, and how much the material relaxes after finishing.
| Placement zone | Best use | Typical decoration fit | Buyer risk |
|---|---|---|---|
| Center front cuff | Maximum recognition | Embroidery, woven patch, leather patch | Limited cuff height |
| Off-center cuff | Retail-style branding | Small patch, woven label, compact embroidery | Can look accidental if offset is not measured |
| Side cuff | Subtle fashion placement | Woven label, small icon, side tab | Less visible in photos |
| Back cuff | Secondary sponsor or small label | Woven label, small embroidery | Low front-facing visibility |
For buyers planning mixed kits, placement should also match how the beanies will be packed. If the same style will be sold folded in a retail sleeve, shipped in bulk cartons, or tagged for e-commerce fulfillment, the logo needs to stay visible after the beanie is opened and reshaped. That is where packaging and decoration should be reviewed together instead of as separate steps.
Key Factors That Decide the Best Logo Position
Logo shape is usually the first thing to check. Wide wordmarks often need a longer front panel or a larger cuff area, while compact icons or initials can sit comfortably in tighter spaces. When artwork is too detailed for the available height, the result can look muddy, especially with embroidery. In those cases, a woven label or patch is often the safer choice.
The second factor is cuff depth. Many cuffed pom pom beanies have a fold that falls somewhere in the 2.25 to 3.5 inch range, but that can vary by style, yarn thickness, and how the knitter forms the fold. A shallow cuff leaves less room for bold decoration, while a deeper cuff can support a stronger logo without crowding the crown. Buyers should always ask for a measured sample, not just a size name.
The third factor is knit stretch. Rib knits and chunkier yarns can widen slightly after wear, especially around the forehead. That means a logo placed near the top fold may look fine on the bench and then slide visually once the beanie is worn. For that reason, many decorators leave a bit of breathing room between the logo and the fold line, especially for first-time orders.
The fourth factor is visual hierarchy. The pom itself is a strong design element. If the logo is too large, it competes with the pom; if it is too small, it gets lost. The best layout usually gives the pom a role as the top accent and the logo the role of front anchor. That balance matters most for retail products, where the beanie must look intentional from several angles.
The fifth factor is audience behavior. A ski resort staff beanie may need quick recognition in cold, low-light conditions, so a bold center front patch can be the right call. A boutique apparel brand may want a smaller woven label on the cuff seam to preserve a cleaner silhouette. A corporate giveaway may prioritize easy reading in photos and fast production, which pushes the choice toward simple embroidery or a small heat-applied patch.
The sixth factor is production tolerance. Some methods allow minor placement correction during setup, while others do not. Embroidery can often be nudged slightly during sample approval. Sewn patches, especially ones with a full stitch perimeter, are more fixed. Woven labels can be positioned with high consistency once the sewing spec is set, but the artwork itself must be finalized earlier. Understanding that sequence helps avoid last-minute redesigns.
The final factor is packaging impact. A beanie that is folded with the cuff outward will expose the logo immediately. A beanie packed with the cuff tucked inward may hide part of the front branding until the buyer unfolds it. This is not a minor detail. For retail buyers, packaging can either amplify a well-placed logo or make a good design look understated in the box. For practical planning, it is worth reviewing the packaging approach alongside the placement spec, not after the sample arrives.
- Use front visibility when the brand must read fast in photos or on a team.
- Use smaller side placements when the style needs a cleaner retail look.
- Use patches or woven labels when detail is too fine for standard embroidery.
- Use simpler art when the cuff height is short or the yarn is thick.
Process and Timeline: From Mockup to Finished Beanies
The placement process usually starts with a flat mockup, but the mockup should be treated as a proposal, not proof. A good supplier will translate the artwork into a production-friendly spec that includes decoration size, exact offset, stitch type or patch construction, and a note on the panel or seam reference. That is the stage where simple branding decisions become manufacturable instructions.
Next comes artwork review. If the logo is being embroidered, it may need digitizing so stitch direction, density, and underlay are appropriate for knitwear. If the logo is going to be woven, the artwork needs to be simplified enough to remain readable at small size. If it is a patch, the outline, border width, and attachment method should be checked against the beanie texture. This is a good time to cross-check the artwork against a broader custom packaging guide if the beanies will ship with inserts, hangtags, or wrapped presentation.
After the art is approved, the supplier usually prepares a sample or pre-production proof. For pom pom beanies, a sample is especially useful because knit stretch and cuff behavior are hard to judge from digital layouts alone. The sample can show whether the logo sits too high, whether the patch feels oversized, and whether the pom visually dominates the front face.
Typical lead times vary by method and order size, but buyers often see a range of about 10 to 25 business days for standard production after approval, with longer timelines if custom yarn-dyed elements, special packaging, or detailed embroidery are involved. Rush schedules are sometimes possible, but they often reduce flexibility on packaging, label sourcing, or inspection time.
Production control matters at the sample stage. A factory might adjust the logo 0.125 to 0.25 inch to improve symmetry or keep stitching out of a seam line. Those small changes are normal as long as they are documented before the bulk run begins. The danger is approving a placement based on a loose conversation rather than a written spec.
Once bulk production starts, the finished beanies should be checked in the same folded condition the buyer expects to receive them. That means looking at the logo with the cuff folded, the pom fluffed, and the beanie packed. A placement that looks perfect on an open hat may look different after folding, so final inspection should match final presentation.
Good process also includes carton planning. Pom pom beanies are bulky compared with flat caps or tees, so overstuffed cartons can crush the pom or distort the cuff. Even if the branding is correct, poor packing can make the beanie look tired on arrival. Clean folding, consistent bagging, and sensible carton fill levels protect both the logo and the shape.
Cost, Pricing, and Unit Cost Effects of Placement Choices
Placement choices can affect unit cost in ways buyers sometimes miss. The logo location itself may not carry a separate line item, but it can influence the decoration method, setup time, labor, and rejection risk. A simple front embroidery on a standard cuffed beanie is often the least expensive path. A custom woven patch or shaped leather patch may increase the cost a little, while more detailed positioning or multiple placements can raise the total further.
In many programs, the biggest price jump comes from complexity rather than size alone. For example, a compact 2 inch embroidered mark is usually easier to run than a detailed 3 inch mark with thin letters. Likewise, a single center front patch is often simpler than a front-and-side combo with matching positions across multiple colorways. Those added decisions slow setup and raise the chance of inconsistency.
Common cost drivers include digitizing, patch molding or weaving, sewing labor, placement alignment, sampling, and special finishing. If the beanies use a premium patch or a Custom Woven Label, the supplier may also need minimums from an external mill or trim source. That is why buyers should ask whether a placement choice changes the decoration method before asking for a price comparison.
As a practical range, small embroidery on a straightforward beanie often stays near the lower end of the decoration budget, while premium patches, custom labels, or multiple placements can add a noticeable increment per piece. The actual amount depends on order volume, artwork detail, thread count, and whether the supplier is sourcing trims in-house or through a third-party converter.
There is also an indirect cost tied to revisions. A poor placement choice may require a second sample, a re-digitize, or a new patch layout. That delay can cost more than the original adjustment would have cost if it had been caught earlier. For that reason, it is usually cheaper to slow down at the spec stage than to fix the issue after the sample is already approved.
Packaging can affect cost too. If the beanies need individual polybags, printed size stickers, barcode labels, or retail hangtags, those items can add modest unit cost and labor time. But packaging can also protect the logo presentation and reduce damage claims, so the cheapest option is not always the best value. Many buyers find it helpful to think of placement, decoration, and packaging as one combined presentation budget rather than three unrelated choices.
| Choice | Cost effect | Why it changes pricing |
|---|---|---|
| Simple center embroidery | Usually lowest | Lower setup and easier alignment |
| Woven or leather patch | Moderate increase | Extra trim sourcing and sewing labor |
| Large or detailed art | Often higher | More production time and finer quality risk |
| Multiple placement points | Often highest | More operations and more inspection time |
Step-by-Step Placement Guide for a Clean Branded Beanie
The safest way to choose placement is to work in stages. Start with the beanie style, then the decoration method, then the exact position. This keeps the decision practical and helps the supplier quote the job without guessing.
- Measure the cuff. Ask for the folded cuff height, front panel width, and any seam offsets. A style that looks roomy in a product photo may have a much tighter production window.
- Review the logo shape. Determine whether the art is wide, tall, circular, or text-based. Narrow script usually needs more caution than block lettering.
- Choose the decoration method. Use embroidery for simple art, woven labels for fine detail, and patches when texture or premium appearance matters more than stitch detail.
- Set the visible area. Decide whether the logo should read from the front, act as a subtle fashion accent, or support a resale presentation.
- Check the fold behavior. Confirm whether the cuff will be worn fully folded, partially unfolded, or packed in a retail display style. This changes the visible logo zone.
- Approve a physical sample. If possible, inspect one finished unit before bulk production. Real knitwear is the best test for spacing and balance.
- Lock the packaging plan. Decide how the finished beanie will be folded, bagged, tagged, and cartoned so the logo still looks right at delivery.
For a clean front logo, many buyers keep the design between roughly 1.5 and 3 inches wide, depending on the cuff height and artwork complexity. That range is not a rule, but it is a useful starting point. Smaller marks usually feel more premium on retail styles, while larger marks can help staff or event beanies read from farther away.
If the logo is off-center by design, the offset should be measured from a fixed point rather than estimated by eye. On knitwear, "looks a little left" can easily turn into a visible mistake after sewing. The best suppliers will show the offset on a mockup or tech pack so the same position can be repeated across the full order.
It also helps to specify what should happen when the beanie is packed. For example, the cuff can face front for immediate logo visibility, or the logo can be presented with a side fold for a softer retail look. The packaging choice should support the branding goal, not fight it.
Common Logo Placement Mistakes That Make Beanies Look Cheap
The most common mistake is making the logo too large. Buyers often want maximum visibility, but oversized branding can overwhelm the cuff and make the beanie look promotional rather than retail-ready. On a pom pom style, that effect is even stronger because the hat already has a strong top silhouette.
Another frequent issue is placing the logo too close to the crown. When the cuff is folded and the beanie stretches on the wearer, the logo can slide upward and lose breathing room. This makes the front look cramped and can cause the decoration to sit near a seam or fold line.
Busy artwork is another problem. Thin script, tiny secondary text, and highly detailed icons often do not hold up well on knitwear unless they are scaled carefully or converted into a woven label. In embroidery, fine details can blur. In patches, tiny text can become hard to read. Simpler shapes usually look more expensive because they stay crisp.
Some buyers also ignore seam placement. A logo centered on the mockup may land slightly off once the beanie is sewn and shaped. This is why production alignment should reference a seam or a known knit point, not just the visual center of the digital art.
Poor packaging can make a good placement look bad. If the beanies are shipped loosely packed, the cuff may crease the logo, the pom may flatten, and the front face may not recover quickly. That is not a decoration failure, but buyers experience it as one. Clean folding, reasonable carton fill, and proper bagging all protect the placement work.
Here are the issues that usually create the most trouble:
- Logo too high, so it disappears into the fold.
- Logo too wide, so it crowds the cuff edges.
- Artwork too detailed for embroidery at the chosen size.
- Placement chosen without a physical sample.
- No packaging spec, so the logo is hidden on arrival.
One more subtle mistake is mixing visual goals. If the buyer wants a premium retail look, a giant front print is usually the wrong answer. If the goal is event visibility, a tiny side label may be too understated. The correct placement depends on what the beanie is supposed to do in the real world, not just what looks clean in a render.
Next Steps: Specs to Send Before You Request a Quote
If you want a useful quote, send a spec that answers the production questions before they are asked. The more clearly you describe the logo placement, the less likely you are to receive a vague estimate that changes later.
At minimum, include the beanie style, cuff type, pom type, logo file, target decoration method, approximate placement area, and packaging requirement. If the supplier knows whether the beanies are for retail, teamwear, or giveaways, they can usually suggest a better placement range from the start.
A good spec packet often includes:
- Artwork in vector format if available.
- Preferred logo width or height range.
- Placement preference, such as center front or off-center cuff.
- Decoration method preference, such as embroidery, patch, or woven label.
- Packaging preference, such as individual polybag, folded retail presentation, or bulk carton.
- Target quantity and color count.
If you do not know the exact placement yet, that is okay. A good supplier can often recommend a range based on cuff depth and artwork shape. Just make sure the quote reflects the possibility of sample revisions, because that is where most beanie placement decisions are actually finalized.
When packaging is part of the requirement, ask how the beanies will be folded and how the logo will face inside the bag or carton. That one detail can change whether the product looks polished when opened. For many brands, that is the difference between a decent hat and one that feels retail-ready from the first touch.
FAQs
What is the safest logo placement for a pom pom beanie?
Usually center front on the cuff, because it gives the clearest visibility and the most consistent alignment. That said, a small off-center patch can look more premium if the brand wants a subtler finish.
How big should the logo be?
It depends on cuff height, artwork type, and decoration method. Many buyers start around 1.5 to 3 inches wide for front logos, then adjust after sampling.
Is embroidery or a patch better?
Embroidery is often better for simple marks and lower cost. Patches are usually better for texture, sharper detail, or a more elevated retail look.
Can the pom change logo placement?
Yes. A large pom can shift visual attention upward, so the logo may need a bit more breathing room to avoid feeling crowded.
Should packaging be decided before sampling?
Yes, if possible. Folding style, bagging, and retail presentation can change how the logo is seen, so they should be considered together.
What should I ask for in a first sample?
Ask for the exact logo size, measured offset, decoration method, and the finished packed presentation. That makes it easier to confirm that the placement works in real use.
How do I know if the placement is too high?
If the logo starts to disappear into the fold when the cuff is worn normally, it is probably too high. A sample viewed on a head form or worn by a person is the best check.
Will a woven label work on a stretchy beanie?
Usually yes, if it is sewn securely and sized appropriately. Woven labels are often a good option for small branding because they hold fine detail well.
What is the best way to keep bulk orders consistent?
Use a written placement spec, approved sample, and clear folding and packaging instructions. Consistency usually comes from process, not just from artwork quality.


