Get Logo Patches Unit Cost for Ceramic Studios Quoted
Your Studio Apron Is Already Advertising. Is It Doing a Good Job?
Logo Patches Unit Cost for ceramic studios matters because every apron, tote, clay bag, tool roll, staff jacket, and workshop beanie is already carrying your brand. Planned or not.
Studios will spend carefully on signage, glaze displays, shelf styling, product photography, and those pleasing little handwritten price cards. Then the person answering customer questions is wearing a blank apron that looks like it came from three jobs ago. Charming, possibly. Strategic, no.
Logo patches clean up that gap without forcing a studio to buy fully custom garments in every size, color, and cut. One patch program can cover staff aprons, workshop totes, retail merch, wholesale sample bags, tool pouches, and event gear. That flexibility is useful for ceramic studios because inventory has a way of breeding in closets: extra small aprons nobody wears, tote colors that sold poorly, hats ordered for a winter market that happened during freakishly warm weather.
Ceramics are rough on branding. Clay dust grinds into fibers. Water hits everything. Aprons get washed hard. Glaze splatter has no respect for a premium aesthetic. Kiln rooms add heat, shelves scrape fabric, and weak printed labels can look tired after a short life.
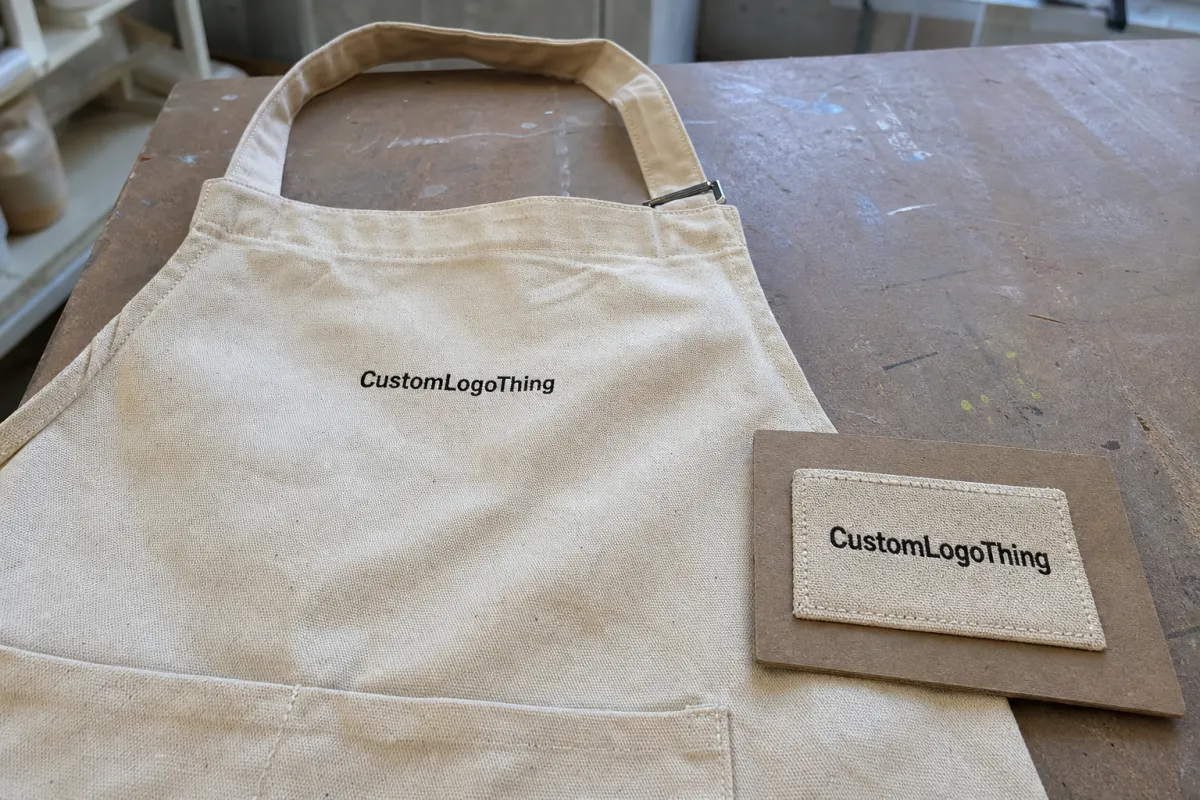
A well-specified woven, embroidered, printed, leatherette, or PVC patch can hold up better than a thin tag added as an afterthought. It also gives the studio a more finished look: easier staff identification, stronger retail presentation, and better perceived value on giftable items. A canvas tote with a centered woven patch feels intentional. A maker apron with a clean chest patch reads as studio gear, not borrowed catering supplies.
Common uses include denim jackets, canvas totes, clay tool pouches, beanies, wholesale sample bags, workshop swag, staff uniforms, market aprons, and limited-run merch drops. The real cost depends on patch type, size, stitch density, backing, quantity, and whether the job needs daily workwear durability or boutique retail polish.
Patch Styles That Actually Work for Clay, Aprons, and Merch
Not every patch style belongs on a clay-stained apron. Some are built for detail. Some are built for texture. A few look excellent in a mockup and odd once they meet real fabric.
Woven patches
Woven patches are often the best first option for detailed ceramic studio logos, small type, maker marks, kiln icons, fine-line pottery wheels, and clean geometric branding. The threads are woven tighter than standard embroidery, so thin lines reproduce with less distortion. If the mark includes a small bowl outline, location name, stamp-style symbol, or delicate monogram, woven should be in the quote set.
They also sit flatter than embroidered patches. That can be useful on aprons and tote bags where a raised surface may snag or collect clay dust. The tradeoff: woven patches can feel less “handmade” than embroidery if the art is extremely simple.
Embroidered patches
Embroidered patches work well for bold logos, initials, simple stamps, pottery wheel graphics, and designs that benefit from raised texture. They have that familiar tactile quality people associate with uniforms, clubs, shops, and workwear.
A 3-inch embroidered chest patch on a heavy canvas apron can look excellent. A 1.5-inch embroidered patch with six words, tiny wheel spokes, and a town name tucked under a bowl? That is how thread becomes spaghetti. Embroidery needs room to breathe.
Printed and sublimated patches
Printed patches and sublimated fabric patches make sense for watercolor logos, glaze gradients, painterly marks, full-color illustrations, and art that thread cannot reproduce cleanly. If the brand identity depends on soft color shifts or a speckled glaze reference, printing may protect the artwork better than forcing it into thread.
The caveat is surface feel. Printed patches usually do not have the same dimensional look as woven or embroidered options. They can be visually accurate but less textural, which may or may not fit the studio’s merch plan.
Leatherette and PVC patches
Leatherette patches feel elevated on premium aprons, tool rolls, hats, notebooks, and retail merch. They can be debossed, laser-etched, or printed depending on the finish. They also pair well with neutral canvas, denim, and waxed-looking fabrics.
Wash routine is the catch. If the apron will go through heavy laundry every week, confirm the material and care instructions before committing. A leatherette patch may be perfect for retail tool rolls and questionable for clay-saturated production aprons.
PVC patches are durable, flexible, and water-resistant. They can be effective for modern, industrial, or outdoor-adjacent studio identities. For earthy handmade ceramic branding, PVC can skew a little tactical. Not wrong. Just specific.
Direct warning: tiny type, thin pottery wheel spokes, delicate line art, and maker marks copied straight from a clay stamp can wreck a patch. Simplify before quoting unless you enjoy paying for disappointment.
If the patch has to survive daily studio work, prioritize washability, abrasion resistance, secure attachment, and edge durability. If it is for retail merch, prioritize color, texture, finish, and how it feels in the customer’s hand. Those are different jobs. Quote them that way.
Specifications to Lock Before You Ask for a Patch Quote
A patch quote without specs is not a quote. It is a guessing contest with a PDF attached.
Before asking for logo patches unit cost for ceramic studios, lock the basics: size, shape, material, colors, border, backing, attachment method, intended garment, quantity, deadline, and shipping location. The more complete the request, the less padding a supplier has to build into assumptions.
Size is the first cost driver many buyers underestimate. For beanies, sleeve marks, or small tool-roll labels, 1.5 to 2 inches is common. For apron chest logos, jacket fronts, and staff uniforms, 2.5 to 3.5 inches usually reads better. For tote bags, jacket backs, or statement merch pieces, 4 to 5 inches can work, but material use and production time climb.
Shape matters too. Circles, rectangles, squares, and ovals are efficient. Custom contour shapes look more branded and less generic. Very jagged silhouettes, thin protrusions, and awkward negative spaces can increase cost or create weak edges. If the outline looks like a kiln explosion, expect production questions.
Border choice affects durability as much as style. Merrowed borders give a classic patch edge and work best on simple shapes such as circles, rectangles, ovals, and shields. Laser-cut or heat-cut borders suit custom contours. Satin stitch borders create a cleaner garment-label feel, especially on woven patches.
Backing is not decoration. Sew-on backing is the most reliable option for aprons, jackets, tool rolls, and high-wash uniforms. Iron-on backing is convenient for lighter use, but heat, wash cycles, and fabric texture affect performance. Hook-and-loop backing works for removable instructor roles or rotating staff badges. Adhesive backing is best for temporary positioning before sewing. It is not a long-term plan; asking pressure-sensitive adhesive to carry your entire brand reputation is optimistic in the wrong direction.
Color count should be realistic. Fewer colors often mean cleaner production and lower unit cost. Thread colors will approximate a palette but may not match glaze tones, web colors, or packaging inks exactly. Complicated gradients usually push the project toward printed or sublimated patches.
Artwork should be vector whenever possible: AI, EPS, SVG, or a clean PDF. High-resolution PNG files can work for initial review. Photos of clay stamps, signage, or packaging may need redraw work. Maker stamps are especially tricky because marks that look beautiful pressed into clay can become fuzzy thread noodles at 2 inches wide.
Match the spec to the item. Aprons and totes need abrasion resistance. Gift merch may justify softer hand-feel, refined borders, and more color nuance. That single decision can move the quote more than people expect.
Logo Patches Unit Cost for Ceramic Studios: Real Pricing Factors
Logo Patches Unit Cost for ceramic studios is mostly shaped by quantity, patch style, size, color count, backing, edge finish, artwork complexity, and whether setup charges are included or listed separately. No mystery ritual. Just production math.
For basic woven or embroidered patches at moderate quantities, buyers often see low single-digit pricing per piece. As a working range, a simple 2.5-inch woven or embroidered patch may land around $1.20 to $3.50 per unit at 250 to 500 pieces, depending on construction and finish. Smaller premium runs, leatherette patches, PVC patches, complex printed patches, specialty backings, or large 5-inch pieces can move higher, sometimes $3.50 to $8.00 or more per unit for lower-volume custom work.
Those ranges are not promises. They are useful guardrails. Freight, sampling, rush service, packaging, and artwork cleanup can change the final number.
Quantity changes almost everything. Ordering 50 pieces usually costs much more per patch than ordering 250, 500, or 1,000 because digitizing, proofing, machine setup, color planning, and production prep are spread across fewer units. Many custom patch orders start around 50 to 100 pieces, with better price breaks at 250, 500, and above.
Ask how setup is handled. Embroidery digitizing, woven setup, PVC mold work, printed proofing, sampling, and color matching may appear as separate tooling fees or be folded into the per-unit price. Ask directly. Assuming is how budgets go feral.
Total landed cost matters more than the prettiest number in an email. Freight, rush service, sample fees, individual bags, hang cards, barcode labels, and split shipments can change the real cost per piece. If the patches need to be packed individually for retail resale, say that early. If they need to arrive before a market weekend, say that before production starts, not after.
| Quantity | Patch Type | Typical Use | Main Cost Drivers | Best-Fit Studio Scenario |
|---|---|---|---|---|
| 50-100 pcs | Woven or embroidered | Small staff run, trial merch | Setup charges spread across fewer pieces | Testing a new logo patch before scaling |
| 250 pcs | Woven, embroidered, printed | Aprons, totes, class gear | Size, colors, backing, border | Good balance of flexibility and unit cost |
| 500 pcs | Woven or embroidered | Retail merch and staff gear | Artwork detail, attachment method | Studios using patches across multiple items |
| 1,000+ pcs | Any scalable style | Wholesale, events, recurring merch | Freight, packing, QC requirements | Established studios with repeat demand |
| 100-500 pcs | Leatherette or PVC | Premium hats, tool rolls, modern merch | Material, mold/setup, finish, size | Higher retail price or branded workwear upgrade |
Quote by use case. Daily studio aprons need durable value: usually woven or embroidered, sewn down, with a clean border. Retail merch can justify a higher patch cost if it raises perceived retail price. That is sensible math, not hype.
Production Process and Timeline from Artwork to Finished Patches
A clean patch order follows a basic path: send artwork and specs, receive quote, approve digital proof, approve sample if needed, move into production, complete quality control, then ship. Skip steps and the invoice may stay low, but the risk goes up.
Quoting can take 1 to 2 business days when the buyer provides complete specs. If the request says “we need patches, how much?” with no size, quantity, material, or deadline, the first reply will be questions. Not because anyone enjoys inbox tennis. Because production needs facts.
Proofing often takes a few business days, depending on artwork cleanup and revisions. Production commonly takes a couple of weeks after proof approval, though quantity, patch style, custom shapes, specialty backing, and current production load can push that longer. Rush timelines may be possible. They are not magic.
If your studio has a market, class launch, gallery opening, wholesale show, or holiday merch drop, start earlier than feels necessary. The patch still has to be set up, produced, inspected, packed, shipped, and applied to the garment or product. Physics remains annoying.
The proofing stage is where cheap mistakes should die. Check logo proportions, thread colors, border thickness, text legibility, backing type, and final size. Print the proof at actual size if possible. A logo that looks readable on a 27-inch monitor can fail hard at 2 inches wide.
Sampling is recommended for larger orders, premium apron programs, retail merch, or logos with small type and detailed maker marks. A physical sample lets you check stiffness, color, edge finish, and how the patch behaves on the actual garment. For broader packaging and fulfillment planning, resources from ISTA are useful when brands want more formal shipping and handling expectations.
Shipping planning also matters. Account for freight time, customs if applicable, and in-house sewing or heat application before launch. If 200 aprons need patches sewn on, that is labor, not a footnote. Build it into the calendar.
Order a small overage. Five to ten percent extra is common for programs that may need replacements, samples, photoshoots, or late staff additions. Reordering ten missing patches later can be more expensive and more irritating than adding overage to the original run.
Common Buying Mistakes That Make Studio Patches Cost More
The fastest way to raise patch costs is to quote with messy information. A rough screenshot from a social profile is not production art. It is a conversation starter, at best.
Small text is the classic ceramic studio problem. Maker signatures, town names, clay body references, kiln symbols, and fine stamp details often look fantastic on packaging or impressed clay. On a 2-inch embroidered patch, they can turn into lint. Woven patches can hold more detail, but they are not sorcery. Simplify early.
Over-customization is another budget killer. Odd shapes, too many colors, oversized patches, specialty backing, low quantities, metallic threads, individual retail cards, and rush freight all stack. None of those choices are wrong by themselves. Together, they can take a patch from practical branding to “why is this tiny thing so expensive?” territory.
The cheapest patch is not always the cheapest outcome. If it curls, frays, bleeds color, peels off, or looks exhausted after three washes, the low unit cost did not save money. It moved the cost into replacement, embarrassment, and extra labor.
Using one patch for every application can also backfire. A 4-inch tote patch may be too stiff for a beanie and too large for an apron chest. A leatherette hat patch may not tolerate heavy washing on clay aprons. A printed retail patch may look beautiful but lack the texture you wanted for maker uniforms. Match the construction to the job instead of forcing one compromise patch to disappoint everywhere.
Attachment choices deserve more respect than they get. Iron-on backing is convenient, yes. For high-wash workwear, sewing is usually smarter. Clay studio aprons are not delicate little tea towels. They get dragged through wet clay, countertops, shelves, buckets, and laundry.
Color mismatch can create drama too. Thread colors and printed colors will not always match glaze tones, website colors, or packaging exactly. Ask for closest matches and review proofs carefully. If the brand depends on a very specific cobalt blue or speckled glaze reference, say so before production.
Better buying method: order by program. Staff workwear patches, retail merch patches, and limited-edition event patches may need different specs. That keeps each patch useful instead of making one design carry too many conflicting requirements.
How Custom Logo Things Handles Practical Patch Orders
Custom Logo Things is built for buyers who want clear specs, realistic pricing, and fewer vague answers. The point is not to make patches sound miraculous. The point is to make the studio look more intentional and make the order easier to buy.
The team can help narrow the style before quoting: woven versus embroidered, printed versus leatherette, sew-on versus iron-on, merrowed versus laser-cut, 100 pieces versus 250 pieces. Those comparisons matter because they change both appearance and Logo Patches Unit Cost for ceramic studios.
Artwork review is a practical part of the process. Before production, artwork can be checked for stitchability, legibility, color count, scale, and border risk. Bad production art should be caught before it reaches the machine. Nobody needs a pottery wheel icon that looks like a spider wearing a hat.
Quote structure should make decisions easier. A useful quote might compare a 3-inch woven sew-on patch at 100, 250, and 500 pieces against a 3-inch embroidered version at the same quantities. That lets the studio see where price breaks happen instead of staring at one vague number and hoping it means something.
Brand consistency matters too. Patches often sit next to hang tags, stickers, tissue, bags, labels, shipping boxes, thank-you cards, and retail displays. If the patch looks premium but the packaging feels unrelated, the brand experience gets messy. For material and sourcing conversations around paper-based packaging, FSC is a useful reference point for responsible forestry certification.
Quality control should check borders, backing, color consistency, shape accuracy, surface finish, and overall construction. A ceramic studio’s handmade reputation is valuable. A cheap-looking patch can undercut it fast.
Send photos of the actual apron, tote, hat, jacket, or pouch if you have them. Recommendations based on real fabric, placement, washing needs, and use case are better than guesses. Shocking, I know.
What to Send for a Fast, Accurate Patch Quote
If you want a fast quote, send complete information upfront. Not perfect information. Complete enough to price properly.
- Logo file: AI, EPS, SVG, or vector PDF preferred; high-resolution PNG accepted for initial review.
- Preferred patch size: include width and height, such as 3 inches wide by 2 inches tall.
- Quantity targets: ask for two or three breaks, such as 100, 250, and 500 pieces.
- Intended use: aprons, totes, hats, jackets, tool rolls, retail add-ons, or wholesale packaging.
- Backing preference: sew-on, iron-on, hook-and-loop, adhesive positioning, or unsure.
- Deadline: include the date patches need to be in hand, not just the event date.
- Shipping destination: city, state, country, and whether split shipment is needed.
- Budget target: if there is a hard ceiling, say it. It saves everyone time.
Photos help. If the patch will be sewn onto a 12 oz cotton canvas apron, say that. If it will be heat-pressed onto tote bags, mention fabric content and whether the totes are already purchased. If patches will be packed loose as merch add-ons, ask about individual bags, cards, or barcode labels.
Wash and wear conditions matter. Daily clay work is different from occasional event use. Retail resale is different from staff uniforms. Wholesale packaging is different from beanies. Give those details so the recommendation matches reality.
Ask for one practical alternative. If your preferred patch style is expensive, request a second option that keeps the look but reduces cost. For example, a woven patch may replace embroidery for small detail, or a simpler border may reduce production complexity. That is how smart buyers control patch budgets without making the finished piece look cheap.
The cleanest path to an accurate quote is simple: production-ready artwork, realistic quantities, clear use case, and a deadline based on the day patches must arrive. Send that, and the quote can compare usable options instead of dropping one lonely number into your inbox.
FAQ
What affects logo patch unit cost for ceramic studio aprons the most?
Quantity, patch size, patch type, backing, edge finish, and artwork complexity have the biggest impact. Small orders cost more per patch because setup and proofing are spread across fewer units. For daily studio aprons, sew-on woven or embroidered patches are usually a smarter durability choice than chasing the absolute cheapest option.
What MOQ should a ceramic studio expect for custom logo patches?
Many custom patch orders start around 50 to 100 pieces, depending on material and construction. Better price breaks often appear at 250, 500, and higher quantities. If the studio uses patches for aprons, totes, and merch, combining needs into one order can lower the unit cost.
Are embroidered or woven logo patches better for ceramic studios?
Woven patches are better for small type, thin lines, and detailed maker marks. Embroidered patches are better for bold logos, simple symbols, and a textured handmade feel. If the logo has gradients, watercolor effects, or complex glaze-inspired colors, printed patches may be the better fit.
How long does production take for custom studio logo patches?
A typical order includes quoting, proofing, optional sampling, production, quality control, and shipping. Simple orders can move faster, while complex shapes, specialty materials, samples, or large quantities add time. Studios should plan ahead for markets, workshops, gallery events, and merch launches instead of treating rush production like a personality trait.
Can logo patches be used on both ceramic studio uniforms and retail merch?
Yes, but the same patch may not be ideal for every item. Aprons and tool rolls need durability and secure attachment, while tote bags, hats, and retail merch may prioritize feel, color, and presentation. For mixed use, ask for recommendations by application before ordering one patch style for everything.


