Ordering custom beer packaging sounds simple until the first pouch lands on the table. The artwork may be correct, the dimensions may match the spec, and the zipper may even work, yet the pack still feels wrong in hand. Frosted film does that. It softens light, changes contrast, and makes every design choice feel more deliberate, which means the beer Frosted Zipper Bags physical sample checklist is not a formality. It is the fastest way to catch the small problems that become expensive once production starts.
That is especially true for beer-adjacent packaging, where buyers usually want more than a container. They want shelf presence, a premium tactile impression, and a closure that suggests the contents are protected. A physical sample is where that promise gets tested against reality. Screens cannot show you how matte film reads under fluorescent lighting. PDFs cannot tell you whether a zipper closes with a crisp, even pressure. And a quote sheet certainly does not reveal whether the seal line looks clean once the bag is filled.
The goal is not perfection for its own sake. The goal is a pack that looks intentional, performs the way the buyer expects, and does not introduce avoidable friction during packing, shipping, or retail handling.
Why frosted beer zipper bags look different on a sample table
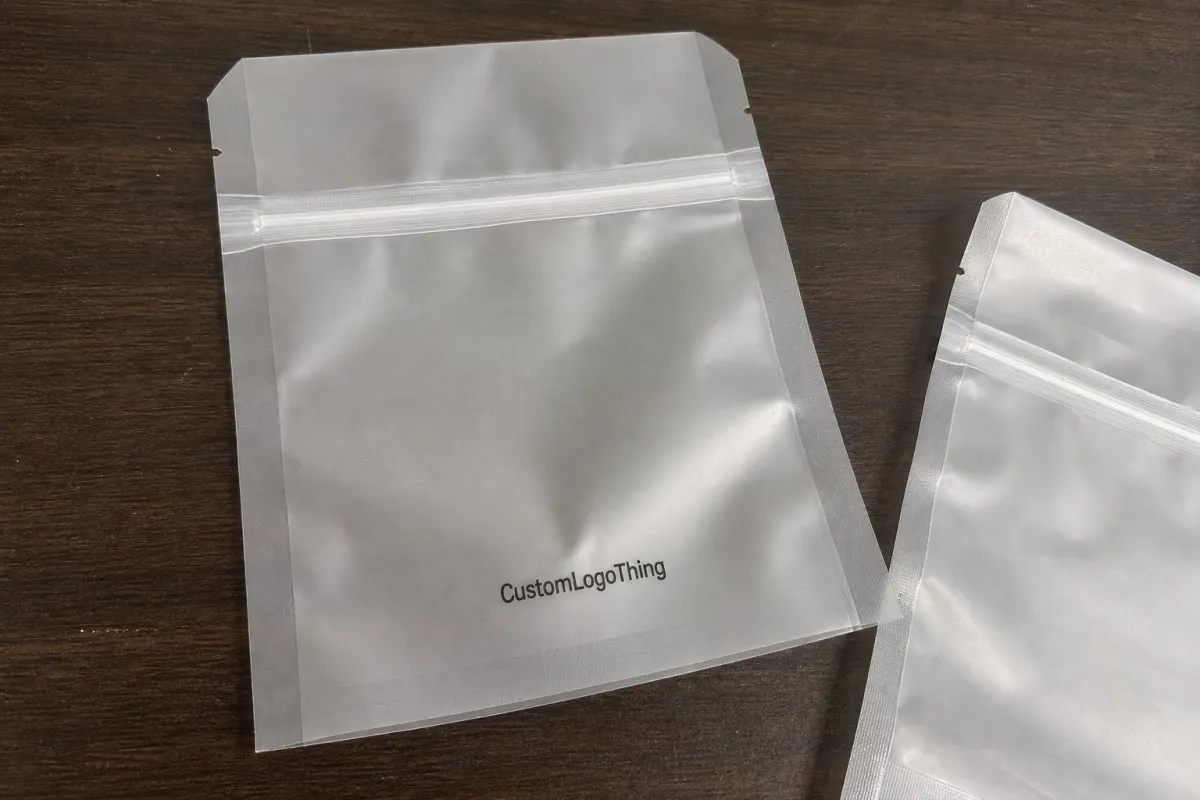
Frosted film behaves differently from clear film the moment it meets light. It diffuses reflections, cuts glare, and gives the package a restrained, higher-end look, but it also lowers visual contrast. A logo that feels bold on a monitor can look quieter on frosted polyethylene or laminated film, particularly if the artwork depends on thin strokes, pale colors, or delicate gradients.
That visual shift matters because packaging is judged quickly. In a retail setting, buyers and consumers scan a shelf from a few feet away. If the artwork does not hold up at that distance, the pack loses impact even if it looks polished in a design file. Frosted surfaces can hide scuffs better than glossy ones, which is useful during shipping and handling, but they can also mute a weak palette. Some brands want that softer effect; others discover too late that the bag reads muddy instead of premium.
There is a second issue: the sample table is usually a controlled environment, while real use is not. Bright lights, warm bulbs, fingerprints, and stacking pressure all change how the pouch appears. A buyer evaluating frosted beer zipper bags needs to see the object under neutral light, then again under the light it will actually live under. A design that looks calm and expensive in daylight may look flat under a warehouse lamp. The reverse happens too: a high-contrast layout can appear harsh once the frosted surface starts scattering light.
“A frosted bag can look elegant in a file and flat in hand, or the other way around. The sample is where you find out which one you actually ordered.”
That is why the physical review matters more than a verbal approval. You are not just confirming appearance. You are checking whether the bag communicates the right price point, whether the finish supports the brand position, and whether the structure feels appropriate for the product it is meant to carry.
How the frosted film, zipper, and seal work together
A good zipper pouch is a system. The frosted film gives the visual effect and part of the barrier. The zipper controls access and resealability. The heat seals hold the structure together. If the pouch is a stand-up format or includes a gusset, the base shape changes how it fills, how it sits on a shelf, and how stress is distributed once contents are inside.
Film gauge is one of the first specs to review. A thinner film can feel more flexible and cost less, but it may wrinkle easily and make the zipper area feel less stable. A heavier film usually adds stiffness and a more substantial hand feel, though it can increase unit cost and sometimes make the pouch feel unnecessarily rigid for a small promotional pack. For beer-related sample kits, dry goods, branded merchandise, or accessory packs, the right gauge depends on fill weight, display expectations, and how often the bag will be opened and closed.
Barrier performance should be discussed in practical terms. The bag should help resist moisture, limit odor transfer, and close securely enough that the contents do not feel exposed. That does not mean every pack needs the highest possible barrier structure. It does mean the buyer should know what the bag is protecting against and how long it needs to perform. A pouch that holds a one-time event kit has different requirements from one that may sit in storage or travel through multiple distribution points.
The closure deserves special attention because it often becomes the deciding factor in user satisfaction. A zipper that is hard to line up frustrates people. One that closes too easily can feel loose or unreliable. The best sample testing reveals the middle ground: smooth engagement, even tension from end to end, and no weak spot at the corners. If the zipper feels inconsistent, that is not a minor detail. It is a warning sign that the final run may produce the same complaint repeatedly.
For packaging validation and shipping stress, teams often refer to ISTA methods, then cross-check expectations with trade resources from organizations such as the Packaging School and other industry bodies. The point is not to turn a pouch into a lab project. The point is to make sure the sample reflects real handling conditions rather than a best-case presentation on a desk.
Beer frosted zipper bags physical sample checklist: what to inspect
Start with dimensions. Confirm the overall width, height, gusset depth if one is specified, and the usable fill area below the zipper. A pouch can match the nominal size and still feel wrong if the closure steals too much usable space or the artwork sits too close to the seal. If the package is intended for a defined kit or retail quantity, test it at that actual fill weight rather than empty on a table.
Next, inspect print placement and color under neutral light. Frosted film softens contrast, so type size, logo placement, and solid fills need to be checked from both close range and a few steps back. Fine type should remain legible. Dark solids should stay solid instead of looking washed out. White areas should look clean rather than gray. If registration between layers or colors matters, this is where a physical proof earns its keep.
The zipper should have its own review. Open it, close it, and repeat the cycle several times. You are checking for smooth engagement, even pressure across the length, and whether both ends seat fully. If the zipper requires too much force, it becomes annoying. If it closes with almost no resistance, it may feel unreliable. Either problem can hurt confidence long before the product reaches the shelf.
Then look closely at the edges. Seal wrinkles, haze, curled corners, pinholes, or uneven side seals are all small defects that tend to become big complaints later. A good sample checklist turns those observations into decisions. A weak one turns them into vague comments that no one can act on. Record pass or fail beside each item, and note the reason. That is what makes the review usable during revisions and production sign-off.
- Dimensions: verify width, height, gusset, and usable fill space.
- Print: check placement, scale, contrast, and color under neutral light.
- Zipper: test close force, reclose feel, and end-to-end engagement.
- Seal quality: inspect alignment, wrinkles, and edge consistency.
- Surface finish: note haze, scuffing, stiffness, and dull patches.
| Sample type | Typical cost | Typical timing | Best use | Watch-outs |
|---|---|---|---|---|
| Evaluation sample | $35-$120 plus freight | 3-7 business days | Early fit and look check | May not match full production details |
| Pre-production sample | $75-$220 plus freight | 5-10 business days | Artwork, zipper, and seal approval | Often includes setup charges |
| Production-approved sample | $100-$300 plus freight | 7-15 business days | Final sign-off before the run | Should match the final spec as closely as possible |
The table above is only a starting point. A simple pouch with standard print and a common zipper will sit at the lower end of those ranges. Specialty film, multi-color artwork, custom sizing, or a rush request will move the number quickly. If you want the review to hold up later, write the observations down while the bag is in front of you. Memory is a weak approval system.
Cost, MOQ, and quote drivers for custom sample runs
Sample pricing usually comes down to a small set of variables, and they are fairly predictable. Size is the first one because larger formats use more film and more press time. Film gauge follows, since heavier material costs more and can require different handling. Zipper style matters too. A standard press-to-close zipper is usually simpler than a specialty closure, and features like tear notches, hang holes, or reinforced bottoms can add cost one by one.
Print method is another major driver. A single-color logo is not the same as a full-coverage multi-color build. Special inks, matte or soft-touch finishes, and high-coverage artwork can push the quote up fast. Buyers sometimes underestimate how expensive revisions become. Every artwork change can trigger a new proof, additional setup, or another sample. A precise brief is cheaper than a vague request that generates three rounds of questions.
MOQ also changes the economics. Small sample orders often have higher unit costs because the setup expense is spread across fewer pieces. That does not make small orders a bad idea. It means they should be treated as a deliberate evaluation step with a clear purpose. If the sample is only there to check appearance and function, keep the order focused. If it is being used for final approval, make sure it represents the actual production build as closely as possible.
A practical quote should explain what is included and what is not. Ask whether the sample is evaluation-only, pre-production, or production-approved. Those labels matter. A low quote can hide a rough sample that does not answer real questions. A higher quote may save money by preventing rework, especially if the project has a fixed launch date or a retailer review window.
- Lower cost: standard size, one- or two-color print, common zipper, no special finish.
- Mid-range cost: custom size, full-color print, tighter color control, branded closure details.
- Higher cost: large format, specialty film, premium print coverage, rush turnaround, extra revisions.
One more caution: minimum order quantities are not just a production issue. They also affect how much room you have to test and revise. A low MOQ can be useful for early approval, but if it is too low to reflect the final process, the resulting sample may hide the very issues you need to catch.
Process, timeline, and approval steps from proof to handoff
The cleanest sample process usually follows a simple sequence. Send the final dimensions, artwork files, target fill weight, and notes on zipper or finish. Review the proof carefully before anyone cuts material or prints. Then the physical sample gets built, packed, and shipped for inspection. The last step is written sign-off based on criteria, not a quick visual nod from across the table.
Most delays come from incomplete requests. Missing dielines, undecided color values, vague zipper descriptions, or unclear artwork placement all create extra back-and-forth. That adds days, sometimes more than the build itself. If the sample is tied to a launch meeting, a retailer presentation, or an internal approval deadline, shipping time matters as much as production time. A rushed freight option can be worth more than a cheaper, slower one if it protects the schedule.
Approval works better when it is broken into parts. Approve structure first, then print, then closure function. Trying to approve everything at once makes it easy to miss a weak spot. A pouch may look strong but fail the handling test. Another may close well but have art sitting too high against the seal line. Separate the questions and the decision gets cleaner.
Typical timing, once the request is complete, often lands in this range:
- Proof review: 1-3 business days.
- Sample production: 3-10 business days, depending on complexity.
- Transit: 2-7 business days, depending on carrier and destination.
- Final internal approval: same day to several days, depending on how many people need to sign off.
That may sound tidy on paper, but handoff is where projects slow down. The designer is looking at artwork balance, purchasing is watching cost and lead time, and operations is checking fill behavior and pack-out speed. Those priorities do not always line up. A structured review helps everyone compare the same object with fewer assumptions.
Common mistakes that make samples look better or worse than production
One of the biggest mistakes is judging the sample from phone photos alone. Frosted film is sensitive to light, and warm indoor bulbs can make the surface look creamier or flatter than it really is. If the only review happens on a screen, the team may approve a look that changes the moment the pouch reaches a brighter retail space or a colder warehouse.
Another common error is approving the bag empty and never testing it filled. Once the contents go in, the shape shifts, the zipper sits differently, and the seal area takes more stress. A pack that feels fine empty can become awkward once it is carrying real weight. That is especially true for stand-up or gusseted formats, where the base and side panels start working as soon as the bag is loaded.
Side-by-side comparison helps more than most teams expect. Put the sample next to a known reference pack, ideally one that has already performed well in market. That makes it easier to spot differences in print density, opacity, stiffness, and surface sheen. Those details often disappear when you are staring at a single pouch by itself.
Do not ignore small defects because the bag is “close enough.” Curled edges, tiny wrinkles near the zipper, uneven seals, or a scuffed panel can all point to a repeatable production issue. If a defect shows up once in a sample, it can show up again in a full run unless the cause is addressed now. The cheapest mistake is the one discovered before the order is released.
“The goal is not to find a perfect sample. The goal is to find the problems while they are still cheap.”
That is especially true for custom logo packaging, where surface quality and presentation carry real brand weight. A sample that looks merely acceptable should not be approved just because it is close to the target. Close is not the same as ready.
Expert tips for testing seal, shelf feel, and customer handling
Test the bag the way people will actually touch it. Open it, close it, stack it with other units, restock it, and move it from one surface to another. If a customer or retail staff member has to pinch the corners to get it open, that is not a cosmetic issue. It is a usability issue, and usability changes perception fast.
A simple stress check can reveal more than a polished photo ever will. Open and close the zipper repeatedly. Look for wear at the corners. Rub the face lightly with a clean cloth to see whether the finish marks easily. If the frosted surface shows shiny rub spots too quickly, that may matter in shipping, storage, or handling at the point of sale.
Compare the frosted version against a clear bag before making the final call. Clear film gives more visibility, but frosted film often looks more premium and hides handling marks better. The right choice depends on whether the brand wants product visibility or a more curated presentation. There is no universal winner. The point is to match the structure to the job.
It also helps to gather notes from everyone who touches the sample. Designers notice visual balance. Purchasing teams focus on cost and lead time. Operations cares about closure function and pack-out speed. Those viewpoints can disagree, but they uncover different risks. A sample that survives all three is usually the one worth approving.
- Designer focus: logo scale, contrast, and visual balance.
- Purchasing focus: cost, MOQ, and supplier responsiveness.
- Operations focus: closure function, fill efficiency, and handling.
A useful final check is to ask whether the bag still feels appropriate after 30 seconds of handling. A lot of weak packaging looks fine in the first five. The problems show up after the second close, the first stack, or the first time someone sets it under harsh light and steps back.
Next steps to lock in a reliable physical sample
If you want the next round to go smoothly, gather the essentials before you request anything: final dimensions, artwork files, target fill weight, finish notes, and a short approval list. The more complete the request, the more useful the sample will be. It also makes quoting easier because the supplier can see what is fixed and what still needs confirmation.
Ask for a sample that sits as close to production as possible. Then document any acceptable differences, such as a temporary print method or a non-final zipper color, so nobody confuses a development sample with the finished article. That distinction matters. Many approval problems start when teams forget which version they are actually looking at.
I also recommend creating one final pass-fail sheet that everyone uses. Keep it simple: structure, zipper feel, print quality, surface appearance, and fill behavior. If the sample passes, note who approved it and what was approved. If it fails, write down why. That paper trail saves time later when revisions start getting compared with the first version.
Before you place the order, revisit the beer frosted zipper bags physical sample checklist and make sure every note points to a decision, a revision, or a production approval. That is the real value of the checklist: it keeps the project grounded in practical packaging details, where the difference between “looks nice” and “works well” is often only a few millimeters and one honest zipper test.
What should a beer frosted zipper bags physical sample checklist include?
Dimension checks, zipper feel, seal quality, print placement, and surface finish should all be on the list. Add a real-fill test so the bag is judged in the same shape and weight it will have in production. Include pass-fail notes for color, stiffness, and handling so the checklist supports an actual approval decision.
How long does a frosted zipper bag sample usually take?
Timelines depend on artwork readiness, proof turnaround, and whether the bag uses standard or custom materials. Production time and shipping time both matter, so the total can stretch if revisions are needed after the first proof. A clean, complete request usually moves faster than a vague one with missing dimensions or undecided print details.
What affects the price most on a custom beer sample bag?
Bag size, film thickness, zipper type, and print complexity usually move the quote the most. Small sample orders can carry a higher unit cost because setup is spread across fewer bags. Rush timing, extra revisions, and special finishes can add cost even when the bag structure stays simple.
Can I approve the design from a digital proof alone?
A digital proof is useful for layout, but it cannot fully show frosted texture, zipper feel, or sealing performance. Physical samples are better for judging opacity, scuff resistance, and how the art reads on the actual film. Use the proof for artwork approval, then use the sample for structure and handling approval.
What if the zipper feels different on the sample than expected?
Compare it against the intended closure spec and test it through several open-close cycles. Ask whether the difference is caused by the sample build, the film gauge, or the zipper style selected. If the feel changes usability, flag it before production so the closure can be corrected or re-specified.

