What an Embroidered Baseball Caps Material and Sizing Guide Actually Solves
Two caps can look almost identical on a supplier page. One arrives with a crisp crown, clean stitching, and a retail-ready feel; the other collapses after a week because nobody specified fabric weight, backing, crown structure, or closure quality. This Embroidered Baseball Caps Material and Sizing guide helps buyers turn vague product listings into production-ready decisions before money, logos, and deadlines are at risk.
Caps are harder to standardize than many promotional items. A corrugated cardboard mailer can be measured with calipers, tested under an ISTA protocol, and stacked in a fairly predictable way. A cap sits on a human head, which means comfort and fit are not abstract details. Embroidery adds stiffness. Curved front panels distort artwork. A low-profile dad cap and a structured snapback may both be called “baseball caps,” yet they behave like different products.
That is the real buyer problem. Not style. Risk control. Poor material selection can make a logo look cheap, create pressure points on the forehead, reduce actual wear rate, and complicate future reorders. If the same company orders 500 caps now and 2,000 more six months later, the difference between “navy cotton cap” and “6-panel structured cotton twill, mid-profile, metal buckle, Pantone-matched navy thread” becomes expensive.
From a packaging buyer’s point of view, caps deserve the same discipline as a printed carton spec. You need a substrate, decoration method, color target, tolerance, quantity, packing method, and approval process. The core decisions are fabric, crown structure, profile, sizing method, closure, stitch count, order quantity, proofing, production timeline, and final QC checks. Miss one, and the cap may still ship. It just may not get worn.
How Cap Materials Change Embroidery Quality, Comfort, and Durability
Material does more than set the hand feel. It changes how the needle enters the surface, how the thread sits after tension, and how the front panel reacts after thousands of stitches are packed into a small area. Cotton twill is the dependable middle lane: familiar, breathable, and usually stable enough for logos in the 5,000- to 10,000-stitch range. Brushed cotton feels softer but can look more casual. Polyester resists moisture and color fading better, which helps for outdoor teams or events. Wool blends feel premium and structured, though they can run warmer and cost more.
Performance fabrics add another twist. They may wick sweat and stretch better, but stretchy or lightweight materials can pucker if the embroidery file is too dense. Stable, tighter-weave fabrics usually hold stitches cleaner. Lightweight caps often need stronger backing, lower stitch density, or simpler artwork.
The visible logo is only half the story. Backing, interfacing, and thread tension often decide whether a cap looks smooth or puckered after production.
Structured caps have internal support behind the front panels, so logos tend to sit flatter and sharper. Unstructured caps feel relaxed and broken-in, which many buyers like for hospitality, nonprofits, and casual retail drops. The trade-off is precision. A high-density embroidered badge on an unstructured crown can look heavy, especially if the fabric is soft and the logo is wide.
There is also a comfort penalty that buyers underestimate. A design with 8,000 stitches can add real density to the front panel. Add 3D puff foam or a large filled background, and a breathable cap may feel hotter than expected. Not always dramatically. Enough for employees to stop wearing it during long shifts.
A practical Embroidered Baseball Caps material and sizing guide should connect fabric choice to the use case. Budget giveaways may work with cotton-poly blends. Staff uniforms need repeatable fit, color, and cleaning behavior. Premium resale caps may justify heavier twill, wool blends, woven labels, or FSC certified Hang Tags Printed on kraft paper. If the caps ship individually, recycled materials or biodegradable packaging can support a sustainability claim, but the claim should be specific rather than decorative.
Sizing, Fit, and Closure Options Buyers Should Compare Before Ordering
“One size fits most” is a range, not a promise. That phrase usually means the cap can cover a broad middle of adult head circumferences, often through an adjustable strap or snapback. It does not mean it will fit every employee, teen attendee, retail customer, or trade-show visitor.
Adjustable caps are safest for broad distribution. Fitted caps look cleaner and more premium, but they require size planning and inventory splits. Flexfit caps sit between the two: stretch bands create a tidy back view, yet they still come in size ranges such as S/M and L/XL. Snapbacks are visible and casual. Metal buckles feel more refined. Hook-and-loop closures work for utility settings where speed matters more than polish, although they can catch lint and wear down over time.
| Closure or Fit Type | Best Use | Buyer Watchout | Typical Cost Impact |
|---|---|---|---|
| Plastic snapback | Events, sports, streetwear-style promotions | Casual look may not suit corporate uniforms | Usually low to moderate |
| Metal buckle strap | Hospitality, retail, office teams | Must confirm strap length and finish color | Often moderate |
| Hook-and-loop | Field crews, schools, utility use | Can collect fibers and lose grip over time | Usually low |
| Flexfit stretch band | Uniforms with cleaner back appearance | Needs size split planning | Moderate to higher |
| Fitted | Retail caps, teams, premium drops | Highest risk of wrong-size inventory | Moderate to higher |
Profile matters just as much. Low-profile caps sit closer to the head and often feel less bulky. Mid-profile is the safest mainstream option for most branded programs. High-profile caps create a taller, bolder silhouette, common on trucker caps and streetwear-inspired styles. Brims also shift perception. Pre-curved brims feel familiar and corporate-friendly. Flat brims skew younger, sportier, and more retail.
Here is the plain measurement step I would not skip: sample at least one cap from the intended size category before approving bulk production. For uniforms, test it on several people. A quarter inch around the head can decide whether a cap gets worn weekly or left in a drawer. That is why an embroidered baseball caps material and sizing guide has to treat fit as a specification, not a preference.
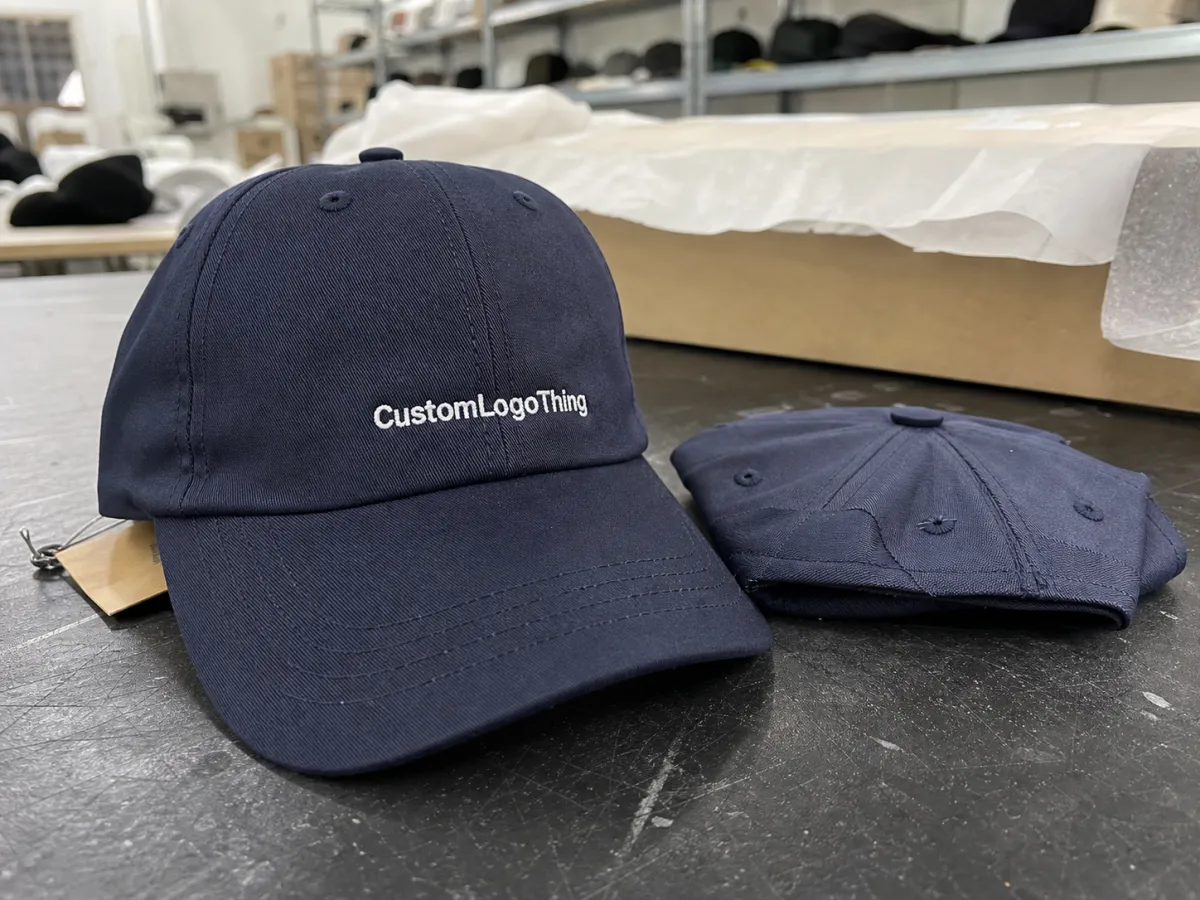
Logo Placement, Stitch Count, and Artwork Rules for Clean Results
Embroidery is not print. Thread has thickness. Small gaps close up. Fine gradients disappear. Tiny registered marks and legal lines that look acceptable on a PDF can turn into knots on a curved cotton panel. A cap is also not a flat mailer, label, or shirt front. The needle is working across curved fabric under tension.
Common placements include front center, left front panel, side panel, back arch, back strap area, and small icon placements near the brim. Front center is the default because it gives the logo the most visibility. Side embroidery can work well for secondary marks. Back embroidery needs careful sizing because the closure interrupts available space.
Good cap artwork usually follows four rules. Simplify thin lines. Convert gradients into solid colors. Keep small text large enough to stitch. Avoid excessive filled backgrounds unless the cap structure can support the density. Lettering below roughly 0.2 inches tall can become unreliable, depending on the font, fabric, and digitizing quality.
Stitch count affects both cost and quality. More stitches usually mean more machine time, more thread, more density, and a higher unit cost. It does not automatically mean a better logo. A 12,000-stitch design with tiny details may look worse than a 6,500-stitch version that was simplified for thread.
- Flat embroidery: best for most logos, badges, icons, and readable text.
- 3D puff embroidery: best for bold letters and simple shapes with enough surface area.
- Side embroidery: useful for taglines, small icons, or location marks.
- Back arch embroidery: workable for short names, but difficult with long phrases.
3D puff deserves caution. It creates height by stitching over foam, which looks strong on block letters but performs poorly with fine detail, tiny counters, and delicate scripts. If the logo has an “e,” “a,” or “R” with small enclosed spaces, ask the supplier whether puff will close those spaces.
A digital mockup shows placement. A sewn sample or production photo shows whether the thread, fabric, and logo actually cooperate. For a 250-piece giveaway, a detailed mockup may be enough. For a 2,500-piece uniform or resale order, I would want a sewn reference before full production. The logic is the same as approving a carton drawdown or a Printed Kraft Paper sample: screens lie, materials tell the truth.
Cost, Pricing, MOQ, and Unit Cost Variables for Custom Caps
Cap pricing is built from several moving parts: blank cap quality, embroidery placement count, stitch count, thread colors, 3D puff, inside labeling, packaging, order quantity, and shipping method. A simple one-location logo on a stock cotton twill cap will price very differently from a structured cap with front puff embroidery, side embroidery, custom inside tape, and individual recycled polybags.
Minimum order quantity is practical, not mystical. Lower minimums may be available for simple domestic jobs, sometimes around 24 to 72 pieces. Better unit economics often start when digitizing, setup, and machine time are spread across 144, 288, 500, or more units. Overseas custom builds may need higher minimums, especially if the cap body, fabric color, closure, or labeling is custom.
Digitizing is another line item buyers should understand. Artwork must be translated into stitch instructions: pathing, density, underlay, pull compensation, trims, and thread color order. A rushed or cheap digitizing file can create thread breaks, puckering, or uneven edges. Typical digitizing fees may land around $35-$100 for a standard logo, though complex marks can cost more.
| Order Type | Typical Quantity | Common Price Range Per Cap | Best Fit |
|---|---|---|---|
| Basic stock cap with front embroidery | 48-144 pieces | $8-$15 | Small events, team gifts, local promotions |
| Mid-range structured cap | 144-500 pieces | $10-$18 | Staff uniforms, trade shows, branded merchandise |
| Premium cap with extra decoration | 288-1,000+ pieces | $14-$28+ | Retail drops, loyalty gifts, premium campaigns |
Those ranges depend on artwork, sourcing, freight, and timing. The cheapest cap may save $1.50 per unit but lose the campaign if nobody wears it. Wear rate matters. A $12 cap worn 30 times creates more brand exposure than a $7 cap worn once.
Hidden cost traps include extra logo locations, oversized embroidery, rush production, split shipments, multiple cap colors, and last-minute artwork edits after digitizing. Packaging also matters. Individual polybags, recycled paper belly bands, FSC certified hang tags, or retail-ready cartons add cost but may reduce damage and improve presentation.
Ask for itemized quotes. Separate the blank cap, decoration, setup, digitizing, sample, packaging, freight, and rush charges. If sustainability claims matter, ask what percentage of post-consumer waste is in the packaging or whether any paper components are FSC certified. The Forest Stewardship Council is a useful reference point for paper-based claims, while the EPA recycling resources can help teams use more precise language around recycled materials.
Process, Timeline, and Production Steps from Sample to Delivery
The production path is fairly linear, but delays usually hide in the handoffs. First, choose the cap style. Then submit artwork, confirm sizing and materials, approve digitized embroidery, review a mockup or sample, begin production, complete QC, pack, and ship. Each step has a decision attached to it. Each decision can stall the order.
Timelines vary because cap availability, artwork complexity, embroidery locations, quantity, sampling requirements, factory capacity, and shipping distance all matter. A small domestic order using stock caps may move in roughly 7-15 business days after proof approval. A larger custom cap order with sampling, special closures, custom labels, and freight planning may need 4-8 weeks or longer. Rush orders can happen, but rushing reduces the time available to catch thread color, placement, and fit errors.
There are three approval tools buyers confuse. A digital proof shows logo size, position, thread colors, and general layout. A pre-production sample shows the actual cap and embroidery before the full run. A production sample photo shows one of the first completed caps during production. The right choice depends on risk. If the cap is for a high-visibility launch, a physical sample is usually worth the wait.
Production sequencing also matters. Caps often need decoration before final packing. Multi-location embroidery may require additional hooping time, which increases labor and the chance of placement variation. A front logo plus side logo plus back arch is not just “three small designs.” It is three setup and handling moments per cap.
- Approve cap material, color, profile, closure, and quantity.
- Send artwork in vector format when available, plus brand color references.
- Review embroidery digitizing and confirm logo size in inches.
- Approve a digital proof, sewn sample, or production photo.
- Confirm carton packing, labeling, ship method, and in-hand date.
For events, build a decision calendar. Include artwork approval date, sample review date, production start date, ship date, and in-hand deadline. Caps can be packed in corrugated cardboard cartons with brim protection or dividers, but loose packing can bend brims and dent structured crowns. Packaging is not a glamorous line item. It is damage prevention.
Common Buying Mistakes That Lead to Bad Fit or Weak Embroidery
The biggest mistake is choosing caps by photo alone. A product image rarely tells you fabric weight, crown height, backing quality, closure feel, or actual head fit. It may not even show how the cap behaves after embroidery. Ask for the spec. If the supplier cannot provide one, treat that as a warning sign.
Oversized logos are another repeat offender. A large embroidered area can stiffen the front panel, distort curved fabric, increase stitch count, and raise cost. On a low-profile unstructured cap, it can also make the logo feel like armor on the forehead. Bigger is not always more premium. Often, cleaner is.
Print artwork causes trouble too. Thin taglines, shadows, gradients, tiny trademark symbols, and distressed textures often need redesigning for thread. A screen print can fake detail with ink. Embroidery has to build detail with physical strands. That difference is not negotiable.
Reorders create a quieter problem. If buyers do not record cap model, fabric, color code, thread colors, stitch file, logo size, placement measurements, and closure type, the next run may not match. A practical embroidered baseball caps material and sizing guide should push buyers to create a repeatable spec sheet, because memory is a poor purchasing system.
Color surprises deserve their own warning. Thread, fabric, and screen colors do not match perfectly. Navy thread on brushed cotton may look different from navy thread on polyester. Warehouse lighting, daylight, and retail displays can shift perception. If the brand color is sensitive, request actual thread references or a sewn sample.
Finally, do not ignore shipping cartons. Crushed corrugated cardboard or loose inner packing can bend brims and deform structured crowns before the caps reach the buyer. For premium orders, ask how many caps are packed per carton, whether brims are nested consistently, and whether the carton grade is strong enough for parcel handling.
Actionable Next Steps Before You Approve a Bulk Cap Order
Start with the wearer. Employees, customers, athletes, volunteers, and retail buyers do not all need the same cap. Then choose the structure, material, profile, closure, and logo treatment around that person. A cap built for a warehouse crew may need moisture resistance and hook-and-loop adjustment. A cap built for a boutique retail shelf may need heavier twill, a metal buckle, cleaner interior finishing, and branded packaging.
Before bulk approval, order or borrow a physical sample. This matters most for uniforms, resale, and high-visibility events. Put it on several heads. Check the crown height, forehead pressure, brim curve, and closure range. Then look at the logo size in real space, not on a screen.
Prepare a short spec sheet before requesting quotes. Include cap style, fabric, profile, crown height, closure, color, logo size, placement, thread colors, packaging, quantity, deadline, and shipping destination. If sustainability is part of the brief, list the exact claim you want to support, such as FSC certified paper hang tags, recycled materials in shipping components, or reduced plastic packing. Vague “eco-friendly” language is hard to verify.
Compare quotes by total landed cost, not just unit price. Freight, setup, rush fees, samples, packaging, and split shipments can change the economics quickly. A cap quoted at $9.80 may cost more than a $10.60 cap after decoration and shipping are counted.
Approve one final reference point before production: a sewn sample, production photo, or detailed mockup with measurements. For simple low-risk jobs, a proof can be enough. For complex logos, premium materials, or fitted sizing, get stronger evidence.
The best embroidered baseball caps material and sizing guide is not just something to read once. It should become a decision tool you can hand to a supplier, compare against a quote, and use again for reorders without guessing.
FAQ
What is the best material for embroidered baseball caps?
Cotton twill is a strong all-around choice because it feels familiar, holds embroidery well, and works for uniforms, events, and retail-style giveaways. Polyester and performance fabrics are better for moisture resistance, but stretchy materials may need simpler designs and stronger backing. Wool blends feel premium and structured, though they usually cost more and may not suit hot outdoor use.
How do I choose the right size in an embroidered baseball caps sizing guide?
Start with the audience. Adjustable caps work for broad giveaways, fitted caps need precise size planning, and flexfit caps sit between the two. Check head circumference ranges from the cap supplier instead of relying only on labels like small, medium, large, or one size fits most. For employee uniforms or resale, test a physical sample on several people before approving bulk production.
Does embroidery affect how a baseball cap fits?
Yes. Dense embroidery can make the front panel feel stiffer, especially on lightweight or unstructured caps. Large logos and 3D puff embroidery add more thickness and can slightly change how the cap sits on the forehead. Choosing the right backing, cap structure, and logo size reduces fit problems.
What information should I include when requesting a quote for embroidered caps?
Include quantity, cap material, cap color, closure type, profile, logo placement, logo size, thread colors, and required delivery date. Send vector artwork if available, but also ask whether the supplier will adjust the design for embroidery. Request separate line items for blank caps, digitizing, embroidery, samples, packaging, shipping, and rush fees.
How long does the embroidered baseball cap production process usually take?
Timing depends on cap availability, order size, logo complexity, sampling needs, and shipping distance. The process usually includes artwork review, digitizing, proof approval, production, quality checks, packing, and delivery. Buyers with fixed event dates should build in buffer time for sample review and corrections rather than approving production at the last minute.


