Order Hologram Stickers Custom Made for Your Brand
What Hologram Stickers Custom Orders Really Are
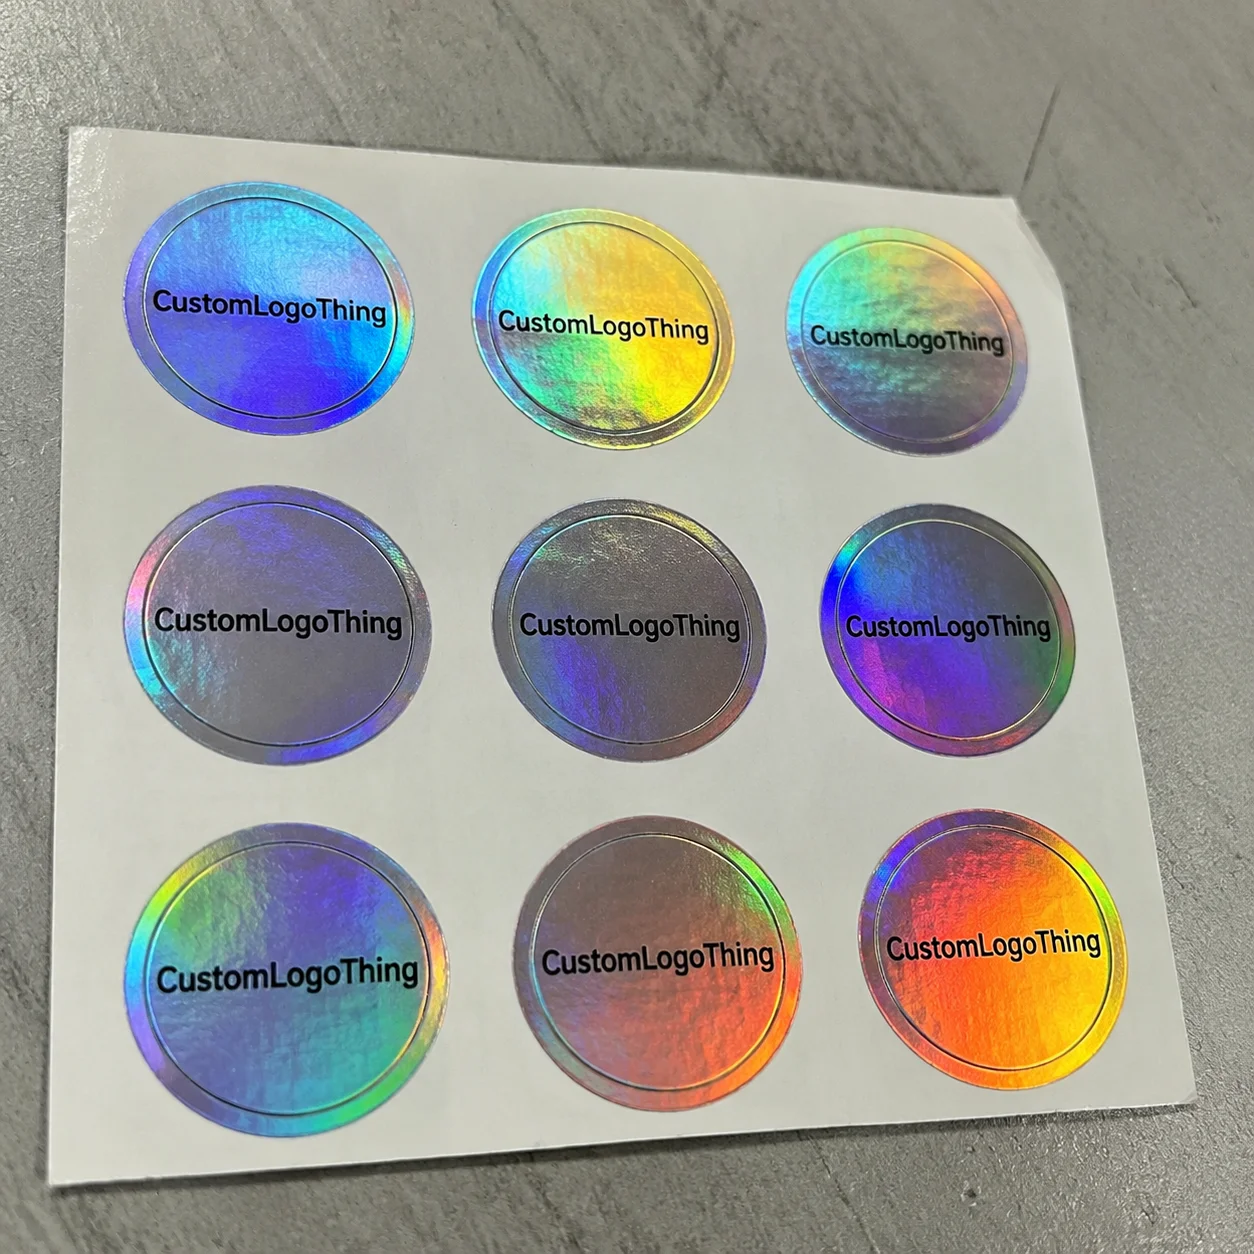
Place a plain silver seal beside a holographic one in the same 1-inch circle, and most customers will read them differently before they read a single word. One says “label.” The other suggests limited edition, authenticity, collectability, or a higher-value product. That reaction is not accidental. Hologram stickers custom orders combine reflective film, print layers, adhesive, cutting, and finishing into a small piece of packaging that has to look good and behave correctly in use.
A custom holographic sticker is usually built from a micro-embossed or metallized film, then printed and cut to match a brand, promotion, product seal, or authentication cue. The rainbow movement comes from the film structure. The brand clarity comes from artwork quality, white ink, color choices, cut shape, and finish.
These stickers appear across the Stickers category in practical, commercial places: cosmetics cartons, electronics labels, candle jars, ecommerce insert sheets, retail box seals, event handouts, collectible merch drops, and limited-run product packaging. They can make a simple box feel more deliberate without changing the full carton structure. That is often their strongest use: a controlled visual upgrade at a smaller footprint than Custom Rigid Boxes, foil-stamped sleeves, or specialty printed cartons.
Decorative holographic stickers and security hologram labels should not be treated as the same product. A decorative holographic label can create premium shelf impact, but it is not serious anti-counterfeit protection by default. Security-style labels may require tamper-evident film, destructible stock, void patterns, serialized numbering, microtext, controlled artwork access, or documented production controls. If authentication matters, ask specific questions. The word “hologram” alone does not guarantee security.
The strongest orders start with a clear use case. A sticker for a glossy folding carton has different requirements than a label for an HDPE bottle, a refrigerated jar, a textured mailer, or a giveaway sheet. Before quoting, production needs to know the surface, size, quantity, artwork goals, handling conditions, and deadline. Without that context, the supplier is guessing at material and adhesive choices.
How Holographic Sticker Materials Create the Rainbow Effect
The familiar rainbow flash usually comes from micro-embossed patterns in the film, not ordinary ink. Light hits the patterned surface and scatters at different angles, so the same sticker may shift from blue to green to gold as the package moves under store lighting. It is closer to an optical structure than a printed color.
A typical construction includes holographic or metallized face film, pressure-sensitive adhesive, a release liner, printed ink, optional white ink, and sometimes a gloss laminate, matte laminate, or protective varnish. Each layer has a job. The film creates movement. The adhesive determines bond strength. The liner affects dispensing and application. The print carries the brand. The finish changes scuff resistance, glare, and tactile feel.
White ink is the layer buyers underestimate most often. On holographic stock, standard inks can look translucent because the reflective surface shines through them. That can be attractive for a metallic wash, but it can also weaken a logo that needs to match a brand color. If a red mark must look solid red, the printer may place white ink underneath the red area first. If a border, starburst, or background pattern should shimmer, that area can remain clear or lightly printed.
This gives designers useful control. Clear areas reveal the full holographic effect. White-backed areas become more opaque and readable. Heavy color coverage sits between those two results, depending on ink density, press setup, and the film pattern. A disciplined layout often uses holographic movement around the focal point rather than behind the smallest type.
Adhesive selection is less glamorous, but more consequential. Permanent adhesive is common for product packaging and retail labels. Removable adhesive may suit temporary promotions, inserts, or events where clean removal matters. Stronger adhesive may be needed for textured paperboard, low-energy plastics such as polyethylene or polypropylene, curved containers, cold-chain packaging, or surfaces exposed to moisture and hand oils.
Finish changes the read. Gloss laminate produces strong shine and usually improves scuff resistance. Matte laminate controls glare and can make type easier to read, although it softens sparkle. A varnish or spot treatment may be enough for short-term indoor use, while handled retail packaging may need stronger protection. If the sticker will be rubbed in transit, stacked on shelves, or touched repeatedly, finish is not decorative trivia.
Packaging performance references such as ISTA are useful because shipping vibration, compression, abrasion, and climate can affect labels as much as boxes. A sticker that looks excellent on a flat proof still has to survive the real route: packing bench, warehouse, freight, shelf, and customer handling.
Key Specs That Decide Whether Your Sticker Looks Premium
Premium appearance rarely comes from one feature. It comes from the fit between size, shape, film pattern, adhesive, ink coverage, white ink placement, finish, format, and the surface receiving the sticker. A good holographic label looks intentional. A poor one looks shiny because no other decision was made.
Size sets the design limit. A 0.75-inch seal needs simple artwork, strong contrast, and perhaps only a logo mark or short word. A 3-inch decal can carry illustration, promotional copy, a social handle, or a limited-edition message. The smaller the sticker, the less tolerance there is for hairline strokes, pale color, crowded type, and complex backgrounds.
Shape affects both appearance and production. Circles and rectangles are efficient, easy to apply, and less wasteful. Ovals suit jars, candles, and cosmetics. Kiss-cut stickers on sheets work well for giveaways and sticker packs. Contour-cut logos look more custom but may slow hand application and add cutting complexity. Very sharp points, narrow bridges, and tiny protrusions can lift, tear, or weed poorly, especially on thicker film.
Readability is the usual failure point. Fine type, thin outlines, pale pastels, delicate barcodes, and low-contrast marks can disappear when the sticker catches light at an angle. A PDF proof on a white screen is not a reliable preview of reflective stock under bright retail lighting. If the brand name, ingredients, QR code, or warning copy must be read quickly, build that area with opacity and contrast.
For artwork setup, vector files are preferred for logos, typography, and cut lines. AI, EPS, and editable PDF files give production cleaner edges and better control. Raster artwork should be high resolution at final print size, often 300 dpi or higher for detailed images. Dielines should be supplied as a separate spot color or clearly labeled layer, not flattened into the printed art.
Bleed and safe zones deserve more attention on small stickers than many buyers give them. Normal cutting tolerance can make a border look uneven if it sits too close to the edge. A common bleed range is 0.0625 inch to 0.125 inch, depending on the process and supplier. Safe zones keep text and logos away from the cut path, where tiny shifts become visible.
Rolls and sheets serve different jobs. Rolls work better for label dispensers, faster hand application, and machine labeling, especially when unwind direction matters. Sheets are convenient for inserts, small runs, sample packs, and giveaway stickers. If the holographic stickers support Custom Labels & Tags or a larger packaging program, choose the format based on how the packing team will actually apply them, not just how the proof looks.
Production callout: clear specs create a clear inspection target. Size, cut line, white ink placement, liner release, adhesion, registration, and scuff resistance can be checked more consistently when the order brief is specific.
Cost, Pricing, and MOQ Factors Buyers Should Expect
Holographic stickers usually cost more than standard paper stickers or white vinyl decals. Specialty film, white ink setup, finishing, waste control, and die cutting add real production steps. That does not make every order expensive, but it does mean a useful quote needs more detail than “price for 1,000 stickers.”
The main pricing variables are finished size, order quantity, material, adhesive type, print coverage, white ink coverage, laminate, cut complexity, roll or sheet format, and packing requirements. A simple 2-inch circle with light print coverage may run efficiently. A small contour-cut logo with heavy white ink, tight registration, and laminate may cost more even though it uses less material.
MOQ is often misunderstood. Small runs carry higher unit costs because proofing, press setup, material loading, cutting, inspection, and packing still happen whether the order is 100 pieces or 5,000. Unit cost usually drops as volume rises because setup cost spreads across more units and material waste becomes a smaller percentage of the job.
| Order Factor | Typical Buyer Choice | Cost Impact | Practical Note |
|---|---|---|---|
| Quantity | 500 to 10,000 pieces | Lower unit cost at higher volume | Small test runs are useful, but setup costs weigh heavily. |
| Size | 1 inch to 4 inches | Larger stickers use more film | Oversizing a seal can increase cost without improving function. |
| White Ink | Spot white or heavy white coverage | Moderate to high increase | Use white ink where readability matters most. |
| Finish | Gloss, matte, or no laminate | Varies by durability need | Laminate can improve scuff resistance and handling life. |
| Shape | Circle, rectangle, oval, contour cut | Complex cuts can increase cost | Simple shapes apply faster and reduce waste. |
As a practical ballpark, simple custom holographic stickers in moderate quantities may fall around $0.08 to $0.35 per piece, depending on size, quantity, finish, artwork, and supplier setup. Short runs, premium adhesives, specialty laminates, heavy white ink, security features, and intricate contour cuts can move above that range. These figures are not universal, but they explain why two quotes for “the same” sticker may be far apart.
Quote quality improves when buyers provide finished size, quantity, artwork file, intended use, application surface, indoor or outdoor exposure, preferred finish, and deadline. Surface details matter: rigid box, folding carton, mailer, pouch, glass jar, plastic bottle, coated paperboard, kraft stock, and flexible film can all require different recommendations.
Do not compare quotes only by unit price. A lower quote may use thinner film, no white ink, weaker adhesive, looser color tolerance, or a finish that does not suit the application. For larger packaging programs, compare the sticker alongside related Custom Packaging Products so the label, carton, insert, and shipper feel like one system rather than four separate purchases.
Process and Timeline From Artwork to Finished Stickers
A clean ordering process follows a predictable sequence: define the use case, choose size and shape, confirm material and adhesive, prepare artwork, review the proof, approve production, print, finish, cut, inspect, pack, and ship. The steps sound simple. The risk sits in the details.
During artwork review, production checks resolution, dielines, bleed, safe zones, white ink layers, color expectations, barcode or QR code placement, and whether the holographic effect is being used with intention. If a label wraps a curve or seals an opening, the team also needs to consider bend, edge lift, and application pressure.
A digital proof confirms layout, finished size, cut shape, and white ink placement. It cannot fully reproduce the shifting optical effect of holographic film. Screens emit light; holographic stock reflects it. If color matching is critical, ask about drawdowns, printed samples, or material swatches, and allow time for that step. Reflective stock will not behave exactly like white paper.
Lead time depends on artwork readiness, proof approval speed, material availability, quantity, finishing requirements, cutting complexity, inspection level, and shipping method. Many straightforward orders fall around 7 to 15 business days after proof approval. Larger or more specialized orders can take longer. Repeat orders with approved files often move faster because the dieline, white ink setup, and material path are already known.
Revisions affect timing unevenly. A spelling correction may be simple. A change to white ink separations, barcode size, cut shape, or label orientation can require a fresh production check. If the sticker fits a carton panel, bottle shoulder, cosmetic tube, mailer flap, or tamper seal location, test the final size on the actual package before approval.
Reflective materials also expose handling flaws. Scratches, dust, liner curl, registration shifts, cutting debris, and edge lift stand out more on shiny film than on plain paper. Quality checks should look at print clarity, cut accuracy, liner release, adhesive behavior, scuffing, and whether the white ink is aligned to the artwork. A beautiful face print can still fail if the sticker weeds badly or lifts during application.
Before final approval, check the dimensions with a ruler, review spelling, confirm logo placement, inspect white ink areas, test code readability if relevant, and hold a printed mockup against the real package. Five minutes at this stage can prevent days of rework.
Common Mistakes That Make Holographic Labels Hard to Read
The biggest design mistake is treating holographic film like white sticker stock. On white material, fine gray text and pale color may pass. On holographic material, those same details can lose contrast as the light shifts.
Overusing the effect creates another problem. If everything shimmers, nothing has hierarchy. Strong designs usually balance reflective areas with opaque printed areas. The background may move while the logo sits on white ink. Or the logo may shimmer while the product name remains solid and readable.
Tiny type and thin lines are risky on small seals, curved jars, cosmetic tubes, flexible pouches, and irregular surfaces. Glare and surface distortion reduce readability, especially once the sticker wraps around a radius. If the copy needs to be read quickly, keep it bold, large enough, and away from the highest-glare zone.
Weak safe zones make otherwise good stickers look poorly cut. Artwork placed too close to the edge may be trimmed during normal die-cutting variation. Hairline borders are especially unforgiving. Either give the border enough margin or design it so slight movement does not look like a defect.
Adhesive mismatch can ruin a good print. Dusty cartons, oily plastic, rough paperboard, cold surfaces, flexible pouches, and textured mailers do not behave alike. If the sticker must survive refrigeration, moisture, retail handling, shipping abrasion, or long storage, request material guidance and test comparable stock before committing to a full run.
Vague ordering language is expensive. “Make it holographic” can mean a full rainbow background, a holographic logo only, foil-style accents, or a security-looking seal. Better instructions specify which areas shimmer, which areas stay opaque, how the sticker will be applied, and what it must stick to.
Sustainability questions may come up, especially for retail packaging and custom printed boxes. Paperboard sourcing references such as the Forest Stewardship Council can help frame discussions about cartons and inserts. Holographic films, adhesives, and laminates need their own separate review for recyclability, separation, and end-of-life impact. A decorative sticker can complicate recycling if it is applied to otherwise recyclable packaging.
Next Steps Before You Request a Sticker Quote
Gather the basics before requesting pricing: finished size, shape, quantity, artwork, application surface, indoor or outdoor use, expected handling, finish preference, and deadline. That short list gives the supplier enough context to recommend a construction instead of filling in blanks.
Decide the visual priority early. Should the holographic effect be the main attraction, a background texture, a security cue, or a small accent around the logo? The answer affects white ink, artwork setup, finish, and sometimes the film pattern. A cosmetics label may need restrained movement. An event sticker may benefit from a louder rainbow flash.
If you know which areas should stay opaque, mark the white ink layer in the file. If not, ask for help planning it. White ink strategy often separates a polished holographic sticker from a shiny label that fights the logo.
Ask for material and adhesive guidance instead of choosing by appearance alone, especially for plastic bottles, folding cartons, mailers, candles, cosmetics, freezer items, or food-adjacent packaging. Holographic film creates the look. Adhesive and finish decide whether that look survives handling.
- Send the real use case: retail seal, giveaway sticker, QR label, jar label, carton accent, or tamper-evident cue.
- Provide the surface: coated paperboard, glass, PET, HDPE, kraft paper, pouch film, or textured stock.
- Share the artwork: vector files are best, with cut lines and white ink clearly separated.
- Ask about proofing: confirm size, cut shape, white ink placement, MOQ, lead time, and shipping method.
- Test when performance matters: moisture, refrigeration, scuffing, curved surfaces, and long storage all deserve extra attention.
The best hologram stickers custom projects are not built from shine alone. They come from clear use conditions, clean artwork, a practical adhesive choice, and a proofing process that respects the way reflective film actually behaves. Get those pieces right, and the holographic effect supports the brand instead of stealing attention from it.
FAQ
Are custom holographic stickers waterproof?
They can be water-resistant or waterproof depending on the film, adhesive, ink system, and laminate. Bottles, bath products, outdoor items, and refrigerated packaging need a recommendation based on real moisture exposure and handling. Laminate can improve scuff and moisture resistance, but the adhesive still has to match the surface and environment.
What artwork file is best for hologram sticker printing?
Vector files such as AI, EPS, or editable PDF are usually best for logos, cut lines, and crisp type. Raster artwork should be high resolution at final print size, especially for gradients, textures, or illustrations. If the design needs white ink, the file should clearly show which areas stay opaque and which areas reveal the holographic film.
Can hologram stickers custom designs include barcodes or QR codes?
Yes, but barcodes and QR codes usually need a solid white or opaque background for reliable scanning. Avoid placing scannable codes directly over a busy holographic pattern because glare and contrast shifts can interfere with readability. Test the code at final size before approving production, especially on small stickers or curved packaging.
How long does custom holographic sticker production take?
Turnaround depends on artwork readiness, proof approval, material availability, order quantity, finishing, cutting complexity, inspection, and shipping method. Straightforward jobs often take about 7 to 15 business days after proof approval, while specialized orders can take longer. Complete specs and careful proof review protect the timeline more than rushed approval.
Why do holographic stickers cost more than regular stickers?
They use specialty reflective film and often require extra setup for white ink, lamination, die cutting, and inspection. Custom shapes, small quantities, heavy ink coverage, premium adhesives, and security features can increase unit cost. The added cost usually buys stronger shelf impact, a more premium feel, and better brand distinction than plain white sticker stock.


