Order Personalized Leather Clothing Labels That Last
Shoppers do something revealing before they read a care tag: they touch the waistband patch, sleeve tab, hem label, or bag badge. Personalized leather clothing labels quietly tell them whether a garment feels boutique, rugged, handmade, premium, or disposable.
That is a lot of pressure for a trim that may measure only 1.5 by 2.5 inches. Packaging buyers recognize the pattern. A rigid box can make a small product feel giftable; a textured label can make a plain garment feel considered. Material, edge finish, logo depth, stitching holes, and contrast all start working before the buyer checks fiber content or price.
What Personalized Leather Clothing Labels Signal Before a Garment Is Tried On
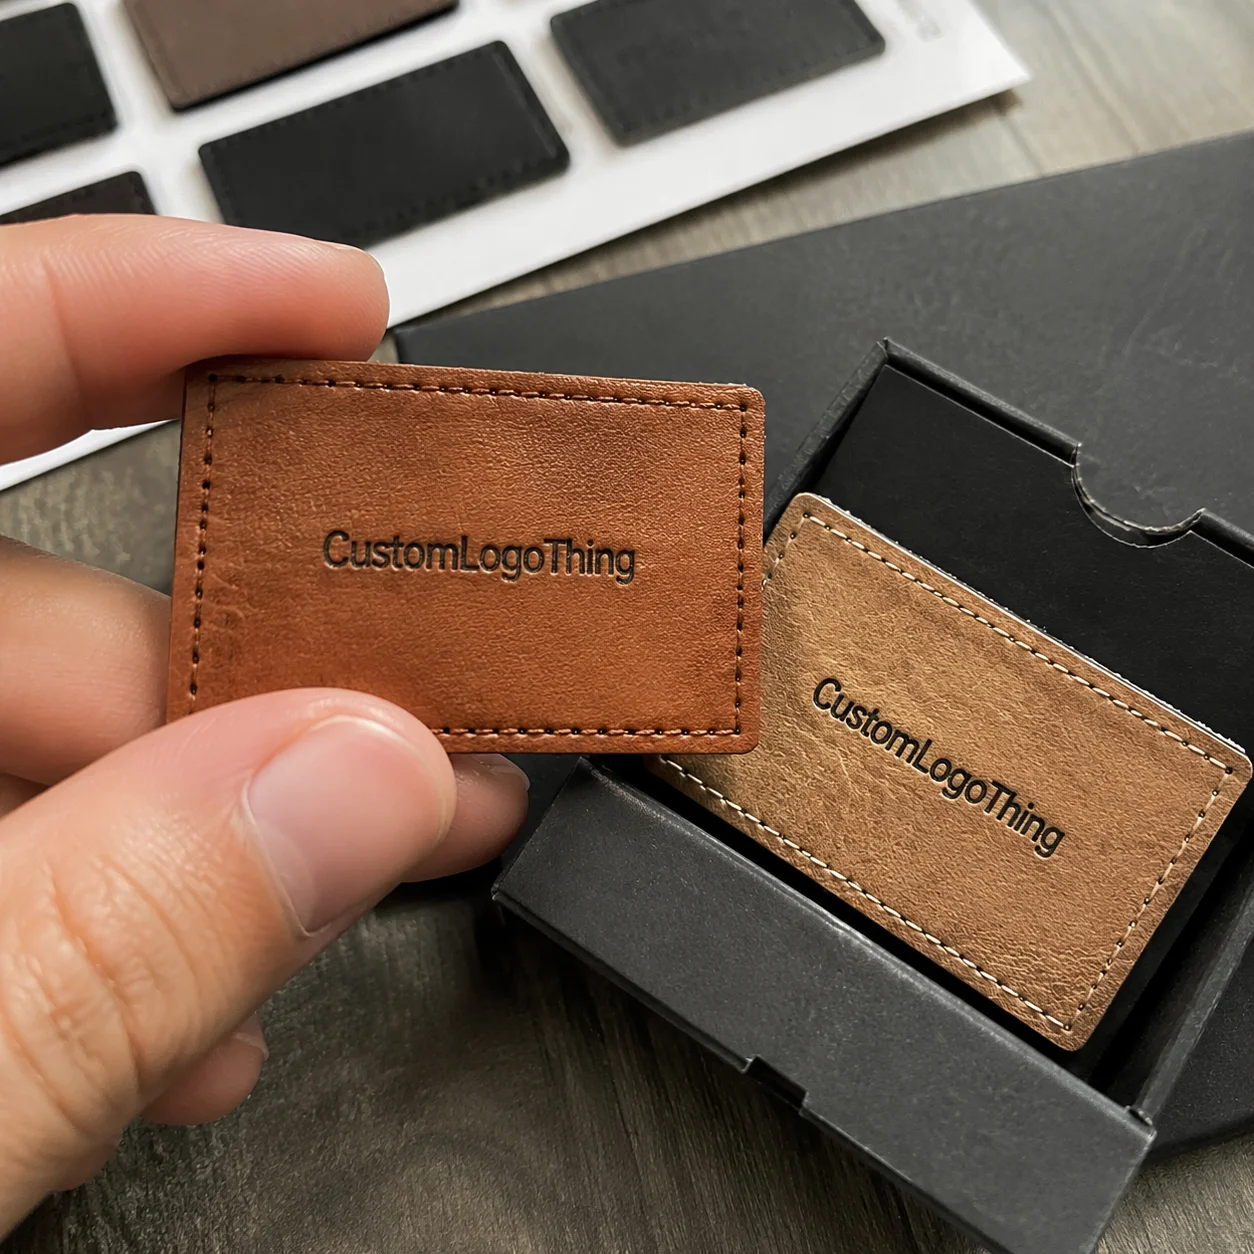
Personalized leather clothing labels are custom-branded patches, tags, tabs, or badges made from genuine leather, faux leather, PU leather, microfiber leather, or washable leather-like materials. They usually carry a logo, collection name, origin mark, size cue, or simple brand symbol. Some are flat patches. Others are folded tabs, end-fold labels, center-fold labels, or riveted badges.
You see them on denim waistbands, jackets, knitwear hems, beanies, aprons, bags, workwear, handmade goods, and limited-run fashion drops. The job is often emotional. A 2-inch faux leather patch on a beanie does not make the yarn warmer, but it can make the product feel finished. A debossed waistband patch on denim can move the visual language from basic to retail-ready in seconds.
Leather labels are not usually a substitute for legally required textile care labels. Care instructions, fiber content, country of origin, and compliance marks often need to appear on separate woven or printed textile labels, depending on the selling market. Leather garment labels are mostly brand-facing trims, though care-safe symbols or size marks can be added if the material and marking method reproduce them clearly.
Buyer rule: treat the label as part of the garment system, not a loose decoration. Placement, wash exposure, stitch tension, and shopper visibility all change the right specification.
Before ordering, buyers need a practical grasp of materials, marking methods, cost drivers, lead times, artwork rules, and durability limits. A good label strengthens the brand. A poorly specified one creates production friction, late sewing schedules, inconsistent reorders, or returns after laundering.
How Custom Leather Garment Labels Are Made
The production logic is simple on paper. A supplier selects the base material, checks the artwork, prepares the marking method, cuts the label shape, adds holes or backing if needed, then inspects and packs the finished pieces. In practice, it behaves more like packaging finishing than ordinary printing.
Texture, pressure, heat, thickness, grain, and color all affect the result. A logo that looks crisp on a white screen can soften when pressed into pebbled brown faux leather. Thin strokes may vanish. Distressed textures can fill in. Metallic foil may need wider line work than a blind deboss.
The most common branding techniques include:
- Debossing: presses the logo down into the surface; clean, subtle, and common for denim, outerwear, and handmade goods.
- Embossing: raises the artwork above the surface; more dimensional, though not ideal for every thin or flexible material.
- Foil stamping: adds metallic or colored foil, often gold, silver, black, or copper; strong contrast but sensitive to heat, pressure, and line thickness.
- Screen printing: applies ink for color logos; useful when the brand mark needs contrast beyond texture.
- Laser engraving: burns detail into the surface; sharp on many faux leather and microfiber materials, though the final shade varies by substrate.
Woven-in effects belong to woven labels, not leather patches. If a supplier describes a “woven leather label,” clarify whether they mean a leather patch paired with woven fabric, a printed texture, or a different trim category. For nearby trim formats, Custom Logo Things’ Custom Labels & Tags category is a useful way to compare labels, tags, and related branding pieces.
Cutting choices shape cost and application. Straight-cut rectangles are usually the most economical. Rounded corners reduce sharp edges and can look more polished. Die-cut silhouettes add brand character but may require tooling. Folded tabs work on hems, sleeves, side seams, and beanies. Pre-punched sewing holes help makers attach labels consistently, especially on thicker patches or hand-finished products.
Attachment deserves early attention. Sew-on labels are usually the safest choice for washable garments. Heat-press options can be efficient for compatible materials and fabrics, but testing is critical because heat, dwell time, pressure, adhesive chemistry, and fabric finish all matter. Rivets work well on jeans, bags, and aprons. Adhesive backing is usually positioning support, not a final garment solution, unless the product is non-washable and the adhesive has been specified for that exact surface.
Material, Thickness, Color, and Washability Factors to Compare
Material choice drives the look, price, durability, and brand message. Genuine leather offers natural grain, prestige, and variation. It can look expensive because no two pieces are exactly identical. That same variation can frustrate brands that need tight color matching across 5,000 units or across several reorders.
Faux leather, PU leather, and microfiber leather give more control. They can be easier to source in repeatable colors, often support vegan positioning, and may allow lower minimums. For many apparel programs, especially beanies, casualwear, denim accessories, and handmade items, faux leather is not a downgrade. It is a consistency decision.
Washable leather-like materials are popular for clothing that must survive repeated laundering, denim finishing, detergent, heat, and abrasion. Labels used on uniforms, kidswear, everyday basics, and workwear need a more conservative spec than labels used on gift bags or occasional-wear jackets. Ask about wash guidance before ordering labels for anything that will go through frequent machine cycles.
| Material Option | Best Fit | Typical Strength | Watch-Out |
|---|---|---|---|
| Genuine leather | Premium denim, jackets, bags, luxury craft goods | Natural grain and prestige | Color and texture can vary between hides |
| PU faux leather | Fashion apparel, beanies, promotional garments | Consistent color and vegan-friendly positioning | Needs wash and heat compatibility checks |
| Microfiber leather | Washable apparel, uniforms, active casualwear | Good durability and controlled surface | May cost more than basic PU |
| Washable leather-like material | Denim, kidswear, basics, workwear | Built for laundering and abrasion | Texture choices may be narrower |
Thickness is another practical decision. Thin labels, roughly 0.6 mm to 1.0 mm depending on material, flex better on lightweight knits, T-shirts, and soft accessories. Medium labels around 1.0 mm to 1.5 mm suit beanies, denim accents, aprons, and bags. Heavier patches can feel substantial on jackets and rugged workwear, but they may fight the fabric, distort stitching, or feel bulky against the body.
Color strategy deserves more attention than it usually gets. Tan, brown, black, gray, cream, and cognac remain popular because they pair with many fabrics and photograph well. Bold red, blue, green, or white labels can work beautifully for a narrow collection, but they may reduce compatibility across future colorways. If the garment line changes seasonally, neutral labels create fewer inventory headaches.
Texture and finish control detail. Smooth surfaces hold fine logos better. Pebbled, distressed, or cracked textures add character but can reduce small-letter clarity. A 6-point tagline may survive on a printed paper hangtag; it can blur on textured faux leather after debossing.
Safety and compliance questions belong in the first quote request, not after bulk production. Ask about colorfastness, nickel-free rivets if metal hardware is used, material composition, wash testing, and suitability for children’s clothing or skin-contact use. For sustainability and material claims, buyers can review guidance from the U.S. Environmental Protection Agency’s greener products resources, then ask suppliers for documentation that supports any marketing language.
Cost, Pricing, MOQ, and Quote Variables Buyers Should Know
Unit cost is shaped by material, size, thickness, order quantity, marking method, color count, cutting complexity, backing type, and inspection requirements. A simple faux leather debossed rectangle in one size is usually cheaper than a genuine leather die-cut patch with foil stamping, rivet holes, and three colorways.
Minimum order quantity exists because setup work has fixed costs. Even a small label may require material sourcing, artwork cleanup, machine calibration, tooling, pressing tests, cutting setup, packing, and inspection. For many custom trim orders, buyers may see MOQs from 100 to 500 pieces for simpler labels, while custom materials, special colors, or dies may push practical minimums higher. The exact threshold depends on the supplier and specification.
As a planning range, simple faux leather debossed labels can land around $0.25 to $0.80 per unit at moderate quantities. More complex genuine leather or foil-stamped patches may run from about $0.80 to $2.50 or more per unit. Very small runs cost more because setup is spread over fewer pieces. Larger orders often drop sharply once tooling and proofing are absorbed.
A supplier will usually need these quote inputs:
- Finished label dimensions, such as 1 x 2 inches or 2 x 3 inches
- Material preference, including genuine leather, PU, microfiber, or washable leather-like material
- Logo file, ideally AI, EPS, SVG, or editable PDF
- Quantity and any expected reorder volume
- Attachment method, such as sew-on, rivets, heat-press, or pre-punched holes
- Garment type, wash requirements, delivery location, and target in-hands date
Setup charges may appear separately. Custom embossing plates, debossing dies, foil dies, cutting dies, sample fees, and material matching can all add cost before the first bulk label is produced. That is not automatically a warning sign. It is often how custom finishing economics work. The better question is whether the setup cost supports repeatable, approved production.
The packaging buyer’s uncomfortable truth is blunt: the cheapest label can become expensive if it fails in washing, arrives late, or forces rework on finished garments. Removing and replacing a bad patch from 300 sewn garments can cost more than choosing the correct material from the beginning.
Ask for price breaks at several quantities. A quote at 250, 500, 1,000, and 2,500 pieces can reveal whether buying slightly more reduces the unit cost enough to justify holding inventory. If the garment program also needs hangtags, care labels, or brand stickers, compare formats through Custom Labels & Tags so the visual system does not feel patched together.
Process, Timeline, and Lead Time From Artwork to Delivery
A typical order moves through inquiry, spec confirmation, artwork review, digital proof, sample or pre-production approval, bulk production, quality check, packing, and shipping. The fastest orders are not always the simplest designs. They are the orders with complete information.
Vector artwork speeds review because edges are clean and scalable. AI, EPS, SVG, or editable PDF files reduce redraw time and make the logo easier to translate into debossing, engraving, or foil stamping. High-resolution PNG or JPG files can help with visual review, but they often require conversion before production.
For a standard custom leather garment label, a digital proof may take 1 to 3 business days after complete specs are received. A physical sample can add 5 to 10 business days, sometimes more if custom material or tooling is involved. Bulk production may take another 7 to 20 business days after approval, depending on quantity, complexity, and supplier capacity. Shipping is separate.
Sampling is not always necessary, but it is smart for major launches, premium garments, first orders with a new supplier, unusual materials, foil stamping, or labels intended for frequent washing. A sample gives buyers a real read on thickness, grain, logo depth, edge quality, and stitch-hole placement. Photos help. Touch helps more.
Several issues slow turnaround: unclear sizing, low-resolution art, custom material colors, special thicknesses, complex die cuts, multiple approval rounds, seasonal production congestion, and late changes after proof approval. Rush orders can sometimes shorten proofing or production windows, but material availability, curing, pressing, cutting, inspection, and packing still create hard limits.
Build the timeline backward from the garment sewing date, not the product launch date. Labels must arrive before final assembly, packing, photography, wholesale samples, and ecommerce fulfillment. If the sewing contractor needs trims on the 10th, a label delivery on the 18th is late even if the collection launches weeks later.
For reorders, keep an approved label spec sheet. Include material name, thickness, color reference, dimensions, artwork version, marking method, hole size and spacing, edge style, supplier proof, and approved sample photos. A good spec sheet can save days and prevent the quiet drift that happens when a “same as last time” order is rebuilt from memory.
Common Design and Ordering Mistakes That Make Labels Look Cheap
Most bad leather labels do not fail because the idea was wrong. They fail because the buyer treated a tactile trim like a flat logo upload. Tiny taglines, fine serifs, gradients, distressed marks, and hairline borders may look strong on a screen but muddy once pressed into textured material.
Proportion errors are just as common. A patch that is too large can overpower a beanie or lightweight knit. A patch that is too small may lose brand impact, especially in ecommerce photography where the label must read from several feet away on a product grid. Before approval, print the label at actual size on paper and place it on the garment. Crude? Yes. Effective? Very.
Contrast needs judgment. Blind debossing on dark brown or black material can look elegant in person, but it may be difficult to read under retail lighting or in online images. Foil, print, or a lighter material can improve visibility, though each adds its own cost and durability questions.
Attachment mismatch causes real production problems. Adhesive-only labels on washable clothing can lift. Thick patches on delicate knits can sag. Rivets on thin fabric can tear if the fabric is not reinforced. Heat-press labels can fail if the fabric finish, adhesive layer, pressure, or laundering conditions are wrong.
Incomplete specs create fuzzy quotes. “How much for leather labels?” is not enough. A credible estimate needs dimensions, material, quantity, logo method, attachment style, and artwork. Without those details, the first price is often a placeholder, and the final price may move once real production requirements appear.
Ignoring wash testing is another expensive shortcut. A label can look perfect on arrival and still fail after detergent, heat, abrasion, garment dyeing, or tumble drying. For apparel shipping in ecommerce or retail distribution, packaging durability standards such as those from ISTA reinforce a useful principle: products must survive the conditions they will actually face, not the conditions of a photo sample.
One more mistake: changing suppliers without retaining specifications. Small differences in grain, thickness, stamp depth, or color can make reorders look inconsistent. Customers may not know why a newer batch feels cheaper, but they can sense the shift.
Build a Label Spec Before You Request Samples
Before requesting samples, build a simple label specification. It does not need to be a 12-page technical file. It does need enough information for a supplier to quote accurately and produce a sample that reflects the final garment.
- Choose the garment type: denim, jacket, knitwear, beanie, apron, bag, workwear, or handmade item.
- Define placement: waistband, hem, sleeve, side seam, pocket, cuff, bag front, or strap.
- Select the finished size, including sewing allowance or fold allowance.
- Pick the material, thickness range, surface texture, and color.
- Choose the logo method: debossing, embossing, foil stamping, screen printing, or laser engraving.
- Confirm attachment: sew-on, pre-punched holes, rivets, heat-press, or temporary adhesive for positioning.
- List quantity, target delivery date, wash expectations, and reorder plans.
Photograph or sketch the label placement on an actual garment. Placement affects scale, fold style, stitch access, sewing method, and shopper visibility. A center-fold tab that looks perfect on a hoodie hem may not suit a thick apron pocket. A waistband patch that reads well on rigid denim may feel oversized on stretch fabric.
Prepare artwork carefully. Send vector files when possible. Outline fonts. Provide Pantone or close color references if printing or foil is involved. Include a simplified logo version for small labels, especially if the primary mark contains fine text, texture, or multiple line weights.
For new designs, order one production sample if timing allows. Sampling is especially useful with genuine leather, unusual colors, foil stamping, special die cuts, or labels intended for frequent washing. Review the sample on the garment, not just on a desk.
Ask suppliers for durability guidance, not only price. Washability, colorfastness, attachment compatibility, and reorder consistency can matter more than a $0.07 unit-cost difference. For a broader branded trim package, Custom Logo Things’ Custom Labels & Tags options can help align garment labels with hangtags, stickers, and other customer-facing details.
Before buying personalized leather clothing labels, confirm the garment use case, approval timeline, and exact label spec. The finished trim should make the brand feel sharper, more durable, and more intentional, not create avoidable production friction two days before sewing starts.
FAQs
Are personalized leather clothing labels washable?
Some are washable, but it depends on the material, finish, marking method, and attachment style. PU, microfiber, or washable leather-like materials are often better for garments that need repeated laundering. Ask for wash-test guidance before ordering labels for denim, kidswear, uniforms, or everyday basics.
What size should custom leather labels for clothing be?
Small hem or sleeve tabs may be around 1 to 2 inches wide, while waistband patches and bag labels can be larger. The right size depends on garment scale, logo complexity, sewing allowance, and how visible the label should be. Test the dimensions on a real garment before approving bulk production.
Can personalized leather patches be used on handmade clothing?
Yes. They work well for knitwear, crochet goods, aprons, bags, denim, and boutique apparel. For handmade items, softer and thinner labels usually sew more cleanly and feel less bulky. Pre-punched holes can help makers attach labels consistently without damaging the material.
How much do personalized leather garment labels cost?
Pricing depends on material, size, quantity, logo technique, cutting shape, backing, and setup needs. Simple faux leather debossed labels usually cost less than genuine leather labels with foil or Custom Die Cuts. Request quantity price breaks and ask whether setup, sampling, and shipping are included.
What artwork file is best for leather clothing labels?
Vector files such as AI, EPS, SVG, or editable PDF are usually best for clean debossing, embossing, engraving, or foil stamping. High-resolution PNG or JPG files may work for review but can require conversion before production. Avoid tiny text, gradients, and overly thin lines unless the supplier confirms they will reproduce clearly.