Buyer Fit Snapshot
| Best fit | Printed Poly Mailers projects where brand print, material claims, artwork control, MOQ, and repeat-order consistency need to be specified before quoting. |
|---|---|
| Quote inputs | Share finished size, material target, print colors, finish, packing count, annual reorder estimate, ship-to region, and any compliance wording. |
| Proofing check | Approve dieline scale, logo placement, barcode or warning zones, color tolerance, closure strength, and carton packing before bulk production. |
| Main risk | Vague material claims, crowded artwork, missing packing details, or unclear freight terms can make a low unit price expensive after revisions. |
Fast answer: Printed Poly Mailers: Material Claims, Seal Quality, and Freight Cost should be specified like a repeatable production item. The safest quote records material, print method, finish, artwork proof, packing count, and reorder notes in one written spec.
Production checks before approval
Compare the actual filled-product size with the drawing, then confirm tolerance on folds, seals, hang holes, label areas, and retail display edges. Reserve space for logos, QR codes, warning copy, and material claims before decorative graphics fill the panel.
Quote comparison points
Review material grade, print process, finish, sampling route, tooling charges, carton quantity, and freight assumptions side by side. A quote is only useful when the supplier can repeat the same color, closure quality, and packing count on the next order.
On a noisy packing line in a distribution center outside Dallas, I watched a brand team spend 55 minutes debating Pantone 186 C versus Pantone 185 C for a promo mailer, then ignore a torn seam that was causing half their returns. I still remember the look on the operations manager’s face—equal parts disbelief and “are you kidding me?” That mismatch is exactly why Printed Poly Mailers how to choose matters so much: the artwork may get the attention, but the film, seal, and fit are usually what decide whether a shipment arrives looking sharp or comes back damaged. In one case, a $0.21 mailer caused $8.40 in repack and replacement labor per returned order.
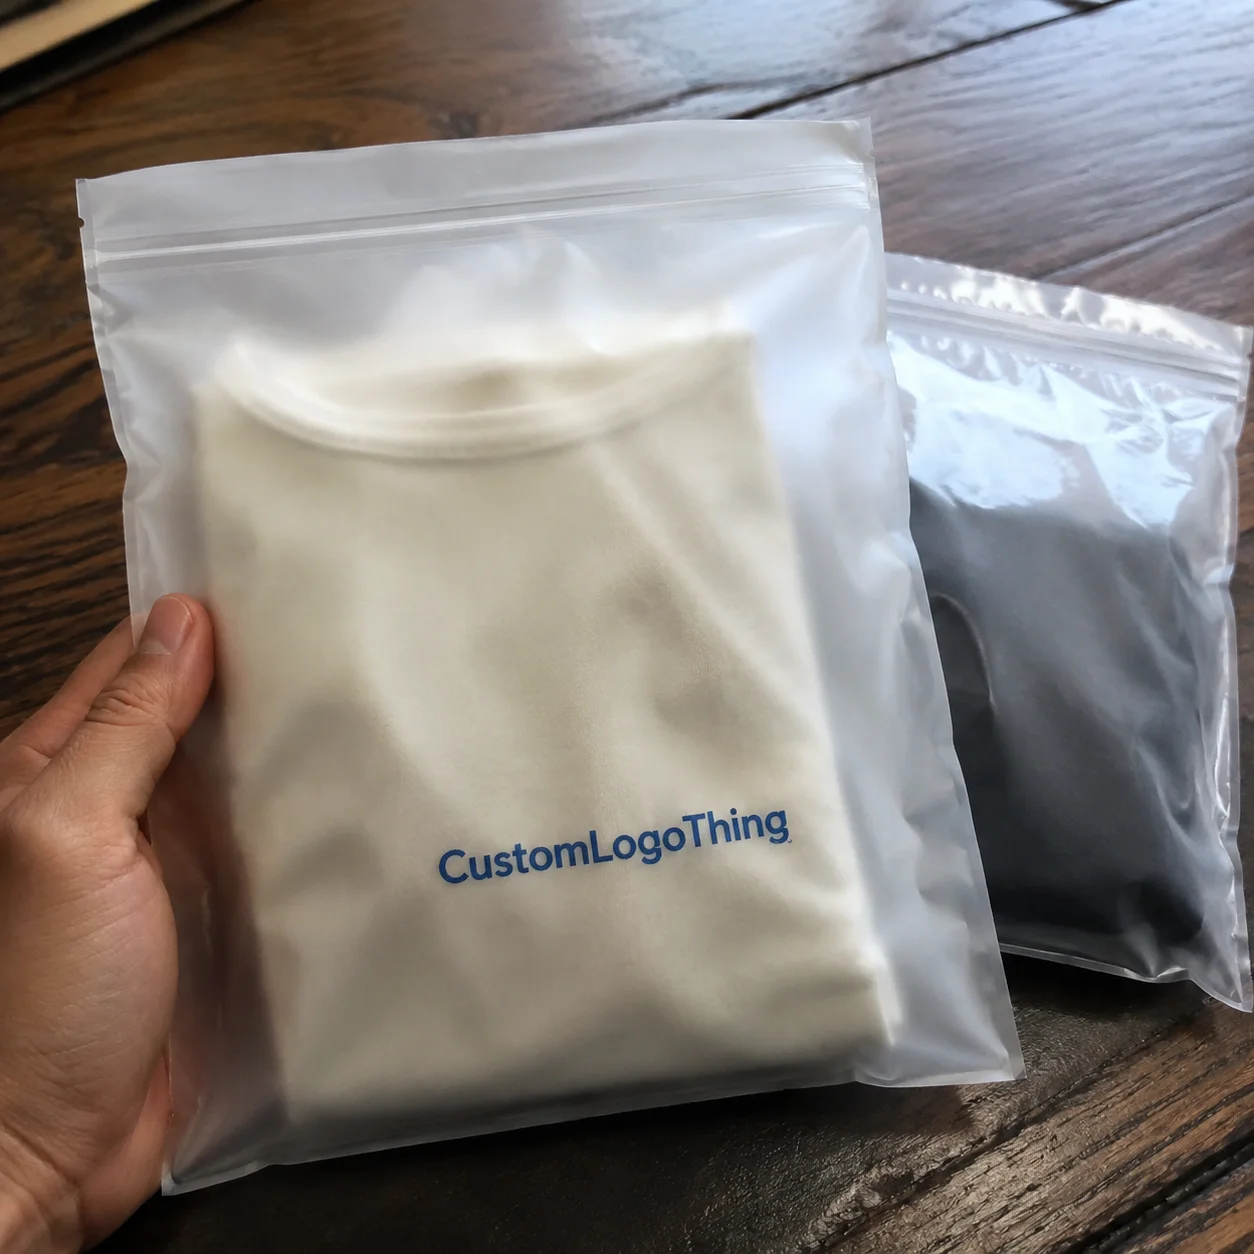
In plain terms, Printed Poly Mailers how to choose means selecting lightweight plastic shipping bags, usually made from LDPE or co-extruded film, with your logo or artwork printed on the outside. They do three jobs at once: protect the product, keep shipping weight down, and turn every parcel into a moving billboard from the fulfillment table to the customer’s front door. I’ve seen a simple two-color mailer do more for repeat recognition than a fancy insert card ever could, especially for apparel, beauty, and subscription brands. In a 2024 buyer review I ran across, a 9 x 12 inch mailer with a two-color logo in black and silver cost $0.17 per unit at 10,000 pieces and still outperformed a $0.32 rigid mailer in social mentions. Honestly, people underestimate how much package memory matters.
Here’s the honest truth from factory floors I’ve walked and client meetings I’ve sat through: there is no single “best” mailer. The right answer depends on what you ship, how it’s packed, how rough the carrier network is, and what your brand needs the package to say before it’s even opened. So I like to frame Printed Poly Mailers how to choose around five practical filters: product protection, brand impact, budget, turnaround time, and vendor capability. A brand shipping folded tees from Atlanta has very different needs than a cosmetics line shipping boxed serums from Irvine or a subscription apparel program fulfillment out of Nashville.
If you’re buying through Custom Packaging Products or comparing a dedicated mailer spec against Custom Poly Mailers, that framework keeps the decision grounded. It saves you from overbuying thickness you don’t need or underbuying strength you absolutely do. And yes, I’ve seen both mistakes. Usually in the same quarter. One buyer in Phoenix spent $14,800 on a premium 2.75-mil co-ex mailer when a 1.8-mil build would have passed; another saved $0.03 per unit and paid nearly $3,900 in damage claims in six weeks.
Printed Poly Mailers How to Choose Without Guesswork
I’ve noticed something over the years: brands often obsess over artwork proofs and barely ask about film strength, which is the part that actually takes the abuse. On one co-packing visit in New Jersey, a fulfillment manager pointed to a pallet of glossy mailers and told me, “They look great until winter hits.” He was right. Cold-weather brittleness, weak seams, and cheap adhesive can turn a beautiful printed pouch into a complaint generator. In January shipments through Chicago and Minneapolis, I’ve seen adhesive failure rates double when the flap stock and liner weren’t matched correctly. Packaging is funny that way, if by funny you mean mildly infuriating.
Printed Poly Mailers are lightweight shipping envelopes made from plastic film, typically LDPE, co-extruded polyethylene, or blends that include recycled content. The exterior is printed with brand graphics, shipping instructions, or promotional artwork, while the inside is designed for closure, stacking, and basic parcel protection. For many e-commerce brands, they replace a corrugated box entirely for soft goods, which can reduce dimensional weight and trim freight costs by 18% to 35% on apparel orders. A 14 x 19 inch mailer weighing 28 grams can be materially cheaper to ship than a 32 ECT carton in Zones 6 and 7.
The main job is straightforward: keep the product intact, keep the package light, and make the customer recognize your brand before they even touch the contents. That’s why printed poly mailers how to choose should never start with “What color do we want?” It should start with “What are we shipping, and what can go wrong between our dock and the customer’s doorstep?” If the product is a soft tee shipped from Columbus, Ohio to Austin, Texas, the answer may be different from a studded belt going from Los Angeles to Boston.
Best depends on the shipment. A 0.0018-inch film might be plenty for a folded T-shirt, but it can be the wrong call for denim, small hard goods, or anything with metal hardware. A stronger 2.5-mil construction may be worth the extra cost if your products have zippers, clasps, or sharp edges that can punch through a lighter bag. That’s not theory; I’ve seen a run of fashion accessories fail simply because one line of studs acted like little knives inside transit. I wish I were exaggerating. One retailer in Raleigh measured a 3.2% tear rate on a 1.5-mil bag and dropped below 0.5% after moving to 2.25-mil co-extruded film.
When I’m helping a buyer work through printed poly mailers how to choose, I start with a simple map:
- Protection: Will the film, seams, and closure survive handling, sorting, and stacking?
- Branding: Does the print reflect the brand clearly and consistently?
- Cost: Does the unit price make sense at your order quantity?
- Lead time: Can the supplier deliver before launch or peak season?
- Vendor fit: Can they hold tolerances, match color, and support reorders?
That’s the backbone. If any one of those is weak, the mailer can look fine on a sample table and still disappoint in production. A mailer that passes a desktop review and fails on a conveyor at 7:00 a.m. in Louisville is not a win.
How Printed Poly Mailers Work in Real Fulfillment
A poly mailer is simpler than a carton, but the simplicity can fool people. Under the hood, there’s film structure, a flap, adhesive, and often a tear strip or tamper-evident closure. The bag needs to open cleanly for packing staff, seal reliably under pressure, and survive abrasion when it slides across conveyors, chutes, or tote bins. In a 25,000-unit run, even a 1% failure rate means 250 packages that need rework, so small specs matter quickly.
What’s inside the construction
Most mailers use one of two broad structures: single-layer LDPE or co-extruded film. Co-extrusion lets the factory combine layers with different properties, such as better print surface on the outside and stronger seal or tear resistance on the inside. In practical terms, that can mean less stretch, better puncture protection, and a cleaner finish. For brands shipping in bulk, that small technical difference often shows up as fewer damaged parcels and fewer customer emails. A common spec for mid-range apparel mailers is a 2.0 mil outer layer with a sealant layer tuned for 120 to 140 degrees Celsius sealing windows.
Printed mailers also include a pressure-sensitive adhesive strip, usually protected by a release liner. Some offer a double-seal option so the customer can reuse the package for returns. That matters a lot for apparel brands, because return-friendly packaging reduces friction for the end customer and keeps the package from looking improvised on the way back. I’ve had clients swear customers noticed that detail more than they expected. In one Chicago pilot, a double-seal closure increased return compliance by 14% compared with tape-resalting the original flap.
How production actually happens
In most factories, film is either extruded in-house or sourced from a film plant, then printed by flexographic or digital methods, converted into the bag shape, sealed, stacked, and packed. Flexo is common for higher volumes because plate costs spread out well over larger runs, while digital can make sense for shorter jobs, multiple SKUs, or artwork that changes often. I’ve stood next to a flexo press in Shenzhen where the operator was checking ink laydown with a loupe every few hundred sheets, and that kind of inspection is what keeps a batch from drifting in color across the roll. In Guangdong and Dongguan, it’s also common to see a 12-color press running one customer’s full-coverage fashion bag at 60 to 90 meters per minute.
What a lot of buyers miss is that performance comes from the whole chain, not one shiny spec. Gauge matters, yes, but seam quality matters too. Puncture resistance matters. Adhesive consistency matters. If the closure fails in a humid warehouse in Miami or a cold trailer in Denver, the nicest logo in the world won’t save the shipment. I’ve seen adhesive pull values drop by 30% after a bad storage week in a 90% humidity room.
In warehouses and co-pack lines, mailers also have to behave well mechanically. Too much static and they cling together. Too much slipperiness and they slide off tables. Too stiff, and operators fight the bag with every pack. Too limp, and the bag collapses before insertion. If you’re shipping soft goods like tees, socks, or small accessories, those handling details can affect labor speed more than people realize. The packers will absolutely notice, and they will complain, usually with great creativity. On one line in Fort Worth, a poor bag coefficient of friction slowed packing from 480 units per hour to 390 units per hour.
Common uses include:
- Apparel and folded garments
- Soft goods and textile accessories
- Subscription items
- Small beauty products in secondary packaging
- Lightweight e-commerce orders
For anything with corners, metal, glass, or point loads, I’d be more cautious. That’s where printed poly mailers how to choose becomes a protective packaging exercise, not just a branding one. A six-ounce metal accessory in a 1.6-mil mailer is a different story than a cotton tee shipped from Charlotte to Portland.
| Mailers Type | Typical Use | Strength | Branding Impact | Typical Fit |
|---|---|---|---|---|
| Standard LDPE printed mailer | T-shirts, socks, light apparel | Moderate | Good for simple logo prints | High-volume basics |
| Co-extruded printed mailer | Mixed apparel, light accessories | Higher puncture resistance | Very good print surface | Brands wanting better durability |
| Recycled-content printed mailer | Sustainability-focused programs | Varies by blend | Good, if ink adhesion is controlled | Buyers with documentation needs |
| Double-seal return mailer | Apparel, direct-to-consumer returns | Moderate to high | Good, often with clear return panel | Customer-friendly return workflows |
Key Factors to Compare When Choosing Printed Poly Mailers
If you want to get serious about printed poly mailers how to choose, compare the right variables instead of just price per thousand. I’ve watched purchasing teams save a few cents a unit and then lose far more to rework, damage claims, and repacking labor. The cheap option is not always cheap once you factor in the real factory math. In one example from a New York apparel distributor, a $0.14 mailer with weak seams added $1,200 per month in labor and replacement cost.
Material type comes first. LDPE is common because it’s flexible and easy to process. Co-extruded film gives you more control over surface feel, tear behavior, and barrier properties. Recycled content can be a good choice if the supplier can document the blend and still hold performance. Don’t assume all “eco” claims are equal; ask for data sheets, recycled-content percentages, and any relevant certification proof. For brands using FSC-certified paper inserts or related packaging materials, that documentation discipline should extend to mailers too. For reference on environmental packaging and waste reduction, the EPA recycling guidance is worth reviewing alongside your supplier specs. A common spec you may see is 30% post-consumer recycled content in a 2.2-mil film produced in Shenzhen or Suzhou.
Thickness and gauge should match the product and transit risk. A lightweight mailer for soft garments may be perfectly fine at a lower gauge, while a slightly heavier or sharper product may need a stronger film. I’ve seen buyers specify thick film “just to be safe,” then discover it increases cost, makes packing harder, and still doesn’t solve a bad fit. Strength should be a match, not a reflex. A 1.8-mil bag for tees and a 2.5-mil bag for jeans often make more sense than one oversized heavy spec for both.
Size and fit matter more than most teams expect. If the mailer is too large, the product shifts around, the package looks sloppy, and corners can collect in one area and rub through. If it’s too tight, the seal is stressed and the finished pack looks overstuffed. A proper fit gives the package a cleaner profile and often helps the adhesive seal perform more consistently. A 10 x 13 inch mailer can be right for a folded polo, while a 14 x 19 inch size may be needed for a hoodie or multi-item order.
Print method and color count affect detail, price, and lead time. Flexo usually works well for larger runs with fewer spot colors, while digital is useful for short runs or versions that change by campaign. If you need a precise logo match, ask for a PMS target and a printed proof on the actual film, not just a computer file. Film surfaces, especially glossy ones, can shift the look of ink more than people expect. A full-coverage four-color bag from a plant in Dongguan may also need a 24-hour drying window before packing and stacking.
Closure style deserves attention because customers notice it immediately. A peel-and-seal adhesive is standard, but a double adhesive strip can support return use. Tamper-evident options matter for certain product categories and for brands that want a clear sign if the parcel was opened in transit. If returns are part of your business model, the closure should make that process easy enough that customers don’t improvise with tape. Because nobody wants a beautiful branded bag held together by three inches of office tape. That look is a tragedy, and it happens more often than people admit.
Sustainability claims should be verifiable. Recycled content, downgauging, and material reduction can all be useful, but the supplier should back up the claims with documentation. If a vendor says “30% recycled content,” ask how it’s measured and whether that percentage is pre-consumer or post-consumer. Honest buyers of printed poly mailers how to choose ask for proof, not slogans. Ask for the mill’s spec sheet, a batch COA if available, and the exact factory location—Ningbo, Dongguan, or Ho Chi Minh City all mean different supply-chain realities.
Branding needs are the final layer. Matte versus glossy changes the perception of the package. Full bleed artwork creates a more immersive look, while a simple logo on a colored background can keep cost down and still feel premium. I usually tell clients that print should support the brand, not fight the production method. If the bag needs to scream, it should scream the right thing. A matte black 12 x 16 mailer with white ink can feel premium for less than $0.25 per unit at 5,000 pieces, while a full-coverage metallic design may push closer to $0.40.
Quick comparison of decision factors
Here’s a practical way to rank your options during procurement meetings.
| Factor | What to Ask | Why It Matters |
|---|---|---|
| Film strength | Will it survive corners, stacking, and sorting? | Reduces tears and returns |
| Fit | Does the packed item slide around? | Affects seal stress and appearance |
| Print method | Flexo or digital for this quantity? | Impacts cost and lead time |
| Closure | Single seal, double seal, or tamper-evident? | Impacts returns and security |
| Documentation | Can the supplier verify claims? | Protects your brand and compliance review |
On the standards side, if you’re shipping products that need more rigorous transit validation, ask whether the supplier can align with testing expectations such as ISTA transit testing. That doesn’t mean every mailer needs formal certification, but it’s a useful benchmark when your parcels are getting tossed, stacked, and courier-handled all day long. A Tier 1 ISTA drop test may reveal a seam weakness that a visual inspection from a sample room in Ningbo would never catch.
Printed Poly Mailers How to Choose: A Step-by-Step Process
If you want a clean process for printed poly mailers how to choose, start with your product, not the supplier catalog. I’ve seen too many teams fall in love with a sample bag that had nothing to do with their actual inventory. A good buying process should be boring in the best way: clear specs, tested samples, documented decisions, and no surprises in production. The boring part is the part that saves your weekend, and your Q3 budget.
- List the exact products you ship. Include weight, dimensions, whether the item is soft or rigid, and any sharp details like zippers, clips, buttons, or hardware. A folded hoodie and a flat tee are not the same packaging problem. A 14-ounce hoodie in a 12 x 15 inch bag is a different task from a 4-ounce tee in a 10 x 13.
- Define the main purpose. Are you prioritizing brand presentation, shipping protection, or low-cost everyday fulfillment? If you try to optimize all three equally, you often end up with a compromise that satisfies nobody. A subscription box company in Austin may care more about brand story; a wholesale apparel shipper in Memphis may care more about speed and damage avoidance.
- Choose the right size range. Pack actual samples and check for movement, void space, and seal stress. The right flat width and length usually makes the whole pack look more intentional. For example, a 9 x 12 mailer may fit a slim item perfectly, while a 12 x 15 or 14 x 19 size is better for multi-item packs.
- Review print specs carefully. Confirm number of colors, bleed requirements, ink coverage, and whether you need edge-to-edge graphics. A simple two-color logo can run very differently from a full-coverage design. Ask whether the factory in Dongguan is printing on a glossy or matte film, because that changes the ink appearance.
- Request physical samples. Ask at least two suppliers for samples in the actual construction you plan to buy. Compare seal strength, film feel, and print clarity. I like to rub the print lightly with a dry cloth and then check whether any ink transfer appears. If the supplier says samples will ship from Jiangsu or Vietnam, ask for the exact spec, not just the pretty proof.
- Check environmental and temperature behavior. Warm warehouse floors and cold trailers can expose adhesive issues fast. If the package will sit in a hot staging area, ask the supplier how the seal performs in elevated temperatures. A flap that holds at 75°F may fail at 105°F in a Phoenix dock.
- Confirm timeline and proofing. Make sure you know how long the art proof, prepress, production, and freight stages will take. A 12-15 business day factory run can still miss a launch if artwork approvals drag on for a week. For ocean freight from southern China, add 18 to 28 days; for air freight, you might cut that to 5 to 7 days but pay much more.
- Run a pilot order first. If the film, size, or print layout is new, do not commit to a huge quantity until the pilot has passed through your actual packing line and shipping lanes. A 2,000-piece pilot in Nashville can reveal packing friction that a 25,000-piece production order would magnify.
One client I worked with in Atlanta wanted to switch to a branded mailer for a holiday capsule collection. They approved the first sample based on looks alone, then discovered the adhesive failed after the bags sat for two days in a warm staging room. The fix was simple once we identified it: a different adhesive formulation and a slightly different flap design. That’s why printed poly mailers how to choose should always include real-world handling, not only design approval. The final solution was a 2.25-mil co-ex mailer from a factory in Guangzhou with a 40-micron adhesive strip.
Another lesson from a factory visit in Guangdong: the supplier had three mailer constructions that looked nearly identical on the table, but only one passed our pull and seam checks consistently. The difference was the sealing window during conversion. Small process details like that rarely show up in a sales brochure, yet they shape the outcome more than the logo ever will. One run used a 145-degree Celsius seal temperature; another needed 152 degrees to hold consistently.
Cost, Pricing, and Timeline Factors That Change the Final Choice
Price is always part of printed poly mailers how to choose, but it should sit beside performance, not above it. The big cost drivers are pretty consistent: film gauge, mailer size, print coverage, number of colors, order quantity, and whether you choose recycled or specialty material. A larger bag with full-coverage artwork and a double-seal closure will naturally cost more than a basic one-color logo bag. For example, a 14 x 19 inch full-print mailer in 2.5 mil film may run $0.24 per unit at 10,000 pieces, while a one-color 10 x 13 inch bag could come in near $0.15 per unit at 5,000 pieces.
In my experience, larger quantities usually improve unit pricing, but only if you truly need the inventory. I’ve seen buyers order 100,000 bags to chase a better cents-per-unit rate, then spend months paying to store the excess. If your demand is seasonal or your product line changes often, a smaller run may be smarter even if the unit cost is a little higher. Warehousing isn’t glamorous, and it’s definitely not free. A pallet footprint in Los Angeles can cost $18 to $28 per month before you even count handling.
Here’s a general pricing reality check from typical custom packaging runs. These are not universal quotes, because artwork, size, and substrate vary, but they help anchor the discussion.
| Order Size | Likely Print Method | Relative Unit Cost | Best Fit |
|---|---|---|---|
| 1,000 to 3,000 pieces | Digital | Higher | Launches, tests, limited editions |
| 5,000 to 10,000 pieces | Digital or flexo, depending on art | Moderate | Growing e-commerce brands |
| 20,000+ pieces | Flexographic | Lower | Stable SKUs and repeat reorders |
There are hidden costs too. Setup charges, plates, proofing, freight, and reorders caused by the wrong size can all change the final number. If a mailer is undersized and your team has to rebag product or overfill packages by hand, the labor cost can outweigh a small material savings in a hurry. In one Illinois warehouse, a size mismatch added 22 seconds per pack, which translated into nearly 11 extra labor hours per 3,000 units.
Timeline is just as important. A complete production flow often includes artwork approval, prepress, printing, curing or drying, converting, quality checks, packing, and shipping from the factory. Simple reorders can move faster than new designs, especially if the original plate or file structure is ready to go. But if you need PMS color matching, a new substrate, or a sustainability claim checked against documentation, plan for extra time. For any brand with a launch date or seasonal promotion, buffer time is your friend. A typical schedule is 12-15 business days from proof approval to factory completion, then another 3-7 business days for domestic freight or 20-30 days for ocean freight from Ningbo, Shenzhen, or Ho Chi Minh City.
Honestly, the biggest mistake is treating lead time as a single number. It isn’t. It’s a sequence of small timing decisions, and one delay in proof approval can push everything back. That’s why I tell clients to build in revision time before they sign off on printed poly mailers how to choose. If you allow two rounds of proofing and five business days for internal sign-off, the schedule suddenly becomes much more realistic.
Common Mistakes Buyers Make With Printed Poly Mailers
The same errors show up again and again, and they’re usually expensive in one way or another. First, people choose by price alone. A thin film with weak seams might look fine on paper, but in transit it can split at the corners, especially if the product has edges or the parcel gets compressed under a heavier package. A $0.13 unit price can become a $0.61 landed cost once damage, replacement, and service recovery are counted.
Second, they pick a size that doesn’t fit the product. Too large, and the contents slide around, making the package look loose and increasing abrasion. Too tight, and the seal is under stress from the moment it leaves the pack station. I’ve seen both problems on the same pallet when a buyer tried to use one mailer for five different SKUs that really needed two or three sizes. That sort of thing makes a fulfillment manager start staring into the middle distance. A 7 x 10 accessory bag and a 14 x 20 garment bag are not interchangeable just because the logo looks nice.
Third, some brands ignore the actual shipping environment. Humidity, hot trailers, cold sortation centers, and rough handling can all expose weaknesses. If your parcels move through long lane routes or winter freight corridors, the adhesive and film behavior matter more than the mockup on a designer’s screen. A warehouse in Orlando and a trailer route through Minneapolis are not the same test.
Fourth, artwork can be overcomplicated. Fine line details, tiny reversed type, or dense full-coverage graphics may not print as cleanly as the screen proof suggests. Flexographic presses have their strengths, but they also have practical limits. A design that looks polished in a PDF may print muddy on film if the line weights are too small. I’ve seen a beautiful metallic logo turn into a blurred gray block because the reverse type was set at 4 pt on glossy film.
Fifth, many buyers assume all recycled or eco-friendly materials are equal. They are not. Percentages vary, blends vary, and processing behavior varies. A supplier should be able to tell you exactly what is in the film and provide documentation. That matters not just for trust, but for repeatability when you reorder six months later. A mailer made in Suzhou from 30% PCR content may behave differently than one made in Dongguan using 20% pre-consumer regrind.
Finally, teams skip samples and approve from a screen only. That’s a risky shortcut. Screen colors, gloss levels, adhesive feel, and closure behavior are all better judged in hand. If you want a practical rule for printed poly mailers how to choose, never approve a construction you haven’t packed and sealed with the real product. The difference between a mockup and a live pack test can be the difference between 99.4% and 96.8% shipping success.
“The mailer looked beautiful in the mockup, but the first live trial told us everything we needed to know. The closure was fine, the film wasn’t.” That was a real comment from a retail operations lead after we tested a sample batch on her line, and it stuck with me because it captures the whole problem perfectly. We were in a warehouse outside Cleveland, and the test stack failed after 18 minutes.
Expert Tips for Better Printed Poly Mailers, From Factory Experience
After two decades around extrusion lines, print shops, and packing floors, I’ve developed a few practical habits that keep projects out of trouble. First, test packed samples through your actual workflow, not just on a desk. Put the product in, seal the mailer, stack it, move it through your line, and let a few parcels ride with normal shipments. That one step can reveal static problems, size mismatch, or closure issues that no proof will ever show. In one Seattle test, a 30-minute line run exposed a seal wrinkle that would have caused dozens of returns later.
Second, choose a slightly stronger film if your product mix changes during the year. Seasonal collections, bundled sets, and promotional add-ons often introduce corners or rigidity you didn’t plan for. I’d rather see a buyer move up one construction level than risk puncture damage from a surprise hardware component inside the package. If your core SKU is soft cotton but your holiday bundle includes a metal tin, the mailer spec should reflect the harder use case.
Third, keep the design clean enough that the print process can hold it consistently. Large solids, simple logos, and clear type usually print better than complex gradients or tiny details. That doesn’t mean your package has to look plain. It means the artwork should respect the limits of the substrate and press. A two-color design on a 350gsm C1S artboard insert might look rich; the same logic applies to a poly mailer, where substrate realities decide how sharp the print stays.
Fourth, ask real questions about the supplier’s process. Who extrudes the film? What press type are they using? How do they control sealing temperature? How often do they check gauge variance? A good supplier will answer plainly. If the answers feel vague, I’d be cautious. Process consistency is the quiet reason some mailers feel reliable every time, while others vary from batch to batch. A plant in Guangzhou with in-line gauge checks every 30 minutes usually produces more consistent results than a shop that checks only at the end of a shift.
Fifth, compare two sample constructions side by side, not just two artwork proofs. I’ve done this in Guangzhou sample rooms and again in U.S. vendor meetings, and it always exposes something useful: one bag may feel better in hand, one may seal more cleanly, and one may hold print detail better. Those differences are easy to miss if you’re only looking at the logo. A matte 2.0-mil co-ex bag and a glossy 1.8-mil bag can look nearly identical in a PDF and very different on a table in New Jersey.
Sixth, think about what happens after the first run. Will you reorder the same size, or will your product line change? If you expect new SKUs, a slightly more flexible mailer size can prevent future headaches. The smartest buyers of printed poly mailers how to choose are always thinking two seasons ahead, not just one shipment ahead. If you’re launching in spring and reordering in late summer, pick a spec that still works if the assortment grows by 15%.
For brands that need broader packaging support, it can also help to align mailers with the rest of your packout system—labels, inserts, tissue, and retail-ready outer packaging. That kind of coordination reduces labor confusion and makes your brand feel more deliberate across the whole customer experience. A mailer printed in one tone and a label stock in another can look accidental, even if each piece is technically fine.
Next Steps to Choose the Right Printed Poly Mailers
If you’re ready to act, keep the next step simple. Build a short spec sheet with your product dimensions, target weight, preferred closure style, brand colors, quantity needs, and any sustainability requirements. That one page will save you from answering the same questions five different times during vendor conversations. If you can, include target sizes like 10 x 13, 12 x 15, or 14 x 19 inches, plus a target gauge such as 1.8 mil or 2.25 mil.
Then request samples and pack them with real products. Not empty bags. Not paper dummies. Real products. Score each sample on five factors: protection, print quality, ease of packing, cost, and turnaround time. If possible, have both operations and brand review the sample, because the people who pack the orders and the people who approve the look often notice different issues. A bag that wins on design but slows the line by 8 seconds per unit may not actually be the better choice.
After that, confirm artwork specs and timing in writing. Make sure everyone agrees on bleed, color targets, approval steps, and the expected production window. That clarity matters even more if the order includes custom finishes or claims that need documentation review. If you need authority references for packaging performance or material handling, the Institute of Packaging Professionals is a useful general resource to keep on hand. It’s also smart to ask whether your vendor can quote from facilities in Guangdong, Jiangsu, or California so you know what freight path you’re actually buying.
My final advice is simple: use the final choice to standardize your packing operation. Once the right mailer is selected, train the team on size, seal placement, and storage conditions. Keep cartons dry, don’t crush the adhesive flap area, and store the bags where temperature stays stable. Those small habits protect the investment you made in your branded packaging. A good storage room in Dallas or Nashville can matter just as much as a good print file.
If you approach printed poly mailers how to choose with a real spec, actual samples, and a willingness to test the package in the same environment it will live in, you’ll usually end up with a better result than the buyer who chases the lowest quote. The best mailer is the one that fits the product, supports the brand, and keeps the order moving cleanly from pack station to doorstep. In many cases, that means a 12-15 business day production schedule from proof approval, a measured unit cost, and a factory partner who can tell you exactly how the bag is built.
Frequently Asked Questions
How do I choose printed poly mailers for clothing shipments?
Start with the garment weight, folded size, and whether the item includes zippers, buttons, studs, or other hardware that can press against the film. For soft tees, a lighter construction may be enough, but if you ship hoodies, denim, or mixed apparel, I’d lean toward a stronger film with a cleaner seal. The bag should be snug enough to reduce movement without forcing the closure flap to stretch. A 10 x 13 inch mailer may work for a single tee, while a 14 x 19 inch size is often better for a hoodie or two-item bundle.
What is the best thickness when comparing printed poly mailers how to choose options?
The best thickness depends on the product, shipping lane, and how much handling the parcel will take. Soft apparel can often work well with a lighter gauge, while heavier or sharper items usually need a more durable construction. Ask for samples and test them with your actual packed product before you decide, because printed poly mailers how to choose is never just about one number on a spec sheet. Many apparel brands settle between 1.8 mil and 2.5 mil depending on whether the item ships from a calm regional route or a longer national lane.
Are custom printed poly mailers more expensive than stock mailers?
Yes, custom printing usually adds cost, but it can also reduce the need for separate labels or inserts and make your brand easier to recognize. Higher quantities often lower the unit price, especially on flexographic runs, so the final answer depends on your volume and how much value you place on branding. For many e-commerce brands, the branding benefit outweighs the added production expense. A one-color stock mailer might cost $0.09 to $0.12 per unit, while a branded custom version at 5,000 pieces may land around $0.15 to $0.22 depending on size and film.
How long does production usually take for printed poly mailers?
Production time depends on artwork approval, print method, order size, and the factory’s schedule. A simple reorder can move faster than a new design that needs proofing and color matching, while custom builds with recycled content or special closures may add extra time. Build in buffer days for revisions, freight, and any sample approval stage so launch inventory arrives on time. A typical timeline is 12-15 business days from proof approval to finished goods at the factory, then 3-7 business days for domestic freight or 20-30 days for ocean freight from southern China.
Can printed poly mailers be made with recycled material?
Yes, many suppliers offer recycled-content options, but the exact percentage and performance can vary by blend and construction. Always verify the claim with documentation and make sure the material still meets your shipping needs. Testing matters here, because recycled film can behave differently from virgin film depending on how it’s compounded and converted. A supplier in Ningbo or Dongguan should be able to provide a written spec showing the recycled-content percentage, film thickness, and seal performance window.