Buyer Fit Snapshot
| Best fit | Printed Void Fill Branding projects where brand print, material claims, artwork control, MOQ, and repeat-order consistency need to be specified before quoting. |
|---|---|
| Quote inputs | Share finished size, material target, print colors, finish, packing count, annual reorder estimate, ship-to region, and any compliance wording. |
| Proofing check | Approve dieline scale, logo placement, barcode or warning zones, color tolerance, closure strength, and carton packing before bulk production. |
| Main risk | Vague material claims, crowded artwork, missing packing details, or unclear freight terms can make a low unit price expensive after revisions. |
Fast answer: Printed Void Fill Branding: How It Works and What It Costs should be specified like a repeatable production item. The safest quote records material, print method, finish, artwork proof, packing count, and reorder notes in one written spec.
Production checks before approval
Compare the actual filled-product size with the drawing, then confirm tolerance on folds, seals, hang holes, label areas, and retail display edges. Reserve space for logos, QR codes, warning copy, and material claims before decorative graphics fill the panel.
Quote comparison points
Review material grade, print process, finish, sampling route, tooling charges, carton quantity, and freight assumptions side by side. A quote is only useful when the supplier can repeat the same color, closure quality, and packing count on the next order.
Printed Void Fill branding can look like a small line item on a packaging spec, then the box opens and that first layer of paper, crinkle, or shredded fill takes over the moment. That is the part a lot of teams miss. In many shipments, printed void fill branding is the first physical and visual cue a customer gets, which means it can shape perception before the product even leaves the carton. For ecommerce brands, subscription kits, gifting programs, and premium consumer goods, that inside layer often carries more brand weight than people expect.
Used well, printed void fill branding protects the product, keeps it from shifting in transit, and supports brand identity without making the box feel overdesigned. Used poorly, it reads like a warehouse fix that wandered into the unboxing moment by mistake. Same material. Very different result.
I’ve spent enough time around pack tables to know the difference between filler that looks nice in a proof and filler that actually behaves in a real box. That gap matters. This piece covers what printed void fill branding really involves, how it is made, what affects print quality, how pricing usually works, and how to decide whether the extra spend fits your product mix. I’ll also call out the places where brands overspend on paper that looks great on a screen and turns into a headache once it hits the line.
Printed void fill branding: the packaging layer people notice first
The first bad assumption is that customers notice the carton first. Not always. In plenty of shipments, the filler sits right on top, so printed void fill branding becomes the first thing the customer sees, touches, and mentally connects to the order. A plain box can still feel considered if the filler is intentional. A beautiful carton can lose some of its effect if the interior looks generic or rushed.
That matters because void fill does more than occupy space. It reduces product movement, cushions the contents, and closes the dead air inside a box that can turn into damage during transit. At the same time, printed void fill branding can repeat brand marks, carry pattern work, or hold a restrained color palette that ties into the rest of the packaging system. One layer. Two jobs. That is the value.
For ecommerce brands, the filler often shows up in photos, short videos, and customer posts. For subscription businesses, it becomes part of the ritual. For gifting, it adds to the sense of value and finish. For cosmetics and premium consumer goods, it helps the package feel deliberate instead of improvised. That is why printed void fill branding makes the most sense where the unboxing experience is part of the product story rather than a shipping afterthought.
Plain kraft paper still has a place. Generic shredded filler still does the job. Those choices send a different message, though. Plain stock says functional and straightforward. printed void fill branding says the brand paid attention to the inside as carefully as the outside. Customers catch that difference quickly, even if they do not say it out loud.
Before treating the filler like a throwaway line item, set the expectations clearly. The useful questions are simple: which format fits the product, which print method suits the volume, what does it cost, how long does it take, and does printed void fill branding earn its place in the margin structure?
How printed void fill branding works inside the box
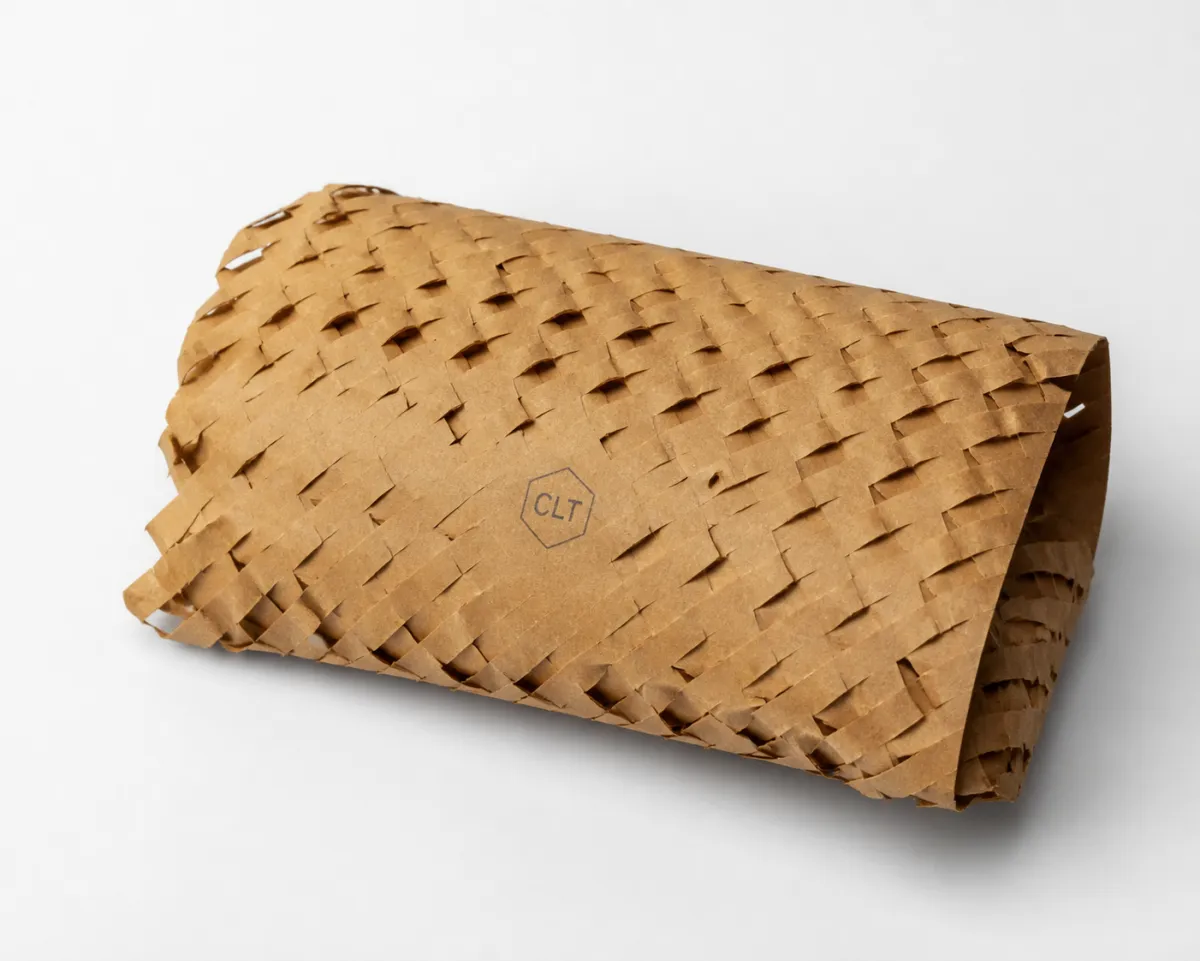
Printed void fill branding can take several forms, and the format changes the outcome more than people expect. Printed tissue is common for apparel, beauty, and gift sets. Crinkle paper is popular when a brand wants more volume and a little visual texture. Shredded paper can fill awkward spaces, though it needs good handling to keep the pack area tidy. Molded paper fill gives a more engineered look and can work well for heavier products. Some brands use custom-printed loose fill styles where the repeated print or color does the branding work without a full illustration.
The production logic is straightforward. Artwork goes onto the substrate first, then the material gets cut, crumpled, folded, or shredded so the print still reads after handling. The tricky part is that a design that looks crisp on a flat proof can go muddy once it is packed, compressed, or moved through a warehouse by someone who is trying to clear a stack of orders. Packaging rarely respects the fantasy version of the artwork.
Good printed void fill branding works with the material’s behavior instead of fighting it. Tissue likes repetition and lighter coverage. Crinkle paper can support a stronger print block or a simple logo repeat. Molded fill usually performs better with limited ink coverage and a clear form. The point is not to turn filler into a billboard. The point is to keep the brand readable after compression, transit, and normal handling.
What the customer sees depends on the strategy. Some brands choose a subtle pattern that supports the visual system without taking over the box interior. Others repeat a logo at a scale that is visible from above the box. Others add a hidden message or a secondary cue, like a monogram, product line mark, or short line of copy. printed void fill branding can be quiet or bold. The right answer depends on how much energy the rest of the package already carries.
There is also a practical packaging benefit. Good filler stabilizes the product, keeps inserts from shifting, and makes the box feel finished instead of padded with random paper scraps. That difference shows up in brand consistency. If the outer carton, insert, label, and filler all speak the same visual language, the package reads as intentional from the moment it opens.
A filler that looks expensive but packs badly is still a bad filler. Nice print does not cancel out a messy packout.
If you want to see how a branded interior plays with other pack components, it helps to compare it with the rest of the system. Many teams pair printed void fill branding with a printed insert or a product tag so the visual language carries through the whole box. If that is the direction you are exploring, it also makes sense to review Case Studies and see how other packaging pieces work together in a finished kit.
Printed void fill branding cost, pricing, and MOQ basics
The cost of printed void fill branding depends on a few concrete variables: material type, print coverage, number of colors, fill volume, finishing, and whether the job needs custom die-cutting or specialty inks. Nothing mysterious there. A one-color repeat on stock tissue usually costs far less than a full-coverage print on premium paper with tight color matching and custom pack counts.
MOQ matters because suppliers are balancing press setup, waste, and inventory. A small brand may want 500 units. A supplier may need 3,000 or 5,000 for the job to make sense. That is not a penalty for being small. It is a production reality. For many early launches, a smaller run of printed void fill branding is smarter than chasing the lowest unit price and ending up with storage headaches or a color that misses the mark.
A practical way to think about pricing is to separate simple branded filler from highly customized work. Stock-style Branded Void Fill stays more economical when coverage is light and the format is straightforward. Premium custom jobs climb quickly once you add ink coverage, specialty substrates, or short runs. If a quote looks surprisingly low, check what has been left out: pack count, waste allowance, freight, proofing, and whether the fill volume actually matches your box sizes. Cheap quotes have a habit of turning into expensive invoices once the details surface.
| Format | Typical Use | Common MOQ | Indicative Unit Cost | Notes |
|---|---|---|---|---|
| Printed tissue | Apparel, beauty, gifting | 1,000-5,000 sheets | $0.06-$0.18 per sheet | Good for light product protection and clean brand consistency |
| Printed crinkle paper | Boxes needing volume and visual texture | 500-3,000 bags | $0.12-$0.30 per bag | Looks fuller, but coverage and print sharpness can vary by substrate |
| Shredded paper | Gift sets, retail inserts, mixed product kits | 500-2,500 bags | $0.10-$0.25 per bag | Can look premium if the cut is consistent and the color is controlled |
| Molded paper fill | Heavier items, repeat shipping programs | 2,000-10,000 units | $0.18-$0.45 per unit | Higher tooling or setup cost, but stronger protection and cleaner packout |
Those numbers are not universal. They shift with paper weight, print method, fill size, shipping zone, and the level of custom work involved. They still help stop the common mistake of treating every branded filler as the same thing. It is not. printed void fill branding that uses heavier material, higher coverage, or a more customized format will cost more, and the real question is whether that spend improves customer perception enough to justify itself.
Quote shopping needs discipline. Compare apples to apples on material weight, print method, packaging count, overage allowance, and shipping. A quote for 10,000 loose sheets is not comparable to a quote for 1,000 packed bundles, even if the headline number looks attractive. Ask how much fill each box actually uses. Ask whether the quote includes proofing and sample packs. Ask whether the supplier has tested the print on the same substrate you intend to run. That is how you keep printed void fill branding from becoming a budget leak.
If you are working on other packaging touchpoints at the same time, branded filler often sits beside labels or tags in the budget. That is one reason teams often combine printed void fill branding with Custom Labels & Tags; the result is usually a cleaner spend than trying to make every component carry the whole brand story on its own.
Printed void fill branding process and timeline: from proof to rollout
The process for printed void fill branding usually follows a predictable path: brief, artwork prep, material selection, digital proof, sample approval, production, packing, and warehouse rollout. The order sounds ordinary because it is. Ordinary is useful. Ordinary keeps launches from getting derailed by surprises in the middle of a shipping window.
Artwork prep is where a lot of delays start. If the file is not vector-based, if the logo is not sized for repeat use, or if the color target is vague, the proof cycle drags. Clean files save time. A clear brand reference saves time too. If the filler needs to coordinate with cartons, inserts, or mailers, say so at the beginning. printed void fill branding is much easier to approve when the team knows how it should sit inside the system.
Timeline depends on format and complexity. Fast digital sample work can move quickly, sometimes within a few business days once files are ready. Custom production with larger quantities, special colors, or freight coordination can stretch much longer. If the project needs custom substrate sourcing or additional pack testing, the schedule gets longer again. There is no shortcut that replaces time on the machine and time on the bench.
The approvals usually split into three camps. Marketing wants the filler to look sharp and on-brand. Operations wants it to pack cleanly and not shed everywhere. Procurement wants the quote to stay within budget and not creep upward. All three matter. If one group approves printed void fill branding in isolation, the rollout can go sideways as soon as the boxes reach the packing table.
- Send a clear brief with box size, fill volume, product weight, and the impression you want the customer to have.
- Approve artwork scaled to the real packout, not a flat mockup alone.
- Request a physical sample or at least a folded mock pack before production.
- Test one warehouse lane first, especially if the fill is used at high volume.
- Roll out the approved version only after the packout proves it holds up.
Here is the practical planning rule: if a launch date is fixed, leave room for samples, revisions, and one round of warehouse testing. A safe window for printed void fill branding is usually longer than people hope and shorter than they fear, but only if the artwork is ready and the supplier can turn the job without waiting on a chain of approval emails.
Testing should be real, not theoretical. Use a real box, real product weight, and the same lighting your customer will see in an apartment, office, or porch photo. Better still, compare the sample to the carton, insert, and outer label together. The goal is brand consistency, not isolated perfection on a desk under ideal lighting.
Key factors that make printed void fill branding work or fail
Color is the first make-or-break factor. Strong contrast, restrained palettes, and clean print usually beat noisy graphics that disappear once the material is crumpled. If your logo is dark and the filler is dark, the result can read as elegant or muddy depending on the substrate. That is not a small distinction. printed void fill branding lives or dies on legibility inside an already busy box.
Scale matters just as much. A logo that is too small gets lost once the filler is layered into the box. A logo that is too large can look clumsy and repetitive, especially on tissue or shredded formats. The best middle ground is usually a repeat that reads from above but still feels refined when the customer lifts the product out. In some cases, a single strong mark repeated at a controlled interval works better than a full pattern.
Material behavior changes the whole result. Some substrates hold ink sharply. Others soften the edge or mute the print, which can make the piece feel warmer or more casual. That may suit the brand identity. It may also make a premium product look strangely underprinted. This is why printed void fill branding should be judged in physical form, not only on a PDF. A screen preview is not a packaging test.
Protection still matters. If the filler sheds, clumps, or leaves residue on the product, the brand cue backfires. Customers do not think, “What an artisanal paper texture.” They think, “Why is this mess in my box?” Good printed void fill branding stabilizes the product and supports the unboxing experience without creating cleanup for the buyer.
Sustainability belongs in the decision too, but only if the claims are real. Recycled content, compostability, and single-material choices can support the story, yet the buyer needs something trustworthy behind the claim. For fiber-based materials, look at FSC certification through FSC. If your team is working to improve packaging recovery or material choice, the EPA’s solid waste and materials guidance is worth reviewing through EPA sustainable materials management.
Shipping performance matters too. If your boxes go through rough handling, test the fill against common distribution methods and ask for an ISTA-aligned evaluation where appropriate. Many brands reference ISTA test methods when validating transit durability. That does not mean every filler needs a lab report. It does mean printed void fill branding should not be designed in a vacuum while the product is getting hammered by the carrier network.
From a buyer’s point of view, the best filler is the one that feels deliberate, performs reliably, and matches the rest of the pack. That is brand consistency in practical form. No drama. Just careful execution.
Common mistakes with printed void fill branding
The biggest mistake is overdesign. Too much copy, too many colors, too many decorative elements. Once the material is folded, shredded, or crumpled, the whole thing can turn noisy very quickly. A clean repeat usually beats a clever illustration that only works on a flat artboard. printed void fill branding should support the box, not compete with it.
Another common problem is treating the filler like a poster instead of a packaging component. Posters sit still. Filler gets handled, compressed, and packed by people who are trying to move boxes efficiently. If the design cannot survive that, it is the wrong design. That sounds obvious, yet brands still approve art that never had a chance outside the studio.
Box-fit planning gets overlooked all the time. Too little fill looks stingy and can let the product slide. Too much looks wasteful and can make the brand feel careless. The actual packout matters more than the mockup. If you only approve printed void fill branding from a flat sample, you are guessing about how it will behave in the box. Guessing is not quality control.
Color matching can also drift when the filler needs to coordinate with cartons, labels, tissue, or mailers across different print methods. Digital print, flexo, and offset all behave differently. A color that looks right on tissue may shift on crinkle paper. That is why teams should ask for physical samples whenever the filler is part of the customer-facing presentation.
One of the most expensive mistakes is approving printed void fill branding without a real packout test, then discovering it slows the line or ruins the open.
Operations problems are easy to underestimate. If the filler clogs the pack table, sheds too much, or requires too many hand motions, the labor cost rises quickly. Even a beautiful version of printed void fill branding can become a bad buy if it adds 20 seconds to every pack. On a few hundred units, that feels minor. On a few thousand, it gets annoying fast.
There is also a subtle issue with visual hierarchy. If the filler is too bold, it can overshadow the product or the insert. If it is too subtle, it may disappear and waste budget. Good decisions usually live in the middle: enough contrast to signal the brand, enough restraint to leave room for the rest of the package.
Expert tips and next steps for printed void fill branding
Start with one packaging lane first. Test the most common box size before you try to cover every SKU in the catalog. That keeps printed void fill branding focused and gives you better feedback from the warehouse team, the customer service team, and anyone who has to open the box ten times a day for quality checks.
Use a short approval checklist. Keep it simple: brand colors, logo size, fill coverage, warehouse handling, sustainability claim, and target unit cost. If those six items are aligned, the project usually stays on track. If they are not, the job drifts and someone ends up “just making it work,” which is a phrase people like to say right before the problems begin. I’ve heard that line enough times to know it usually means the details were rushed a week earlier.
Ask for a sample packout, not just a flat proof. Flat proofs are useful, but they do not show how printed void fill branding looks in a real box under real lighting with real product weight. A physical packout lets you see if the filler crushes awkwardly, reads clearly, or makes the box look fuller than it actually is.
If the budget is tight, prioritize one strong brand cue over three weak ones. A clean repeat pattern, a single logo scale, or a restrained color band usually performs better than a busy layout trying to say everything at once. That is especially true for brands where the box already carries other visual branding elements.
Think beyond the filler itself. The best interior experience usually works as a system: carton, insert, filler, label, and product all pulling in the same direction. If you need help balancing those layers, compare the filler plan with the rest of your pack architecture. That is where brand consistency starts paying off in a way the customer can actually feel.
Printed void fill branding works best when it feels like part of the package, not a last-minute garnish. If the box, insert, and shipping materials all line up, the package feels deliberate from first glance to final reveal. A practical next step is simple: choose one SKU, one box size, and one filler format, then approve a real packout before you scale it across the catalog. That one test will tell you more than a stack of mockups ever will.
Bottom line on printed void fill branding
printed void fill branding is worth considering when the inside of the box is visible, the unboxing experience matters, and the product needs both protection and presentation. It is not automatically a premium move, and it is not a fit for every low-margin shipment. For the right product line, though, it can improve brand recognition, reinforce visual branding, and make a package feel finished instead of improvised.
The smartest buyers treat printed void fill branding like a packaging decision, not a decoration decision. That means checking material behavior, comparing quotes carefully, testing the packout, and making sure the filler supports the whole system. If you do that, the spend usually has a clear reason. If you do not, you end up paying to hide dead air with expensive fluff. Nobody needs that.
Frequently asked questions
What is printed void fill branding in packaging?
It is branded protective filler used inside shipping boxes to stop movement and reinforce the brand during unboxing. Common formats include printed tissue, crinkle paper, shredded paper, and molded paper fill with logos or patterns. The goal is to make the protection layer feel intentional instead of generic.
Is printed void fill branding worth the extra cost?
It is worth it when the package is customer-facing, the unboxing moment matters, or the filler is highly visible. It is harder to justify for low-margin products, hidden inner cartons, or shipments where the filler barely shows. The return comes from perceived value, not from the filler itself doing direct sales work.
What affects the lead time for printed void fill branding orders?
Artwork readiness, proof approvals, material type, print method, and order quantity all affect turnaround. Custom shapes, specialty colors, and freight scheduling can add time quickly. If the launch date is fixed, build buffer for samples and one revision round.
How do I keep printed void fill branding from looking cheap?
Use strong contrast, clean repetition, and a logo scale that still reads after the material is packed. Choose a substrate that holds print well and does not shed or flatten awkwardly. Keep the design simple and test it in a real box before approving production.
What files do I need for a printed void fill branding quote?
Have vector artwork, logo files, Pantone or color references, and approximate fill dimensions ready. Share your box size, fill volume, target MOQ, and whether the filler is for shipping, gifting, or retail. The more complete the brief, the fewer surprises in pricing and production.


