Buyer Fit Snapshot
| Best fit | Retail Box Die Cutting projects where brand print, material claims, artwork control, MOQ, and repeat-order consistency need to be specified before quoting. |
|---|---|
| Quote inputs | Share finished size, material target, print colors, finish, packing count, annual reorder estimate, ship-to region, and any compliance wording. |
| Proofing check | Approve dieline scale, logo placement, barcode or warning zones, color tolerance, closure strength, and carton packing before bulk production. |
| Main risk | Vague material claims, crowded artwork, missing packing details, or unclear freight terms can make a low unit price expensive after revisions. |
Fast answer: Retail Box Die Cutting: Board, Finish, Dieline, and Unit Cost should be specified like a repeatable production item. The safest quote records material, print method, finish, artwork proof, packing count, and reorder notes in one written spec.
Production checks before approval
Compare the actual filled-product size with the drawing, then confirm tolerance on folds, seals, hang holes, label areas, and retail display edges. Reserve space for logos, QR codes, warning copy, and material claims before decorative graphics fill the panel.
Quote comparison points
Review material grade, print process, finish, sampling route, tooling charges, carton quantity, and freight assumptions side by side. A quote is only useful when the supplier can repeat the same color, closure quality, and packing count on the next order.
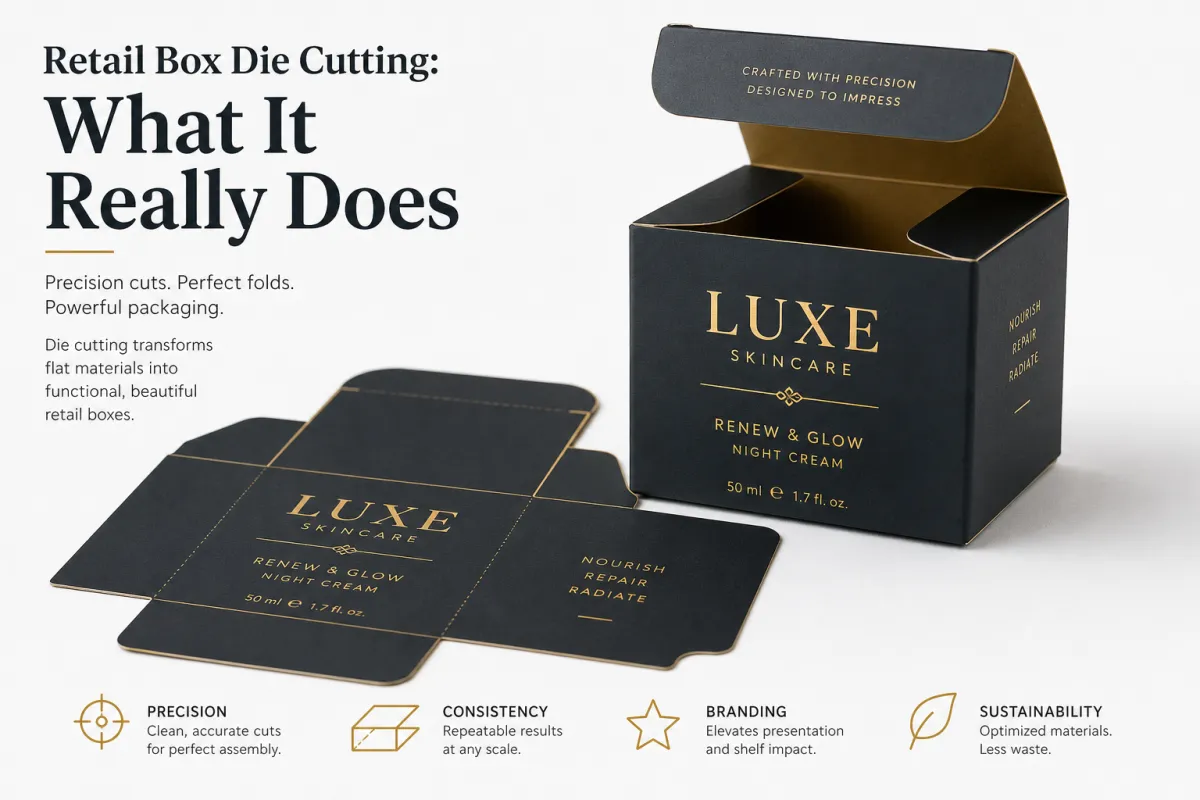
Retail Box Die Cutting is one of those production steps people underestimate until a carton comes back with a tiny flaw that somehow ruins the whole mood. A brand can spend real money on rich printing, metallic foil, textured coatings, and a polished render, then lose the effect because the cut is blunt, the score is too deep, or the flap fights the fold. Packaging has a way of exposing weak decisions fast. Kinda brutal, honestly.
For a buyer, retail box die cutting is not a background task hidden at the tail end of production. It shapes the box, defines the closure, sets the folding behavior, and helps determine whether the package survives shipping, stocking, and repeated handling. The artwork carries the story. The die cut structure carries the weight. If a folding carton looks good on a screen but behaves badly in the hand, the product feels less finished no matter how pretty the print is.
That tension between appearance and function is where packaging gets interesting. A box may print cleanly and still crack at the score, buckle at the lock, or weaken around a window. Retail box die cutting sits right where design meets manufacturing, which means it affects look, cost, timing, and performance in one move. One bad line can ripple through the whole job, and that ripple usually shows up somewhere expensive.
I have seen teams approve a beautiful carton mockup, only to discover that the closure needed two hands, the insert shifted during packing, or the finish scuffed the minute the box touched another carton. Those failures do not come from bad intent. They come from underestimating the geometry. That is the real lesson here: structure is not decoration. Structure is the part that has to work.
What Is Retail Box Die Cutting?
Retail box die cutting uses a custom tool to cut, crease, perforate, and shape paperboard or carton stock into a finished retail package. That tool, the die, turns a flat printed sheet into a box that folds correctly, locks where it should, protects the product, and still looks tidy on shelf. Before that step, you have printed board. After it, you have a package that can actually do the job.
Printing and retail box die cutting are often spoken about as if they belong to the same phase, but they solve different problems. Printing applies the brand colors, images, typography, and surface effects. Die cutting creates the mechanics: cut lines, score lines, glue flaps, thumb notches, windows, tabs, and perforations. One shapes perception. The other determines whether the carton behaves like a real box.
That distinction matters once the box leaves the design file. Shelf-ready packaging has to assemble quickly, hold its shape, and feel intentional in the hand. A carton that opens too freely can feel flimsy. A carton that resists folding can slow the line. A carton that ships badly pushes costs into places nobody wanted to budget for. Good retail box die cutting removes a lot of that friction before it becomes expensive.
Structure also changes how premium the package feels. A sharp cut edge, a clean crease, and a closure that lands with a neat, confident motion can make a plain carton feel far more expensive than it is. A sloppy die line does the opposite. I have watched teams spend heavily on coatings and special inks, then wonder why the box still reads as cheap. The answer is often hiding in the geometry.
"The artwork was not the problem. The carton failed because the structure did not fit the product." That is the kind of failure retail box die cutting is supposed to prevent before anyone has to explain it to finance.
Brands that need more than a standard tuck-end carton usually treat retail box die cutting as a design decision, not just a manufacturing one. A window patch can help sell the product. A locking bottom can carry weight better. A display flap can improve shelf presence. Each of those choices can improve the package, and each one can also complicate the production path. The best results usually come from deciding the structure first, then building the artwork around it.
There is also a subtle psychological effect at play. A box that opens with a controlled, clean motion communicates care. It tells the shopper someone paid attention. A box that buckles, tears, or pops open too easily tells a different story, even if the print is gorgeous. That is why experienced packaging teams tend to talk about fit and fold before they talk about visuals. The visuals bring people in; the structure decides whether the package earns trust.
If you want to compare how structure choices fit into the rest of the build, our Manufacturing Capabilities page is a practical place to review board options, finishes, and production limits before the concept gets locked in.
How Retail Box Die Cutting Works From File to Form
The process usually begins with a dieline. That flat template marks where the panels, folds, glue areas, cut paths, and score lines belong. For retail box die cutting, the dieline is not a styling aid. It is the production map. If the map is wrong, the route gets messy quickly.
The workflow often moves through artwork setup, dieline creation or review, tool building, test cutting, adjustment, and final production. It looks orderly on paper. In practice, it rarely behaves that way. A small change in panel size can shift copy placement. A new insert can alter the closure. A thicker board can change how the fold holds. Retail box die cutting has a way of pulling every hidden assumption into view, which is useful and annoying in equal measure.
The die itself is usually built on a wood base with steel rules mounted into the cut and crease pattern. Some tools include stripping or ejector rubber so waste lifts cleanly after the cut. Steel rule height and placement have to match the board thickness and the box style. Too much pressure crushes or splits the stock. Too little leaves incomplete cuts or ragged edges. That is not guesswork. It is calibration.
Registration matters as well. In retail box die cutting, print, cut, and fold have to line up with one another. A spot UV panel may look excellent in proof form and still drift into a score once the box folds. A foil logo can look sharp on a flat sheet and end up awkward on the finished carton. Packaging tolerances are unforgiving. A one-millimeter miss is often visible from arm's length, and sometimes it is even worse once the box is stacked beside its neighbors.
Sampling should never be treated as a courtesy step. A plain structural sample catches geometry problems before the full run starts. A printed sample reveals artwork alignment issues. A physical fold test shows closure friction, board memory, and weak points that a screen will never expose. In retail box die cutting, the cheapest mistakes are the ones you catch before the order is printed. Once the board is cut, the budget gets a lot less forgiving.
Brands shipping products that have to survive distribution often connect the packaging spec to real testing standards. Transit and vibration references from ISTA can be useful, because a retail box that looks perfect on a table can behave very differently after a truck ride, warehouse stacking, or a few hours of rough handling. A nice-looking carton that fails in transit is still a failure, no matter how polished the mockup looked.
Once the die is approved, the line can move much faster. That is the quiet advantage of solid retail box die cutting: fewer surprises at press, fewer corrections at finishing, and fewer boxes that need to be rescued by hand. It is not glamorous work, but it saves people from making the same mistake 5,000 times.
Key Factors That Affect Retail Box Die Cutting Quality
Board choice is one of the biggest variables in retail box die cutting. SBS board gives a smooth print surface and predictable folding for many carton styles. Kraft board brings a natural texture and a different visual tone. Corrugated material adds strength, but it also changes how the structure cuts and scores. Specialty boards can look excellent, though they often need more tuning because not every surface reacts the same way under pressure.
The common trap is assuming every stock behaves alike. A design that runs perfectly on 14 pt SBS may act very differently on 18 pt kraft or a laminated sheet. Retail box die cutting responds to thickness, grain direction, coating, and ink load. If the board cracks along the fold, the fault may have nothing to do with the artwork. It may simply be the wrong stock for that geometry, which is a harder truth but usually the correct one.
Design complexity matters too. A simple straight tuck-end carton is easier to run than a box with a window, thumb notch, locking tab, or unusual closure. Each extra feature creates another place for the die to miss, the board to crack, or the closure to bind. In practice, retail box die cutting tends to reward clean geometry. Fancy can work. Complicated for its own sake usually does not.
Crease depth and cut pressure are another pair of levers that shape quality. Too much pressure crushes fibers, especially on coated or printed stock. Too little leaves weak folds or incomplete cuts. Heavy ink coverage, UV coating, soft-touch lamination, and spot UV all make the surface less forgiving. That does not mean finishes should be avoided. It means the die line should be built with the finish in mind, not after the finish is already locked.
Carton size and product weight also change the calculation. A lightweight cosmetic box has different needs from a carton for electronics, health products, or premium food items. Larger boxes may need stronger panel support, tighter locking features, or board that resists bowing. Retail box die cutting should match the load, not just the marketing brief. That sounds obvious until it gets ignored.
Grain direction deserves more respect than it usually gets. Fold against the grain and the board may crack earlier. Fold with the grain and the closure may behave better, but the panel can spring back in a way that surprises people. It is a small detail on paper and a big one in production. A lot of first-run disappointment comes from assuming the sheet will bend like a graphic designer expects instead of how paperboard actually behaves.
Responsible sourcing belongs in the discussion too. FSC-certified board can support sustainability claims when that matters to the brand. If certification is part of the spec, the source matters as much as the finish. The official framework is available at FSC for anyone who wants the language straight from the source.
For stronger shelf impact, die cutting often gets paired with embossing, foil stamping, and spot UV. Those effects can be powerful, but they are not magic. A raised logo or glossy highlight still depends on a clean substrate and a structure that folds without scuffing the finish. With retail box die cutting, the best-looking box is the one that still works after shipping, stacking, and handling. Shelf appeal starts to matter a lot less if the carton arrives dented or torn.
In short, the quality of retail box die cutting comes from the combined behavior of paperboard, print finish, grain direction, and die setup, not from any single variable.
Retail Box Die Cutting Cost and Pricing Drivers
Retail box die cutting pricing usually splits into two buckets: tooling cost and run cost. Tooling covers the custom die itself. Run cost includes setup, press time, board usage, finishing, and labor. That split explains why the first order can feel expensive while a repeat order looks far friendlier. The tool already exists, so the math changes.
For a simple folding carton, tooling might land around $250-$500. A more complex window carton, locking structure, or unusual perforation pattern can move the die into the $600-$1,500 range, sometimes higher when the design gets very specific. Those are working ranges, not promises. Retail box die cutting always depends on board thickness, press method, and the number of cuts and scores involved. A tiny structural twist can change the quote more than people expect.
Unit pricing changes with quantity as well. On a low-volume run, setup cost is spread across fewer boxes, so the per-unit price rises. On a larger run, that same setup gets diluted. A simple carton at 5,000 units can cost very differently from the same carton at 25,000 units. Small test runs are useful for proofing, but they are rarely kind to the budget. That is not a flaw in the process; it is just how fixed costs behave.
Here is a rough comparison of common structural choices in retail box die cutting:
| Box Style | Typical Tooling Range | Best Use | Typical Unit Impact at 5,000 pcs |
|---|---|---|---|
| Simple tuck-end carton | $250-$500 | Light products, basic retail display | $0.08-$0.16 |
| Window carton | $400-$800 | Products that need visibility | $0.12-$0.24 |
| Lock-bottom or reinforced structure | $600-$1,500 | Heavier items, faster assembly | $0.18-$0.40 |
| Display-ready custom design | $900-$2,000+ | Premium launches, shelf impact | $0.25-$0.55 |
Several things push the price upward quickly. Multiple dieline revisions do it. Specialty perforations do it too. Extra make-ready time on press can add cost, especially if the print file and the die line keep forcing corrections. Retail box die cutting is not the place for endless back-and-forth. Every revision hides a bill somewhere in the background, and those bills add up faster than most launch calendars do.
Structure and cosmetics also trade against each other. A buyer may want a special opening system, foil stamping, soft-touch lamination, a window patch, and a custom insert all in one carton. That can be done, though the budget usually starts to strain. A simpler structure with a strong print layout often saves more money than shaving a few cents from ink coverage. Flashy is pleasant. Efficient usually wins.
Standard board sizes can reduce waste as well. If the dieline nests cleanly on a common sheet size, the job may run with less scrap and fewer setup headaches. That detail looks boring until it starts adding up across a large order. Retail box die cutting rewards designs that respect material dimensions instead of fighting them.
If you need multiple versions of a carton for different SKUs, compare the structure options side by side before final approval. Our Manufacturing Capabilities overview can help separate what is realistic from what turns every SKU into a custom engineering project.
The financial pattern is simple enough to miss: clean retail box die cutting lowers waste, and lower waste tends to lower total cost more reliably than cosmetic shortcuts do. The cheapest-looking fix on a spreadsheet is often the one that costs most in rework.
Step-by-Step Retail Box Die Cutting Process and Timeline
A realistic retail box die cutting timeline starts with dieline review. The carton dimensions, closure behavior, bleed, and safe zones need to be checked against the product. If the artwork already exists, the die line has to fit around it. If the structure is still flexible, this is the time to decide whether the box needs a tuck top, lock bottom, window, or custom insert. That early decision can save a lot of backtracking later.
Artwork prep comes next. Good files include bleed, proper panel alignment, and copy kept away from folds and cut edges. Bad files force the printer or die maker to solve problems that should have been caught in layout. That slows down retail box die cutting before the tool is even built. A clean file saves time in a way people usually only appreciate after they have dealt with a messy one.
After that, the die is fabricated and tested. Simple cartons may move through this stage quickly. Custom structures often require pressure adjustments, score refinement, or changes to the waste clearance. A sample cut or structural proof is often the moment where the job either becomes clean or starts to reveal trouble. If the fold feels tight or the closure sits wrong, fix it now, not after 20,000 pieces are in motion.
A practical planning range looks like this: simple jobs can move through production in about 8-12 business days after proof approval, while custom structures often need 12-20 business days or more depending on coatings, finishes, and approval rounds. Retail box die cutting slows down when the project includes unusual tabs, windows, heavy ink coverage, or multiple sample revisions. That is normal. Rushing a bad layout is not.
The most useful checkpoint is physical sample approval. A digital proof helps, but a printed proof and a foldable sample reveal where the board resists, where the flap catches, and where the panel dimensions need a little more clearance. Retail box die cutting is much easier to correct in sample form than in finished inventory. That is one of those dull truths that saves real money.
If the packaging has to survive distribution, the process should connect to the product's actual shipping conditions. That is why packaging teams often pair structural approval with transit expectations, compression concerns, and finish durability. For broader context, practical guidance from ISTA and supplier spec sheets can help connect structure, printing, and use case in a way that feels grounded instead of theoretical.
Strong file prep shortens the whole timeline. When the dieline is accurate, the press team spends less time nudging registration and the die maker spends less time correcting avoidable issues. That is the quiet advantage of professional retail box die cutting: fewer surprises, fewer revisions, fewer "why is this panel off?" moments.
I have seen one missing note in a file knock a project back by several days because nobody knew whether a flap was supposed to tuck inside or outside. That kind of delay does not sound dramatic on a schedule, but it has a habit of snowballing. One unclear drawing can become a missed ship date before anyone notices the pattern.
Common Retail Box Die Cutting Mistakes to Avoid
The first mistake is designing too close to the edge. It looks minor until the board starts cracking or the cut line weakens the fold. In retail box die cutting, there needs to be enough room for scores, glue areas, and visual margins. Push everything to the edge and the box starts fighting itself. That usually shows up as handling problems, not just cosmetic ones.
The second mistake is treating a dieline like an artboard. It is not. It is a production file with exact mechanical requirements. A designer can create a handsome carton render and still miss fold depth, flap overlap, or closure fit. Retail box die cutting is hard on that kind of optimism. The file has to be built for a real machine and a real board, not just a nice mockup.
Another common issue is ignoring how the product actually enters the box. If insertion is awkward, production slows down. If the closure has to be forced, the line becomes inconsistent. If the product shifts after insertion, the box may look fine flat but fail in use. Good retail box die cutting supports the product flow, not just the mockup. The carton should help the packout, not make the crew work around it.
Too many effects can work against one another. Heavy coatings, spot UV, foil stamping, embossing, and tight structural tolerances can each be fine on their own. Put them together without planning and scuffing, cracking, or registration drift can appear fast. That is especially true with soft-touch lamination, which looks premium but can be less forgiving if the structure is aggressive. The finish may be gorgeous and still wrong for the build.
Skipping a sample is usually the most expensive shortcut in the process. That may sound dramatic, yet it is hard to overstate how much damage one untested structure can do. Wasted board, delayed schedules, and awkward rework show up quickly. Retail box die cutting is one of those areas where a small upfront check avoids a large cleanup later. The first sample is cheap insurance, not a luxury.
Another mistake is assuming all boards behave the same. They do not. SBS, kraft, coated stocks, and corrugated all react differently under the die. Grain direction matters too. If the fold runs against the grain, the board may crack more easily. That is why a competent structural review is worth far more than a vague "this should probably work" approval. Those words are the start of expensive lessons.
Finally, some teams overcomplicate the box because the concept sounds premium. Premium does not mean awkward. A clean structure with good graphics, a solid closure, and the right finish often beats a complicated carton that needs a miracle to assemble. In retail box die cutting, restraint usually reads as confidence. A package that feels calm in the hand usually sells the idea of quality better than one that tries too hard.
Most of the avoidable mistakes in retail box die cutting come from rushing the structure review or assuming the first mockup is already production-ready. If the sample hasn't been handled, folded, and tested by someone who knows what to look for, the risk is still there.
Expert Tips and Next Steps for a Cleaner First Run
Start with the product, not the box shape. That is the step many teams skip. The right structure should protect the item, support shelf display, and move through packing without creating a bottleneck. If the product is fragile, the carton may need stronger corners or a tighter insert. If the product is light, there is no reason to build a fortress. Retail box die cutting should serve the item, not force the item to serve the box.
Ask for a structural sample before artwork is locked, especially if the box includes tabs, windows, or a tight closure. A plain sample tells you whether the geometry works. A printed sample tells you whether the visual design survives the folds. One step can prevent a long, expensive guessing game. If a supplier pushes to skip it, the reason is worth questioning.
Leave a small tolerance buffer around folds, inserts, and locking areas. Real production is not a perfect lab. Board variation exists. Press variation exists. Human handling exists. Retail box die cutting performs better when the design allows a little breathing room instead of pretending every sheet is identical. That little bit of margin often decides whether the first run feels smooth or kind of wobbly.
Choose finishing effects that support the structure instead of fighting it. A matte laminate can hide scuffs and make retail cartons feel calmer. Spot UV can highlight the logo without flooding the whole box with glare. Foil stamping can add contrast. Embossing can create a tactile cue. None of these should be added just because they sound premium. They should help the box do its job.
A useful next step is to compare three options before final approval: one simple structure, one premium structure, and one cost-saving structure. That makes it easier to see what actually changes the budget and what only changes the mood board. If you need help narrowing the field, our Manufacturing Capabilities overview can help separate what looks attractive from what can run cleanly at scale.
It also helps to ask one blunt question before sign-off: what is the failure mode if this box ships exactly as drawn? If the answer is scuffing, cracking, or a closure that needs force, the design is not ready yet. That question tends to expose the weak point faster than a dozen polite comments ever will.
Most strong packaging decisions are not about picking the flashiest route. They are about choosing the structure That Holds Up, prints well, and does not eat the launch schedule alive. That is the real value of retail box die cutting: a carton that opens cleanly, stacks properly, and makes the product look intentional from the first unit to the last.
When the structure, artwork, and production specs line up, retail box die cutting becomes less of a technical hurdle and more of a quiet advantage. The actionable takeaway is simple: approve the dieline, test the sample, and confirm tolerances before print, because that is where most of the preventable problems are hiding.
FAQ
What is retail box die cutting in packaging?
It is the process of using a custom cutting tool to shape carton board into a finished retail box. The die creates the cut lines, score lines, perforations, and openings needed for the box to fold and function correctly. In practical terms, retail box die cutting turns printed board into a working package, often a folding carton built to match the product and the shelf.
How much does retail box die cutting usually cost?
Cost depends on tooling complexity, board type, order quantity, and the number of special features in the design. Simple cartons cost less to tool and produce; windows, perforations, and custom closures push the price upward. Low-volume orders usually carry higher setup cost per unit, which is why retail box die cutting looks more expensive on small runs than on repeat production. A second run can be dramatically easier on the budget because the die already exists.
How long does a retail box die cutting project take?
Simple jobs can move quickly if the dieline is clean and the sample gets approved without revisions. Custom structures take longer because the die has to be built, tested, adjusted, and approved before production starts. Most delays come from late artwork changes, unclear specs, or skipped sample reviews, not from retail box die cutting itself. If the file is clean and the approvals are tight, the schedule usually behaves.
What file do I need for retail box die cutting?
You usually need a proper dieline file with separate layers for cut lines, score lines, folds, and artwork. The file should include bleed, safe zones, and exact panel sizing so the design stays aligned after cutting and folding. Your printer or die maker should review it before production because one bad layer can ruin the whole retail box die cutting run. A good file looks boring; that is usually a sign it was built correctly.
How do I know if my retail box design is die-cut ready?
Check whether the structure fits the product, closes securely, and folds cleanly without forcing the board. Make sure artwork avoids critical fold areas and that the file follows the manufacturer's dieline specifications. If you have special closures, windows, or inserts, request a structural sample before locking the design. That is the fastest way to confirm retail box die cutting will support the product, the budget, and the launch timeline. If the sample feels awkward in your hand, it probably will not get better on press.
If you want the short version, good retail box die cutting is the difference between a carton that merely looks finished and one That Actually Works in the real world.