Retail Mesh Trucker Hats print options for bulk buyers seem simple until the production details start deciding the outcome. The cap is small, but the choices are not: decoration method affects shelf read, handfeel, unit cost, durability, and whether the logo still looks clean after shipping and retail handling.
The main buying problem is balance. The hat needs to stay light and breathable while still presenting a brand mark clearly enough to sell at a distance. Too little decoration and it looks generic. Too much and the cap loses the open, easy feel that makes it a trucker.
Why mesh truckers are harder to decorate than they look
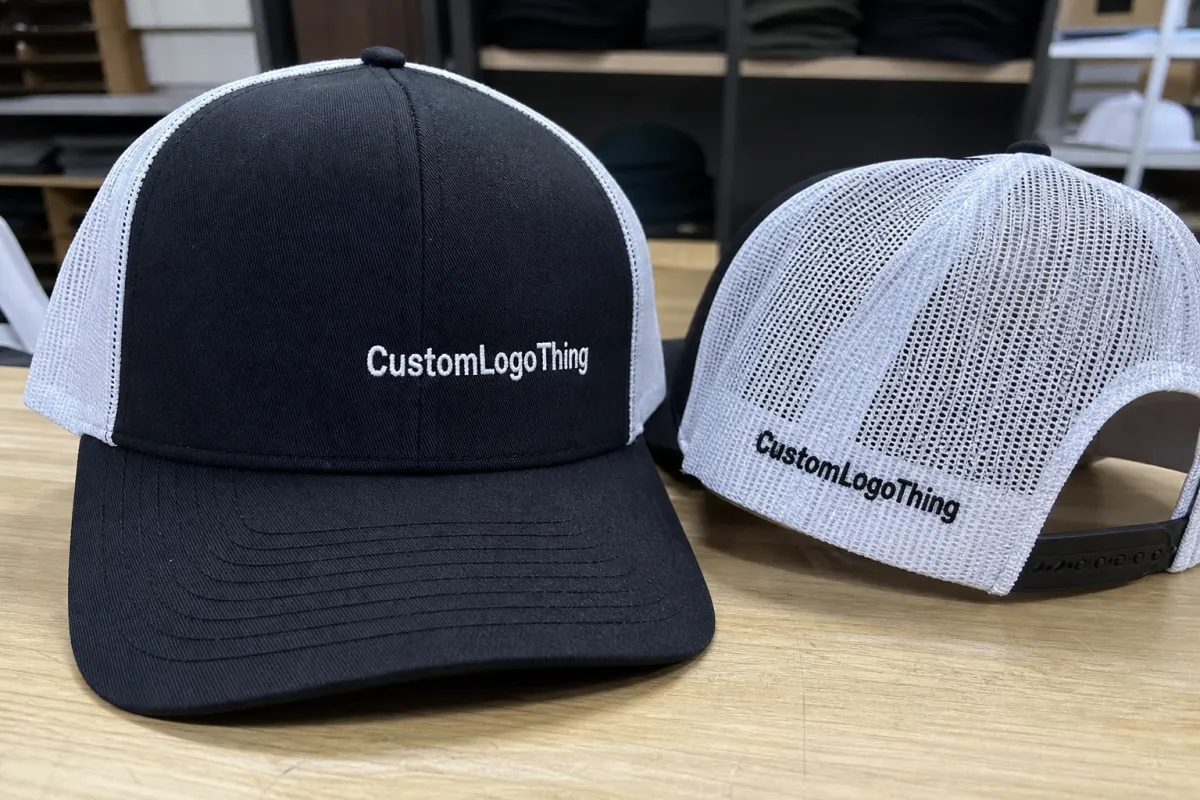
Open mesh changes the decorating math. A logo that looks crisp on a flat cap can distort on a curved seam, a soft front panel, or a vented crown. The mesh itself usually is not the decoration surface; the front panel is.
For buyers, the cap has to do three things at once: sit well on a rack, feel light in hand, and read clearly from a few feet away. Those goals do not always line up, which is why the cheapest decoration method is not always the safest one.
The back mesh is rarely the right place for print. The holes and stretch work against clean edges. In most cases, the smarter approach is to keep the main branding on the solid front panel and treat the mesh as ventilation only.
- Front panel: best surface for the main logo.
- Mesh back: good for breathability, poor for crisp print.
- Side panels: workable for small marks, but detail is limited.
- Closure area: better for woven labels or tags than direct print.
Material choice matters too. Foam-front truckers usually accept decoration more easily than soft cotton twill or thin polyester. A stiff front helps a patch or embroidery read evenly. A softer front can feel better on head, but it leaves less room for error when the artwork is large or close to a seam.
What retail mesh trucker hats print options actually include
The main choices are embroidery, woven patches, PVC or rubber patches, screen print, and heat transfer. None is universally best; the right method depends on the logo, the cap construction, and the quantity.
Embroidery is the classic trucker choice. It is durable, familiar, and adds texture that makes a simple logo feel substantial. The tradeoff is detail. Fine lines, tiny text, and gradients often need to be simplified before stitching.
Woven patches are better when the artwork includes small type or sharp edges. They hold detail better than thread and usually look cleaner than direct print on a curved surface. They do not have the raised texture of embroidery, but they often give the most controlled result for dense artwork.
PVC or rubber patches work well for sporty, modern branding. They hold shape, show color blocking clearly, and fit a foam-front trucker well. They are less friendly to delicate line work, but that is a good trade when the logo is built around bold shapes.
Screen print still works on flatter front panels with simple graphics. It is predictable when the art is restrained and the number of colors is low. The limit is the curve: on flexible or textured surfaces, the print can show stress faster than a patch or stitched mark.
Heat transfer is the most flexible option for color-heavy art, gradients, and shorter runs. It handles small details better than embroidery and can be the right answer when the logo includes thin outlines or tiny text. Finishing quality matters here, especially edge clean-up and surface sheen.
| Method | Best use case | Typical setup cost | Typical decoration cost per unit | Main strength | Main limitation |
|---|---|---|---|---|---|
| Embroidery | Bold logos, classic retail truckers | $25-$80 digitizing | $0.90-$2.50 | Durable, familiar, tactile | Can lose tiny detail |
| Woven patch | Small type, clean edge branding | $60-$150 tooling | $1.10-$2.75 | Sharp detail, premium feel | Less texture than embroidery |
| PVC or rubber patch | Sporty logos, strong shapes | $120-$300 mold | $1.25-$3.20 | Bold appearance, high durability | Not ideal for delicate art |
| Screen print | Simple front-panel graphics | $20-$60 per color | $0.50-$1.40 | Low cost on simple art | Poor fit for texture and curve |
| Heat transfer | Multi-color or fine-detail logos | $15-$50 art prep | $0.65-$1.80 | Handles detail well | Needs careful durability review |
For simple logos, embroidery and woven patches are usually the safest first choices. For color-rich art, heat transfer avoids the compromises that stitching introduces. For bold branding, PVC patches can outperform everything else on shelf. The best option matches the logo to the surface instead of forcing one decoration style to do all the work.
Cost, pricing, MOQ, and quote drivers
Pricing is usually more layered than buyers expect. Setup charges, proofing, tooling, packaging, and freight can matter almost as much as unit cost, especially on smaller runs. A quote that looks cheap on paper can become the expensive option once landed cost is visible.
MOQ changes the math. A method with higher setup cost can still be the better value at scale because the setup gets spread across more units. On a 300-piece order, a $150 mold or digitizing charge feels heavy. On a 5,000-piece retail run, it may barely move the average.
Typical decoration pricing often lands around these ranges: embroidery at $0.90-$2.50, woven patches at $1.10-$2.75, PVC patches at $1.25-$3.20, screen print at $0.50-$1.40, and heat transfer at $0.65-$1.80. Those numbers move with logo size, stitch count, patch dimensions, color count, and placement. A dense logo costs more than a simple wordmark. A multi-piece patch costs more than a single-shape patch. A mark placed across a seam usually costs more than one centered on a flat area.
The blank hat matters too. A basic foam trucker may sit at the lower end of the cost range, while a better-shaped cap with cleaner stitching, tighter mesh, or a stronger closure can cost several dollars more before decoration starts. For many retail programs, the undecorated cap lands around $1.00-$4.50 depending on materials, structure, and sourcing origin.
If packaging is included, ask for it separately. Individual polybags, insert cards, tissue, hang tags, and belly bands can add $0.15-$0.45 per cap. If the order ships in master cartons for distribution, confirm crush resistance and count accuracy. It is easier to solve packaging early than to sort damaged hats after arrival.
For freight-sensitive programs, ask suppliers to break the quote into clear components:
- Decoration method - embroidery, patch, print, or transfer.
- Setup - digitizing, screen prep, mold work, or art cleanup.
- Sample cost - mockup, strike-off, or pre-production piece.
- Packaging - polybag, hang tag, insert card, or custom wrap.
- Freight - domestic delivery, ocean, air, or mixed routing.
That breakdown makes comparisons cleaner and exposes hidden costs early. It also separates a genuinely efficient quote from one that shifts expense into setup or shipping.
Process, timeline, and production steps to expect
The usual workflow is artwork review, mockup, proof approval, production, quality check, and shipment. Every step sounds simple until a low-resolution file forces a redraw or a proof comes back with the wrong placement. Clean source art saves time.
A realistic timeline for decorated hats often looks like this: 1-3 business days for art review and mockup, 3-7 business days for sample or strike-off work if needed, 7-15 business days for production after approval, and then transit time on top. New tooling or a late change to the decoration method can add days.
Most delays are ordinary. The usual causes are low-resolution logos, late approvals, and last-minute changes to cap color or decoration placement. If the launch date is tied to a retail season, build in buffer time instead of assuming the order will move perfectly on the first pass.
If the logo cannot read clearly from a few feet away on the first sample, it will not improve once it reaches the store wall.
Quality control is more than counting units. A serious check includes stitch alignment, patch adhesion, color match under daylight, front-panel placement, and carton counts. For molded patches, ask how edge clean-up is inspected. For transfers, ask whether there is any edge lift after handling. For embroidery, ask whether the stitch density creates puckering on the front panel.
If repeat orders matter, keep the artwork file clean and versioned. A vector master, a placement note, and a color reference reduce back-and-forth. The better the brief, the less time a factory spends guessing where the brand mark should sit and how much detail it can hold.
Spec choices that change the retail look
Decoration is only part of the visual story. Logo size, placement height, patch shape, thread density, and negative space all change how the hat reads on shelf. A 2.5-inch patch looks different from a 3-inch patch. A logo set too low feels crowded. A mark placed too high can look like it is floating.
Flat embroidery, 3D puff, woven labels, and molded patches each send a different signal. Flat stitching feels straightforward and durable. 3D puff pushes the cap toward fashion. Woven labels are discreet and detail-friendly. Molded patches feel bolder and more engineered. The right choice depends on the logo and the brand position, not just the decoration file.
Crown structure matters more than many buyers expect. A high-profile foam front gives artwork room to breathe. A lower profile can look cleaner and more premium, but it leaves less space for error. Closure style matters too. Snapback, hook-and-loop, and fabric strap closures all change fit perception, which affects how retail the product feels.
Packaging can shift the read as much as decoration. A hat in a plain polybag sells differently from one with a hang tag, folded insert, or belly band. If the packaging includes paper components, it is worth checking whether the stock is FSC-certified so sustainability claims have support.
One useful rule: the decoration method and the finishing details should reinforce the same message. A simple logo with careful placement often looks more expensive than a complicated logo with crowded spacing. In retail, clarity usually wins over decoration density.
Common mistakes that cause bad decoration or returns
The biggest mistake is asking too much of too little surface. Tiny type, thin outlines, and dense graphics may look good in a PDF, then collapse once the artwork is reduced to hat size. If the logo has to be read across an aisle, it should not depend on delicate line work.
Another common error is approving a digital mockup and skipping a physical sample. Screens hide problems politely. Thread thickness, sheen, foam density, and patch edge behavior do not. A sample shows whether the artwork needs to be scaled up, simplified, or moved before the full order runs.
Placement mistakes create avoidable waste. Stitching or printing too close to seams, vent holes, or curved panel lines can warp the result. That matters most on soft fronts, where the decoration may look centered in the file but drift once it meets the cap’s actual shape.
Underplanning can be just as costly. If the order quantity is too low for the chosen method, the unit price rises and the supplier may push back on the run. If the color target is too strict, expect extra proof cycles. If the method does not suit the logo, the factory may suggest a workaround after the order is already moving.
The safest retail path is usually the simplest one: keep the logo readable, keep the placement clean, and keep the decoration method matched to the surface. The more the brief fights the hat, the more the final product looks like a compromise.
Next steps for a quote-ready hat brief
Before requesting pricing, gather vector art, target quantity, preferred decoration method, color specs, packaging notes, and deadline. If the logo includes tiny text or a gradient, say so early. If the hat has to hit a hard price ceiling, include that too. Clear constraints produce better quotes.
It helps to ask for two paths: one premium version and one value-focused version. A premium option might use a woven patch with custom packaging, while the value version could be a clean embroidery hit with a standard polybag. Seeing both side by side makes the buying decision easier to defend internally.
When the logo has small type, request a sample or strike-off before full production. When the color palette is delicate, inspect the sample under real lighting rather than trusting a monitor. When the goal is retail resale rather than a handout, verify front-panel scale at actual size. Those checks catch most expensive surprises early.
For buyers comparing retail Mesh Trucker Hats print options, the useful question is not which method sounds most premium. It is which method gives this logo the clearest shelf read, the right handfeel, and the least risky production path for the quantity and timeline in front of you.
Which retail mesh trucker hat print options work best for small logos?
Woven patches and clean embroidery usually outperform direct print when the logo has fine detail or small type. If the logo has to stay tiny, ask for a sample at actual size before approving full production. Avoid methods that depend on thin lines crossing mesh openings, since the texture can make the mark harder to read.
How do retail mesh trucker hats print options affect pricing?
Pricing usually shifts with setup work, stitch count, color count, patch tooling, and whether a sample is required. Higher MOQ can lower the unit price, but it can also raise total spend if the run is larger than you need. Ask suppliers to separate decoration, packaging, and freight so you can compare quotes cleanly.
What is a realistic lead time for decorated mesh trucker hats?
Lead time depends on proof approval, sample needs, and whether the decoration method requires new tooling or color matching. Fast orders often stall because artwork is not print-ready, so vector files can save days. Always ask when the clock starts: on art approval, deposit, or final proof approval.
Can you print directly on the mesh back of a trucker hat?
Usually not in a way that looks clean or lasts, because open mesh does not hold ink or transfers as reliably as a solid front panel. Most brands place decoration on the front and leave the mesh for ventilation. If branding needs to appear on the back, a woven label, small patch, or sewn-in tag is usually a better fit.
Should I choose embroidery or a patch for retail resale?
Choose embroidery for a classic, durable look when the artwork is bold and does not need extreme detail. Choose a patch when the logo has fine lines, small text, or a sharper retail feel. If the decision is still unclear, compare both mockups under real lighting and at actual size before signing off.


