This stationery Embroidered Baseball Caps material sample guide is about avoiding a familiar trap: approving a logo on the wrong blank and finding out too late that the cap, not the artwork, is the real problem. The same embroidery file can look sharp on one fabric and tired on another. A soft twill, a brushed finish, or an underbuilt crown changes the result more than most buyers expect.
Mockups are useful for direction. They are not proof. A screen image will not show how the crown holds its shape, whether the visor feels flimsy, or if the embroidery sits cleanly instead of sinking into the fabric. A physical sample answers the questions that matter once the cap leaves the design file and becomes something people wear.
That matters even more for stationery brands and promotional programs, where the cap has to feel consistent with the rest of the product line. If the first sample already looks cheap, the rest of the order will not magically improve. Sampling is the point where the budget, materials, and brand expectations meet reality.
“Review the cap in daylight, on a real head, with the actual thread colors. Photos can support the decision, but they should not make it.”
Stationery embroidered baseball caps material sample guide: why guessing costs more
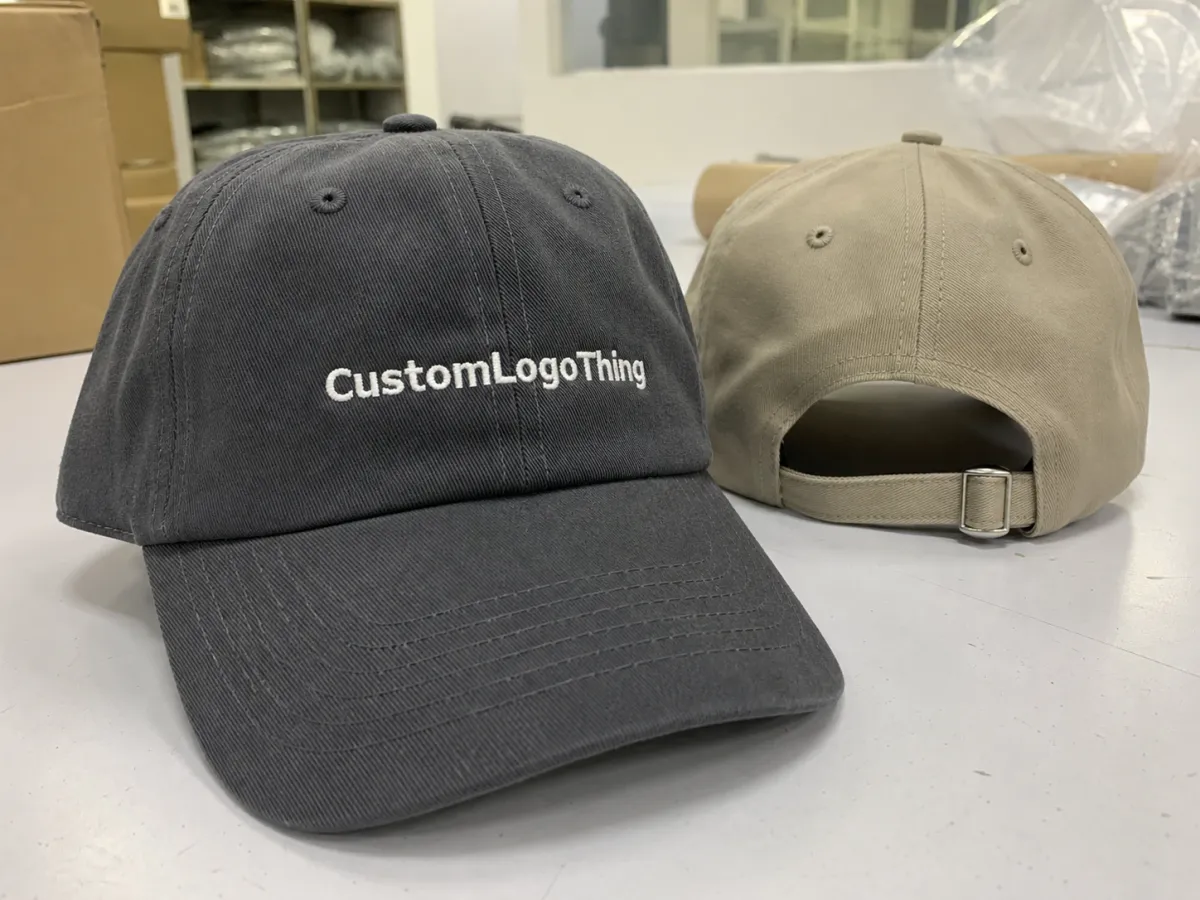
A sample usually arrives in one of three forms: a fabric swatch, a blank cap, or a decorated test cap. Each one answers a different question. Swatches show texture, weight, and color depth. Blank caps show structure and fit. Decorated samples reveal stitch clarity, distortion, and how the logo behaves once thread meets fabric.
That distinction sounds obvious until the first order goes sideways. A logo can be digitized perfectly and still look muddy if the front panel is too soft or too textured. A glossy polyester cap can make a brand mark pop, but it can also show surface shine that looks less premium in person than it did in the photo. Cotton twill usually gives a more familiar matte finish and steadier stitch definition. Blends sit in the middle, which is often where buyers end up after comparing samples instead of promises.
The same logic applies to packaging. If the caps will ship in corrugated cardboard cartons, nested with kraft paper or another filler, the sample should show whether the product still looks presentable after pack-out. Buyers asking for recycled materials, FSC certified board, or biodegradable packaging inserts should raise that during sampling, not after approval. Once the order is locked, every packaging change costs more and takes longer.
A good sample is not a luxury line item. It is the cheapest way to catch a mistake before it multiplies. A small correction on a sample might cost a few dozen dollars. A wrong approval can become a warehouse problem, a resale problem, or a write-off. That is not pessimism. It is how production math works.
There is also a brand perception issue that gets overlooked. Caps are worn at eye level. Tiny defects are visible. A slightly twisted logo, a seam that pulls, or a closure that feels rough will be noticed long after the buyer forgets the color name. Sampling gives you one chance to see the product the way customers will, not the way a render suggests it should look.
How the sample process works from brief to first prototype
The best sample process starts with a brief that leaves little room for interpretation. Send the cap style first: 5-panel or 6-panel, structured or unstructured, low, mid, or high profile, closure type, visor shape, and target fabric. Then send the decoration details: logo dimensions, placement, color references, and whether the decoration is direct embroidery, applique, patchwork, or a different treatment. If the sample must match production exactly, say that plainly. If it is a concept sample and not a final reference, say that too.
From there, the workflow usually moves through pattern selection, blank sourcing, stitch setup, test embroidery, visual review, and shipping. The cleanest projects are the ones where the supplier gets all the variables up front. If the artwork needs digitizing, build in time for that. If the fabric has to be ordered, add more. If the sample crosses borders, transit becomes part of the timeline, whether anyone likes it or not.
Typical timing is not mysterious. Fabric swatches can be ready in 3-5 business days. A decorated sample cap often needs 7-14 business days before shipping. A pre-production sample may take 10-20 business days if the order needs exact materials, extra review, or multiple corrections. Dense embroidery, small lettering, and special finishes push the schedule out further. Fast is possible, but fast and precise rarely arrive together.
The fastest way to keep the sample moving is to send the right inputs on day one:
- Vector artwork in AI, EPS, or a clean PDF
- Pantone references or thread color targets
- Exact logo placement with measurements
- Preferred crown height, visor style, and closure type
- Notes on sweatband feel, lining, seam finish, or internal labeling
That last point matters more than many buyers assume. A cap can look right and still feel wrong once it is worn for an hour. Sweatband texture, seam bulk, and closure hardware affect comfort just as much as the front embroidery does. If the sample is approved on appearance alone, the bulk order can still disappoint once people start wearing it.
Shipping details deserve the same attention. A decent supplier should protect the sample in a corrugated cardboard mailer or carton, not in a flimsy bag that crushes the crown before the buyer ever sees it. If sustainability is part of the brief, ask whether the pack-out uses recycled materials, FSC certified board, or a biodegradable packaging insert where appropriate. These are not decorative questions. They shape the condition of the sample on arrival, which shapes the quality of the review.
Fabric, crown, and stitch factors that change the finished look
Fabric changes more than color. It changes stitch clarity, drape, shine, and durability. Cotton twill is still one of the safest choices for embroidered caps because it is stable, familiar, and usually easy to read visually. Polyester handles moisture better and holds color well, but some grades reflect light in a way that can make the cap look more synthetic. Brushed canvas feels softer and more casual, yet the surface can blur tiny details because it is less uniform under the needle. Blends sit between those extremes and are often chosen because they solve two problems at once, even if they never solve both perfectly.
Fabric weight also matters. A cap fabric in the roughly 280-350 gsm range often gives enough body for embroidery without feeling heavy. Too light, and the front panel can pucker. Too heavy, and the cap can feel stiff or overbuilt. That balance shifts again if the cap is structured, unstructured, lined, or backed with additional support. A sample is the only sensible place to test that balance, because numbers alone do not tell you how the cap behaves in hand.
The crown structure is just as important. A structured crown with buckram support gives embroidery a firmer base, so logos tend to sit cleaner and stand up more evenly. An unstructured crown drapes more casually, which can be the right look for lifestyle branding but a poor choice for a logo that needs to feel authoritative. Low-profile caps look relaxed. Mid-profile caps are usually the most commercially forgiving. High-profile caps carry more visual height, which can be useful for certain designs and awkward for others.
Stitch behavior is where the truth shows up. Thread sheen changes how bold the logo looks. Stitch density determines whether letters stay crisp or start to crowd each other. Underlay stabilizes the embroidery and keeps the top thread from disappearing into the fabric. On a sample, look for clean edges, even tension, and no puckering around corners or tight curves. For front logos, many buyers end up in the 70-90 mm width range, with stitch counts often around 6,000-12,000 depending on the complexity of the artwork. That is not a rule. It is a practical range. Once the design becomes small or highly detailed, the risk of distortion rises quickly.
Comfort sits alongside appearance, not beneath it. Check the sweatband feel. Check whether the visor keeps its curve after packaging. Check whether the closure scratches, pinches, or adds too much bulk at the back. A sample that looks polished but wears badly is still a failed sample. People do not forgive uncomfortable caps just because the logo is correct.
If you are comparing materials, look at four points and ignore the hype:
- Color depth: does the fabric hold the brand color without going dull or washed out?
- Stitch clarity: are letter edges readable at normal viewing distance?
- Shape retention: does the crown recover after being packed or compressed?
- Handfeel: does the surface feel premium, stiff, soft, or overly synthetic?
Those checks sound basic. They are the checks that prevent expensive disappointment.
Pricing, MOQ, and unit cost for sample kits
Sample pricing depends on what is being made. A blank material swatch pack is the least expensive path. A decorated sample cap costs more because somebody has to source the blank, set up the embroidery, and inspect the result. A pre-production sample sits at the top of the range because it is expected to mirror the final order as closely as possible. That usually means tighter control, more checks, and less tolerance for vague instructions.
| Sample type | Typical price range | Usual timing | Best for |
|---|---|---|---|
| Fabric swatch pack | $8-$25, plus freight | 3-5 business days | Checking handfeel, color, and fabric selection |
| Decorated sample cap | $25-$80, plus shipping | 7-14 business days | Reviewing embroidery, crown shape, and logo placement |
| Pre-production sample | $50-$120+, depending on detail | 10-20 business days | Final sign-off before bulk production |
Several factors push the number up. Low minimum order quantities do it. So do special fabric sourcing, extra thread colors, rush handling, revision rounds, and alternate logo placements. The underlying logic is simple: small batch embroidery does not benefit from scale. A factory still has to digitize, set up, test, and review the work even if only one sample is being made. The machine time is only part of the bill. Setup and correction are where the real cost lives.
Many factories quote a manufacturing MOQ in the low hundreds, often somewhere around 100-300 pieces for standard programs, though the real threshold can be higher or lower depending on fabric, decoration, and packaging. Sample pricing should be read in that context. A one-off cap is not priced like a bulk run because the setup burden is almost the same. That is why sample fees can look expensive beside a final unit cost and still be perfectly rational.
Watch the quote language carefully. A supplier may offer a low sample fee and then charge separately for digitizing, setup, shipping, and revisions. That is not automatically a problem. It becomes a problem when the quote is vague and the buyer assumes everything is included. Ask for the full landed cost: sample fee, artwork adjustments, freight, and the number of revision rounds included. If the sample cost is credited against the first bulk order, good. If not, you still need the honest number before work begins.
For buyers comparing options, the real question is not which sample is cheapest. It is which sample gives the most useful information for the least waste. Those are not the same thing, and experienced buyers know the difference.
Step-by-step approval workflow for a sample that matches production
Start with a spec sheet that is hard to misread. List the cap model, fabric composition, closure, crown height, visor shape, logo position, thread colors, and acceptable variation. If the sample is meant to become the production reference, insist on the same blank, the same thread, and the same backing that the bulk order will use. A close substitute may look similar in a photo and still behave differently under production conditions.
Then review the sample in layers. First, look at it in daylight. Indoor lighting hides flaws and compresses contrast. Second, put it on a head. That sounds too simple, which is exactly why people skip it. Third, inspect the stitch edges up close. You want even tension, no puckering, and clean letter edges. Fourth, compare the sample with the approved artwork and a retained control sample. If the cap is meant to feel premium, the sample should communicate that without explanation.
A practical approval trail usually includes:
- Written spec sheet approval
- Photos of the sample under good light
- Comments on fit, stitch clarity, and fabric feel
- Final sign-off naming the exact sample version
- A retained physical control sample for production checks
The control sample is not optional if consistency matters. Once bulk production begins, the factory needs a physical standard to compare against. Memory is weak quality control. So are phrases like “close enough” and “make it like the photo.”
Packaging should be part of the same review. A cap arriving in a snug corrugated cardboard box with kraft paper support tells a different story from one crushed in transit. For long-distance shipments, some teams compare their pack-out standards against distribution testing frameworks such as those described by ISTA. If the order uses certified paper or board, FSC is the reference point to check for sourcing claims. Those standards do not replace good judgment, but they make the conversation more precise.
One practical detail gets ignored too often: revision naming. If a supplier sends Version A, Version B, and Version C, the buyer should approve one of them in writing and keep that exact reference on file. Verbal approval and scattered email comments create avoidable mistakes once production begins.
Common sampling mistakes that distort the final cap
The biggest mistake is approving a sample made from a different fabric or a different cap block and then expecting the production run to match. The logo may be the same. The color name may be the same. The result can still diverge because the structure changed. If the crown, fabric, or backing differs, the sample is not a reliable reference. It is only a visual approximation.
Photo-only approval is another recurring problem. Supplier photos are useful for early filtering, but they flatten texture, hide wrinkles, and make embroidery look cleaner than it may be in hand. A shiny polyester blend can look rich on screen and cheap in daylight. A soft cap can seem neat in a flat lay and then collapse the moment it is worn. The camera is a poor substitute for touch.
Buyers also underestimate comfort. A stiff forehead panel, a seam that sits awkwardly, or a closure that feels clunky will be noticed within minutes. People rarely forgive a cap that irritates them, no matter how accurate the logo is. The sample is there to catch those failures before the order is multiplied.
Revision discipline matters too. Notes like “make it nicer” do not help anyone. Neither does approving one version verbally and then referring to a different version in email later. Use measurement notes, annotate photos, and identify the exact sample code. If the supplier offers multiple revisions, agree on the limit before sampling starts. Otherwise the process turns into a long, expensive loop with embroidery attached.
Sustainability requests belong in the first round, not the last one. If the project needs recycled materials, FSC certified cartons, post-consumer waste content, or biodegradable packaging inserts, those decisions should be made while the sample is still open. Late-stage changes are slower and more expensive, and the choices tend to be narrower.
There is also a hidden cost to chasing perfection in the wrong place. A cap sample that keeps changing because the buyer is adjusting tiny details without a measurable reason can delay the order more than a genuine technical problem would. The best sampling decisions are specific: fix the stitch density, move the logo 3 mm, change the crown depth, or switch the backing. Vague polish requests usually waste time.
What to do next after sample approval
Once the sample is approved, freeze the final spec sheet. Lock the cap code, artwork placement, thread chart, backing choice, and packaging method. That is the handoff point between design discussion and production control. If this step is skipped, someone in the factory will improvise. Sometimes the improvisation is harmless. Sometimes it creates a batch that technically follows the order and still misses the mark.
Next, confirm the order controls. Decide who keeps the master sample, how cartons are labeled, what the pack counts are, and whether any size breakdown needs to be documented. If the caps are retail ready, specify the outer shipper and inner pack materials clearly, especially if you want corrugated cardboard with kraft paper or recycled materials instead of generic filler. The more precise the pack-out, the easier it is to spot drift later.
Then set the timeline in writing. Bulk sewing, embroidery, finishing, QC, and shipping should all have dates or date ranges. A sample that was approved quickly does not mean the production order will move quickly. They are different jobs. If the supplier says 12-15 business days after approval, build the schedule around that, not around optimism.
Good buyers also ask for a final production checkpoint. That may be a photo review, a partial run approval, or a warehouse comparison against the retained control sample. The point is not bureaucracy. The point is to catch variation before the caps are boxed and sent out the door.
The practical next step is simple: compare the approved sample against the original brief, verify that every detail still matches the intended standard, and carry that documented reference into the bulk order. That is how a Stationery Embroidered Baseball Caps material sample guide saves money, protects quality, and prevents the kind of mismatch that only shows up after delivery.
What should I request in a stationery embroidered baseball caps material sample?
Ask for the exact production fabric, the same embroidery thread, and the same backing or buckram so the sample reflects real stitch behavior. If the bulk caps will be washed, steamed, or finished in a special way, ask for that condition to be tested too instead of approving a raw sample only.
How many material samples do I need before ordering embroidered baseball caps?
Most buyers need one strong decorated sample plus a few fabric swatches for side-by-side comparison. If you are choosing between multiple cap blanks, compare at least two construction options so you can judge structure, fit, and logo clarity in person.
How long does the cap sample process usually take?
Simple swatch approval can be quick, but a decorated sample usually needs time for setup, embroidery, review, and shipping. Add more time if the design needs digitizing, the fabric must be sourced specially, or a revision round is needed before sign-off.
What affects the price of embroidered baseball cap samples?
Price changes with fabric type, decoration complexity, revision count, shipping method, and whether the supplier is making a one-off sample or a pre-production piece. Low MOQ orders can raise the apparent unit cost, so compare the full quote instead of only the sample line item.
Can I approve a stationery embroidered baseball caps sample from photos only?
Photos help, but they miss texture, crown shape, fit, and how the thread catches light, which is exactly where many bad approvals happen. Use photos for early feedback, then insist on a physical sample before final production sign-off whenever the order matters.


