A vitamin Logo Patch Beanies material sample guide should do one job: help you approve a patch that works on a real knit cap, not just in a render. Beanies stretch, cuffs move, and patch edges behave differently on soft knit than on flat apparel. That is why a physical sample matters more than a screen proof.
The sample is where the idea meets production reality. You can see whether the logo still reads clearly once the fabric flexes, whether the patch feels too stiff against the forehead, and whether the attachment method survives normal wear. If a sample fails here, that is a cheap failure.
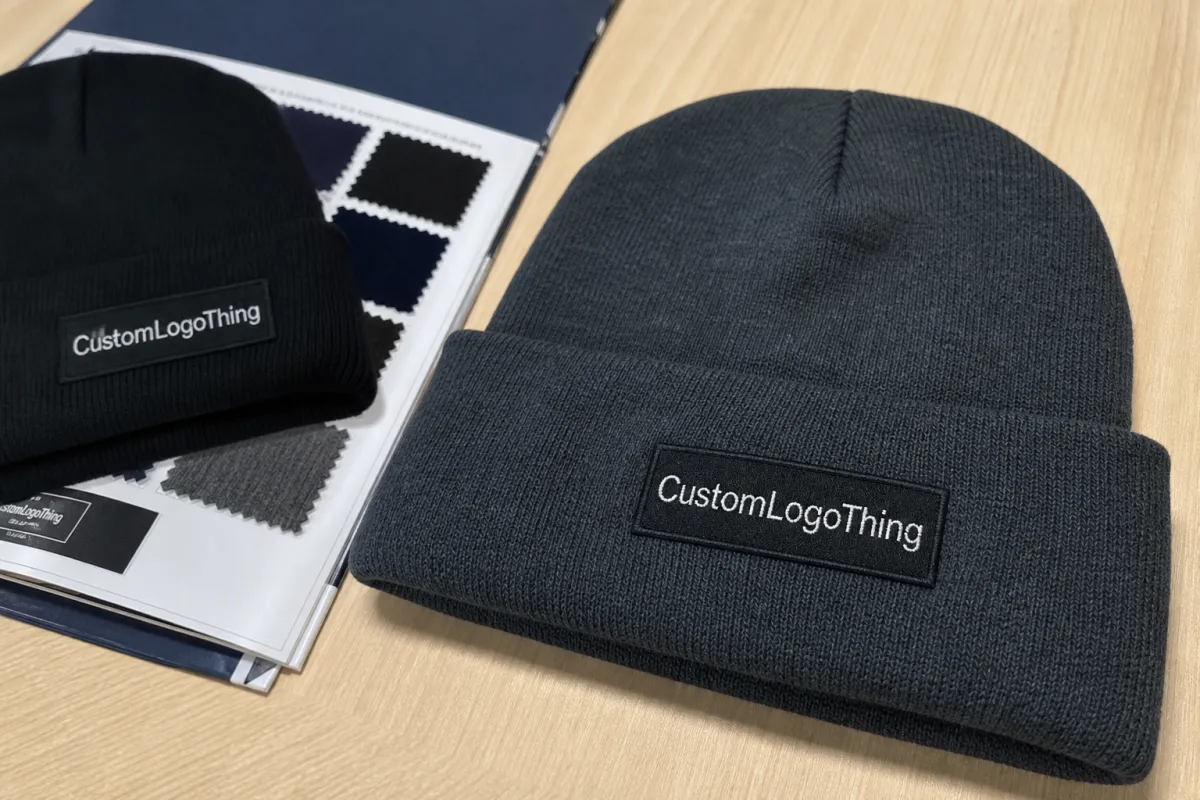
What the vitamin logo patch beanies material sample guide actually shows
Mockups are useful, but they are flattering. A patch can look centered and sharp on screen, then shift once it lands on a cuff under tension. On a beanie, even a few millimeters can matter because the eye notices uneven placement quickly.
A real sample shows more than a color swatch. It includes the patch face, backing, border finish, attachment method, and the way the patch sits on the actual beanie blank. That combination tells you whether the logo feels premium, stiff, scratchy, glossy, or oddly heavy. It also shows whether the knit stretches the artwork out of shape.
Logo patches on beanies need more scrutiny than the same patch on a flat garment for three reasons. First, the cuff creates tension at the placement point. Second, the crown curves, so alignment can drift. Third, knit texture can swallow fine detail, especially on chunky rib knits. A patch that looks precise on a hoodie can look muddy on a beanie if the border is too thin or the contrast is too soft.
A sample exists to answer boring questions before they become expensive ones: Does it feel right? Does it read clearly? Does it hold up when someone actually wears it?
That is the value of the sample stage. It turns guessing into a yes-or-no decision. If the sample works, you move on. If it does not, you still have room to adjust the patch style, backing, or placement before bulk production locks in the wrong choice.
How patch materials behave on knit beanies
Patch material changes the entire character of the beanie. Some options feel classic and soft. Others feel structured and almost architectural. On a knit cap, that difference is amplified because the base fabric already has texture and movement.
Embroidered patches are familiar and tactile. They work well for bold branding and medium-detail logos, but they can get bulky if the stitch density is too high. On a fine-gauge beanie, that bulk becomes obvious fast.
Woven patches are better for small lettering and tight line work. They carry more detail with less thickness, which helps on beanies where the cuff already does enough visually. They can look flatter than embroidery, but that is often the right tradeoff when legibility matters.
PVC patches give a crisp, high-contrast look and strong color separation. They also bring more stiffness and weight. That can work on a rugged outdoor beanie or a technical streetwear style, but on a soft cuff they can feel hard and overbuilt.
Felt patches look casual and warm. They fit heritage or cold-weather branding, but they can fuzz over time and are not the best choice if the logo has tiny details. Leather patches lean premium and minimal. They are a good fit for simple graphics and small marks, though they can show moisture marks and darken unevenly if the finish is too sensitive.
The attachment method matters just as much as the patch face. Sew-on is usually the safest choice for knit beanies because it respects the stretch of the fabric. Iron-on can work if the backing and fabric are compatible, but the heat has to be controlled. Adhesive backing is convenient for sample staging and temporary placement, yet it is not always the best long-term answer because repeated flexing can weaken the bond.
Do not approve a patch sample just because it looks neat on a desk. Stretch the cuff. Twist the beanie. Wear it for a few minutes. If the edges lift, the surface wrinkles, or the patch feels like a stiff tile under the knit, that is the wrong build.
- Embroidered: best for texture and bold branding; less ideal for tiny copy.
- Woven: better for detail and cleaner edges; thinner profile.
- PVC: strong visual impact; firmer handfeel on soft knits.
- Felt: cozy and casual; can pill or fuzz with wear.
- Leather: premium and simple; moisture marks are a real risk.
Edge crispness is another quiet deal-breaker. From a few feet away, can you still read the mark? Does the border stay clean against the knit texture, or does it blur into the background? A fancy render does not count if the sample looks tired in daylight.
Packaging matters because sample quality can be ruined in transit. Flat-packing with corrugated cardboard and kraft paper reduces rubbing and keeps patch edges from getting bent. If sustainability matters to your brand, specify FSC certified corrugated cardboard or recycled materials instead of assuming the supplier will choose them automatically. Biodegradable packaging is only useful if it protects the product.
Specs that change feel, fit, and durability
Patch size is one of those details that seems simple until you see it on a real head. Too small, and the logo disappears into the rib. Too large, and the cuff starts to sag or the layout feels top-heavy. For most knit caps, a 4 to 6 cm patch is a practical starting point. Oversized patches around 7 to 8 cm can work on slouchier silhouettes, but only if the knit gauge is tight enough to support the weight.
Beanie construction changes placement more than many buyers expect. A 1x1 rib behaves differently from a 2x2 rib. A deep cuff gives you room to center the mark cleanly. A shallow cuff leaves less space before the patch starts drifting toward the edge. Seam placement can also ruin a good layout if the logo sits too close to the join. The blank is not a neutral canvas.
Finish changes perception fast. Matte surfaces usually read softer and more premium on knit caps. Gloss finishes look sharper and more technical, but they show scuffs sooner. Thread sheen in embroidery can move a logo toward sporty or polished, depending on the contrast. High-contrast combinations are easier to read from a distance. Low-contrast combinations can look subtle in a sample tray and vanish under store lighting.
Durability is where a sample earns its keep. Ask how the patch handles light washing, repeated flexing, and abrasion at the cuff edge. If the backing cracks after a few bends or the border starts fraying after the first wear test, that is not a production success. Plenty of suppliers can quote a look. Fewer can deliver one that survives regular use.
Here is a practical spec range that usually saves time during the first round:
| Patch type | Typical sample fee | Typical bulk add-on per beanie | Best use | Main risk |
|---|---|---|---|---|
| Embroidered | $25-$60 | $0.20-$0.55 | Classic texture and bold branding | Bulky on fine knits |
| Woven | $20-$50 | $0.18-$0.45 | Small type and clean line work | Can feel flatter than expected |
| PVC | $35-$90 | $0.35-$0.90 | High-contrast, dimensional logos | Stiff handfeel on soft knits |
| Felt | $20-$45 | $0.18-$0.40 | Cozy, casual branding | Can pill or fuzz over time |
| Leather | $30-$80 | $0.40-$1.10 | Minimal premium look | Moisture marks and darkening |
Those numbers are not fixed. Size, color count, backing, and order quantity move them around quickly. Still, they are useful as a sanity check. If one quote is dramatically cheaper than the others, something was simplified. Usually that thing matters.
Sample process and lead time from art to approval
The sample process should feel organized, not mysterious. Start with clean artwork, the beanie color, the target patch size, the attachment method, and the order quantity. If those details arrive late, the supplier will either guess or send follow-up questions that should have been in the first message.
Proof review comes next. Check dimensions, placement, attachment style, and whether the patch actually fits the beanie silhouette. A detailed logo may need woven construction. A bold wordmark may look better in embroidery or leather. This is also the time to confirm whether sample packaging should use corrugated cardboard, kraft paper wraps, or a recycled option that protects the product in transit.
Lead time depends on patch type and how many decisions are still floating around. Simple embroidered or woven samples often take about 5 to 10 business days. PVC patches usually need 10 to 15 business days because tooling and curing slow the cycle down. Leather and layered builds usually sit in the middle. Revisions add time fast.
Shipping is separate from production. Domestic courier transit may take 2 to 5 days. International shipping can take longer. If the project has a fixed launch date, leave room for a second sample round. That is basic planning.
Approve the sample only after checking it in real light and on a real head. A patch that looks fine under warehouse fluorescents may read differently outdoors or under retail lighting.
Cost, MOQ, and quote breaks to watch
Sample fees, setup fees, and production pricing are different line items. They get bundled sometimes, usually because the quote looks cleaner that way. A sample might cost $20 to $90 depending on patch type, but setup fees can run from $25 to $150 if the artwork needs digitizing, tooling, or a new mold. Some vendors credit sample fees back on the bulk order. Some do not.
MOQ changes pricing more than most buyers expect. Lower quantities usually mean higher unit cost because the setup has fewer pieces to spread across. At 100 to 300 beanies, the price will usually sit noticeably higher than it does at 1,000 pieces. Past that, pricing often improves at common breakpoints like 500, 1,000, and 3,000 units. Fewer colors, fewer patch styles, and fewer placement variations usually help. Mixed colorways and alternate placements usually hurt.
Useful quote questions are boring, which is exactly why they save money:
- What does the sample fee include?
- What is the production price at my target quantity?
- Is the setup fee credited back after approval?
- Is there a rush fee?
- What is the courier or freight cost?
- What does a re-sample cost if the art changes?
Re-sampling is the sneaky cost that blows up budgets. If the logo weight, font, or patch outline is still under discussion, the sample is not ready. Finish the art first. Then sample. Otherwise you are paying to prove a decision you have not made yet.
If sustainability is part of the brand story, do not treat packaging like an afterthought. A sample wrapped in kraft paper and packed in FSC certified corrugated cardboard looks more disciplined than a loose pile of plastic sleeves, and it avoids awkward conversations later. Recycled materials and post-consumer waste content are useful only if the packaging still protects the beanie.
Common mistakes that wreck a good approval
The first mistake is approving from a screen-only mockup. Digital art cannot show knit texture, patch thickness, or how an edge behaves when the beanie stretches. A mockup can suggest a direction. It cannot prove the product.
The second mistake is testing only one color or one size. Black-on-black can hide problems that show up immediately on cream or gray. A patch that looks strong on one blank may disappear on another. Check at least one high-contrast colorway so you can see how visibility changes across options.
The third mistake is ignoring placement math. Put the patch too close to the cuff edge and it twists when worn. Put it too high on the crown and it feels lost. If the beanie has a deep fold, measure the usable area with the cuff both relaxed and stretched.
The fourth mistake is inspecting only under one type of light. Warm store lighting, gray office light, and daylight all change how thread sheen and color contrast read. If the sample has not been seen in more than one setting, it has not really been checked.
One more problem shows up all the time: people judge the sample visually and ignore comfort. A patch can look great and still feel wrong after ten minutes of wear. If it scratches, pulls, or creates a stiff ridge, customers will notice later.
Finally, do not let a supplier talk you into treating “close enough” as acceptable for a first run. If the border is rough, the lettering is too thin, or the backing feels too hard, ask for a revision. The sample is the moment to be picky.
Expert review checklist and next steps
Before approval, use a simple review matrix. Keep it to five categories: feel, visibility, durability, cost, and lead time. Score each sample from 1 to 5. That forces the conversation away from vague opinions and toward something the team can defend.
It also helps to compare one front-runner and one backup material. For example, embroidered can be the main choice and woven can be the backup. Or PVC can be the hero and leather can be the premium alternate. Two serious options are usually enough. Three if the project is high stakes.
Before production, lock the final artwork file, Pantone references, patch size, and placement spec. If any of those change after sample approval, expect another proof or sample round. That is normal. What is not normal is changing the logo after approval and acting surprised when the price changes with it.
Judge the sample by how it will feel in a buyer’s hands, not by how it looks in a presentation deck. If the sample passes that test, you are in good shape. If it does not, fix it now instead of after 1,000 units land on the dock.
What should a vitamin logo patch beanies material sample include?
It should include the actual patch on a real beanie blank, not just a loose swatch or a render. Check backing, edge finish, size, and color, then test stretch and wear in daylight and under indoor light.
How many sample options should I request for patch beanies?
Two to three options is usually enough: one front-runner and one backup material. More than that tends to slow the decision and can add avoidable sample fees.
What affects the price of vitamin logo patch beanie samples?
Patch type, color count, size, backing, setup, and shipping are the main drivers. Re-sample fees can matter more than the sample itself if the art keeps changing.
How long does the sample process usually take?
Simple embroidered or woven samples are usually faster than PVC or layered patch builds. Each revision can add several business days, and peak season can stretch the timeline further.
Can I approve from photos instead of a physical sample?
Photos are fine for checking artwork and placement, but they do not show handfeel or stretch behavior. Use photos only when the timeline is tight or the order is a low-risk reorder.
If you want fewer surprises, use the vitamin Logo Patch Beanies material sample guide as the approval checklist, then make the final call on the actual sample in your hands.


