The phrase beer Embroidered Beanies Material Sample guide sounds procedural, but the real issue is practical: most beanie approval problems come from fabric stretch, knit density, and logo placement, not from the artwork alone. A clean design on a screen can look unexpectedly crowded, sunken, or off-center once it meets a rib knit cuff. That is where time slips away and where small mistakes become expensive.
For beer promotions, retail merch, and event giveaways, those small mistakes matter. A beanie is a simple product only on paper. In hand, it is a stack of decisions: yarn choice, gauge, cuff height, embroidery method, backing, thread color, and how much the material gives under tension. A sample is the buyer's checkpoint for all of it. It is not just a color match. It is a test of fit, hand-feel, stitch clarity, stretch recovery, and repeatability.
Buyers who treat the sample as a formality usually regret it. The ones who use it as a working document tend to save money, because the sample exposes the weak points before bulk production locks them in. That matters even more on beer-branded pieces, where the logo often has to read clearly from a distance, survive casual wear, and still feel like something people actually want to keep.
Beer embroidered beanies material sample guide: what buyers miss first
The first mistake is assuming the art file is the hard part. It usually is not. The quiet variable is the material itself. A loose knit can make embroidery look slightly buried. A tighter gauge may sharpen the logo, but it can also make the beanie feel less forgiving on the head. That trade-off is common, and it is exactly why samples exist.
From a buyer's point of view, the material sample is a reference object, not a promise. It shows how the yarn behaves under real embroidery tension, how the cuff holds shape after handling, and whether the logo still reads cleanly after the beanie is stretched and worn. For a retail display or a promo table beside cans and cartons, those details affect perceived value almost immediately.
Most teams look at color first, fit second, and logo third. Production tends to punish that order. The structure of the beanie decides how much the embroidery can carry. If the fabric is too elastic, thin lettering can separate under strain. If the yarn has too much loft, stitch edges blur. If the cuff height drifts between samples, placement shifts and the same artwork starts to look inconsistent. None of that is dramatic by itself. Together, it is enough to make a run feel uneven.
A good sample does not flatter the design. It shows the risks before bulk production hardens them into facts.
There is another common blind spot: teams often approve a sample because it looks better than expected, not because it matches the real use case. A beanie can look polished under bright studio lighting and still behave badly on a head. The sample should answer a more useful question than "Is it nice?" It should answer "Will this still look controlled after wear, folding, shipping, and handling?"
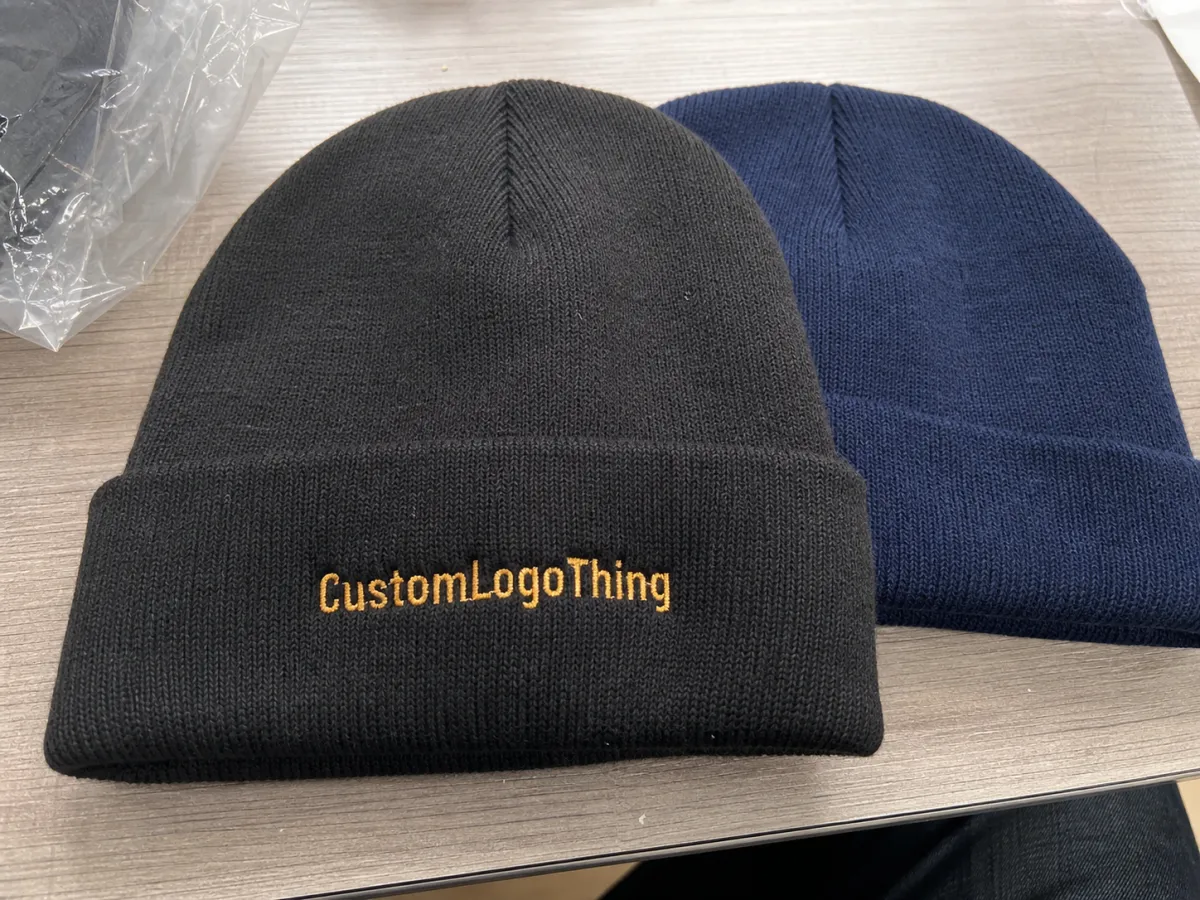
How a stitched sample shows the real look and feel
A flat mockup helps align expectations, but it is still a drawing. A stitched sample shows how knit density, thread sheen, stitch direction, and the beanie's own structure interact. That is the difference between approving a graphic and approving a finished item.
One physical sample can settle a surprising number of questions quickly. Does the logo stay centered when the cuff is folded a little higher? Is the crown tall enough for the silhouette the brand wants? Does the embroidery still read cleanly from arm's length, or does it only work close up? Those questions matter because beanies are worn, not displayed behind glass. Once they are on a head, the geometry changes.
A sample also gives different teams a common reference. Purchasing can judge whether the cost makes sense. Design can see whether the logo needs to be simplified. Merchandising can decide whether the shape feels premium enough for the channel. Without the physical piece, those conversations tend to wander. With it, the debate gets sharper, and that is useful.
Fine lettering and small icons are where this matters most. A design can look perfect in vector form and still lose definition on a knit surface. Thin outlines may disappear into the texture. Dense fills may feel bulky. Tight corners can fray visually, especially if the underlay is too heavy. A buyer who sees that early can widen a stroke, increase contrast, or shift placement a few millimeters instead of discovering the problem after hundreds of units are already in motion.
Sample process and timeline: from swatch request to approval
The cleanest sample process starts with clear artwork and a short list of decisions. Share the logo file, placement notes, and any size limits. Choose the beanie material or material group. Confirm the decoration method, because embroidery, woven patch, and appliqued decoration create different approval questions. Then request the sample and ask for the revision policy in writing before anything is made.
That sequence sounds basic, but skipped steps are a major source of delay. A supplier can only sample accurately if they know whether the buyer cares more about warmth, shape, price, or retail finish. If those priorities change halfway through, the sample changes with them. That is how a one-week job turns into three rounds of revision.
Typical timing depends on artwork complexity, yarn availability, and how much the design needs to be refined. A simple beanie with standard lettering and stock yarn can often move in 7-10 business days. Add custom yarn, denser stitch coverage, or multiple thread colors, and 10-15 business days is more realistic. If the logo uses tiny text or unusual placement, expect a little more time because the first version usually needs adjustment. Rush sampling is possible in some cases, but it works best when the spec is already settled.
The approval flow should be written down. Photos first help catch gross errors. The physical sample comes next because photos flatten texture and hide the way embroidery sits against a rib knit. After that, send written sign-off or a change list. If the order has a hard launch date, lock each milestone: art approval, sample ship date, review window, and final production release. That sequence is not bureaucracy. It is insurance against expensive ambiguity.
One more practical point: sampling should mirror production as closely as possible. If the sample uses a different yarn lot, a different cuff fold, or a different stitch density than the bulk order, the result may be encouraging but misleading. The closer the sample sits to the final spec, the more useful it becomes as a production reference.
Fabric, yarn, and embroidery factors that change the result
Material choice is where a beer Embroidered Beanies Material Sample guide becomes genuinely useful. Acrylic is still the most common starting point because it is affordable, holds color well, and usually gives clean contrast under embroidery. Acrylic blends can feel softer or warmer depending on the mix. Recycled fiber blends add a sustainability angle, but they can change how the knit rebounds after stretching. Heavier gauges create warmth and a more structured feel, yet they can soften fine linework if the surface is too plush.
| Material | Sample behavior | Typical bulk impact | Best use |
|---|---|---|---|
| Acrylic | Crisp stitch visibility, stable shape, easy color matching | Usually the lowest-cost option | Event giveaways and large promo runs |
| Acrylic blend | Softer hand-feel, slightly more drape | Often adds a modest premium | Retail merch with a comfort focus |
| Recycled fiber blend | Can feel smoother; recovery varies by blend | May add $0.20-$0.50 per unit | Brands highlighting recycled content or lower-impact materials |
| Heavy-gauge knit | Warm, structured, but can soften fine linework | Often higher due to yarn use and machine time | Premium winter merchandise |
Yarn thickness changes stitch definition more than many buyers expect. Thin yarn can make the surface feel cleaner, but it can also show uneven tension more easily. Thick yarn can create a richer hand-feel, yet small text may disappear into the knit. Cuff depth matters too. A deeper cuff gives more room for embroidery, while a shallow cuff compresses the available field and can force the logo closer to the seam than the artwork suggested on screen.
Embroidery construction matters just as much as base fabric. Backing, underlay, thread direction, and total stitch count all affect the result. Dense embroidery usually improves durability, but it can also make the design feel stiff on a stretchy base. A lighter stitch strategy sometimes performs better because the logo moves with the knit rather than fighting it. That is why a sample should be judged as a system, not as a single decoration choice.
There is also the packaging layer, which buyers often underestimate. A beanie folded into a corrugated mailer with kraft paper tissue and a paperboard insert feels more intentional than one tossed into a loose poly bag. If the brand uses recycled materials or FSC sourced components, the story gets stronger, but only if the product itself still looks finished. Overbuilt packaging can inflate cost for little gain. Cheap packaging can make a premium beanie feel ordinary. The right answer depends on the channel, the budget, and how the item will be opened.
Cost, pricing, MOQ, and what actually moves the quote
Buyers often ask for a price before the sample is locked. That is understandable, but the better question is what exactly is being priced. For a custom beanie, the quote usually reflects material choice, embroidery complexity, sample quantity, packaging, shipping method, and whether the factory can build from an existing setup or has to create a new decoration path.
A plain sample made with stock yarn may land around $25-$50 before shipping. A more complex embroidered sample with multiple thread colors, tighter logo tolerances, or several revision rounds can move closer to $50-$120. Bulk pricing usually drops meaningfully at higher quantities. At 500-1,000 units, many orders fall somewhere around $2.20-$5.80 per piece depending on knit weight, stitch coverage, finishing, and the level of packaging included. At lower volumes, the unit price climbs quickly because setup costs are spread across fewer pieces.
MOQ still matters at the sample stage because some suppliers treat low-volume prototypes as special work. A factory may be happy to make one reference piece, yet still require a different minimum for production, especially if the beanie uses custom yarn or a more involved embroidery build. That is not a warning sign by itself. It is simply the arithmetic of machine time, setup, and material waste.
The most useful pricing rule is also the simplest: the closer the sample sits to final production, the more trustworthy the quote becomes. If the sample uses one yarn type and the bulk order uses another, the buyer can end up with a flattering number that falls apart later. Clear sample specs reduce quote drift, cut down on avoidable artwork revisions, and prevent the cycle where every small change triggers a new round of approval.
For teams that need packaging or transit standards, references such as ISTA can help frame shipping stress, while FSC is useful if the presentation kit includes paperboard, inserts, or retail wrap. Those references do not determine stitch quality, but they do shape the final buying experience and can influence how the product is unpacked, stored, and perceived.
Step-by-step sample review: fit, color, stitch, and wear tests
Start with a visual check under natural light. Indoor lighting can make thread color look warmer or flatter than it really is, and a dim room can hide minor stitch inconsistencies. Place the sample next to the approved artwork, a Pantone or thread reference if one exists, and any earlier beanie sample from the same supplier. If the campaign depends on packaging color or label tone, compare those pieces too. The item should feel coherent as a set.
Next, measure the beanie. Confirm crown depth, cuff width, overall height, and stretch recovery after the knit is extended and released a few times. That last test is easy to skip and easy to regret. A beanie that looks correct straight out of the bag can relax differently after handling, storage, or wear. Since the item will be stretched repeatedly, recovery matters just as much as first impression.
Then inspect the embroidery from two distances. Up close, check thread direction, density, edge definition, and whether the back side feels too bulky. At arm's length, ask the more commercial question: does the logo still read clearly? A sample can pass one and fail the other. If the item is meant for retail, event staff, or beverage-brand visibility, the distance test is not optional.
Wear the sample for a few minutes. Check slippage, seam irritation, and whether the logo stays in the right visual zone while the beanie moves. That small test reveals more than a table check ever will. A product that looks fine while folded can slide awkwardly once worn, and that usually shows up in use faster than anyone expects.
Measure it flat, wear it once, then wear it again after ten minutes. Weak structure usually shows up in the second round.
If there is time, repeat the review after the sample has been folded and unfolded a few times. Beanies often travel in bags, boxes, and sleeves before they are worn. A sample that only looks good in a perfect state is not a strong approval candidate. Buyers do not need perfection. They need consistency.
Common mistakes that make a sample look better than bulk production
The biggest trap is approving a sample made with a different yarn lot. Even small changes in fiber content, dye uptake, or knit tension can shift color and elasticity. The sample may look ideal, then the production run comes out a little tighter, duller, or less balanced around the logo. Lot control matters because textile products are sensitive to variance that looks minor on paper but obvious in hand.
Studio photos are another weak substitute. They flatten texture and hide the way embroidery sits against rib knit. They also conceal scale issues. A logo that looks bold in a close crop may feel small once the beanie is worn. If the buyer only approves from images, the sample can be technically accepted while the bulk run still disappoints.
Small wording and icon changes create problems too. Sometimes a sample is simplified to make production easier, then the team forgets that the final art still contains fine internal spaces or thin strokes. If the sample does not fully reflect the actual artwork, the approval becomes less useful than it appears. A nice-looking shortcut can hide the real risk.
Another mistake is leaving feedback unrecorded. If changes are discussed verbally only, memory does the work of documentation, and memory is a poor quality-control tool. A good approval note should say what changed, what stayed fixed, and what tolerance is acceptable. That protects the buyer if the next run repeats the same conversation six weeks later.
There is also a subtle communication problem: teams sometimes approve based on enthusiasm instead of criteria. That is especially common on seasonal items, where launch pressure can make a sample seem "good enough" before it has been fully checked. A calmer review usually finds the issue before it becomes a reorder dispute.
Expert tips and next steps before you approve the run
Document the approval criteria before the sample arrives. List the exact material, thread colors, logo placement, measurements, acceptable shift range, and packaging expectations. If the item ships with kraft paper wrap, a paperboard insert, or any FSC sourced component, write that down too. The more precise the record, the less room there is for reinterpretation later.
Keep the approved sample with the purchase order. That makes reorder checks faster and reduces subjective debate. It also helps when someone new joins the account and needs to know what "approved" actually meant. A dated photo set is useful, but the physical sample remains the strongest baseline for future production comparisons.
If the artwork is high risk, ask for one extra reference sample. That is especially useful when the logo uses thin type, a gradient translated into thread color, or a layout that sits close to the cuff seam. The extra sample usually costs far less than correcting a run that missed the brief.
Production teams also benefit from clear tolerance language. A beanie does not need to match the sample like a machine part. It needs to stay within a practical range for color, placement, and shape. Buyers who define that range early reduce argument later. That is one of the few places where a little precision saves both time and budget.
The best beer Embroidered Beanies Material Sample guide is the one that turns opinion into evidence. Request the sample, review it against the spec sheet, capture written sign-off, and archive the sample with the final approval record. If those steps are handled well, bulk production becomes less volatile, and the finished beanies are far more likely to match the product everyone thought they were buying.
What should I check in a beer embroidered beanies sample before approving?
Check logo size, placement, and stitch clarity in both flat and worn positions. Confirm the knit feels stable, the cuff holds shape, and the beanie does not distort when stretched. Compare the sample against your spec sheet and record any required changes in writing so the bulk run has a clear target.
How long does a custom beer beanie material sample usually take?
Timeline depends on artwork readiness, material availability, and whether the decoration method is already confirmed. Simple samples move faster than designs with fine text, multiple thread colors, or unusual placement. For planning, 7-10 business days is common for straightforward work, while more complex samples can take 10-15 business days or longer if revisions are needed.
What affects the cost of a beer embroidered beanie sample?
The main drivers are fabric choice, embroidery complexity, revision count, and shipping method. Higher stitch density or more colors usually raises the sample price because it takes more machine time. MOQ and whether the sample can convert cleanly into production also influence the final quote, especially if special yarn or custom finishing is involved.
Can one sample show different knit and embroidery options?
Yes, but only if the options are close enough to compare without confusing the approval process. If the materials behave very differently, separate samples are usually safer for judging fit, recovery, and stitch quality. Ask for side-by-side notes so everyone knows which version is which and what changed between them.
What should I do after I approve the beanie sample?
Send written approval, keep a dated photo set, and save the physical sample as a production reference. Lock the final specs for color, placement, measurements, and packaging before bulk order release. Use the approved sample as the baseline for any reorder or quality dispute so there is no confusion about the standard.


