Buyer’s Guide: Printed Padded Mailers for Bakers
If you are comparing Printed Padded Mailers for bakery packaging material thickness guide options, start with the seam, the corners, and the closure line. That is where most failures show up. A pastry box can stay intact and still arrive looking tired if the outer mailer scuffs, crushes, or peels. Thickness is not just a cosmetic choice; it affects protection, print appearance, and how often you have to replace damaged packs.
Printed padded mailers: why thin film fails bakery orders
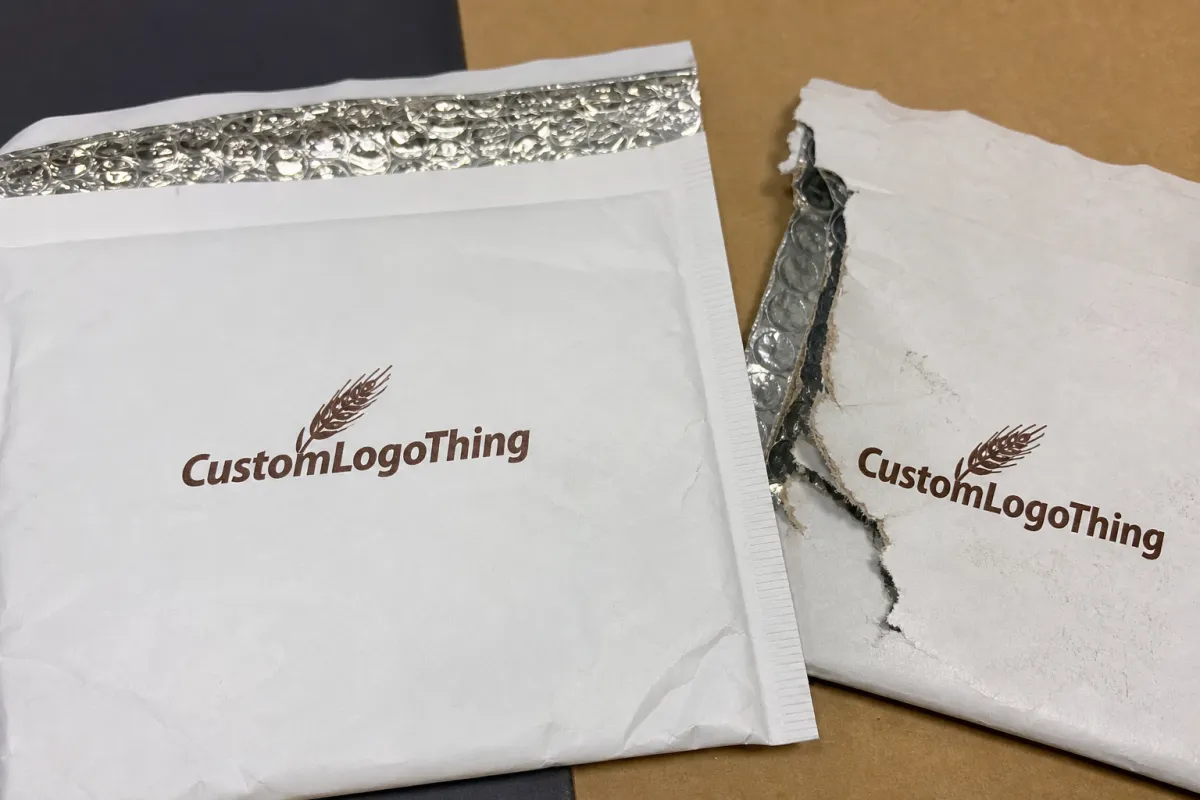
The mistake buyers make most often is treating the padded center as the whole story. It is not. Real shipping stress shows up at the edge, the fold, the seam, and any point where the mailer rubs against another carton or a label edge. A printed padded mailer can look fine on a packing bench and still fail after one courier cycle.
Bakery orders are especially unforgiving because the package is part of the product experience. A customer opening decorated cookies, a sampler box, or a gift pack sees the outer mailer first. If the print is scuffed or the structure looks crushed, the impression changes before the food is even touched.
Thin film also creates false savings. Saving a few cents is easy to justify until return rates rise, replacement postage starts adding up, and service time gets eaten by avoidable complaints. The unit price is visible on the quote; the hidden cost appears later.
For bakery teams building a packaging system, the mailer should be judged alongside the inner box, inserts, and transit route. A rigid cake box or stackable pastry carton may need a different outer structure than a flat cookie sleeve. In some cases, a printed padded envelope is the right choice; in others, a corrugated shipper with a simpler print layer performs better.
A shipment can arrive on time and still feel like a failure if the outside looks worn before the customer opens it.
How thickness changes cushioning, seals, and shelf appeal
Thickness affects three jobs at once: cushioning, seal integrity, and print appearance. Those jobs do not always move together. A heavier wall may resist puncture better, but it can also make the closure zone harder to seal consistently. A softer build may fold neatly yet show abrasion too quickly on dark artwork.
There is a point of diminishing returns. Going from too thin to usable makes a major difference. Going from usable to overbuilt often adds cost faster than it adds protection. Experienced buyers usually ask for the lightest construction that passes the real test: handling, stacking, rubbing, and route stress.
Print quality changes with substrate stability. Thin film telegraphs dents, waviness, and fold marks more easily. On full-bleed artwork, the difference can be obvious. Dark solids may look uneven. Fine type can lose edge definition. Foil accents, matte finishes, and saturated brand colors tend to expose weak substrate control quickly.
For buyers comparing materials, the useful distinction is this: outer film thickness, padding density, and seal zone strength are not interchangeable. A thicker outer layer improves scuff resistance. A denser pad improves compression recovery. A stronger adhesive or heat seal keeps the package closed under pressure. If one of those three is weak, the whole mailer starts to feel cheap.
A quick sample check helps. Drop the packed mailer from table height on a corner, rub the print with a sleeve or cloth, and leave a few units under stacked cartons for several hours. If the mailer survives those three tests without visible wear or seal creep, the spec is close. If it fails one of them, the thickness band is probably wrong for the route.
Key thickness factors for bakery products, routes, and branding
Product shape comes first. A flat cookie sleeve does not need the same construction as a boxed tart, a stacked sampler, or a rigid gift set. Sharp corners, hard inserts, and dense fillings create abrasion points that a weak wall will not tolerate. A mailer that works for one SKU can fail quickly on another.
Route matters almost as much as product. A local courier run with one or two handoffs is very different from a long parcel network with repeated sorting and compression. If the package crosses regions or sits in a high-volume carrier stream, seam strength and exterior abrasion resistance matter more than they do in direct store-to-customer handoffs.
Temperature changes the decision too. Heat can soften adhesives. Cold can make film less forgiving. Humidity, condensation, and chilled handoffs can damage the printed face faster than many buyers expect, especially on matte finishes. A bakery item may need food-safe inner packaging to control moisture, while the outer printed mailer only needs to keep the brand presentation clean.
Brand finish is another filter. Full-bleed artwork, deep black fills, metallic details, and premium matte surfaces usually need a more stable substrate than a plain one-color logo. If the brand is aiming for polished retail packaging, the mailer has to support that look rather than fight it.
Material naming causes confusion, so ask for specifics. For poly builds, request the film gauge and padding structure. For paper-faced padded mailers, ask for outer paper weight in GSM and liner density. A supplier who only says “premium thickness” is giving marketing language, not a spec. A supplier who names the face material, padding layer, and seal method is giving something you can test.
If sustainability is part of the brief, ask for verifiable chain-of-custody documentation where it fits the build. FSC certification can support paper sourcing claims, but it does not correct a poor structure. Recyclable claims are also only as honest as the actual construction and local recycling rules. Multi-material mailers are not handled the same way everywhere.
Cost and MOQ: how thickness changes unit pricing
Thickness increases cost for a simple reason: more material, more handling, and sometimes more setup complexity. What surprises buyers is that pricing does not always rise in a smooth line. A small jump in gauge can trigger a different film source, a new adhesive, or a separate production pass. Two quotes that look similar on the page can become very different once the real build is specified.
For a 5,000-unit run, a lightweight custom printed bakery mailer may land around $0.22 to $0.32 per unit for a simple print layout. Moving into a sturdier 3 to 4 mil build often puts the range closer to $0.30 to $0.48 per unit, especially if the design uses full-bleed artwork, multiple inks, or a special finish. Heavier or more complex constructions can push higher.
Minimum Order Quantity usually rises when the supplier has to source a special gauge, reset the line, or run a less common laminate or adhesive combination. That is why it helps to ask for the same artwork across two or three thickness bands. You see the cost break more clearly, and you avoid approving a spec that quietly forces a larger buy than the budget can carry.
| Thickness band | Best for | Typical unit cost at 5,000 | Buyer note |
|---|---|---|---|
| 2.5-3 mil | Light cookie packs, flat bakery sleeves | $0.22-$0.32 | Works best on short routes with simple artwork |
| 3-4 mil | Boxed pastries, samplers, gift sets | $0.30-$0.48 | Better seam strength and scuff resistance |
| 5 mil+ | High-abuse routes, large formats | $0.45-$0.70+ | Usually more structure than most bakery shipments need |
False savings are common here. A thinner mailer can look cheaper until a modest return rate appears. Then replacement units, additional postage, and customer service time erase the material saving almost immediately. For that reason, the real comparison is not unit price alone. It is landed cost plus damage risk plus the value of brand presentation.
For some bakery programs, the best answer is not a thicker mailer at all. It is a better combination of inner tray, sleeve, and outer shipper. A lightweight mailer around a well-designed box can cost less overall than a heavy padded format that still fails on rough routes.
Production steps and lead time from artwork to shipment
The cleanest orders follow a predictable sequence: artwork approval, dieline check, proofing, sample confirmation, production, packing, then freight. That sounds basic because it is basic, and that is exactly why it works. Most delays come from a skipped step or a late change that forces the supplier to restart part of the process.
Thickness changes affect timing more than many buyers expect. A new gauge, a different laminate, or a revised liner can require fresh material sourcing or a new print strike-off. Color matching can also slow down on textured or thicker surfaces, especially when the design uses heavy solids or a premium matte effect.
Typical lead time for custom printed bakery mailers is often 12 to 15 business days after proof approval, then freight time on top. If the build is specialized, or if the thickness spec changes late, a few more days can disappear quickly. Holiday launches, seasonal assortments, and limited-edition runs need buffer time because material sourcing does not care about the sales calendar.
Ask the supplier for a written schedule that separates prepress, production, and transit. That one step removes a lot of confusion. A proof date is not a ship date. A sample approval is not a finished order. And a promise in an email is not a schedule unless the timing is written clearly enough to manage against.
For route-sensitive orders, use a test method that matches the shipment. ISTA-style testing is useful because it focuses on vibration, drop, and compression, which are the conditions that actually break mailers in transit. A glossy mockup can look excellent and still tell you almost nothing about parcel behavior.
Common thickness mistakes that waste money or damage packs
Mistake one is copying a competitor’s spec and assuming it will work for your line. It might. It might not. Their product shape, closure style, route length, and handling conditions could be completely different. A thickness spec only makes sense when it matches the actual item and the actual shipping path.
Mistake two is overbuilding the mailer and forgetting the seal. A thicker wall does very little if the closure peels under pressure or the seam splits at the fold line. Buyers often chase a bigger gauge because the number sounds safer, then ignore the adhesive or seal behavior that actually determines whether the pack stays closed.
Mistake three is forcing one size to cover every SKU. If the package relies on filler to make up for bad sizing, freight volume goes up and product movement goes up too. That creates more waste, more dead air, and more scuffing. For bakery shipments, right-sizing matters because the contents are often light but shape-sensitive.
Mistake four is ignoring temperature swings. Heat, cold, and humidity all change how packaging behaves. A mailer that looks perfect in a dry room can fail after condensation, especially if the finish is matte or the printed surface is heavily covered. If a supplier never asks about temperature exposure, the quote is too generic.
Mistake five is approving artwork on screen and never checking the real substrate. Digital mockups are useful, but they do not show how ink density, finish, or film stability will behave in hand. A design can look sharp on a monitor and still wash out on the actual mailer. Sample testing catches that before the full run turns into a costly surprise.
Next steps to spec the right mailer and place a cleaner order
Start with three inputs: product weight and dimensions, shipping method, and the level of print coverage the design really needs. Then ask for two or three thickness options so you can compare protection, appearance, and unit cost side by side. That is usually more useful than a long pitch built around a single “best” spec.
Test the heaviest SKU first. Use a corner drop, a rubbing test, and a seal check after both warm and cool conditions if your route includes temperature swings. If the logo scuffs, the seam opens, or the pack feels weak in the hand, the spec is not ready. This is the practical side of the guide: it turns a vague purchasing decision into a checkable one.
Choose the final spec based on three things: damage rate, total landed cost, and brand presentation. Not the lowest quote line. For bakery brands, the outer mailer is part shipping protection and part brand surface, so the best build is usually the lightest one that still arrives clean and intact.
If the order needs internal sign-off, keep the brief simple: product dimensions, route length, print coverage, finish, and the two thickness bands you want quoted. That gives procurement a real basis for comparison and keeps the discussion away from vague adjectives. The best packaging decisions are usually the least dramatic ones on paper and the most reliable ones in transit.
What thickness works best for printed padded mailers for bakery packaging?
For lighter bakery orders, 2.5 to 3 mil is often enough if the route is short and the packaging is well-sized. Boxed pastries, samplers, and gift sets usually perform better closer to 3 to 4 mil. The real answer depends on the heaviest SKU, the number of handoffs, and whether the print face has to stay visually clean after abrasion testing.
Does a thicker padded mailer always protect pastries better?
No. Thicker material helps with puncture and scuff resistance, but it does not fix a weak closure, poor sizing, or a bad inner pack. Beyond a certain point, extra material mainly raises cost. For many bakery shipments, a smarter structure beats simply adding more thickness.
How does thickness affect price and MOQ on bakery mailers?
Thicker constructions usually increase unit cost because they use more material and can require a different production setup. MOQ can rise if the supplier needs to source a special gauge or change the adhesive or laminate. Asking for quotes across multiple thickness bands is the fastest way to see the real cost break.
What lead time should I expect for custom printed bakery mailers?
A common production window is 12 to 15 business days after proof approval, then freight on top. Special thicknesses, late artwork changes, or complex print finishes can add time. The safest timeline separates proofing, sample approval, production, and transit so there is no confusion about what is actually finished.
Should I order samples before approving printed padded mailers for bakeries?
Yes. Samples reveal scuffing, seal weakness, sizing problems, and print issues before the full run is locked in. Test the heaviest product, the actual route, and the temperature conditions the package will face. A small sample failure is far cheaper than a full production mistake.


