Ceramic embroidered baseball caps Digital Proof Checklist is a long phrase for a simple job: catch production problems before they become expensive. On a curved crown, a logo can look fine on screen and still fail in the machine because the type is too fine, the placement is off by a few millimeters, or the digitizing plan does not suit the cap construction. The proof is the last practical checkpoint before those choices become thread, labor, and lead time.
“Approve the stitch plan, not the screenshot. A flat image can hide more than it reveals.”
Ceramic Embroidered Baseball Caps Digital Proof Checklist: What It Actually Prevents
The real value of a ceramic Embroidered Baseball Caps digital proof checklist is risk control. A cap design can look balanced in a mockup and still fail in production because the front panel seam interrupts the art, the fill is too dense, or the lettering is too small for the stitch method. Once stitching starts, those mistakes are no longer cosmetic. They become rework, waste, and delay.
Buyers who treat the proof as a technical document catch the mismatch between intention and execution: the logo that needs more border, the icon that should move lower, the type that needs more spacing, or the cap style that calls for a different placement. Without that review, a run can still be saved, but it usually costs more than planned.
The checklist also protects budget. A simple front logo with 7,000 to 9,000 stitches behaves very differently from a dense multi-color mark that pushes past 15,000 stitches. Higher stitch counts increase machine time, thread breaks, and fabric distortion risk. If the proof does not make that visible, the quote may be incomplete even if it looks clean.
Three quick questions are usually enough to start: does the artwork fit the panel, does the stitch plan support the artwork, and does the cap style match the intended look? If any answer is unclear, the proof is not ready.
How the Digital Proof Moves From File to Approval
The workflow should be repeatable. The buyer sends vector artwork, usually AI, EPS, or a clean PDF. The supplier digitizes that artwork into stitches, then issues a digital proof that shows placement, color changes, and size on the cap. If needed, a sew-out sample follows before bulk production starts.
It helps to separate the files. Vector art is the source. The digitized proof is the technical translation. A mockup is only the presentation layer. Mockups are useful for stakeholders, but they are not enough to approve embroidery because they can hide stitch density, letter closure, or seam conflicts. If a vendor sends only a pretty render, ask for the stitch map and the spec sheet too.
A useful proof should show the basics without making the buyer hunt for them:
- cap style and panel count
- placement type or placement coordinates
- logo size in inches or millimeters
- thread colors and closest thread references
- backing type or stabilizer note
- special instructions for seams, closures, or curved areas
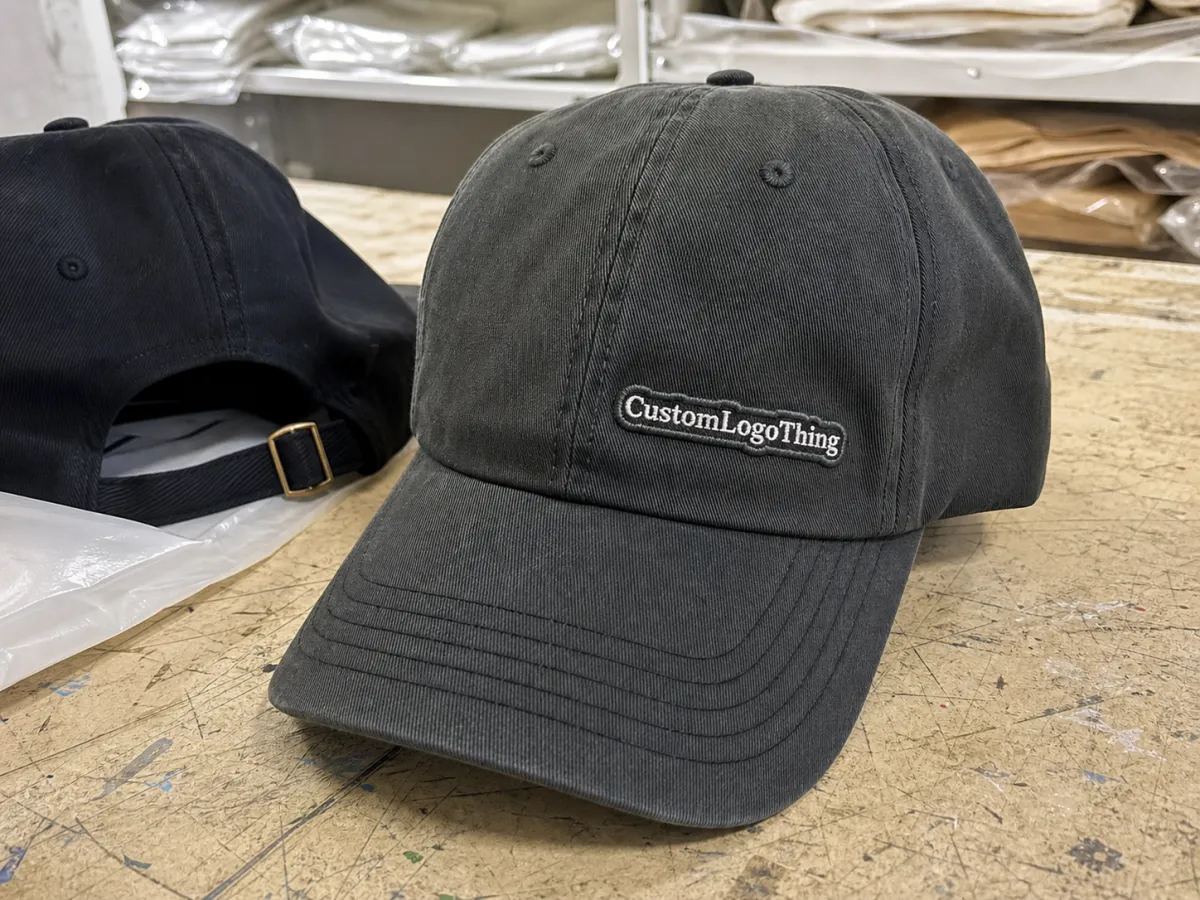
That last line matters more than many first-time buyers expect. A logo centered on a flat layout may need to shift on the actual cap because the front panel rises, the seam cuts into the stitch field, or the curve changes the eye line. Structured caps usually hold embroidery more cleanly than unstructured caps, which can wrinkle or flatten under stitching. The proof should reflect the real cap, not an idealized one.
Keep the spec sheet, proof, and approval note in the same file chain. If the approved size says 2.75 inches and the proof shows 3.25 inches, the order is not aligned even if the render looks good. Good production teams catch that before release because the next step is not another artwork review. It is a needle path.
Specs That Change the Final Look on a Curved Cap
Placement is the first variable that changes the final read. Front-center embroidery is the most forgiving, but even that shifts visually depending on crown height. Low-profile caps compress a logo differently than high-crown caps. Side-panel decoration is harder because the eye sees it at an angle. Back-panel marks and closure-area embroidery have the least room to recover if the file is oversize.
Thread behavior matters almost as much as placement. PMS numbers help with communication, but embroidery thread does not behave like ink. Sheen, pile, lighting, and fabric finish all affect the final color read. A royal thread can look navy on one cap and brighter on another. Matte cotton twill, brushed twill, and polyester blends all reflect light differently, so screen color is only a guide.
Three technical choices do most of the work:
- Stitch density: too loose and edges fray; too tight and the cap puckers.
- Underlay: this supports the top stitches and helps thin letters stay upright.
- Pull compensation: this offsets fabric movement so shapes do not shrink or distort after stitching.
Minimum detail thresholds deserve attention too. Very fine lines under about 1.5 to 2.0 mm often close up on small cap logos, especially with satin stitches or compact lettering. That does not mean detail is impossible. It means the digitizer has to simplify the art intelligently. Shrinking the logo while expecting the same fidelity usually creates a cleaner screen view, not a cleaner cap.
Cap structure also changes the decision. Structured crowns usually take front embroidery better because the front panel is stabilized. Unstructured caps can look softer and more casual, but they allow more movement during stitching. Closure style matters too. Snapbacks, strapbacks, and fitted caps all change the usable area at the back and alter how the cap sits on the head. A proof that ignores construction may look fine on paper and awkward on the product.
The chain is simple: a placement change can force a digitizing change; a digitizing change can alter stitch count; stitch count can change both price and turnaround. That is why approval should be treated as a technical gate, not a style preference.
Cost, Pricing, and MOQ Checkpoints
Pricing for embroidered caps usually comes down to stitch count, number of thread colors, placement complexity, and the amount of revision work needed before approval. A simple front logo can be inexpensive to set up. A dense mark with multiple thread changes, small lettering, or a difficult side placement costs more because it takes longer to digitize and is less forgiving in production.
Typical setup fees may include digitizing, a sew-out sample, or an extra revision if the first proof does not land cleanly. For small and mid-size runs, digitizing often falls around $25 to $60 per logo, while a sew-out sample may add another $15 to $35 before shipping. Those numbers are not universal, but they are a useful sanity check. On larger programs, the fixed costs spread out more efficiently. On small orders, they show up on every unit.
MOQ changes the math fast. A 24-piece run carries the same setup burden across very few caps, so the per-unit price climbs. A 500-piece run distributes the same work across a larger quantity, so the unit cost drops. Two quotes can look very different even when the cap itself is almost identical because the fixed work is being divided in different ways.
For clean comparisons, ask for a line-item breakdown that separates the moving parts:
- digitizing fee
- per-cap price by quantity tier
- sew-out or sample fee
- extra revision charge, if any
- rush fee, if the timeline tightens after approval
- packaging or carton-labeling add-ons
| Proof Option | What It Shows | Typical Use | Common Cost Range |
|---|---|---|---|
| Flat mockup | Artwork placement and general appearance | Early concept review | Often included |
| Digitized proof | Stitch direction, color changes, and size | Approval before sew-out or production | $25-$60 for digitizing, sometimes included on larger orders |
| Sew-out sample | Actual thread behavior on fabric | Small text, fine detail, brand-critical runs | $15-$35 plus shipping |
If the program includes retail packaging, check carton specs, insert requirements, and labeling rules before release. Transit and packaging decisions can affect both cost and damage rates. For shipping expectations, buyers can reference guidance from the International Safe Transit Association. If paper-based packaging is part of the order, the Forest Stewardship Council is a useful reference for sourcing claims.
A good quote reads like a map. A bad one hides the real cost in revision cycles, late changes, or a sample that should have been requested earlier. If the vendor cannot explain where the money is going, the proof stage is probably where the budget leak will appear.
Production Steps, Timeline, and Approval Milestones
The cleanest production path has five steps: artwork intake, digitizing, proof review, final approval, and bulk production. If a sew-out sample is needed, it should happen before the order is released to the line. That sequence keeps responsibility clear and prevents the expensive kind of backtracking.
Timelines vary with complexity, but the ranges are fairly consistent. A simple proof with clean vector art may take 1 to 3 business days. More complex artwork, new digitizing work, or several thread-color changes can push that to 4 to 7 business days. If a sew-out is added, expect extra time for machine setup, evaluation, and shipping. After approval, bulk production for embroidered caps often runs 12 to 15 business days, though larger runs and specialized materials can extend that window.
The delays are usually predictable:
- incomplete artwork files
- missing size or placement instructions
- slow thread-color confirmation
- late wording changes
- approval comments that arrive after the proof has already moved forward
One of the most common breakdowns is internal, not vendor-related. One person on the buyer side says yes, then another sees the issue later. By then the proof has moved forward or production has been scheduled. The fix is administrative, not creative: name one final approver, set a review deadline, and keep the approved proof attached to the purchase order. If shipping labels, carton marks, or case counts matter, lock those before release so the order does not stall later.
For programs that include multiple product categories, the same discipline used in Manufacturing Capabilities planning usually prevents the same mistakes from repeating. The decoration method may change. The control points do not.
Mistakes That Slip Past a Quick Review
The easiest mistake is approving a low-resolution screenshot instead of the actual digitized proof. Screenshots flatten detail and make stitch problems harder to see. A logo can look crisp in a thumbnail while the stitch path is already too dense for small type. If you cannot zoom in and inspect the structure, you are reviewing a presentation, not a production file.
Scale errors show up constantly. A design that feels balanced on a computer screen can look oversized on a low-profile cap or too small on a structured crown. The eye judges digital space differently than stitched fabric. A 3-inch front logo may seem modest in a mockup and dominant on the actual cap. The reverse happens too. Measuring matters more than instinct.
Thread substitutions deserve equal scrutiny. Thread sheen can shift a color lighter, darker, or more saturated than expected. If the proof says “closest available match” instead of an exact thread code, ask what that means before approval. Do not assume the final result will match the monitor render. It usually will not, and that is a material issue rather than a supplier defect.
Other errors are smaller but still painful:
- side-panel logos too close to the seam
- back-closure embroidery that collides with strap hardware
- spelling errors in department names or internal codes
- multiple-SKU orders approved against the wrong proof
- border lines too thin for a dense stitch fill
Rushed approval is the one that usually causes the most regret. It feels efficient because it ends the review. It is not efficient if it creates rework, a longer turnaround, or a batch that misses its ship date. A five-minute correction in the proof stage can save a five-day correction in production.
Expert Review Moves Before You Sign Off
Before sign-off, compare the proof against the spec sheet line by line. Check the artwork size, cap style, panel count, thread references, and placement measurements. Then look at the lettering and borders. Are the curves too tight? Are thin strokes thick enough to survive stitching? Is there enough clearance around the mark to keep it from feeling crowded? Those details decide whether the cap looks intentional or slightly off.
If the design is detail-heavy, ask for a sew-out photo or sample before bulk release. That is not overcautious. It is practical. Metallic thread, tonal logos, and small type all deserve extra scrutiny because thread behavior and screen color diverge fast. What looks crisp on a digital proof can flatten once the machine starts pushing it through fabric.
Keep the approval record clean. Save the proof version, the revision number, the approval date, and any notes that changed the order. If a dispute comes up later, that record matters. It protects both sides and makes reorders faster because the production team is not guessing which version was actually approved.
Also confirm that the approved proof matches the whole job ticket, not just the artwork. Cap count, ship-to address, carton labeling, and packaging requirements should all be settled before release. The embroidery may be right and the order can still fail if the logistics are wrong.
Handled properly, the ceramic embroidered baseball caps Digital Proof Checklist is not paperwork for its own sake. It is a controlled pause that keeps artwork, cap construction, and budget aligned before the needles move.
What should I check first on a ceramic embroidered baseball caps proof?
Start with artwork size and placement so the logo fits the panel before you evaluate decorative detail. Then confirm cap style, crown shape, and thread references because those variables change how the embroidery reads in production. Make sure you are reviewing the digitized proof, not only a flat mockup.
How do I know whether the proof will match the finished embroidered cap?
Compare the proof against the vector art and spec sheet line by line, especially for spacing and letter shapes. Ask for exact or closest thread references because monitor color and real thread sheen can differ noticeably. If the design uses fine detail, small type, or multiple thread changes, request a sew-out photo or sample.
What affects pricing most in a ceramic embroidered baseball caps proof review?
Stitch count, number of thread colors, and placement complexity are the biggest cost drivers on most cap programs. Extra revisions, digitizing changes, and rush production requests can add fees even when the base quote looks simple. MOQ matters because setup costs are spread across fewer caps on smaller runs, which raises unit cost.
How long does the digital proof and approval process usually take?
Simple proofs can move quickly, while new digitizing or complex artwork usually adds more time. Expect revision cycles to extend the timeline if artwork files are incomplete or placement notes are unclear. Bulk production should not begin until the final proof is approved in writing.
What happens if I approve a proof with a mistake on it?
The approved proof often becomes the production reference, so an error can carry directly into the order. Fixes after approval may trigger rework fees, new setup charges, or a longer turnaround time. Keep the annotated proof and approval record so any later dispute has a clear paper trail.