Buyer Fit Snapshot
| Best fit | Custom Die Cut Packaging Inserts projects where brand print, material claims, artwork control, MOQ, and repeat-order consistency need to be specified before quoting. |
|---|---|
| Quote inputs | Share finished size, material target, print colors, finish, packing count, annual reorder estimate, ship-to region, and any compliance wording. |
| Proofing check | Approve dieline scale, logo placement, barcode or warning zones, color tolerance, closure strength, and carton packing before bulk production. |
| Main risk | Vague material claims, crowded artwork, missing packing details, or unclear freight terms can make a low unit price expensive after revisions. |
Fast answer: Custom Die Cut Packaging Inserts: Design, Cost, Lead Time should be specified like a repeatable production item. The safest quote records material, print method, finish, artwork proof, packing count, and reorder notes in one written spec.
Production checks before approval
Compare the actual filled-product size with the drawing, then confirm tolerance on folds, seals, hang holes, label areas, and retail display edges. Reserve space for logos, QR codes, warning copy, and material claims before decorative graphics fill the panel.
Quote comparison points
Review material grade, print process, finish, sampling route, tooling charges, carton quantity, and freight assumptions side by side. A quote is only useful when the supplier can repeat the same color, closure quality, and packing count on the next order.
Custom Die Cut packaging inserts usually cost far less than the damage they prevent. One cracked edge, one accessory rattling free, or one bottle drifting inside a carton can turn a routine shipment into a refund, a replacement, and a frustrated customer. That is the real value of custom die cut packaging inserts: they hold the product steady, protect vulnerable points, and make the unboxing feel planned instead of improvised.
For brands that care about product packaging, retail packaging, and package branding, the insert is not an extra part tossed in at the end. It is part of the structure and part of the experience. The right Custom Die Cut packaging inserts can speed up packing, cut down on breakage, and help the box open like a finished product rather than a shipping carton trying to look polished. If you are comparing structures and box options, the Custom Packaging Products page is a useful place to line up ideas before you settle on a design.
Experienced buyers rarely treat Custom Die Cut packaging inserts as a simple choice between foam and cardboard. Material, thickness, cavity depth, fold style, and assembly speed all shape performance. An insert that looks tidy on a render but fails in transit is not a bargain. It is an expensive mistake with a clean presentation.
Custom Die Cut Packaging Inserts: What They Actually Do
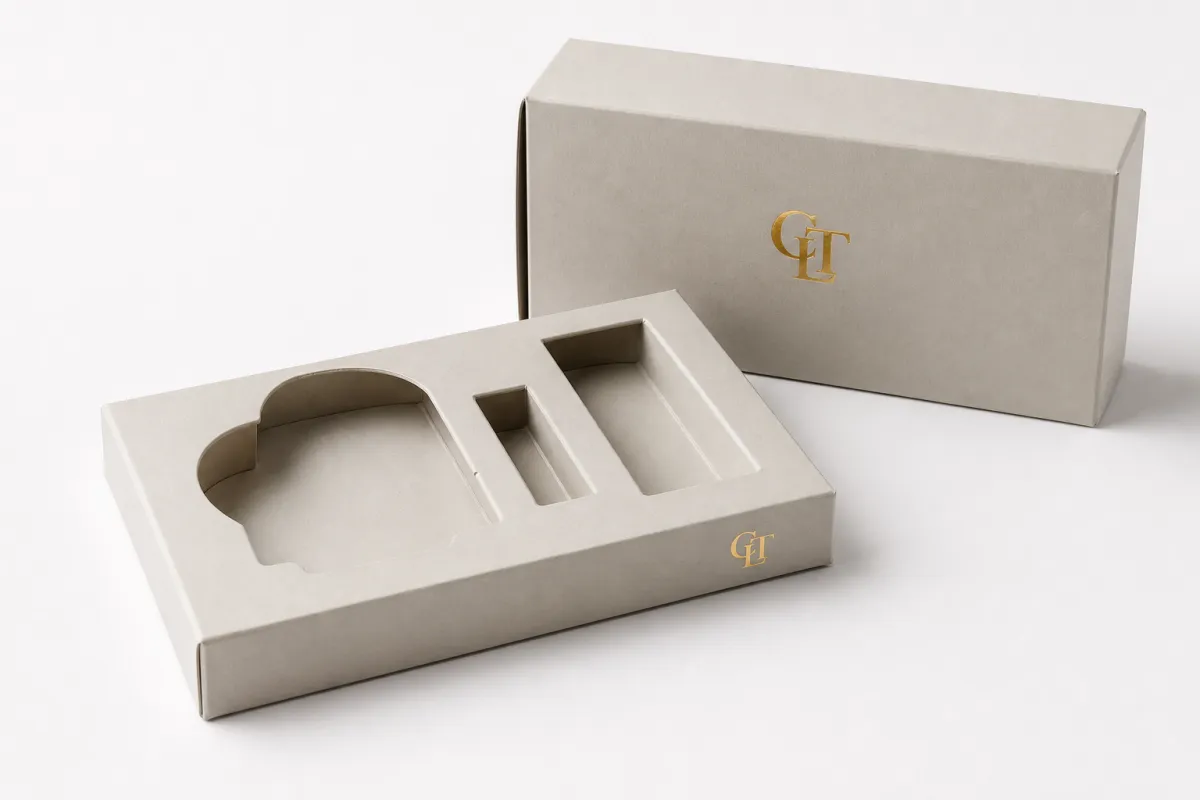
Custom die cut packaging inserts are precision-cut internal supports that hold, suspend, separate, or frame a product inside a box. They stop items from sliding around, protect fragile edges, and keep accessories in the right place. The result is a shipment that behaves like a controlled package instead of a loose bundle. That matters for glass bottles, skincare jars, electronics, subscription kits, candles, tools, and any product that does not enjoy being tossed through a delivery network.
The easiest way to picture custom die cut packaging inserts is to think of them as a fitted home for the product. A strong cavity gives the item the right clearance, the right grip, and the right amount of compression. Too tight, and the insert slows packing or scuffs the product. Too loose, and the item shifts, rubs, and looks cheap the moment the customer opens the box. Good packaging design usually looks simple because the real work is buried in the measurements.
These inserts do three jobs at once. They protect. They improve presentation, which is why they show up so often in branded packaging and premium mailers. They also make packing repeatable. If a warehouse team can place a product into custom die cut packaging inserts in ten seconds instead of juggling tissue, loose fill, and tape, that saves real labor across a long run.
Protection and movement control are not the same thing, and the difference matters. A heavy item with sharp corners needs impact control. A lightweight cosmetic set may need separation more than cushioning. A bundle with several pieces may need different cavities for each item. That is why custom die cut packaging inserts should be built around the item, the shipping method, and the failure points rather than the box size alone.
For many brands, the insert is the part that turns the box into part of the product experience. The outer carton can stay understated, but a well-planned interior changes how the whole package feels. That is especially true for custom printed boxes paired with a precise insert, because the customer opens something that looks organized and cared for. Gaps, loose parts, and broken edges are hard to forget.
Practical rule: if a damaged unit costs $18 to replace and your insert adds $0.35, the insert is not expensive. The failed shipment is.
One detail that gets overlooked: custom die cut packaging inserts are not only for fragile items. They also work well for mixed kits, products with cords or chargers, and items that need a specific orientation for display or storage. A good insert can protect, separate, and present at the same time. That is the quiet part of packaging that carries a lot of weight.
I have seen inserts that looked perfect on a CAD file fall apart the first time they met a real pallet ride. That is usually because the designer solved for appearance first and shipping reality second. If you want the insert to pull its weight, it has to do more than fit the product. It has to survive the trip, keep the pack line moving, and still look deliberate when the box is opened.
How Custom Die Cut Packaging Inserts Work
The process starts with real product dimensions, not a guess and not a rough estimate. For custom die cut packaging inserts, the designer needs the finished product size, the box size, any sleeves or labels, accessory dimensions, and the shipping condition. A product that seems stable on a desk may need a very different cavity once it is packed with a lid, a dust cover, or a cable tucked beside it. Accurate measurement comes first for a reason.
From there, the team builds a dieline. Think of the dieline as the blueprint for the insert. It shows cut lines, fold lines, tabs, pressure points, and voids. Well-designed custom die cut packaging inserts place the product where force can be absorbed and where clearance can stay consistent. If the product has a fragile face, the insert should protect that face. If a corner is the weak point, the cavity should prevent corner impact before it reaches the item.
A few fit styles show up often. A snug cradle supports the product from below and keeps it from shifting. A suspended fit holds the item away from the box walls, which helps reduce edge impact. A compartmentalized tray creates separate spaces for the main product and accessories. Layered protection uses multiple pieces, often a bottom support and a top pad, to control movement from more than one direction. Mixed structures are common in custom die cut packaging inserts because real products do not always fit neat categories.
Material choice changes behavior more than many buyers expect. Corrugated board gives structure and stacking strength. Paperboard looks cleaner and usually performs better in retail-facing presentation. Chipboard is lighter and often fits lower-cost assemblies. Molded pulp works well for eco-forward projects and can support sustainable product packaging. Foam handles shock well, especially for sensitive electronics or higher-value items. The right material depends on weight, fragility, budget, and the kind of shipping test the box needs to survive.
That is why custom die cut packaging inserts are more than a material decision. They are a system. The material must support the product, the cavity must hold it in the right place, and the box must close without forcing the insert to buckle. Even a few millimeters off can make the assembly feel loose or awkward. Buyers sometimes assume a small gap is harmless. It usually is not. Movement adds up fast once a shipment enters parcel handling.
Manufacturing sounds simple on paper and becomes unforgiving in the plant. The design is die cut, nested to reduce waste, then folded, glued, or assembled depending on the structure and volume. For high-volume custom die cut packaging inserts, nesting matters because it lowers sheet waste and helps keep unit pricing under control. An inefficient layout pushes material use higher, and the quote follows. Not flashy. Still very real.
Packaging teams often test inserts against practical standards rather than impressions. For ship-in-box products, ISTA procedures such as ISTA testing and ASTM distribution methods help check drop, vibration, and compression performance. That does not mean every brand needs a full laboratory program for every SKU. It does mean the insert should be judged against how the product actually ships, not just how neat it looks in a rendering.
Used well, custom die cut packaging inserts can improve setup speed at the pack line, reduce the amount of void fill needed, and make the carton feel more premium. Used badly, they create a slow, fragile assembly that annoys the warehouse and still allows damage. The difference usually lives in the details, not the category name. A good insert is quiet. It just does the job.
Custom Die Cut Packaging Inserts Cost, Pricing, and MOQ
The price of custom die cut packaging inserts comes down to a few plain but important variables: material, size, cut complexity, print or coating, quantity, tooling, and whether the insert ships flat or pre-assembled. Those are the pieces that shape a quote. Fancy artwork does not move the math nearly as much as structure does. A simple flat paperboard insert can be inexpensive at scale, while a complex multi-part structure with locking tabs and specialty finishes can climb quickly.
For a practical range, simple paperboard custom die cut packaging inserts might land around $0.12-$0.30 per unit at 5,000 pieces, depending on size and print coverage. Corrugated inserts often sit around $0.18-$0.45 per unit in that same quantity range. Molded pulp can land around $0.22-$0.60 per unit, and foam can run from roughly $0.35-$1.20 per unit depending on density and cut complexity. Those numbers are not promises. They are a reality check before a quote sends the budget off course.
MOQ matters because tooling and setup costs have to be spread across the run. Smaller quantities almost always carry a higher unit cost, sometimes sharply higher, because the same design, cutting, and setup work still happens. Larger runs usually get cheaper quickly. That is why custom die cut packaging inserts can look expensive on a 250-unit quote and much more reasonable at 2,500 or 10,000 units. The machine does not care about your launch calendar. It responds to volume.
Here is the buying rule I would use: if the insert adds a few cents but prevents returns, rework, or replacement shipments, the higher unit cost can still be the better deal. A buyer looking only at the insert line item misses the larger picture. Custom die cut packaging inserts should be judged against damage claims, packing labor, and customer experience. Cheap is not cheap if it creates a mess downstream.
| Material Option | Typical Use | Approx. Unit Cost at 5,000 pcs | What It Does Well | Main Tradeoff |
|---|---|---|---|---|
| Paperboard | Lightweight retail and subscription packaging | $0.12-$0.30 | Clean look, easy printability, good for presentation | Less impact resistance than heavier structures |
| Corrugated | Shipping protection and structured product packaging | $0.18-$0.45 | Better crush resistance and stacking strength | Bulkier and not always as polished visually |
| Molded Pulp | Eco-first packs, consumer electronics, fragile goods | $0.22-$0.60 | Sustainable look, good part retention, recycled content | Tooling and finish options can be less flexible |
| Foam | High-value, shock-sensitive, or delicate items | $0.35-$1.20 | Strong cushioning and consistent fit | Higher cost and weaker eco story |
That table gives the broad view. The actual quote also depends on whether the insert needs print, foil, soft-touch lamination, a special coating, or a custom finish to match the outer box. For custom die cut packaging inserts, print is not always necessary, but it can help when the insert is visible during unboxing and the brand wants the interior to reinforce the package branding. If the insert stays hidden under product layers, the money often works harder in structure than in decoration.
Hidden costs deserve attention too. Sample rounds, dieline revisions, extra packing labor, and storage space can all add cost that never appears in a simple per-unit quote. Bulkier custom die cut packaging inserts also take up warehouse space, which becomes a real expense once pallets start eating into the aisle. People rarely think about storage until the floor plan gets crowded enough to become a daily problem.
One more pricing detail: pre-assembled inserts usually cost more than flat-shipped versions because labor has already been added in. Flat-shipped structures often make more sense if your team can assemble them quickly. Pre-assembled is better if your pack line is already tight and labor costs more than material. The right choice depends on the workflow, not just the quoted unit price for custom die cut packaging inserts.
For eco-conscious brands, asking about FSC-certified board or recycled content can be smart, especially if sustainability is part of the sales pitch. The Forest Stewardship Council gives a useful framework for responsibly sourced paper-based materials. That does not make every insert greener by default. It simply gives you a better sourcing path if your packaging goals include recycled or certified inputs.
Process and Timeline for Custom Die Cut Packaging Inserts
The process for custom die cut packaging inserts runs more smoothly when the team starts with product specs, box dimensions, and shipping conditions before anyone opens design software. You need the finished product measurements, any accessories, the carton internal size, and the way the item will be packed. A bottle shipped upright has different needs than a multi-piece kit shipped flat. That sounds obvious, and yet this is where many projects still drift off course.
Next comes the structural plan. A strong supplier or packaging engineer will map where pressure should be absorbed, where clearance is needed, and where the insert can use the box walls for extra support. In well-built custom die cut packaging inserts, the product is not only held in place; it is guided into a stable position. That distinction matters for fragile corners, lenses, displays, caps, and any part that fails when squeezed by a sloppy cavity.
Then comes the prototype or sample. This is the point where assumptions get tested. A physical sample shows whether the product actually fits, whether packers can load it quickly, and whether the box closes without fighting the insert. If the sample is wrong, revise the dieline before tooling or production starts. Fixing a few millimeters early is cheaper than sorting through a thousand bad units later. That is not theory. It is the arithmetic that protects a packaging budget.
For custom die cut packaging inserts, a realistic lead time is often about 7-10 business days for the initial sample after artwork and measurements are approved, then roughly 12-20 business days for production after final sign-off, depending on material, quantity, and factory load. Simple paperboard structures move faster. Multi-part, foam, or molded formats take longer. Special coatings, print, or unusual cut geometry can push the schedule out further. Planning around the shortest possible lead time is a good way to frustrate a launch.
- Gather product and box dimensions.
- Build the dieline and cavity layout.
- Review a sample with real product and real packers.
- Test for fit, movement, and box closure.
- Approve final specs before production.
That sequence feels basic because it is. The hard part is discipline. Slow feedback, vague measurements, and late material changes are the usual reasons custom die cut packaging inserts slip. Not the factory calendar. Not a mysterious production curse. Usually it is just a team that kept changing the product after the first sample was already underway.
Testing should match the distribution risk. For direct-to-consumer parcels, drop and vibration testing are worth doing, especially if the item is brittle or expensive. Custom die cut packaging inserts that pass a bench test but fail during parcel handling are not done. They are only hopeful. ASTM distribution tests and ISTA methods are useful references here, especially if your team wants a more formal approval process and fewer arguments about what “good enough” means.
If you are buying for a launch, build in one revision cycle. The first sample is often close, not perfect. That is normal. A good timeline leaves room for fit correction, print alignment tweaks if needed, and final material confirmation. Buyers who skip that buffer often end up paying for rush handling later, which is a clean way to make a modest project far more irritating than it needed to be.
Common Mistakes When Ordering Custom Die Cut Packaging Inserts
The first mistake is measuring only the product body and ignoring the extras. Sleeves, chargers, cables, droppers, caps, manuals, labels, and protective wraps all need space. A quote for custom die cut packaging inserts only works if it reflects the full packed condition. Otherwise, the production sample shows up and everyone acts surprised that the item is larger once the real shipping pieces are included. That surprise is very common and never helpful.
The second mistake is designing for shelf beauty but not for shipping abuse. A retail display insert can look great in a controlled environment and still fail once it sees stacking pressure, temperature swings, vibration, and warehouse handling. Good custom die cut packaging inserts should support both presentation and protection, but if you need to choose, protection usually wins. Pretty broken products are still broken products.
The third mistake is overcomplicating the structure. Some inserts look clever on screen and are miserable in the real world. If packing takes too long, the line slows down. If the structure has too many folds or tabs, staff will assemble it wrong. If the insert is delicate, it may break before the product leaves the building. Simple custom die cut packaging inserts are often better than heroic ones. Packaging teams do not get bonus points for suffering through a complicated assembly.
The fourth mistake is choosing the cheapest material without looking at failure cost. A low-cost insert that allows even a small increase in breakage can erase the savings quickly. That is especially true in electronics, glass, skincare, and premium consumer goods where one damaged order can cost far more than the insert itself. The job of custom die cut packaging inserts is not to win a spreadsheet contest. It is to protect margin and keep the customer from receiving a damaged product.
Another issue is ignoring how the insert will be assembled. If your pack team needs to place thousands of units per day, the structure should be quick to load and hard to misread. The best custom die cut packaging inserts reduce human error. They give the packer one obvious orientation and one obvious motion. If staff need a diagram for every box, the design probably needs another round of revision.
Sustainability claims can create mistakes too. A buyer may ask for eco-friendly packaging and accept a molded or recycled board option without checking whether the product actually needs more cushioning. Green materials are useful, but they still need to protect the item. The better route is to define the performance target first, then choose the most responsible material that meets it. That is a more honest path than calling something sustainable because the label sounds good in a sales meeting.
For brands trying to tighten package branding without adding operational headaches, the best move is usually to keep the insert structure simple, keep the print restrained, and keep the tolerances clear. That combination gives you a cleaner unboxing with fewer packing errors. Fancy is optional. Functional is not. And if the line crew says the part feels fussy, listen to them; they are usually right faster than the spec sheet.
Expert Tips and Next Steps for Custom Die Cut Packaging Inserts
Design around the movement you want to stop, not only the shape you want to copy. That sounds straightforward, but a lot of custom die cut packaging inserts get built around a product silhouette and ignore what happens when the box is dropped, tilted, stacked, or shipped sideways. A useful insert limits motion in the directions that matter most. That is the difference between a nice-looking cavity and one that actually earns its keep.
Standardize where you can. If two or three SKUs are close in size and weight, one shared insert may be enough with minor adjustments. That can reduce tooling friction, simplify inventory, and keep the pack line from juggling too many parts. Custom die cut packaging inserts are easier to manage when the portfolio is planned as a family rather than as a pile of isolated exceptions. Real buyers know that consolidation saves more than the quote sheet shows.
Always ask for a physical sample and test it with the actual product, the actual carton, and the actual packing staff. A photo on a screen tells you almost nothing about hand feel, loading speed, or whether the insert catches on a corner during assembly. Good custom die cut packaging inserts should feel obvious during packing. If the team has to force the item into place, the design is not ready.
It also helps to define the shipping method up front. A product that ships in a parcel network faces different risks than one that moves on a pallet or through retail distribution. If the item will see rough handling, ask for testing that reflects that reality. Request drop performance, compression resistance, and fit notes. For premium product packaging, that extra step pays for itself quickly if it prevents a bad batch from leaving the building.
Here is a practical checklist for your next quote request:
- Exact product dimensions, including accessories and any packaging on the product itself.
- Internal box dimensions and carton style.
- Target quantity and likely reorder volume.
- Material preference, if you already have one.
- Shipping method, warehouse workflow, and any special presentation goals.
- Budget range, so the proposal does not drift into unrealistic territory.
If you are weighing custom die cut packaging inserts against other packaging parts, it is smart to compare them with the broader Custom Packaging Products lineup. Sometimes the right answer is a better outer carton, sometimes it is a stronger insert, and sometimes it is both. There is no prize for choosing the wrong component with confidence.
For brands that want the interior to match the exterior, the insert should reinforce the same visual language as the rest of the box. That can mean matching board tones, keeping print aligned with the brand palette, or using a cleaner presentation inside a more decorative outer sleeve. The best custom die cut packaging inserts do not shout. They make the product look ready.
If you need one final rule, use this: buy custom die cut packaging inserts for the product you are actually shipping, not the ideal version you hope nobody drops. Then test them, cost them, and pack them with real people. That is how you get packaging that protects the item, supports the brand, and does not create extra work for the warehouse. Honestly, that is the whole job.
Once the insert is dialed in, the payoff shows up everywhere: fewer damages, better unboxing, faster packing, and less pressure on customer service. That is why custom die cut packaging inserts keep showing up in serious packaging programs. They are not glamorous. They are effective. In packaging, effective usually beats clever, and in the field, that difference shows up fast.
FAQs
How do I choose the right material for custom die cut packaging inserts?
Match the material to the risk level. Corrugated and chipboard work well for structure, molded pulp fits many eco-focused projects, and foam is better when shock control matters most. For custom die cut packaging inserts, I would also look at how fast the pack line needs to run. A flatter, easier-to-assemble material often beats a prettier option if it saves labor and reduces mistakes. Test the insert with the actual product, not a dummy weight, because finish, center of gravity, and fragility all change the result.
What affects custom die cut packaging inserts pricing the most?
Size, material, and cut complexity usually move pricing more than anything else. Quantity matters because setup and tooling are spread over the run, so custom die cut packaging inserts become more efficient as volume rises. Print finishes, special folds, and pre-assembly can raise cost quickly, so ask for both unit cost and landed cost. If your quote seems unusually low, check whether sample work, tooling, or assembly was excluded. That is where surprise costs like to hide.
How long does the process for custom die cut packaging inserts usually take?
Simple designs can move quickly once the measurements are approved and the dieline is locked. A realistic schedule for custom die cut packaging inserts is often 7-10 business days for a sample and 12-20 business days for production after final sign-off, depending on material and quantity. Revision cycles, sample approval, and material availability are the biggest variables. If you need a launch date, build in time for testing and one round of changes instead of hoping the first version is perfect.
Can custom die cut packaging inserts be reused for multiple products?
Yes, if the products are close enough in size, weight, and shape to share the same cavity design. This works best when custom die cut packaging inserts support a product family rather than one highly unusual item. Ask the manufacturer to design around the most demanding SKU so the insert does not feel loose on the smaller one. If the shared insert forces too much compromise, you may save tooling but lose protection and create a sloppy presentation.
What should I send to get an accurate quote for custom die cut packaging inserts?
Send exact product dimensions, box dimensions, quantity, material preference, and a photo of the product in use or assembled. Include shipping method and packing workflow so the quote reflects real handling, not just a polished render. For custom die cut packaging inserts, a target budget helps too. It saves time, trims quote rounds, and keeps the supplier from quoting a premium structure if you only need a practical one. Specific input gets a specific answer. That is the deal.
If you are planning a launch, start with the measurements, choose the protection level, and request a sample before you commit to volume. That is the cleanest way to buy custom die cut packaging inserts without paying for avoidable revisions. If the insert protects the product, speeds packing, and supports the brand story, it has done its job. If it does all that and still fits the budget, even better. Lock the spec only after the sample passes real packing and real shipping conditions, and you will avoid most of the headaches that usually show up later.

