Buyer Fit Snapshot
| Best fit | Custom Foam Inserts for Rigid Boxes projects where brand print, material claims, artwork control, MOQ, and repeat-order consistency need to be specified before quoting. |
|---|---|
| Quote inputs | Share finished size, material target, print colors, finish, packing count, annual reorder estimate, ship-to region, and any compliance wording. |
| Proofing check | Approve dieline scale, logo placement, barcode or warning zones, color tolerance, closure strength, and carton packing before bulk production. |
| Main risk | Vague material claims, crowded artwork, missing packing details, or unclear freight terms can make a low unit price expensive after revisions. |
Fast answer: Custom Foam Inserts for Rigid Boxes: Board, Finish, Dieline, and Unit Cost should be specified like a repeatable production item. The safest quote records material, print method, finish, artwork proof, packing count, and reorder notes in one written spec.
Production checks before approval
Compare the actual filled-product size with the drawing, then confirm tolerance on folds, seals, hang holes, label areas, and retail display edges. Reserve space for logos, QR codes, warning copy, and material claims before decorative graphics fill the panel.
Quote comparison points
Review material grade, print process, finish, sampling route, tooling charges, carton quantity, and freight assumptions side by side. A quote is only useful when the supplier can repeat the same color, closure quality, and packing count on the next order.
Custom Foam Inserts for Rigid Boxes: A Practical Guide
The most expensive packaging failures rarely start with a dramatic crush. More often, the product just moved a little. A few millimeters of travel inside a rigid box can be enough to scratch a polished finish, chip a corner, or loosen a component that looked secure on paper. That quiet failure mode is exactly why Custom Foam Inserts for rigid boxes matter. In premium product packaging, the insert is not an afterthought. It is part of the structure, right alongside the board wrap, the lid depth, and the reveal that shapes the first second of the unboxing.
Brands selling cosmetics, electronics, luxury gifts, tools, watches, glass bottles, or presentation kits tend to feel this quickly. Custom Foam Inserts for rigid boxes can change the whole experience: less movement, fewer scuffs, a more controlled presentation, and stronger package branding. For teams comparing Custom Packaging Products, the insert often becomes the difference between packaging that merely looks tidy and packaging that feels genuinely premium.
I have seen this play out in sampling rooms more times than I can count. A box can photograph beautifully and still fail the moment the product shifts inside it. The outer shell gets the credit; the insert quietly does the hard work.
What Custom Foam Inserts for Rigid Boxes Really Solve
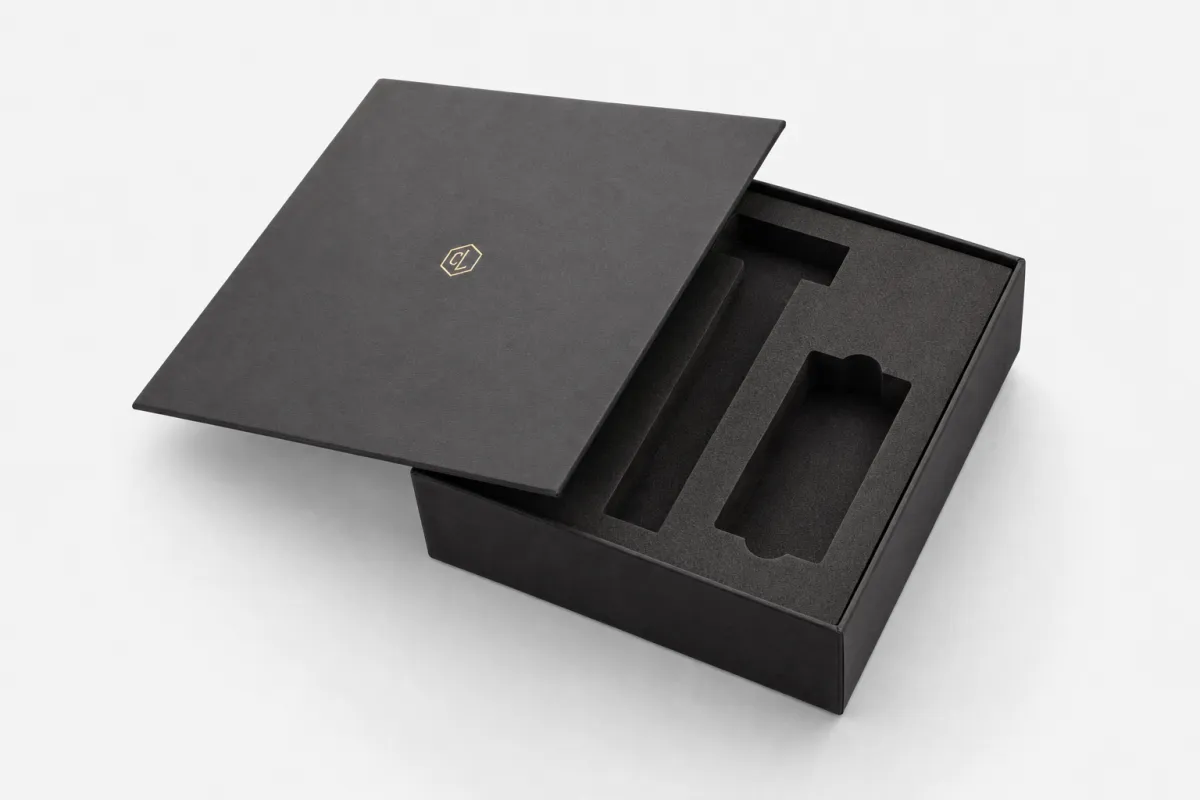
Custom foam inserts for rigid boxes solve one specific problem with several ripple effects: they give the product a fixed home. That sounds simple until you look at what changes because of it. The item stops shifting, the reveal becomes cleaner, the box feels more intentional, and the odds of a damage-related return fall.
Loose void fill can reduce empty space, but it does not engineer a fit. Paper, air pillows, and crumpled fillers protect in a broad sense. They do not hold a product in place with precision. Custom foam inserts for rigid boxes do. The cavity is cut to the right depth, shape, and support level so the item stays put during shipping, storage, and handling. Even tiny movement can be enough to rub a plated finish or knock a small accessory loose, which is why the exact fit matters so much.
Rigid boxes are usually chosen because the brand wants a stronger perception of value. The insert has to match that promise. A luxury candle in a rigid setup box needs a different cavity than a weighted power bank or a fragile glass bottle. The same logic applies in retail packaging programs, where the insert is visible the moment the lid opens and becomes part of the design story instead of hidden utility.
- Impact protection: The insert absorbs shock and limits product travel inside the box.
- Display quality: It centers the product so the presentation feels deliberate.
- Transit stability: It reduces shifting during vibration, stacking, and handling.
- Brand signaling: It supports premium packaging design instead of looking improvised.
Custom foam inserts for rigid boxes also shape the opening sequence. A product set too deep disappears into shadow. A product set too high can get pressed by the lid. A loose fit makes the reveal feel cheap even if the outer box looks expensive. That balance is why the insert is both a protective part and a visual one. The best packaging teams treat it that way from the beginning.
Many teams underestimate how much damage starts with movement rather than impact. A carton can survive rough handling and still fail because the product inside shifted enough to rub, chip, or dent. That is the hidden value of custom foam inserts for rigid boxes: they reduce the damage no one sees in a simple drop photo.
How Custom Foam Inserts for Rigid Boxes Work
At a practical level, custom foam inserts for rigid boxes are shaped protective layers designed to hold a product in a fixed position. The design starts with the cavity. How deep should it be? Where should the foam touch the product? Where should it avoid pressure entirely? Those are fit questions, not decorative ones. Fit is what separates an insert that looks nice from one that performs.
Density, thickness, finish, and geometry are the main variables. Denser foam supports heavier products without collapsing as quickly. Softer foam cushions delicate surfaces better, though it may compress more over time. The cut matters too. Crisp edges usually create a sharper presentation, while rounded or layered cuts can improve release and handling. Custom foam inserts for rigid boxes are not one material with one function. They are a design choice shaped around the product and the journey it will take.
Common foam materials and where they fit best
- EVA foam: Often chosen for crisp edges, firmer structure, and a tidy premium appearance.
- PU foam: Better for softer cushioning and lighter products that need gentler contact.
- PE foam: Good for structural support, travel stability, and more utilitarian programs.
- Flocked or laminated foam: Useful when the brand wants richer visuals or a softer-touch surface.
Custom foam inserts for rigid boxes can be built in several ways. A friction-fit cavity holds the product through contact. A nested recess supports multiple pieces, such as the main item plus accessories. Finger lifts or pull tabs help the user remove the product without forcing it. Layered inserts work well when a kit includes a main body, cords, manuals, and small parts that need separate homes.
The box and the insert should be designed together. That idea sounds obvious, yet it is one of the most common failure points. If the rigid box wall thickness changes, the internal dimensions change. If the foam is too thick, the lid can bow. If the foam is too thin, the product can shift. If the tray depth is wrong, the reveal looks uneven. Custom foam inserts for rigid boxes perform well only when the board, cavity, and closure are treated as one structure.
Here is the usual workflow in practical terms:
- Measure the product, including protrusions, closures, and accessories.
- Define the shipping environment and target fit tolerance.
- Create a CAD or dieline concept for the cavity layout.
- Build a physical or digital sample.
- Check removal, compression, and lid clearance.
- Revise the design before production tooling begins.
Brand details can also be built into custom foam inserts for rigid boxes. Color matching is common, especially in cosmetics or Custom Printed Boxes programs. Some brands use laser engraving, foil cards, or shaped cutouts that lead the eye to the hero item first. That kind of visual choreography matters more than many teams expect. It turns opening the box into a sequence rather than a single glance.
For brands that treat unboxing as part of retail packaging, the insert becomes a stage. The product should lift cleanly. Accessories should sit logically. The eye should land where the brand wants it to land. Custom foam inserts for rigid boxes can do that, but only when the structure is planned instead of improvised.
Key Factors That Shape Design, Fit, and Protection
Three things usually determine whether custom foam inserts for rigid boxes work well: size, sensitivity, and use case. Size sounds obvious, yet tolerances are where projects drift into trouble. A difference of 1 to 3 millimeters can be enough to make a product wobble or, at the other extreme, get pinched by the cavity walls.
Product weight changes the equation too. Heavier items usually need firmer foam and deeper support zones. Delicate finishes may need a softer contact surface even when the product itself is not especially fragile. A matte powder coat is not the same as polished glass. A brushed metal edge is not the same as a painted plastic shell. That is why custom foam inserts for rigid boxes should be specified around finish as much as dimensions.
Geometry gets complicated fast. One large cavity is straightforward. A multi-part insert with a device, charging cable, spare tip, and manual is not. Irregular shapes add cost because the tooling and cutting logic become less direct. If the product has asymmetric features, the insert may need relief pockets, stepped depths, or a layered build to keep everything aligned.
Aesthetics matter, but they should support function. A deep reveal can look elegant and still make the product harder to remove. A flush edge can look clean and still reduce visual drama. Strong color contrast can spotlight the item, but too much contrast can pull attention away from the product itself. For custom foam inserts for rigid boxes, the right answer depends on the story the brand is trying to tell.
Sustainability adds another layer of judgment. The smartest choice is often the simplest one that still protects the product. Less waste, fewer layers, and lower scrap can all help, but the insert still has to do the job. If the program uses paperboard wraps or fiber-based components, it is worth checking how the full structure aligns with sourcing claims and recovery goals. The FSC has useful guidance on responsible fiber sourcing at fsc.org.
If the product is likely to face drop, vibration, or compression stress, ask for testing that reflects the actual transit path. The ISTA standard family is a practical reference point for many packaging teams; see ista.org for the organization behind those protocols. Custom foam inserts for rigid boxes do not replace testing. They are one of the things testing should validate.
Category-specific needs also shape the insert. Cosmetics brands may care most about premium reveal and perfect alignment. Electronics programs often need cable management and accessory separation. Tool kits need stronger retention. Glass bottle packaging usually needs more shock control near the neck and base. In each case, custom foam inserts for rigid boxes are solving a different version of the same problem: how to protect the product while making the opening feel intentional.
I am always a little suspicious of a spec sheet that treats all products as if they had the same failure mode. They do not. A lipstick tube, a lithium battery pack, and a hand-blown bottle can all sit in a rigid box, but they are not asking for the same engineering at all.
Custom Foam Inserts for Rigid Boxes: Cost, Pricing, MOQ, and Quote Drivers
The cost of custom foam inserts for rigid boxes depends on more variables than many buyers expect. Foam type, thickness, density, cavity count, surface finish, color, layering, and assembly all affect the quote. A simple single-cavity insert may stay relatively low in price. A design that requires multiple nested pieces or a more decorative finish will raise the unit cost because labor and material waste increase.
MOQ matters because setup costs are spread across fewer or more pieces. Lower minimums usually mean higher per-unit pricing. That is not a penalty; it is the math of tooling, sampling, and machine setup. Many suppliers can support a smaller run, but the economics change quickly. For simpler custom foam inserts for rigid boxes, a 500 to 1,000 set run may be workable. For better unit economics, 2,000 to 5,000 units often creates more room to negotiate.
Prototype samples usually cost more per unit than production pieces. That is normal. The sample pays for the learning curve: fit checks, revisions, and manual setup. The payoff is obvious when a problem is caught early. An insert that fits correctly on the first mass run is usually cheaper than fixing a bad design after 3,000 boxes have already been packed.
| Insert option | Typical use | Approx. unit cost at 5,000 units | What it gives you | Trade-offs |
|---|---|---|---|---|
| Die-cut PE foam | Simple electronics, tools, general presentation kits | $0.18-$0.35 | Good structure, efficient production | Less refined feel than higher-end finishes |
| EVA foam with clean cut edges | Premium consumer goods, cosmetics, gifts | $0.28-$0.55 | Tidy appearance and strong fit control | Costs more than basic PE |
| PU cushioning insert | Lightweight or finish-sensitive products | $0.20-$0.42 | Softer contact and gentler compression | Can feel less structured for heavier items |
| Flocked or laminated foam | Luxury presentation, high-touch unboxing | $0.45-$0.90 | More premium visual and tactile appeal | Higher material and finishing cost |
The table above is a planning tool, not a final quote. Freight, tooling, carton construction, and finish requirements can move the number up or down. Even so, it helps buyers compare apples to apples when discussing custom foam inserts for rigid boxes with different vendors. A quote that bundles everything into one line is harder to audit than one that separates tooling, sampling, production, and shipping.
"A box can look luxurious and still fail if the product moves once inside it. Buyers usually notice the damage; finance notices the returns."
That is why the cheapest insert is not always the cheapest choice. If a lower-cost option causes scratches, returns, or a weaker premium impression, it can cost more over time. Custom foam inserts for rigid boxes should be judged against the whole packaging cost, including the cost of failure. If you are still comparing structures, reviewing rigid packaging options alongside the insert spec can make the trade-offs clearer.
One practical way to brief a supplier is to spell out the commercial goal, not just the dimensions. For example: protect a 480-gram product in transit, allow one accessory and one printed card, present the product flush with a 12 mm reveal, and keep the total insert cost under a target threshold. That kind of brief makes custom foam inserts for rigid boxes easier to quote and much easier to build correctly.
Custom Foam Inserts for Rigid Boxes: Process and Timeline
The process for custom foam inserts for rigid boxes usually follows a familiar pattern: discovery, measurement, concepting, sampling, approval, and production. Each step carries a different kind of risk. Early on, the risk is missing information. Later, the risk is overcorrecting after the first prototype. Once the design is locked, the risk shifts toward timing and supply availability.
Discovery should cover more than the product body. Include closures, cords, chargers, caps, hoses, instruction cards, and anything else that changes the physical envelope. If the product ships assembled in one market and unassembled in another, say that upfront. Custom foam inserts for rigid boxes need the final use case, not just the showroom version.
Sampling is where the most useful friction happens. The first prototype often reveals one of three things: the cavity is too tight, the reveal is off, or one accessory has been missed. That is not a failure. It is the process doing its job. Once the sample is corrected, the second version is usually much closer to production.
Typical timing depends on complexity, but a simple project may move from brief to approved sample in roughly 7 to 12 business days, with production following in another 10 to 15 business days. More complex custom foam inserts for rigid boxes with multiple cavities, special finishes, or layered builds may need 2 to 3 sampling rounds and a longer production slot. If the project launches alongside a campaign or trade show, build in extra buffer. Packaging deadlines tend to be less forgiving than they look on the calendar.
Here is a practical project file checklist that saves time and reduces rework:
- Product dimensions with tolerances, not just nominal measurements
- High-resolution photos from multiple angles
- Weight of each packed component
- Finish details such as gloss, matte, plating, or coating type
- Accessory count and placement order
- Target order volume and expected repeat runs
- Shipping conditions, including whether the boxes will be palletized or parcel shipped
That last point matters. A display kit sold in a controlled retail setting can tolerate a different insert choice than a direct-to-consumer shipment that moves through multiple hubs. The same custom foam inserts for rigid boxes can behave differently depending on whether the box is riding in a master carton, a retail shelf program, or a mailer.
Once the design is approved, production usually moves faster than sampling because the decisions have already been made. The factory is not guessing anymore. Teams that respond quickly to feedback generally end up with better packaging because they keep the project from drifting. In packaging, drift is expensive.
Common Mistakes When Ordering Foam Inserts
The most common mistake is measuring only the product body and forgetting the full real-world shape. Cables, closures, buttons, trigger guards, caps, rings, and charging ports all change the fit. If a team orders custom foam inserts for rigid boxes based on a bare product dimension sheet, the first sample can look close and still fail the moment someone tries to pack the full kit.
Another frequent issue is an over-tight fit. Tight sounds secure, but it can slow packing and damage delicate finishes. A polished device forced into a cavity may arrive with micro-scratches that show up only under bright retail lighting. Custom foam inserts for rigid boxes should hold the product firmly without making removal feel like a struggle.
Appearance can mislead. A foam surface can look soft and premium while still performing poorly under compression. Density and recovery matter more than visual texture in many cases. A good supplier should explain how the foam reacts under repeated handling, not just how it photographs.
Shipping realities are easy to ignore because they do not show up on the shelf. Yet drop height, vibration, pressure stacking, and temperature swings all affect performance. If you want a useful transit benchmark, ISTA's packaging testing resources are worth reviewing at ista.org. Custom foam inserts for rigid boxes are only as good as the stresses they can survive.
Brands also overcomplicate the layout. Too many tiny cavities can make packing slow, increase tooling cost, and create inconsistency between operators. In some cases, one cleaner cavity plus a printed accessory card does a better job than four separate pockets. The goal is not to make the insert busy. The goal is to make it functional and easy to pack at scale.
Skipping the physical sample is another expensive shortcut. Digital approvals are useful, but they do not show how a premium coating feels against foam, how the lid closes under pressure, or how easy it is to remove the product with one hand. For custom foam inserts for rigid boxes, the sample is where theory meets the product in a real, hands-on way.
- Do not: measure only the visible body of the product.
- Do not: assume a tighter fit always means better protection.
- Do not: choose foam by appearance alone.
- Do not: skip samples when the finish or shape is unusual.
- Do not: ignore how the box will ship and how often it will be handled.
Expert Tips for Better Results and Next Steps
If you want better results from custom foam inserts for rigid boxes, start with the product journey, not the material. Ask three questions: how is the item packed, how is it shipped, and how is it opened? Those answers usually tell you more about the right insert than a generic foam preference ever will.
Ask for a sample that tests both protection and presentation. A good insert survives handling, but it also looks deliberate when the lid opens. That means checking the product height relative to the box, the reveal around the edges, and the ease of removal. In premium product packaging, those details matter because they show up in every unboxing video and every retail handoff.
Align the insert with the box structure early. The lid depth, tray height, foam thickness, and shoulder reveal all influence one another. If the board wrap changes after the insert has been approved, recheck the fit. It is much cheaper to revise the structure before tooling than after the first shipment. Custom foam inserts for rigid boxes work best when they are treated as part of the rigid box architecture, not as an accessory added at the end.
A practical next-step checklist can keep the quoting process clean:
- Confirm product dimensions, weight, and finish
- List every accessory that ships in the box
- Define the target look and reveal depth
- Set the order volume and target re-order schedule
- Choose whether the priority is maximum protection, premium appearance, or balanced cost
If you are comparing structure options, it can help to review a broader packaging lineup before locking the insert. The full system often includes the rigid box board, printed wrap, magnet or ribbon closure, and the insert itself. That is why teams building Custom Packaging Products should treat the foam as one line in a larger packaging decision, not an isolated procurement item.
Compare at least two foam options if the product has any ambiguity at all. A firmer structure may be best for transit. A softer surface may be better for delicate finishes. A laminated or flocked option may be worth the extra spend if the box is part of a luxury launch. Custom foam inserts for rigid boxes are one of those areas where a little comparison work can save a lot of regret later.
My practical view is simple: evaluate custom foam inserts for rigid boxes as part of the full packaging system, not as a last-minute add-on. That approach leads to cleaner quotes, fewer revisions, stronger presentation, and fewer damage claims. It also tends to produce packaging that feels more credible, which is usually what buyers notice first.
If I had to reduce the whole thing to one rule, it would be this: design the insert around the product's actual journey, not its idealized dimensions. Do that, and the packaging gets quieter, stronger, and a lot less expensive to fix later.
FAQs
What are custom foam inserts for rigid boxes used for?
They hold products securely inside premium boxes so items do not shift, scratch, or collide during shipping. They also improve presentation by creating a clean, fitted reveal when the box is opened. Common uses include cosmetics, electronics, glass items, tools, watches, and gift sets.
How do I choose the right foam for custom foam inserts for rigid boxes?
Match the foam type to the product weight, fragility, and finish sensitivity. Use firmer foam for heavier items and softer cushioning for delicate surfaces. Ask for a sample if you are unsure, because feel and fit matter as much as material specs.
How much do custom foam inserts for rigid boxes cost?
Cost depends on foam material, thickness, cavity complexity, finish, and order quantity. Lower MOQs usually raise the unit cost because setup is spread across fewer pieces. A quote should separate sampling, tooling, production, and freight so you can compare options accurately.
How long does the process for custom foam inserts for rigid boxes take?
The timeline usually includes measurement, sampling, revisions, approval, and full production. Simple designs move faster, while multi-cavity or highly detailed inserts often need more revision time. Lead time is heavily influenced by how quickly product specs and approvals are provided.
What mistakes should I avoid with custom foam inserts for rigid boxes?
Do not measure only the product body; include closures, cables, accessories, and any protruding parts. Avoid making the fit too tight, since that can slow packing and damage delicate finishes. Do not skip samples, especially when the product shape or surface coating is unusual. For smaller or premium runs, custom foam inserts for rigid boxes are often worth the effort because they reduce returns, improve presentation, and make the whole package feel more credible.

