Buyer Fit Snapshot
| Best fit | Custom Poly Mailers with Die Cutting projects where brand print, material claims, artwork control, MOQ, and repeat-order consistency need to be specified before quoting. |
|---|---|
| Quote inputs | Share finished size, material target, print colors, finish, packing count, annual reorder estimate, ship-to region, and any compliance wording. |
| Proofing check | Approve dieline scale, logo placement, barcode or warning zones, color tolerance, closure strength, and carton packing before bulk production. |
| Main risk | Vague material claims, crowded artwork, missing packing details, or unclear freight terms can make a low unit price expensive after revisions. |
Fast answer: Custom Poly Mailers with Die Cutting: Film, Print, MOQ, and Carton Packing should be specified like a repeatable production item. The safest quote records material, print method, finish, artwork proof, packing count, and reorder notes in one written spec.
Production checks before approval
Compare the actual filled-product size with the drawing, then confirm tolerance on folds, seals, hang holes, label areas, and retail display edges. Reserve space for logos, QR codes, warning copy, and material claims before decorative graphics fill the panel.
Quote comparison points
Review material grade, print process, finish, sampling route, tooling charges, carton quantity, and freight assumptions side by side. A quote is only useful when the supplier can repeat the same color, closure quality, and packing count on the next order.
A half-inch thumb notch rarely gets applause, yet on a packing line it can save real time, cut down on fumbling, and make a parcel feel more considered before the customer even sees the branding. That is the quiet advantage of Custom Poly Mailers with die cutting. A well-placed cut changes how the bag opens, how quickly the product slides in, and how polished the finished package feels in the hand.
Design teams usually start with color and graphics. Fair enough. Visuals matter. Still, the opening shape, die-cut placement, and film gauge often decide whether the mailer works in the real world or just looks good on a screen. A mailer is branding, but it is also a tool. Custom Poly Mailers with die cutting have to support line speed, product protection, and presentation at the same time, and the bag can miss any one of those jobs if the spec is sloppy.
If you already buy Custom Poly Mailers, the die-cut feature belongs in the same conversation as size and seal, not tucked away as an afterthought. The strongest designs feel deliberate the moment someone touches them. That impression often matters more than a loud print treatment that never solves a practical problem.
Custom poly mailers with die cutting: the hidden packaging upgrade
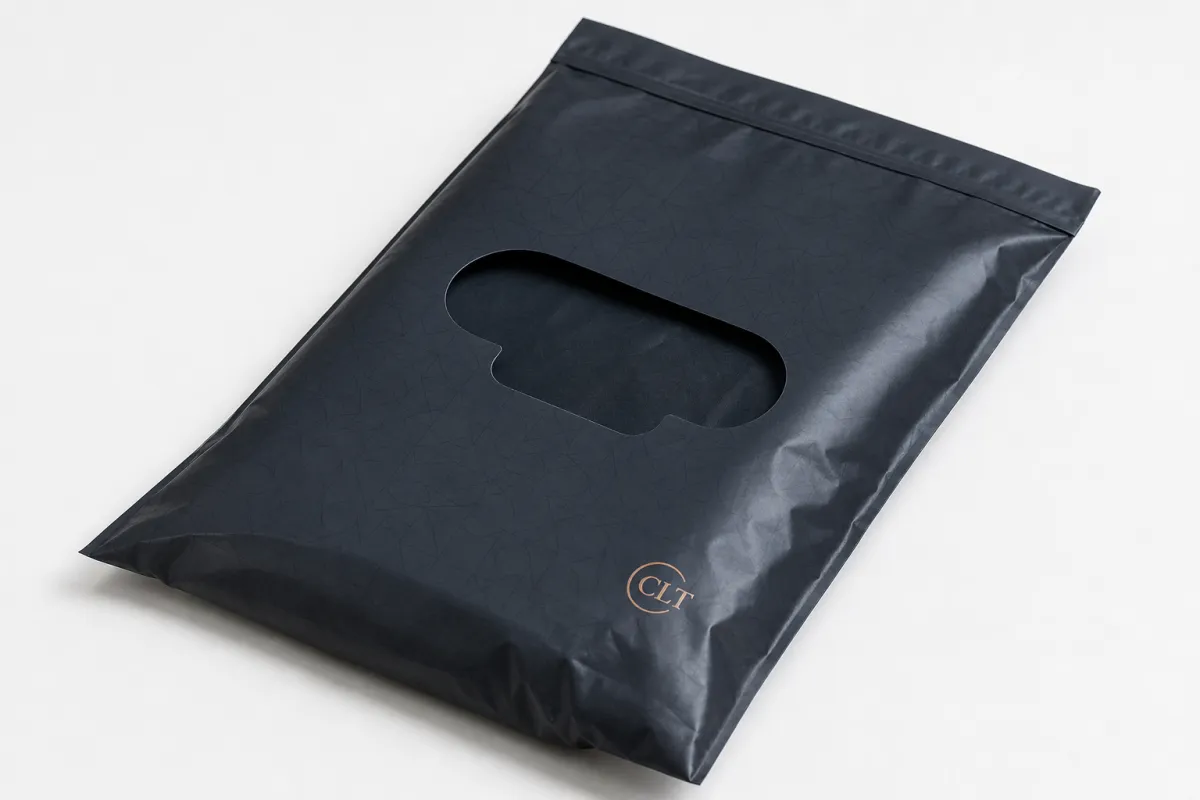
On the shipping floor, a standard flat bag and Custom Poly Mailers with die cutting can behave like two different products. A thumb notch, a hang hole, or a shaped opening may look tiny on a proof, but those few millimeters change how the packer grips the mailer, how the customer opens it, and how the bag moves through a busy fulfillment routine. Spend one afternoon hand-packing a few hundred units and the difference becomes obvious.
Some buyers assume the cut exists for style alone. Sometimes it does. Most of the time, function comes first. Custom Poly Mailers with die cutting can support hanging displays, create a controlled tear point, or make retail pickup and internal distribution easier. In a packaging system that also includes Custom Packaging Products for inserts, cartons, or shipper kits, the die cut helps the mailer feel like part of a broader design language instead of a one-off shipping bag.
There is a tactile side to this, and customers notice it fast. A package that opens cleanly and starts at the intended point feels easier to trust. The opening sits where it should. The seal gives way without dragging. The product does not catch on a ragged edge. Those details shape the first physical interaction a customer has with the brand, whether the order is heading to a home, a boutique counter, or a warehouse shelf.
Technical choices decide whether the feature earns its place. Film gauge, seal strength, cut placement, and the intended product all have to work together. Too thin, and the die cut can make the film feel fragile. Too close to a seam, and the bag may split early. Too tight at the opening, and pack-out slows to a crawl. That is why custom poly mailers with die cutting sit at the intersection of packaging design and functional engineering.
I have watched teams obsess over artwork while ignoring the opening style, then wonder why packing speed drops. The fix was usually mundane, which is to say the best kind: move the cut, widen the safe zone, and stop asking the film to do something it was never meant to do. The result is kinda boring on paper and excellent in practice.
A practical test helps: the cut should make the packer faster, support the product inside, and leave the finished package looking intentional. If it only does one of those things, the spec still needs work.
“A good die cut should disappear into the workflow. If the packer has to think about it, the design probably needs adjustment.”
Brands that care about package branding tend to see the value quickly. The cut says someone paid attention to how the package behaves, not just how the logo looks.
How custom poly mailers with die cutting are made
The production path for custom poly mailers with die cutting starts before film ever becomes a finished bag. It begins with the brief: what is going inside, how is it packed, what opening style is needed, and where should the artwork sit? From there, the converter builds a dieline that places the cut feature against the bag size, the print area, the seal zones, and any flap or gusset structure. That map matters because the die cut has to live where it can do its job without weakening the rest of the mailer.
Once the layout is approved, tooling or cutting dies are prepared for the chosen shape. A thumb notch is simple. A handle slot or shaped opening demands tighter control. A tear notch has to be placed so it starts a clean rupture instead of a ragged split. With custom poly mailers with die cutting, the cut must register precisely to the artwork, which means the print and conversion teams need to agree on exact placement. Even a small drift can make the feature look off-center or interfere with the design.
That is why good suppliers ask detailed questions before sending a quote. A soft garment bag, a subscription accessory pouch, and a lightweight hardware shipper all need different opening forces and tear resistance. The same cut shape can behave very differently once film gauge and seal design enter the picture. A one-size-fits-all answer usually hides more risk than value.
Most teams check a few practical points before signing off. Can the product slide in without fighting the seams? Does the opening feel natural in the hand? Does the cut avoid copy, barcodes, and compliance text? Is the tear point clear enough for the customer but not so aggressive that the bag opens in transit? Those questions sound basic. They are the questions that prevent waste, rework, and customer complaints.
For a more technical review, packaging teams often look to transport testing standards from organizations such as ISTA. For film and seal performance, ASTM methods are often used when suppliers need to compare tensile strength, puncture resistance, or seal integrity across different structures. The goal is not to turn every mailer into a lab project. The goal is to make sure custom poly mailers with die cutting perform the same way at order 20 and order 2,000.
If your packaging partner also covers broader Manufacturing Capabilities, ask how they control registration, tooling, and cutoff tolerances. That conversation usually reveals more than a polished sample photo ever will.
Key design and material factors for custom poly mailers with die cutting
If you want custom poly mailers with die cutting to feel right, start with the film. Gauge affects puncture resistance, hand feel, opacity, and how forgiving the bag is once a cut enters the design. A 2.5 mil coex structure may suit lightweight apparel, while heavier products or sharper edges often call for 3 mil or more. That is not a strict rule. Construction and seal design matter too. Even so, film thickness is usually the first variable worth comparing.
Closure style matters just as much. A peel-and-seal strip fits many shipping programs, but some bag designs need a self-seal flap or a different opening pattern. The closure has to work with the die-cut feature, not against it. If the opening is shaped for fast insertion, the flap still needs enough margin to seal cleanly without wrinkling or drifting off center.
Artwork placement causes more problems than most teams expect. Logos, taglines, warning copy, barcodes, and pattern repeats all need safe zones around the cut line. Run the artwork too close and the die cut can clip a letter or create a break that looks accidental. The same logic applies to branded packaging more broadly: whether the format is custom printed boxes or poly mailers, structural features should support the design rather than interrupt it.
Texture is another small detail that changes the final read. Embossing belongs mostly to paperboard and carton finishes, not poly film. On a mailer, tactile interest usually comes from the cut itself, the material finish, or a shaped opening. Matte film often reads more premium than glossy film. A sharp, carefully placed cut can make the package feel intentional without adding a more complicated print build.
The product inside should drive the final size every time. A garment bag, a folded soft good, and a flat accessory insert all behave differently inside the same format. Leave enough clearance for quick insertion, but not so much slack that the mailer balloons or shifts in transit. In practice, that often means giving the width a little breathing room while keeping the length honest to the product. Oversizing creates waste. Undersizing creates strain.
For brands shipping across multiple formats, consistency matters too. A customer may receive a box on one order and a mailer on the next. If the color language, typography, and package branding match, the experience feels coordinated even when the structures differ. That kind of system thinking helps product packaging, retail packaging, and subscription fulfillment speak the same visual language.
Safe zones around the cut are about more than artwork. They also protect the bag during conversion. The die cut should not sit where sealing jaws need to absorb stress or where a fold line will create a weak point. Good custom poly mailers with die cutting respect how film responds to heat and pressure, which is why the cut layout should always be reviewed with the manufacturing partner before approval.
Custom poly mailers with die cutting process and timeline
The schedule for custom poly mailers with die cutting is usually manageable, provided the brief is complete. A clean project flow often looks like this: sizing discussion, dieline review, artwork proofing, sample or prototype approval, production, finishing, and shipment. Each stage exists because a missing step tends to show up later as a fit issue, a registration problem, or a lead-time delay.
- Brief and sizing: confirm product dimensions, target use, film gauge, closure style, and cut feature.
- Dieline review: place the opening, notch, or hole against the print area and seal zones.
- Artwork proofing: verify colors, safe zones, copy, and any barcodes or compliance text.
- Sample approval: check opening feel, product clearance, and seam behavior by hand.
- Production: run the print, conversion, and die-cutting process once the proof is signed off.
- Shipment: pack, palletize or cartonize, and move the order to freight.
Lead time shifts when the cut becomes more complex. A basic thumb notch usually moves faster than a shaped handle or a multi-feature opening. More print colors can add setup. Higher quantities often improve the unit price, but they can stretch the run. Tooling, if needed, adds another approval point. A revised cut location after the first proof usually restarts the clock because the artwork and conversion details need to be checked again.
For standard custom poly mailers with die cutting, a realistic schedule after proof approval often lands around 12 to 15 business days for production, then a few more days for freight depending on destination. Add time for sampling if a physical sample is required. Launch dates deserve buffer, especially when internal approvals, seasonal demand, or freight delays can push a project sideways. A rushed order is not always a bad order, but it is a fragile one.
Approval speed matters as much as factory speed. A supplier cannot finish a job if artwork is still under review, and a small move in the cut location can force a new proof. That is especially true for custom poly mailers with die cutting, because the feature changes both the visual layout and the way the bag functions. Faster responses from the client side usually lead to a cleaner, more predictable timeline.
For teams sourcing multiple packaging components, it helps to align mailer timing with the rest of the program. If inserts, cartons, or labels are on the order sheet too, your Custom Packaging Products should arrive on a schedule that supports fulfillment rather than complicating it. A coordinated launch usually beats a clever piece that shows up late.
“The best approval process is boring. Clear specs, one proof, one sample, and no surprises at the end.”
Custom poly mailers with die cutting cost, pricing, and MOQ factors
Pricing for custom poly mailers with die cutting comes down to a handful of variables, and the biggest ones are easy to spot once you know where to look. Film gauge, bag size, print coverage, color count, cut complexity, closure style, and order quantity all affect cost. On smaller runs, setup is spread across fewer bags. On larger runs, the unit price usually improves, though storage and cash flow start to matter more.
As a rough planning reference, a straightforward custom mailer in the 5,000-piece range might land somewhere around $0.18 to $0.35 per unit, depending on size, gauge, and print coverage. A simple die-cut feature such as a thumb notch may add only a modest amount. A more complex shaped opening or handle slot can raise the unit cost further. Those are not fixed rates. Every quote reflects the exact build. Still, they give buyers a useful starting point.
Minimum order quantity deserves attention too. Some programs can support smaller runs, especially when the cut is simple and the print is not overloaded. The tradeoff usually shows up in price. A shorter run of custom poly mailers with die cutting can be perfectly workable, but setup, tooling, and conversion labor are carried by fewer units, so the per-bag cost climbs. That is normal, not a warning sign.
Fair comparisons depend on matching specs. Same size. Same film gauge. Same closure style. Same cut feature. Same print count. Same quantity. If one quote uses a 2.5 mil bag with a thumb notch and another uses a 3 mil bag with a shaped handle, the numbers are not comparable yet, even if the outside dimensions look close. Buyers run into trouble when they compare line items instead of build specs.
| Cut style | Best use | Typical cost impact | Production note |
|---|---|---|---|
| Thumb notch | Quick opening for apparel and soft goods | Low, often a small add-on | Best for clean tear initiation and easy hand access |
| Hang hole | Retail display or suspended presentation | Low to moderate | Needs careful placement so the hole does not interfere with print |
| Tear notch | Controlled opening for repeat pack-out | Low to moderate | Should align with seal design and opening direction |
| Shaped handle slot | Pickup, carry, or branded presentation | Moderate to higher | Requires tighter registration and more attention to film strength |
Quote details matter as much as the headline number. Ask whether tooling charges are separate. Ask whether sample fees are credited later. Ask whether freight is included or billed separately. Ask how cartons or bundle packing are handled. A quote for custom poly mailers with die cutting can look attractive until packing method or freight terms change the landed cost. Apples-to-apples comparison is slower than a quick scan, but it is far more honest.
Sometimes the best savings come from adjusting the spec rather than chasing the lowest sticker price. A smaller print area may reduce setup. A simpler die cut can reduce tooling. A better quantity break may improve the unit price enough to justify a higher order. Good buyers ask more than, “How cheap can this be?” They ask, “What is the right balance of cost, speed, and presentation for this product?”
If the brand is also buying paperboard assets, FSC-certified materials may matter for boxes or inserts, even though the poly mailer itself belongs to a different material family. The point is to align the full packaging program, not just the outer shell. That matters especially when custom poly mailers with die cutting sit beside custom printed boxes in the same customer journey.
Common mistakes when ordering custom poly mailers with die cutting
The biggest mistake is treating the die cut like decoration. A cut that looks sharp on screen can feel awkward in hand, slow down packing, or weaken the bag once real product and real shipping enter the mix. Custom poly mailers with die cutting need to earn their place by making the package easier to use, not by adding complexity for its own sake.
Tight sizing causes another round of headaches. If the product dimensions leave no insertion clearance, the packer will fight the bag, the film will wrinkle, and the seal may land inconsistently. That creates hidden labor costs and can slow the line enough to erase any gain from the design. A few millimeters of room in the right direction can change the whole experience.
Skipping the sample is risky. Proofs help, but they do not tell you how the bag feels in the hand, how much pressure it takes to start the tear, or whether the opening sits in the right place once the bag is filled. When teams approve custom poly mailers with die cutting without holding a physical sample, they are guessing on the part that matters most.
Tolerance mistakes show up more often than buyers expect. Film can stretch. Heat can shift the seal. Print registration can drift during conversion. At production speed, those small movements matter. If the cut sits too close to a seal or a printed edge, the final bag can look fine in a PDF and wrong in real life. That gap between artwork and material behavior is where many projects lose polish.
Another issue is forgetting how the mailer fits into the broader brand system. If the company uses branded packaging for some orders, custom printed boxes for others, and a die-cut mailer for apparel or soft goods, the pieces should feel related. Typography, color family, and tone should line up closely enough that the customer recognizes the brand across formats. Good package branding is more than a logo. It is the rhythm of the whole experience.
“A mailer should work for the packer first, the shipper second, and the customer last. If any one of those three feels ignored, the package will show it.”
There is a sustainability angle too. Overbuilt bags waste material, and underspecified bags fail before they reach the customer. Both outcomes are avoidable. The smartest custom poly mailers with die cutting are the ones that match the product, the route, and the handling profile as closely as possible. That is how you get a package that feels considered without paying for unnecessary plastic or avoidable rework.
There is one caveat worth saying plainly: not every brand needs a special die-cut feature. If the pack-out is simple and the customer never interacts with the opening, a standard mailer may be the cleaner choice. I have seen teams spend money on a shaped cut that added almost nothing except a longer approval chain. That kind of vanity spec is easy to spot once you measure it against the actual workflow.
For additional packaging context and standards thinking, the broader resource library at packaging.org is useful for teams that want to keep technical language sharp and planning organized.
Next steps for custom poly mailers with die cutting
The best next step is straightforward: define the use case before asking for a price. What is shipping in the bag? How heavy is it? How is it packed now? How should the customer open it? Once those answers are on paper, custom poly mailers with die cutting become much easier to spec because the brief is grounded in real handling instead of guesswork.
Then gather the essential details in one place. Size. Film gauge. Print colors. Closure style. Cut style. Quantity. Brand colors. Any regulatory copy, recycling language, or barcode placement. Send those specs together and the supplier can quote faster with fewer assumptions. That matters whether you are buying one mailer SKU or building a larger family of Custom Poly Mailers for several product lines.
Ask for a sample or prototype and test it with the actual item. Check seal strength, opening feel, product clearance, and whether the die-cut feature improves packing speed. If the sample saves time on the line and still feels polished in the customer hand, the spec is in the right neighborhood. If it only looks good in a mockup, keep refining. That gap separates a nice concept from a production-ready solution.
From there, compare quotes on equal terms, not just on price. Confirm whether tooling is included. Confirm freight. Confirm pack-out method. Confirm the expected production window. A supplier who understands the practical side of custom poly mailers with die cutting should be able to explain where the cost comes from and what can be adjusted without hurting performance.
If the project sits inside a broader packaging rollout, line up the mailer with the rest of the materials so the system launches together. That might mean coordinating with inserts, labels, and Custom Packaging Products or aligning the mailer graphics with the rest of the retail packaging family. The more unified the program, the more intentional the brand feels.
In the end, custom poly mailers with die cutting work best when branding, durability, and packing speed share the same spec. Get the cut right, keep the material honest, and the rest of the system tends to fall into place. The practical takeaway is simple: start with the product, prove the opening with a sample, and only then lock the artwork around it.
What are custom poly mailers with die cutting used for?
They are used when a brand wants a poly mailer that opens, handles, or presents the product in a more controlled way than a standard flat shipping bag. The die-cut feature can improve usability, speed up packing, or create a cleaner customer experience without changing the basic role of the mailer. They work well when the opening style, product size, and shipping method all benefit from a more intentional cut or shaped feature.
How much do custom die-cut poly mailers usually cost?
Cost depends on film gauge, bag size, print coverage, die complexity, and order quantity, so two similar-looking mailers can price very differently. Smaller orders usually have a higher unit cost because setup and tooling are spread over fewer bags. Ask for a detailed quote that separates tooling, samples, freight, and production so you can compare options fairly.
What is the typical lead time for custom poly mailers with die cutting?
Lead time usually includes proofing, sample approval if needed, production, and shipping, so the full schedule is longer than just press time. Complex cut shapes, artwork revisions, or special finishing can add days or weeks depending on the supplier's workflow. The fastest way to stay on schedule is to approve artwork quickly and provide complete specs from the start.
Can I order a small MOQ for custom poly mailers with die cutting?
Many suppliers can support smaller runs, but the unit price is often higher because setup and tooling costs are divided across fewer units. If you need a small MOQ, ask whether there are tiered price breaks or a better value at a slightly higher quantity. A sample or short run can be a smart way to validate fit and function before scaling up.
What artwork do I need for custom poly mailers with die cutting?
Supply vector artwork, brand colors, and a proper dieline or template so the printer can place the design around the cut accurately. Keep text, logos, barcodes, and important graphics outside the cut zone and safe area to avoid clipping. If you are unsure about file setup, ask for a proof review before production so the final mailer matches the intended layout.

