Buyer Fit Snapshot
| Best fit | Custom Product Inserts for Shipping projects where brand print, material claims, artwork control, MOQ, and repeat-order consistency need to be specified before quoting. |
|---|---|
| Quote inputs | Share finished size, material target, print colors, finish, packing count, annual reorder estimate, ship-to region, and any compliance wording. |
| Proofing check | Approve dieline scale, logo placement, barcode or warning zones, color tolerance, closure strength, and carton packing before bulk production. |
| Main risk | Vague material claims, crowded artwork, missing packing details, or unclear freight terms can make a low unit price expensive after revisions. |
Fast answer: Custom Product Inserts for Shipping: Material, Print, Proofing, and Reorder Risk should be specified like a repeatable production item. The safest quote records material, print method, finish, artwork proof, packing count, and reorder notes in one written spec.
Production checks before approval
Compare the actual filled-product size with the drawing, then confirm tolerance on folds, seals, hang holes, label areas, and retail display edges. Reserve space for logos, QR codes, warning copy, and material claims before decorative graphics fill the panel.
Quote comparison points
Review material grade, print process, finish, sampling route, tooling charges, carton quantity, and freight assumptions side by side. A quote is only useful when the supplier can repeat the same color, closure quality, and packing count on the next order.
Custom Product Inserts for Shipping: A Practical Guide
Custom Product Inserts for shipping look boring right up until a box gets dropped, slid across a conveyor, and stacked under a few hundred pounds of someone else’s order. The outer carton survives. The product inside may not. That is the whole job of custom product inserts for shipping: stop movement, protect weak spots, and keep the item from turning a decent package into a damage claim.
I've watched pretty good packaging fail for a stupid reason: the product had room to wiggle. Not much. Just enough. A half inch of movement can scuff a finish, chip a corner, or knock a connector loose. That is why custom product inserts for shipping matter beyond the material line item. They shape the actual behavior of the shipment.
For packaging buyers, the value shows up in a few places at once. Fewer returns. Faster pack-out. Less dunnage. Fewer "why is this damaged?" emails. And yes, a better first impression when the customer opens the box. That matters whether you are using a plain shipper, a set of Custom Shipping Boxes, or a broader branded packaging system built around product packaging and package branding.
The savings are not glamorous. They are just real. Lower re-ship costs. Less warehouse rework. Fewer replacement parts shipped by mistake. In ecommerce shipping, those little losses stack up fast, and they usually hide until someone looks at the returns report and says, well, this is kinda ugly.
What Are Custom Product Inserts for Shipping?
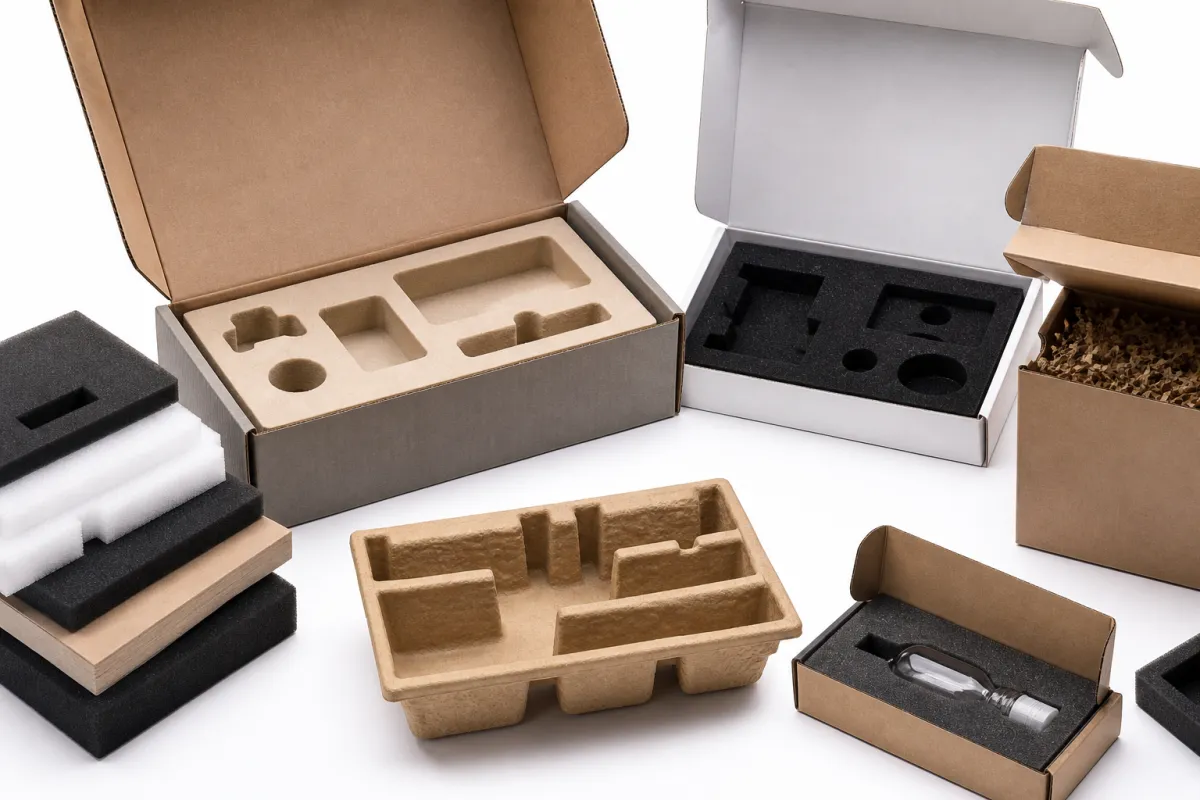
Custom product inserts for shipping are shaped supports made to fit a specific product or product set inside a shipper. They can cradle a bottle, hold a device in place, separate accessories, or keep a fragile surface away from the box wall. In plain terms, the insert prevents movement where movement causes damage. That is the point, even if the insert also carries instructions, branding, or a printed message.
People often confuse inserts with void fill. They are not the same tool. Paper, air pillows, and loose fill can cushion impact to a degree, but they do not control position with much precision. Custom product inserts for shipping create a defined cavity or support structure, so the product is not floating around, leaning into a corner, or rubbing against another component. Outer packaging protects the shipment from the outside; inserts protect the product from the inside.
That difference matters more than a lot of teams expect. I have seen a cosmetic kit pass a visual inspection and still fail in transit because the jar could shift just enough to scuff the lid. I have seen electronics ship in a strong-looking carton and still come back with bent ports because the insert never locked the device down. The box did its job. The internal design did not.
Custom product inserts for shipping also shape the unboxing experience. A clean insert can make a modest package feel deliberate. A sloppy one can make a premium item feel cheap. Packaging design teams usually review the insert alongside the outer carton, print coverage, and pack-out sequence for exactly that reason. If the box tells a story, the insert is part of the plot.
"The best insert is the one the packer barely notices and the customer instantly trusts."
For brands building around custom printed boxes or a wider line of Custom Packaging Products, the insert becomes a quiet but important layer of package branding. It does not need to shout. It just needs to hold the product correctly and not slow the line. That is the practical sweet spot for custom product inserts for shipping.
How Custom Product Inserts for Shipping Work
The mechanics are simple. The design process usually is not. Custom product inserts for shipping work by controlling how the product sits, how pressure spreads, and where impact energy goes during transit. Instead of letting the item bounce around in a carton, the insert creates contact points in safer places. It also shields weak areas like corners, screens, nozzles, caps, handles, and accessory ports.
Most projects start with three inputs: product dimensions, fragility mapping, and shipping-lane assumptions. A buyer may know the item is 9.5 inches long, but that barely scratches the surface. The useful questions are sharper. Where can pressure land without damage? Which faces scratch easily? Does the item include loose parts? Will it ship parcel, freight, or both? Custom product inserts for shipping are much easier to get right when those answers are on the table before the first prototype is cut.
The structure then follows the risk. A light, rigid product may need edge support and top retention. A heavier item may need a deeper cavity and tighter side walls. A multi-part kit may need pockets that keep components from colliding. Fragile finishes may call for a smoother board, a softer liner, or a different material altogether. The goal is not to stack on layers until it feels safe. The goal is to solve the movement problem with the fewest parts possible.
A typical development path looks like this:
- Discovery - Gather product photos, measurements, weight, and pack-out constraints.
- Prototype - Produce a sample insert, usually with a first-pass material and fit.
- Testing - Check real fit, handling, and shipping performance against expected abuse.
- Revision - Adjust clearances, wall thickness, folds, or retainers where needed.
- Approval - Sign off on the structure, appearance, and pack-out method.
- Production - Run the approved insert at scale for order fulfillment.
If the team uses test protocols like those from the ISTA packaging testing organization, the conversation gets a lot more honest. Drop tests, vibration tests, and compression checks do not care how nice a mockup looks. They show whether custom product inserts for shipping actually hold the load in real conditions. That is where good packaging design earns its keep.
Pack-out speed matters too. A clever insert that needs two extra hand motions and a three-second alignment check can get expensive fast. Custom product inserts for shipping should make the packer's job easier, not more theatrical. In a high-volume warehouse, shaving 10 to 15 seconds off each order changes labor cost in a very real way.
Cost and Pricing Factors for Shipping Inserts
Pricing for custom product inserts for shipping depends on more than material cost. The main drivers are material type, design complexity, order quantity, tooling, print coverage, and how much structural precision the product needs. A simple die-cut corrugated insert for a low-risk item can be very economical. A molded or thermoformed solution with tight cavities, multi-part retention, and a premium finish can cost noticeably more. The right question is not "What is cheapest?" It is "What lowers total landed cost?"
Here is a practical comparison of common options. These are planning ranges, not fixed quotes, because thickness, tooling, print, and order volume can move the numbers quite a bit.
| Insert Type | Typical Use | Approx. Unit Cost at 5,000 Units | Strengths | Tradeoffs |
|---|---|---|---|---|
| Corrugated | Light to moderate protection, simple shapes | $0.18-$0.35 | Fast to produce, widely recyclable, easy to die-cut | Less refined for premium presentation, weaker for very fragile items |
| Chipboard | Light products, retail kits, divider systems | $0.16-$0.30 | Thin, economical, good for layered structures | Limited cushioning, not ideal for heavy shock loads |
| Molded pulp | Fragile goods, sustainability-focused programs | $0.22-$0.48 | Good energy absorption, eco-friendly feel, strong fit for irregular shapes | Tooling and drying time can raise upfront cost |
| Polyethylene foam | High-value or delicate products | $0.30-$0.90 | Excellent cushioning, clean edges, very protective | Less attractive for recycling goals, can feel overbuilt if the product is not fragile |
| Thermoformed plastic | Precision cavities, multi-compartment kits | $0.24-$0.70 | Strong fit control, repeatable, good for display | Tooling investment and material choice matter a lot |
Tooling changes the conversation quickly. Simple prototype tooling may start in the low hundreds of dollars, while more complex custom tooling can run much higher depending on geometry and process. For some projects, that upfront cost makes sense because the insert will be reused across long production runs. For short runs, a lower-tooling structure is usually the smarter move.
Volume changes everything. A project quoted at 500 units may look pricey per piece, while the same structure at 5,000 or 10,000 units becomes far more efficient. That is why custom product inserts for shipping should be judged alongside the forecast instead of in isolation. If the SKU is stable, the insert can pay back quickly. If the product is still experimental, flexibility matters more than chasing the lowest unit price.
The hidden economics are usually where the best decisions live. A slightly more expensive insert can reduce damage claims, replacement shipments, customer service time, and freight waste enough to lower total cost. I have watched teams obsess over the insert line item while ignoring the cost of the return label, the re-ship, and the labor needed to inspect the damaged product. That math is incomplete.
There is also a branding angle. If the insert helps the outer pack function like a controlled retail packaging experience, it can reduce the need for extra fillers, extra cards, or extra instructions. Sometimes custom product inserts for shipping handle the job of two or three smaller package elements at once. That is one reason they fit neatly into branded packaging programs and a broader product packaging strategy.
For lighter ecommerce shipping programs, the outer mailer can change the economics too. A structured insert inside a Custom Poly Mailers setup may cost less than a heavier carton system, but only if the product can handle that format. That is why the shipper, the insert, and the product need to be priced together.
Custom product inserts for shipping also become more efficient once the team agrees on a clear standard: protection level, presentation level, and fulfillment speed. With those three things defined, the pricing conversation gets practical instead of fuzzy.
Step-by-Step Process for Choosing the Right Insert
Choosing custom product inserts for shipping gets a lot easier when the work follows a sequence instead of a hunch. The best projects usually start with the product, then move to the lane, then move to the material, and only after that move to the prototype. Skipping steps tends to create inserts that look right and fail in the real world.
1. Audit the product first. Measure the full outer dimensions, not just the nominal size. Record weight, finish, break points, accessory count, and any area that should not bear load. If a product has a gloss surface, a fragile coating, or a protruding connector, that detail belongs in the brief. Custom product inserts for shipping depend on those weak points being called out early.
2. Map the shipping conditions. Parcel shipping, freight, and mixed-mode distribution all create different risks. Vibration exposure, stacking pressure, humidity, and temperature swings can change performance. A shipment that moves through long ecommerce shipping lanes may need more compression resistance than a direct-to-store pack. If the carton will sit under other cartons in a distribution center, that matters too.
3. Choose the Right material family. Corrugated and chipboard work well for straightforward cases. Molded pulp is often stronger than teams expect, especially for irregular profiles. Foam protects extremely well, but not every product needs that much cushioning. Thermoformed plastic can be excellent for repeatable cavities and premium presentation. Custom product inserts for shipping are not a one-material decision; they are a fit decision.
4. Prototype early. A drawing will not reveal everything. Real samples expose tolerance issues, awkward folds, surface rub, and pack-out friction. Put the product into the actual insert, inside the actual box, with the actual closure method. If the insert is part of a larger Custom Packaging Products rollout, test the full system together instead of in pieces.
5. Test with purpose. Use drop, shake, and compression scenarios that mirror the real lane. The right reference point is not whether the insert "looks secure." The question is whether the product survives realistic handling and arrives in acceptable condition. For many teams, that means reviewing test results against standards such as ISTA guidance and, where relevant, ASTM D4169-style performance thinking. Exact protocol choice depends on the product and the distribution path.
6. Set approval criteria. Before launch, define the damage rate target, acceptable pack-out time, and any appearance standard the customer expects. If the packaging design supports custom printed boxes or branded packaging, review the insert alongside the visual system so the whole unboxing experience feels intentional. Once those criteria are written down, custom product inserts for shipping are easier to manage across new SKUs.
One practical detail gets missed more often than it should: training. If an insert is intuitive, the warehouse can train faster and make fewer mistakes. If it needs a diagram and a long explanation, it may be too complicated for high-volume order fulfillment. A good insert should cut down the number of judgment calls on the line.
Common Mistakes With Custom Product Inserts for Shipping
The most common mistake is designing for the product and ignoring the shipping lane. A perfectly shaped insert can still fail if the carton sees vibration, top-load pressure, or repeated handling. Custom product inserts for shipping need to be judged against transit conditions, not just a bench-top fit. A tight-looking cavity is not the same thing as a safe one.
Overengineering causes plenty of damage too. Too many folds, too much material, or too many cutouts can raise cost and slow packing without improving protection. A buyer may feel safer adding more layers, but the warehouse usually pays the price later. The best inserts are often simpler than the first concept, not more elaborate.
Tolerance errors are another big one. If the cavity is too loose, the product shifts. If it is too tight, it can scuff, crush, or create a frustrating assembly step for the packer. Even a few millimeters matter on higher-value items. This is where custom product inserts for shipping either save the day or create a fresh mess.
Skipping real-world testing is an expensive habit. Mockups can hide issues that show up only during actual drops, shakes, and pack-out trials. I would rather see a team spend one extra round on prototypes than discover the problem after 1,000 shipments. That is especially true for products with delicate finishes or multiple accessories.
There is also a branding blind spot. Some teams build inserts that protect the product but ignore the customer experience. The insert may be structurally sound and still feel awkward to open, hard to recycle, or visually disconnected from the rest of the package. In retail packaging, those details shape perception fast. Custom product inserts for shipping should support the story, not pull attention away from it.
Here is a simple rule that catches a lot of avoidable mistakes:
- If the product moves, the insert is too loose.
- If the packer hesitates, the design is too complex.
- If the customer sees scratches, the contact surface is wrong.
- If returns keep mentioning breakage, the lane assumptions were too optimistic.
Finally, some teams forget the return path. If a product is expected to come back for inspection, exchange, or warranty service, the insert should not make reverse logistics painful. Custom product inserts for shipping that look great on outbound shipments but collapse in returns are only solving half the problem.
Expert Tips for Better Protection and Faster Packing
Design for pack-out speed first, then refine the presentation. Fewer folds, fewer touchpoints, clearer orientation, and fewer chances for operator confusion usually matter more than a clever structure. Custom product inserts for shipping should feel obvious in the hand. If a packer has to stop and think every time, labor cost will show it.
Standardization helps more than many teams expect. One insert family can often support several SKUs if the footprint and retention points are planned carefully. That reduces procurement complexity, speeds approvals, and keeps inventory simpler. In many programs, standardization is the difference between a packaging system that works and a pile of one-off exceptions.
Track data before and after launch. Damage locations, return reasons, and pack times tell a much clearer story than opinions do. If scuffing drops after a material change, that matters. If pack time falls by 12 seconds per order, that matters too. Custom product inserts for shipping should be treated like an operational investment, not a design object.
Use the lightest structure that still performs. Sustainability is not only about recycled content. It is also about removing wasted material, lowering freight weight, and keeping the package easy to recover. The FSC certification system is worth considering for paper-based components when responsible sourcing matters to the brand. That can support both sustainability claims and customer trust.
Another practical tip: do not let branding overpower function. Strong package branding is useful, but it should not force the insert into a shape that underperforms. The best branded packaging often looks restrained on the inside because it already solved the hard part: motion control. In that sense, custom product inserts for shipping are the quiet infrastructure behind a polished reveal.
Use insert design to support the broader operation, not just shelf appeal. If the brand sells through ecommerce shipping and retail packaging channels, the insert may need to work for both ship-to-home and store replenishment. That dual use can save time, but only if the structure is consistent enough for order fulfillment and tough enough for transit.
"A good insert removes exceptions. A great insert removes them without anyone noticing."
That is why the most effective custom product inserts for shipping often look boring on paper. Boring means repeatable. Boring means fewer mistakes. Boring means the line keeps moving. In packaging, boring is often what profitable looks like.
What to Do Next After You Define Your Insert Spec
Once the insert spec is written, the work shifts from theory to execution. The first move is usually to audit recent damage claims and group them by failure mode: corner crush, surface rub, accessory loss, shifting, or breakage. That tells the team where custom product inserts for shipping will have the biggest impact first.
Next, create a short vendor brief. Include exact dimensions, product photos, acceptable materials, target cost, shipping method, expected order volume, and the timeline for samples and approval. The better the brief, the fewer surprises. Custom product inserts for shipping are easier to source when the supplier can see the product and the risk profile clearly.
Then run a pilot. A small production lot gives the warehouse a chance to test the real pack-out flow, not just the sample. Measure damage rates, operator feedback, and time per pack before scaling to every SKU. That pilot stage is often where the most valuable corrections happen.
If the insert is going to sit inside a larger branded packaging system, compare it against the rest of the line: outer carton, printed message, opening sequence, and post-use recovery. For many teams, the final decision is not just about custom product inserts for shipping. It is about whether the insert improves product protection, fits the lane, and supports the brand without slowing fulfillment.
Here is the cleanest decision rule: if the insert lowers damage, speeds packing, and fits the shipping path, move it forward. If it only looks better but does not improve the operation, keep testing. If two prototypes are close, compare the samples, not just the quotes. That is how custom product inserts for shipping move from guesswork to something the warehouse can actually live with.
What materials are best for custom product inserts for shipping?
Corrugated and chipboard work well for lightweight or moderate protection needs. Molded pulp, foam, and thermoformed plastic are better for high-value or fragile items. The best material depends on product weight, fragility, branding, sustainability goals, and how much motion the package has to control.
How do I know if custom product inserts for shipping are worth the cost?
Compare insert cost against current losses from damage, returns, replacements, and labor. If the insert also speeds packing or reduces training time, include that value too. A good test is whether total landed cost improves, not just whether unit price goes up.
How long does it take to develop shipping inserts?
Simple projects can move from concept to sample quickly if product data is complete. More complex jobs need prototype review, fit testing, and revisions before approval. Timeline usually depends on material availability, tooling needs, and how fast feedback is given.
Can custom product inserts for shipping reduce returns?
Yes, if the return reason is breakage, scuffing, movement, or missing accessories. They help most when the product fails because it shifts inside the shipper, not because of the outer box. Pair inserts with better pack-out instructions to get the strongest return reduction.
What information should I gather before ordering inserts?
Collect exact product dimensions, weight, fragility points, and accessory count. Document shipping method, average transit conditions, and current damage data. Share photos, sample units, and any pack-out constraints so the design fits real operations. With that input, custom product inserts for shipping are much easier to quote, test, and approve before production.

