A wine bag can look right in artwork and still fail in use if the base is too narrow, the gusset is shallow, or the handle reinforcement is too light for the bottle. For wholesale buyers, the real value of a Custom Wine Paper Bags material and sizing guide is that it ties structure, print, Cost, and Lead Time together before the order is locked.
The bag has to hold a 750 mL bottle, present well at retail, and arrive usable after packing and shipping. That means the buyer has to think about paper stock, paper weight, finished dimensions, handle style, and the finish that fits the brand without creating unnecessary cost or handling problems.
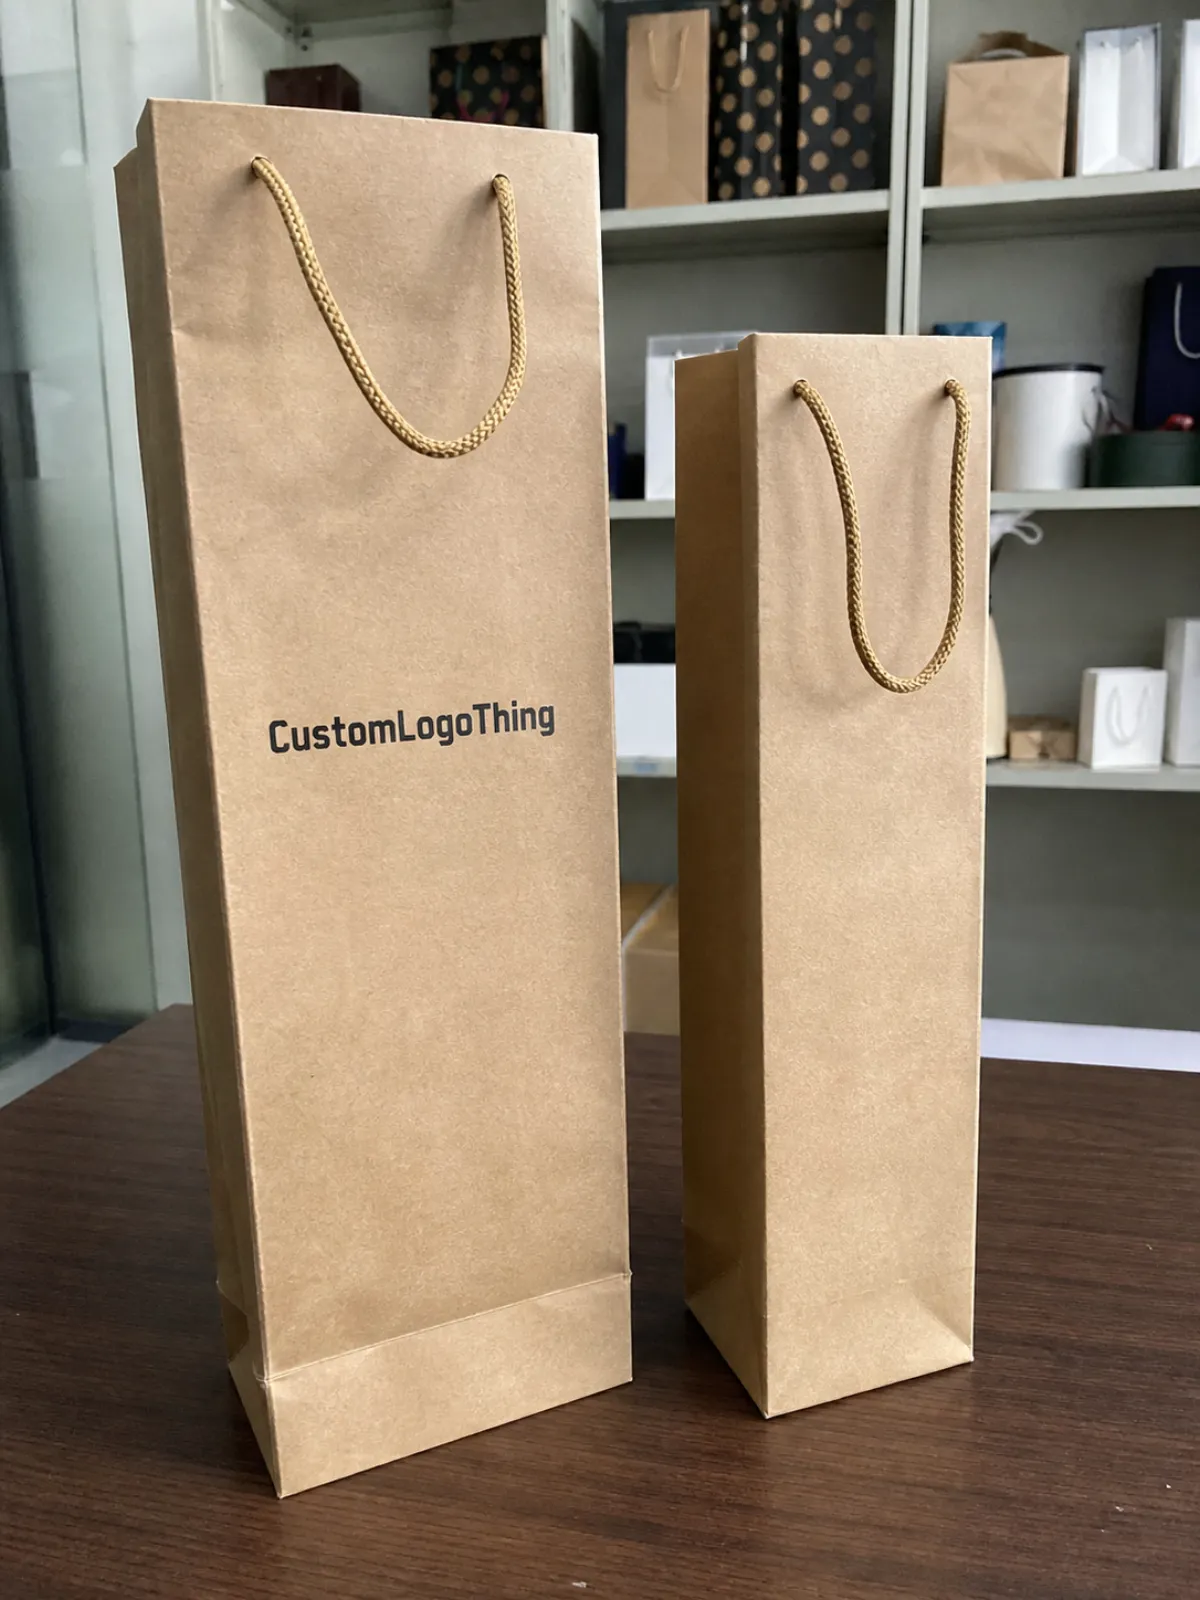
A wine bag should be judged with the bottle in hand, not by artwork alone.
For programs that also use cartons or gift packaging, the bag should sit naturally beside the rest of the line. Kraft, coated, and laminated constructions can all work, but they behave differently in print, in transit, and in the customer’s hand.
Custom wine paper bags material and sizing basics
The common failure points are easy to spot once you know where to look: a bag that matches the bottle height but pinches at the shoulder, bows at the base, or pulls at the handles when lifted. Any buyer spec should start with those issues, because they reveal more than a simple volume callout ever will.
Most wine bag decisions come down to four variables: paper stock, paper weight, finished dimensions, and structural details. Stock is usually kraft paper, coated paper, or a heavier board-style build. Weight is often listed in gsm or paper weight. Finished dimensions cover width, gusset, and height. Structural details include handle style, top reinforcement, bottom patching, and whether the bag is built for a single bottle or a wider gift format.
A wine bag is not the same as a generic gift bag. Wine bottles are dense, top-heavy, and shaped with a shoulder, neck, and closure that often sit higher than a standard bottle top. Sparkling wine is heavier, Burgundy bottles have broader shoulders, and magnums need more interior width plus a stronger base. A bag that works for a candle or small retail item may look similar, but it will not always support a bottle cleanly.
Fit should come before artwork. Strong package branding depends on the right structure first; otherwise the print only highlights a bag that sags or scuffs. For teams comparing the bottle bag with other branded pieces, the same planning discipline applies across Custom Packaging Products.
Choosing paper stock that supports bottles and branding
Material choice affects appearance, print quality, scuff resistance, and carry strength. The most common options are kraft paper, coated paper, and board-style stock. A buyer should compare all three because the brand story and the handling environment usually point in different directions.
Kraft paper gives the most natural look. It suits earthy, minimal, or farm-to-table branding and works well with one- or two-color graphics. Brown kraft hides minor handling marks better than white paper, while white kraft gives a cleaner canvas with some of the tactile feel buyers expect from paper retail packaging.
Coated paper sharpens print detail. It is the better choice for photographic labels, seasonal illustration, foil accents, or color-critical branding. It can feel more refined, but it may show scuffs more clearly unless it receives a protective finish.
Board-style stock sits at the premium end of the range. It feels more rigid, holds shape well, and often pairs with lamination or reinforced tops. That makes it useful for gifting, luxury retail, and event takeaway where the bag is part of the presentation, not only a carrier.
Finish matters too. Matte lamination softens the look and helps hide fingerprints. Gloss can deepen color but may show rub marks sooner. Soft-touch creates a refined hand feel, though it costs more and needs scuff testing. Uncoated surfaces feel natural, but they are less forgiving if the buyer expects rich color density.
If sustainability claims are part of the brief, ask whether the paper is FSC-certified and whether the supplier can document the chain of custody. The FSC program at fsc.org is a useful reference point for buyers who need defensible sourcing claims in branded packaging programs.
| Material option | Best for | Print and finish behavior | Strength notes | Typical wholesale impact at 5,000 pcs |
|---|---|---|---|---|
| Kraft paper, 200-230 gsm | Natural branding, restrained graphics | Good for spot color and clean layouts | Solid for standard wine bottles if the base is reinforced | About $0.18-$0.28 per unit |
| Coated art paper, 210-250 gsm | Sharper artwork, retail displays | Best for clean color, foil, and detailed logos | Needs scuff protection if bags are handled often | About $0.22-$0.36 per unit |
| Board-style stock, 250-300 gsm | Luxury gifting, higher perceived value | Pairs well with matte, gloss, or soft-touch lamination | Excellent rigidity and better shape retention | About $0.30-$0.55 per unit |
| Specialty finish with reinforcement | Launches, event programs, high-touch retail | Supports foil, embossing, or multi-step decoration | Best carry confidence, highest production cost | About $0.40-$0.75 per unit |
A buyer comparing these options should also think about the packaging family around the bag. If the winery or retailer already uses custom printed boxes in a premium style, the bag should match that tone without copying it exactly. That keeps package branding consistent across the line.
One more practical point: the bag is only one part of the shipment. If the bags are packed into master cartons, the outer case usually depends on corrugated cardboard for protection against corner crush, moisture, and stacking pressure.
Sizing wine bags for standard bottles, magnums, and sets
The sizing side starts with three numbers: width, gusset, and height. Width controls side-to-side room. Gusset depth controls front-to-back room and affects stability at the base. Height must clear the bottle plus the neck and closure, with enough opening clearance that the bottle slides in without scraping the top edge.
For a standard 750 mL bottle, many buyers start around 4.25 to 5 inches wide, 3 to 4 inches deep, and 13 to 15 inches tall, but the exact fit depends on the bottle profile. A tall Bordeaux bottle behaves differently from a broader Burgundy shape. Sparkling bottles may need more depth and more handle strength because they weigh more and often have a thicker glass base.
Magnums need a different approach. They are not simply taller standard bottles. They are wider, heavier, and less forgiving when the bag twists during lifting. In many cases, the safest move is to widen the gusset first before adding height, because a wider gusset improves base stability and makes loading easier at checkout or on a packing line.
Sets follow the same logic. A two-bottle presentation, a bottle plus tumbler set, or a bottle with tissue, insert, or neck tag changes the internal volume. Add-ons do not just change appearance; they change usable space. If the customer has to fight the bag to close it, the experience drops immediately.
Measure the actual bottle, not the label area. Check full height, widest diameter, and closure height, then confirm whether the bag needs room for a foil capsule, wax top, or decorative closure. Those details often decide whether a finished bag feels tailored or slightly off.
If one format has to cover multiple bottle styles, test the largest item first. If the magnum or sparkling bottle fits cleanly, the smaller bottle can usually be stabilized with tissue or a simple insert. If the bag is sized only for the smallest product, the larger one may never fit comfortably.
The sizing choice affects cost as well. A taller bag with a narrow base can be cheaper to print but awkward to load. A wider gusset uses more paper, yet it often reduces handling complaints and replacement waste on the sales floor.
Cost, pricing, MOQ, and quote drivers
Price changes quickly when the spec changes. The main drivers are paper weight, handle type, print coverage, number of colors, coating, lamination, and reinforcement upgrades. Custom dimensions matter too, because special cuts and nonstandard dies add setup work.
MOQ is a major factor in unit cost. Smaller runs usually carry a higher per-bag price because setup costs, plates, cutting, and gluing preparation are spread across fewer pieces. A 1,000-piece order can cost noticeably more per unit than a 5,000-piece order, even if the artwork is simple.
The cheapest quote is not always the best value. A thin bag that tears at the handle, scuffs quickly, or looks underwhelming at shelf level can cost more through reorders, spoilage, or customer disappointment. For visible retail packaging, the stronger bag often saves money over time.
When comparing estimates, ask whether the price includes artwork prep, digital or physical proofs, shipping cartons, and overage allowances. Those items can change the real landed cost. If the supplier separates them, compare like with like so one quote does not look lower only because important steps were left out.
For broader packaging programs, it helps to keep the bag spec aligned with the rest of the line, whether that includes tissue, cartons, or custom packaging products. That keeps the color target, material feel, and unboxing experience consistent across product packaging pieces.
If you want a performance benchmark for transit, the ISTA resource center is a practical reference for why packaging that survives shelf handling may still fail under vibration, compression, or drop stress.
- Lower cost: simple kraft, one-color print, standard handles, no lamination.
- Middle range: coated stock, 2-4 colors, reinforced top, standard premium finish.
- Higher cost: board-style stock, foil, embossing, soft-touch, custom structure.
Production steps, timeline, and proofing checkpoints
Production timing follows the spec. Simple runs with standard stock and standard handles move faster than custom die-cut bags with lamination, foil, or reinforced construction.
The usual workflow starts with dieline approval, then artwork placement, then proofing. After that comes printing, cutting, folding, gluing, handle attachment, and final packing. If the bag needs a sample or pre-production approval, add time for that step as well. A paper proof can catch layout problems, but it will not always show the real color, surface feel, or handling behavior. A physical sample costs more time, but it can prevent expensive mistakes on a launch order.
For most standard jobs, lead time often sits around 12-15 business days after proof approval, but that can stretch if the stock is unusual, the finish is specialty, or the artwork changes late. Seasonal orders are the danger zone, so build in buffer time for revisions and freight.
Shipping also matters. Even a well-made bag can arrive damaged if the outer cartons are packed too loosely or the cartons themselves are weak. That is where corrugated cardboard, carton fill, and proper pallet stacking become part of the buying decision.
The fastest way to avoid trouble is to freeze the critical details early: bottle dimensions, handle style, exact printed area, finish choice, and carton count. Late artwork changes are usually the biggest reason a project slips because they can trigger a new proof, a new cutting layout, or a fresh approval cycle.
If the buyer wants a clean paper trail, ask for a measured sample, a signed dieline, and a clear approval checkpoint before the job enters mass production. That is the simplest way to reduce surprises and keep the order aligned with the sales calendar.
Common mistakes, expert checks, and buyer next steps
The most common sizing mistake is also the easiest to make: buyers measure only the bottle body and forget the shoulder, neck, or closure height. The next mistake is choosing a gusset that looks fine on paper but leaves the bottle too tight in the bag. The third is ignoring inserts and tissue, which quietly consume internal space and can make a tight design feel impossible during packing.
Another trap is judging the bag by print sample alone. A beautiful mockup can hide a weak handle attachment or a base that wants to fold under load. The real test is simple: does the bottle load and remove smoothly without scraping the label, bending the closure, or stressing the handle joint?
Before requesting a final quote, prepare a measurement sheet with the bottle dimensions, target use case, desired finish, handle style, print coverage, and shipping method. That one document saves back-and-forth and helps the supplier recommend the right stock instead of guessing.
Ask for a dieline or sample before lock-in, especially if the order is tied to a launch or promotional calendar. Small changes in gusset depth or height can have a bigger impact on usability than many buyers expect. A good supplier will welcome those checks because they reduce risk for both sides.
For larger branded packaging systems, keep the bag aligned with the rest of the line, whether that includes tissue, cartons, or custom printed boxes. That continuity is what makes package branding feel intentional instead of assembled at the last minute.
The practical takeaway is simple: the best custom wine Paper Bags Material and Sizing guide is the one that matches the bottle, the brand, and the timeline. If those three pieces are aligned, the rest of the order becomes much easier to price, approve, and deliver.
Frequently Asked Questions
What paper weight is best for custom wine paper bags?
A heavier stock is usually better for single wine bottles because it resists bowing at the base and feels more substantial in hand. For standard retail use, choose a weight that supports the bottle without making the bag too stiff or bulky to fold and store. If the bag will carry sparkling wine or larger glass bottles, ask for reinforcement at the handles and base.
How do I size a custom wine paper bag for a 750 mL bottle?
Measure the full bottle height, widest diameter, and neck or closure height rather than relying only on label dimensions. Leave enough clearance for easy insertion and removal so the bottle does not scrape the paper or catch on the top edge. A bottle with a wide shoulder or tall closure often needs a different finished size than a narrow Bordeaux-style bottle.
What affects pricing for custom wine paper bags the most?
Paper type, print coverage, handle style, finishes, and custom dimensions usually have the biggest effect on unit price. MOQ matters because setup and tooling costs are spread across the run, so smaller orders often cost more per bag. Foil, embossing, lamination, and inserts can raise cost quickly, so ask for an itemized quote.
How long does custom wine paper bag production usually take?
Timeline depends on stock availability, proof approval speed, print complexity, and whether special finishes are included. Simple runs move faster than custom sizes with multiple colors or premium coatings, so plan extra time for those details. If the bags are tied to a launch, event, or holiday season, build in buffer time for samples, revisions, and freight.
Can one bag size work for wine, champagne, and magnum bottles?
Sometimes one wider format can cover several bottle styles, but it must be checked against the tallest and widest product in the group. Champagne and magnum bottles often need more gusset space and stronger handles than a standard wine bottle. If you want one size for multiple bottles, test the largest format first and confirm the smaller bottles still sit securely.

