Custom Wine Paper Bags Sample Approval Checklist: What You’re Really Approving
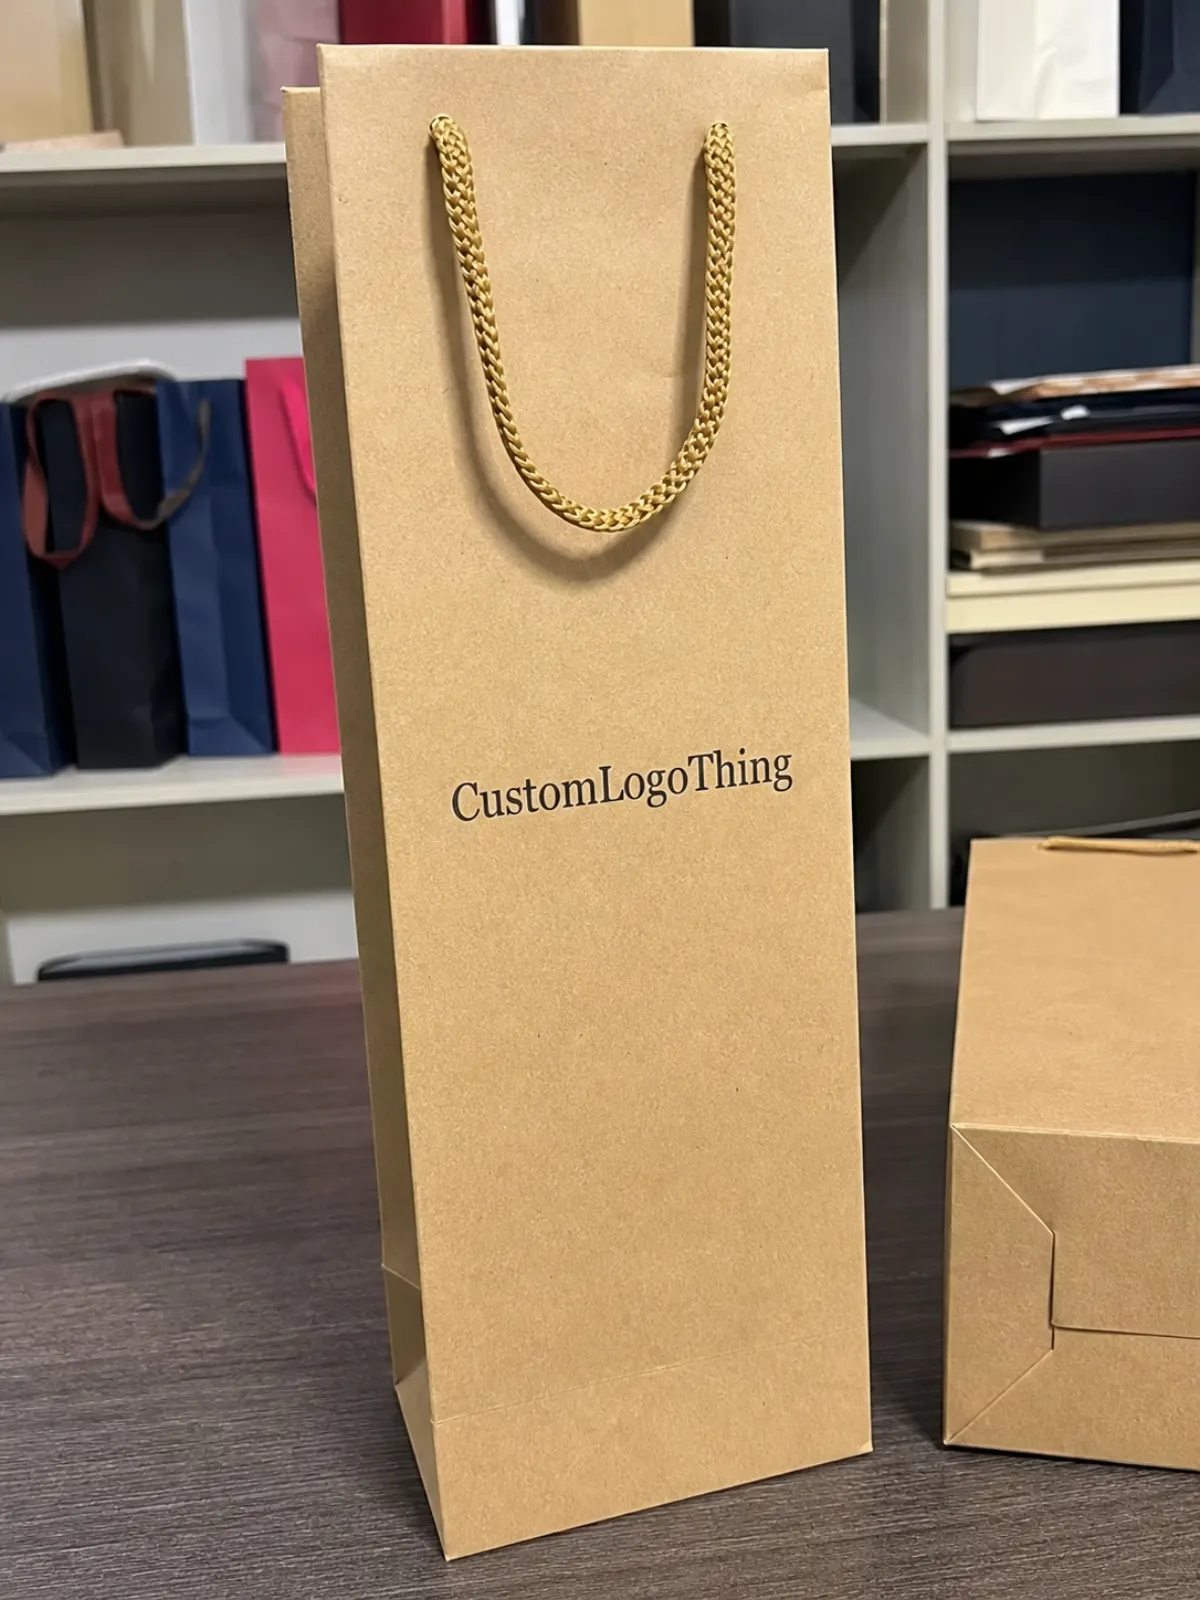
A wine bag can look expensive in a photo and still fail the second a 750ml bottle slides in. The handle can bite into the paper. The base can buckle. The foil logo can sit 3mm too low and make the whole thing feel oddly cheap. Good-looking samples are not automatically production-ready samples.
A Custom Wine Paper Bags sample approval checklist gives buyers one last practical checkpoint before bulk production starts. After approval, the order turns into paper stock allocation, print setup, foil dies, cartons, invoices, freight bookings, and delivery dates. That is not the time to discover the logo is crooked or the bag cannot hold the bottle it was designed to carry.
Sample approval is not only a decoration review. You are confirming that the physical bag matches the quote, artwork proof, dieline, paper stock, handle specification, finish, and intended retail use. If the approved quote says 250gsm white kraft with black rope handles and gold foil stamping, the sample needs to reflect that specification closely enough to judge the real product.
Wine bags need stricter review than basic shopping bags because bottles are heavy, rigid, breakable, and often given as gifts. A lightweight boutique bag may survive a scarf or candle. Glass is less forgiving. For single-bottle wine bags, many buyers use 180gsm to 250gsm kraft or art paper, with heavier stock, lamination, cardboard inserts, or reinforced tops for premium retail packaging.
A pre-production sample can prove shape, size, color direction, handle feel, finish effect, and assembly quality. It cannot always predict mass-production color perfectly unless the same paper, ink, press method, and finish are used. Digital sample printing and offset bulk production are related, but they are not identical. If exact brand color is critical, ask how the factory will control color during production and whether a press proof or color standard can be used.
Buyers comparing wine bags with other branded options can also review broader styles through Custom Packaging Products. Seeing the wine bag as part of a wider packaging system often helps confirm whether the paper texture, handle style, and finish feel consistent with gift boxes, mailer boxes, bottle carriers, or retail shopping bags.
Approval is not about being picky for sport. It is about avoiding reprints, missed launch dates, freight problems, and the frustrating moment when 5,000 bags arrive with a flaw that looked harmless on screen.
How the Wine Bag Sample Approval Process Works
The process starts with clear buyer inputs: bag size, bottle type, logo files, artwork placement, material preference, handle style, order quantity, finish requests, and delivery deadline. Common finish requests include foil stamping, embossing, debossing, matte lamination, gloss lamination, aqueous coating, spot UV, and textured paper. If the bag belongs to a larger branded packaging program, say that early. A wine bag should not feel unrelated to the label, carton, sleeve, or gift box sitting beside it.
Before a physical sample is made, you should receive a digital proof. This proof confirms layout, print area, fold lines, bleed, logo scale, barcode placement if needed, and handle position. Obvious artwork mistakes should be corrected here. They should not be discovered after someone spends several days making a sample.
Not all samples prove the same thing:
- Existing stock sample: Good for checking paper feel, handle style, and general construction, but not your exact artwork or size.
- Blank custom-size sample: Useful for bottle fit and structural review before print costs are added.
- Digital printed sample: Helpful for artwork placement and color direction, though bulk color may shift with offset or flexographic production.
- Production-grade sample: Best for final approval because it uses the intended material, print method, finish, and construction.
Ask which sample type you are getting. A mockup made on different paper with a different process can still be useful, but it is not a true pre-production sample. If you are ordering 10,000 premium bags for a gifting program, “close enough” may not be enough for final approval.
The manufacturer should check technical feasibility, material behavior, folding accuracy, print registration, handle installation, glue strength, and production consistency. The buyer confirms brand accuracy, bottle fit, retail expectations, internal approval, and whether the bag feels right for the bottle price point. For higher-value campaigns, it is common to review one blank structural sample first and then one decorated sample before bulk production.
Written approval matters. If you approve the sample and then change the logo size after production starts, that is usually a change order, not a casual adjustment. The safest approval record includes the approved sample date, version number, artwork file name, material specification, handle specification, and any approved tolerances or exceptions.
Key Specs to Check Before Approval
Start with dimensions: width, gusset, height, and usable internal height. Do not only check the outside measurement. A bag that measures correctly on paper may still grip the bottle too tightly if the gusset folds inward or the reinforced top reduces usable space. Test the exact bottle format: standard 750ml Bordeaux, taller Riesling, wider Burgundy, Champagne-style bottles, or boxed wine inserts if relevant.
Then check weight capacity. A filled 750ml bottle usually weighs about 2.6 to 3.3 pounds depending on glass weight and closure. A heavier sparkling wine bottle may weigh more. That does not sound dramatic until a weak handle starts tearing at a tasting counter. Pretty paper that fails under normal use is not premium packaging. It is branded waste.
Paper stock changes the whole result. Kraft paper feels natural and sturdy. White art paper prints cleanly. Coated paper gives sharper color. Textured paper feels more upscale but can soften fine print detail. Lamination improves scuff resistance but may affect recyclability, depending on the film and local waste stream. A quoted 210gsm kraft bag will not feel like a 300gsm C1S art paper bag with soft-touch lamination. Make sure the sample matches the quoted GSM and surface finish.
Handles deserve real testing during review. Rope handles, ribbon handles, die-cut handles, twisted paper handles, and cotton handles all affect cost, strength, comfort, and brand feel. Tug the handle. Carry the filled bag. Inspect the holes, knots, reinforcement patches, glue points, and top fold. A handle that looks graceful while empty can become a problem with glass and liquid inside.
Bottom construction gets under-checked constantly. Wine bottles concentrate weight at the base, so review the bottom fold, glue coverage, creasing, and optional cardboard insert. A base insert may add a small unit cost, often in the range of a few cents depending on size and material, but it can be the difference between a stable retail bag and one that sags under bottle weight.
For a one-bottle bag, common dimensions often fall near 4 to 5 inches wide, 3.5 to 4.5 inches deep, and 13 to 15 inches high, but the correct size depends on the bottle. A two-bottle wine paper bag needs a wider structure, a stronger base, and usually a divider or reinforced bottom. Never approve by “standard wine bottle” alone if your bottle has a tall punt, heavy glass, unusually wide shoulders, or a decorative closure.
| Spec Area | What to Check | Typical Range or Practical Target |
|---|---|---|
| Paper stock | GSM, stiffness, surface, scuff resistance | 180gsm-250gsm for many single-bottle bags; higher for premium laminated styles |
| Handle | Pull strength, attachment, comfort, color match | Rope, ribbon, or cotton for premium feel; twisted paper for many retail uses |
| Bag size | Bottle fit, internal height, gusset opening, top clearance | Depends on bottle shape; allow practical clearance for easy insertion and removal |
| Bottom support | Glue, fold accuracy, base insert, standing stability | Insert recommended for heavier bottles, two-bottle bags, or premium gifting |
| Top fold | Reinforcement, crease quality, handle hole position | Should resist tearing when carried with a filled bottle |
Print, Finish, and Brand Detail Checks
Print and finish checks should include logo position, color accuracy, edge sharpness, foil coverage, emboss depth, lamination bubbles, scuffing, ink rub, and alignment across panels. The front panel gets the attention, but side gussets often reveal sloppy production. Check the back panel too, especially if it carries compliance copy, QR codes, recycling marks, care instructions, or retail messaging.
For brand color, define expectations before approval. A visual match under office lighting is useful, but not always enough. Paper color, paper absorbency, coating, varnish, and lamination can all shift the final appearance. Kraft paper usually mutes color. White coated paper usually keeps color cleaner. Soft-touch lamination can make dark colors look richer but may show fingerprints. Gloss lamination can increase contrast but may feel too shiny for certain natural or heritage wine brands.
If foil stamping is used, inspect the foil under different angles. Look for missing areas, pinholes, ragged edges, over-stamping, and poor registration with printed artwork. Fine serif type, small tasting notes, and delicate line art may not foil cleanly unless the artwork is adjusted. A practical minimum line thickness should be confirmed with the supplier because it depends on foil type, die quality, substrate, and machine setup.
Embossing and debossing should be checked by touch, not just sight. A shallow emboss may disappear on textured paper. A very deep emboss can distort surrounding print or weaken creases if placed too close to fold lines. If the logo sits near the bag edge, handle hole, or gusset fold, ask whether bulk production can hold the same registration. Small variation is common in paper bag production, so important artwork should not sit dangerously close to folds or trim edges.
For artwork files, vector logo files are usually preferred for clean printing, foil, embossing, and cutting. Raster images should be high resolution at final print size. Bleed is commonly required where color runs to the edge, and safe zones help keep text away from folds, glue seams, and handle holes. If a QR code is printed, test it on the sample with several phones and under typical retail lighting.
When comparing packaging options, it can help to review related formats from Custom Packaging Products so the wine bag does not become the only premium-looking item in an otherwise mismatched packaging set. Consistency across bottle bags, shopping bags, gift boxes, and display packaging often matters more than one isolated finish.
Cost, Pricing, and MOQ Factors
Sample approval also protects the budget. Many wine paper bag costs are driven by paper grade, size, handle type, print coverage, finishing, quantity, and packing method. A simple one-color kraft wine bag with twisted paper handles is usually much less expensive than a laminated art paper bag with foil stamping, ribbon handles, embossing, and a reinforced base.
MOQ depends on the production method and material availability. Digital sampling can often be done in very low quantities, but bulk production usually has higher minimums because paper purchasing, printing setup, die-cutting, foil dies, handle preparation, and machine setup all need to be justified. For Custom Wine Paper Bags, common minimums may range from a few hundred pieces for simpler semi-custom work to several thousand pieces for fully custom printed production. The exact number depends on supplier capability and specification.
Do not approve a sample without confirming what is included in the quoted unit price. Ask whether the quote includes artwork setup, plate or die charges, foil die, sample cost, inner packing, export cartons, inspection, freight, duties, or taxes. A low unit price can become less attractive if essential setup items are listed separately later.
Changes after sample approval can affect cost. Increasing paper weight, switching from twisted paper to cotton handles, adding foil, changing bag size, or requesting a base insert may all change material usage and labor. Even a small size change can alter paper yield and carton packing count. For large orders, that can affect freight cost as well as production cost.
Packaging teams should also consider carton packing. Wine bags can be crushed if packed too tightly or scuffed if packed too loosely. Laminated dark bags, foil logos, and soft-touch finishes are especially sensitive to rubbing. Ask how many bags are packed per inner bundle and per export carton. If bags need to arrive presentation-ready for retail stores, protective packing is not a minor detail.
Timeline and Turnaround: When to Request Changes
Timelines vary by complexity, but sample development commonly includes artwork review, dieline confirmation, material preparation, sample production, internal checking, shipping, buyer review, revisions, and final approval. A simple blank structural sample may be faster than a full printed sample with foil stamping or embossing. International shipping can also add several days, sometimes longer during peak seasons.
For many custom paper bag projects, a practical sample stage may take one to three weeks depending on the finish, workload, and communication speed. Bulk production can often take several additional weeks after approval, especially if paper must be ordered, foil dies must be made, or the order is produced during a busy gifting season. These are typical ranges, not guarantees.
Request changes when the sample fails function, brand, or specification. A slightly different shade may be acceptable if the color tolerance was discussed and the bag still fits the brand. A tearing handle, wrong size, incorrect logo position, missing finish, weak base, or unreadable QR code should not be ignored. If the sample reveals a structural issue, solve it before mass production.
When requesting revisions, be specific. “Make it more premium” is not a production instruction. Better comments include “increase paper from 210gsm to 250gsm,” “move logo 8mm upward,” “change handle from twisted paper to black rope,” “add a bottom insert,” or “reduce foil area to avoid cracking near the crease.” Specific feedback saves time and reduces the chance of a second weak sample.
Keep approved samples safe. The final signed sample should be retained as the physical standard for production and inspection. If possible, both buyer and manufacturer should keep matched approval samples. This helps resolve later questions about color, finish, handle type, and construction.
Step-by-Step Sample Review for Wine Paper Bags
Use the following checklist before giving written approval. The goal is to review the bag like a customer, a retail associate, a logistics coordinator, and a quality inspector at the same time.
- Confirm the paperwork: Match the sample to the quote, purchase order, artwork proof, dieline, material specification, finish list, and approved quantity.
- Measure the bag: Check width, height, gusset, top fold, handle drop, and usable internal space with a ruler or caliper.
- Test the exact bottle: Insert and remove the real bottle type. Check clearance, standing stability, and whether the top edge rubs the closure or neck label.
- Load test the handle: Carry the filled bag for several minutes. Gently tug upward and outward. Inspect holes, knots, patches, and paper tearing.
- Inspect the base: Place the filled bag on a flat surface. Check sagging, tilting, glue separation, and whether an insert is needed.
- Review print quality: Check color, logo position, registration, sharpness, ink rub, scuffs, and print alignment across front, back, and gussets.
- Review finishing: Inspect foil, embossing, lamination, spot UV, varnish, and any specialty texture under normal and angled light.
- Check retail handling: Hold it by the handle, hand it to another person, place it on a counter, and slide it into a shipping carton if that is part of the workflow.
- Document defects: Take clear photos with notes, measurements, and version references. Avoid vague comments that cannot be produced against.
- Approve in writing: Confirm the final sample version, any accepted tolerances, and whether production should match the sample exactly or with listed corrections.
If more than one department must approve the bag, collect comments before sending feedback to the supplier. Mixed instructions from marketing, procurement, sales, and operations can create delays. One consolidated approval note is much easier to produce from than several separate opinion threads.
Common Approval Mistakes That Cause Bad Bulk Orders
The first mistake is approving from photos only. Photos can hide paper stiffness, handle comfort, print texture, foil flaws, glue strength, and scale. If the order is small and low risk, photo approval may be acceptable in some cases. For premium wine packaging or larger orders, a physical sample is usually worth the time.
The second mistake is testing an empty bag. Wine bags are designed to carry bottles, not air. Always test with the actual bottle or a close weight match. If the bag is meant for two bottles, test with two bottles. If a store associate will carry several at once, consider how the handle feels under realistic handling.
The third mistake is ignoring tolerances. Paper bag production involves cutting, folding, gluing, printing, and manual or semi-automatic finishing steps. Small variation is common. The key is to define what matters. A tiny fold variation may be acceptable. A logo drifting into the gusset, a handle tearing, or a base opening under weight is not.
The fourth mistake is changing materials without re-sampling. Switching paper stock, lamination, handle type, or finish can change structure and appearance. A bag approved in 250gsm coated paper may behave differently in uncoated kraft. A foil mark that looks sharp on smooth stock may look broken on textured stock.
The fifth mistake is treating sustainability claims casually. If the bag is described as recyclable, compostable, plastic-free, FSC-certified, or made with recycled content, ask what documentation supports that claim. Lamination, foil, heavy ink coverage, rope handles, and mixed-material components can affect end-of-life options. Claims should be accurate, cautious, and suitable for the market where the bag is used.
Before You Greenlight Production
Before you greenlight production, make sure the sample approval answers three questions: Does the bag protect and carry the bottle? Does it represent the brand properly? Does it match the agreed production specification? If any answer is uncertain, pause and correct the issue before bulk manufacturing begins.
A strong approval note should include the sample version, approved artwork file, bag dimensions, paper GSM, paper type, handle type, finish, packing requirements, order quantity, and delivery expectations. If the sample is approved with corrections, list those corrections clearly. For example, “Approved for production if logo is moved 5mm upward and bottom insert is added” is much safer than “Approved, but please improve.”
Custom Wine Paper Bags are small compared with the bottle, label, and retail display, but they strongly affect customer perception. A sturdy, well-proportioned bag makes the purchase feel giftable and considered. A weak or poorly printed bag makes even a good bottle feel less cared for. The approval checklist is your chance to catch that difference before it becomes inventory.
For broader planning, review available formats and finishing options through Custom Packaging Products before locking the final wine bag specification. The best result usually comes from matching structure, material, decoration, cost, and timeline instead of approving the first sample that looks acceptable in a photo.
FAQ
What should be included in a custom wine paper bags sample approval checklist?
The checklist should include bag dimensions, bottle fit, paper GSM, surface finish, handle strength, base construction, print accuracy, foil or embossing quality, lamination quality, glue strength, packing method, and written confirmation that the sample matches the approved quote and artwork.
How strong should a wine paper bag be?
It should comfortably carry the intended filled bottle under normal retail handling. A standard filled 750ml bottle often weighs about 2.6 to 3.3 pounds, while heavier glass bottles can weigh more. The handle, top fold, and base should be tested with the actual bottle whenever possible.
Is a digital printed sample enough for final approval?
It depends on the order risk. A digital printed sample can be useful for layout and general color direction, but it may not match offset, flexographic, foil, or laminated bulk production exactly. For premium or high-volume orders, a production-grade sample is usually safer.
What paper weight is common for custom wine paper bags?
Many single-bottle wine paper bags use about 180gsm to 250gsm paper, depending on size, paper type, handle style, and finish. Premium laminated bags, two-bottle bags, or bags for heavier bottles may require heavier stock, reinforcement, or a base insert.
When should I reject a wine bag sample?
Reject or revise the sample if the bottle does not fit properly, the handle tears, the base sags, the logo is misplaced, the color is outside agreed tolerance, the finish is defective, the QR code does not scan, or the sample does not match the approved specification.
