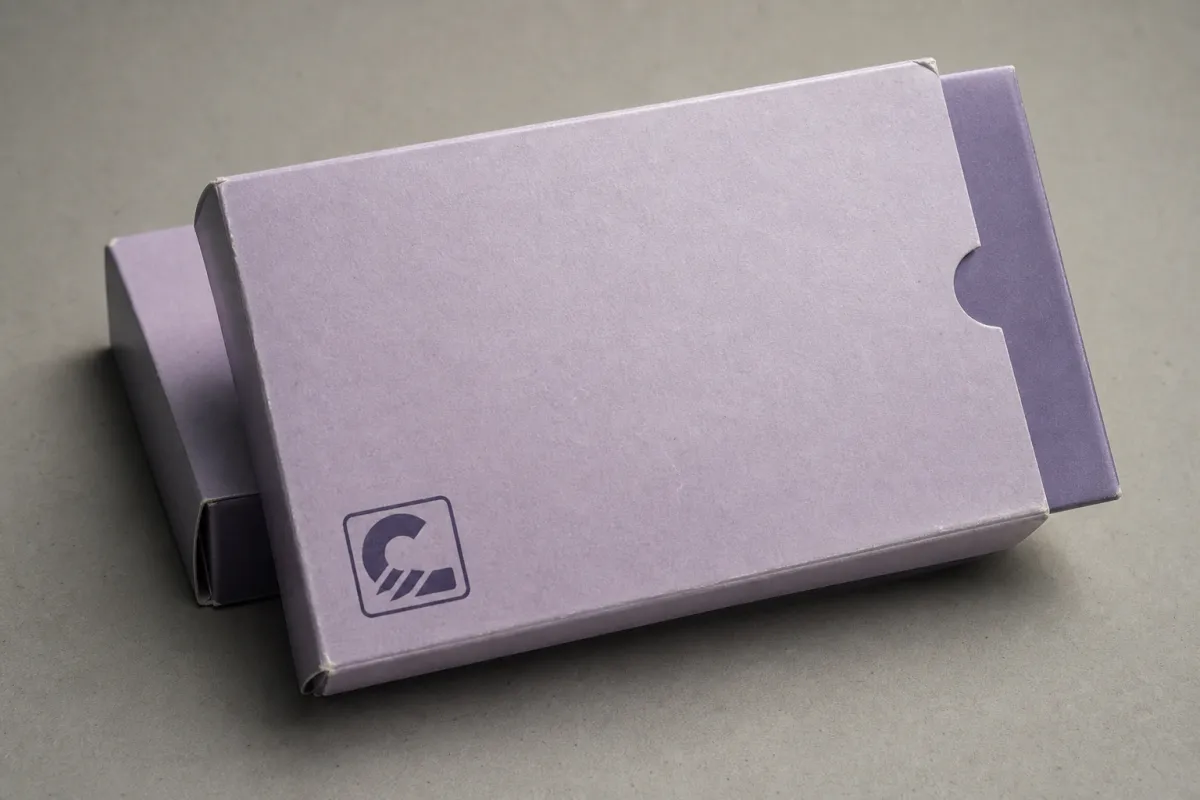
Event merch Box Sleeves Material guide decisions tend to get made quickly, and that speed is where brands either spend too much or save in the wrong place. The sleeve is usually the first surface someone touches, so the stock, coating, and fold behavior shape the impression before the box opens. A thin sleeve can wrinkle, bow, or scuff after only a few handoffs; the right one can make a simple carton feel collectible, sponsor-ready, and far more expensive than it was to produce.
From a packaging buyer's perspective, the job is straightforward but unforgiving. An event merch Box Sleeves Material guide needs to explain how the sleeve protects the front panel, carries branding, stays flat under pressure, and keeps its look under bright venue lights, warm hands, and rushed setup. That test is harder than normal retail shelf life. Event merch gets passed around, dropped into tote bags, and stored on back tables where nobody is handling it gently. And if the event is busy, which it usually is, the sleeve has to keep its composure while everybody else is moving fast.
This event merch box sleeves material guide compares feel, printability, durability, Cost, and Production limits instead of pretending every paper stock behaves the same way. That distinction matters. A sleeve is not just a printed wrap; it is a pressure point between design intent and real-world handling. Get that balance right, and the package feels deliberate. Miss it, and the brand drops a level the moment somebody lifts the box.
Event Merch Box Sleeves Material Guide: What the Sleeve Actually Has to Survive
The first thing to understand in this event merch box sleeves material guide is that event packaging lives a rougher life than many teams expect. A sleeve may only travel a few hundred feet from production to venue, yet it gets handled again and again along the way. It might be inserted, removed, reseated, stacked, restacked, photographed, and then handed off one more time because somebody wants a cleaner shot. That mix creates abrasion, corner stress, and panel flex that exposes weak stock quickly.
The sleeve has four practical jobs. It needs to protect the box face, support branding, stay flat under pressure, and survive a customer or staff member grabbing it by the corner instead of the edge. Once those jobs are clear, material selection gets much easier. A beautiful design printed on the wrong stock is still a weak sleeve. A modest design on the right stock can feel premium because the sleeve holds its shape and finishes cleanly.
Event merch is tougher than standard mailer programs because the item is rarely protected for long. There is temporary storage, occasional humidity, quick transport, and plenty of human contact. I have seen sleeves that looked fine in proofs show handling marks after a single packing round. I have also seen ordinary paperboard become surprisingly convincing once paired with the right coating and clean scoring. That contrast is exactly why an event merch box sleeves material guide should focus on behavior, not only appearance.
Think about the difference between a sleeve used for a VIP kit and one used for a general admission giveaway. The VIP version may need to look perfect for only a few minutes on a table, but it still has to survive photography, transport, and a staff member moving it from storage to stage. The giveaway version may be handled more often and shoved into bags. Those use cases call for different thicknesses, coatings, and fiber choices.
Three failure modes show up again and again. First, a flimsy sleeve wrinkles and reads cheap. Second, a stock that is too stiff cracks at the score lines. Third, a surface with the wrong finish picks up fingerprints or scuffs too easily. Each problem is avoidable if the team treats the sleeve as a performance item, not a decorative afterthought. That is the central lesson of this event merch box sleeves material guide.
One packaging buyer’s rule of thumb helps here: if the sleeve needs to survive being touched five or more times before the unboxing moment, it deserves more scrutiny than a simple print proof. That does not mean overbuilding it. It means matching the board to the event reality. A good sleeve can make an ordinary box feel sponsor-worthy, but only if the stock can hold up to the job. Otherwise the finish starts doing all the work, and finish can only cover so much.
How Event Merch Box Sleeve Materials Change the Look and Feel
Material choice changes more than durability. It changes visual temperature, fold memory, and the way the brand reads from three feet away. In an event merch box sleeves material guide, coatings and fiber content matter as much as print artwork. A smooth, coated surface usually gives tighter ink laydown and cleaner edges on logos. A textured or uncoated surface can soften the image and make the piece feel more natural or handmade.
Coated board is usually the safest option when the design includes photography, gradients, or small type. It gives printers a more predictable surface, which normally means richer color and better sharpness. Uncoated stock and kraft paper push the branding in a different direction. They can signal sustainability, warmth, and restraint, while also muting bright colors and shifting brand tones. That is not a flaw. It is a tradeoff that should be chosen on purpose.
The tactile side matters too. A sleeve with a matte or soft-touch finish often feels more controlled and premium in the hand, but that finish can show handling wear differently than a gloss or aqueous coating. Gloss reflects more light and can make a saturated design pop, though it can also reveal scratches faster if the event is rough. Soft-touch has a pleasant, almost velvet-like feel, yet it is not always the best answer for high-contact programs. The right finish depends on how often the piece will be touched, packed, and displayed.
There is also a structural balance between stiffness and flexibility. Too rigid, and the sleeve can crack at the scores. Too soft, and it may bow, telescope, or pick up dents from adjacent items in transit. Good scoring and proper caliper selection make a real difference. The paper needs enough memory to stay flat, but not so much rigidity that the fold line turns into a fracture line.
From a buyer's perspective, the decision framework helps. If the package is for a VIP kit, use a smoother board that supports crisp print and a refined finish. If the package is a sustainability-led giveaway, a kraft paper look or an FSC certified stock may fit the story better. If the box will be mailed in volume, prioritize abrasion resistance and fold integrity over decorative texture. An event merch box sleeves material guide should always connect aesthetics to handling conditions instead of treating them as separate conversations.
Here is a useful way to think about it:
- Premium launch kits: smooth SBS or C1S paperboard, matte or soft-touch finish, minimal cracking at scores.
- Influencer mailers: strong print consistency, moderate stiffness, coatings that resist fingerprints and scuffing.
- Sponsor packs: surface area for logos, enough rigidity to feel substantial, easy-to-read graphics.
- Eco-positioned events: kraft or recycled board, visible texture, honest sustainability messaging.
If technical benchmarks help your team, packaging groups often compare board performance with standards such as ISTA for transport testing and ASTM methods for paper and board properties. Those standards do not dictate the design, but they do help teams ask better questions about compression, abrasion, and shipping stress. That kind of discipline belongs in any strong event merch box sleeves material guide.
Choosing Between Paperboard, Kraft, and Specialty Stocks
Most sleeve programs begin with three material families: SBS or C1S paperboard, kraft paper, and specialty stocks. Each one solves a different problem. SBS and similar paperboards are usually the cleanest choice for premium print and exact color control. Kraft offers a more natural, earthy look. Specialty boards add texture, fiber effects, or a more elevated feel, but they can be trickier to print and more expensive to source.
For an event merch box sleeves material guide, the question is not which stock is best in the abstract. It is which stock supports the message and the handling conditions. If the design is highly visual, with product photography and strong brand colors, smooth paperboard usually wins because it holds ink more consistently. If the message is “responsible, tactile, low-gloss, and honest,” kraft can become the better storytelling tool, especially when paired with restrained print coverage.
Recycled content deserves a careful look as well. Many teams ask for recycled materials, post-consumer waste content, or biodegradable packaging language without checking what the coating and finish actually allow. A sleeve can include recycled fiber and still be finished in a way that makes recycling more complicated in some local streams. That is why claims should be verified instead of assumed. If the environmental story matters, ask for documentation, not just a sales description. FSC certified options are also worth considering when traceability matters to the brand.
Specialty stocks deserve respect, but they are not automatically superior. A textured board can add depth, yet it may soften fine typography or reduce the sharpness of a metallic logo. In some cases, the texture carries the whole design. In others, it works against the artwork. I have seen simple one-color branding look more sophisticated on a specialty stock than on a smooth board. I have also seen an elaborate design lose clarity because the base sheet was too uneven. That is why swatching matters so much in any event merch box sleeves material guide.
There is a structural side to this choice too. Sleeves have to slide over the box without bunching or tearing. That means thickness, score quality, and dimensional tolerance matter. If the box size varies by even a few millimeters, a sleeve that looked perfect in proof can start to drag or warp in production. Ask for a physical prototype when the box dimensions are tight or when the artwork must align precisely with die-cut windows or tabs. That one step saves a lot of guessing later.
| Material | Best For | Typical Strength | Typical Print Result | Approx. Unit Cost at 5,000 pcs |
|---|---|---|---|---|
| SBS / C1S paperboard | Premium kits, sharp logos, photography | High stiffness, clean folding | Very strong color and detail | $0.22-$0.40 |
| Kraft paperboard | Eco-led events, natural branding | Moderate stiffness, warmer look | Muted colors, earthy tone | $0.18-$0.32 |
| Specialty textured stock | Luxury launches, tactile branding | Good presence, variable fold behavior | Depends on texture depth | $0.28-$0.55 |
Those numbers are directional, not universal. Quantity, finish complexity, and shipping method can move them quickly. Even so, they give a useful anchor for any event merch box sleeves material guide. The gap between a basic kraft sleeve and a specialty printed piece can be meaningful, but the real cost difference often comes from setup, waste, and finishing rather than the board itself.
One more point on sustainability: corrugated cardboard is often used for the base box rather than the sleeve, and that matters because the sleeve must be compatible with the structure underneath. If the box is made from corrugated cardboard, the sleeve should not be so tight that panel bulge or flute memory distorts the fit. A coordinated spec avoids production surprises later. I have seen a good sleeve design become a headache simply because someone measured the inner box rather than the outer box. That kind of miss is easy to prevent, but only if the team is careful at the start.
Event Merch Box Sleeves Material Guide: Cost, Pricing, MOQ, and Unit Cost
Price is where many teams start, but it should be the last thing you judge in an event merch box sleeves material guide. Material grade matters, yes, but so do coating choice, print coverage, sleeve size, cutting method, and any special folding or gluing. A plain white sleeve with one-color print is a different manufacturing job from a full-bleed, soft-touch, foil-stamped piece with tight registration. Treating them as equal is how budgets drift.
The biggest cost drivers are usually easy to identify once you ask the right questions. First, board grade: premium smooth board usually costs more than plain kraft. Second, finish: matte, gloss, aqueous, and soft-touch each affect price differently. Third, print complexity: heavy solids, photographic art, and exact brand colors can require more careful press control. Fourth, quantity: lower volumes almost always increase the unit price because setup costs are spread across fewer sleeves.
This is also where MOQ changes the economics. A low minimum order quantity can help with pilots, but it rarely produces the best unit cost. If a project is approved only for 500 sleeves, the setup burden is significant. At 5,000 or 10,000, that same setup is amortized more efficiently. An event merch box sleeves material guide should help buyers understand that the cheapest-looking quote is not always the best value once prepress, dieline work, and spoilage are included.
Here is a practical budgeting pattern that works well: price the sleeve as part of the full merch presentation, not as an isolated line item. A sleeve can raise the perceived value of the entire kit by making the box feel curated, sponsor-backed, or launch-worthy. If the event is high-stakes, spending an extra ten or fifteen cents on stock and finish can be rational because the sleeve changes the first impression immediately. That may sound small on paper, but across a room full of boxes it adds up fast.
Buyers also underestimate how much specialty requests can move the quote. Metallic inks, spot UV, embossed textures, foil, and strict Pantone matching each add a layer of control. None of these are bad ideas. They just need to be justified by the event goal. If the item is meant to look understated and editorial, a simpler spec may outperform a more decorated one. If the event is built around photos and press coverage, a richer finish can pay off visually.
An event merch box sleeves material guide becomes much more useful when it pushes side-by-side quoting. Ask for two or three volume tiers, such as 1,000, 5,000, and 10,000 units. That exposes where the price breaks sit and how quickly unit cost falls as quantity rises. It also makes it easier to defend the material choice internally because the team can see the relationship between spend, lead time, and appearance.
Typical production ranges for sleeves, excluding unusual finishing, often land around this spread:
- Low volume pilot: about $0.35-$0.75 per sleeve depending on size and print complexity.
- Mid-volume event run: about $0.18-$0.40 per sleeve for common board stocks and standard finish.
- Premium specialty run: about $0.30-$0.60+ per sleeve when texture, foil, or extra finishing is involved.
Those ranges are not promises. They shift with region, paper availability, and the box dimensions. Still, they are far more useful than vague claims of “budget-friendly” or “premium.” A serious event merch box sleeves material guide should give buyers numbers they can actually use in a planning meeting.
Another cost detail matters more than many teams expect: waste. A complicated dieline or a finish that requires careful handling can increase spoilage, which stays hidden in the first quote but shows up in the final invoice. That is one reason experienced buyers ask for an itemized estimate. It is not nitpicking. It is control, and it keeps everybody honest about where the money is going.
Process and Lead Time: From Dieline to Delivery
Lead time is rarely just a print schedule. In an event merch box sleeves material guide, the timeline has to include briefing, dieline setup, artwork prep, proofing, printing, cutting, finishing, packing, and shipping. Any one of those steps can stretch the calendar if the input is incomplete or if the box size changes late. A clean file and a correct dimension sheet are worth more than most people think.
The process usually starts with the box measurements. Give the supplier exact outer dimensions, the target sleeve coverage, and any critical clearances around folds, windows, or locking tabs. Then provide logos, print-ready artwork, Pantone targets if brand color is strict, and finish preferences. If the supplier has to guess about any of that, the project slows down. That is a simple truth, but it saves real time.
The dieline is where many projects gain or lose momentum. Early review helps avoid artwork drift, misaligned text, or content landing too close to a fold. It also helps identify practical problems such as sleeves that are too tight, friction points near the opening edge, or decorative elements that interfere with structural scores. Good dieline work is one of the quiet heroes of an event merch box sleeves material guide.
Then comes proofing. A digital proof can catch layout mistakes, but it will not always reveal how a stock feels in the hand or how a finish changes under real lighting. That is why prototypes or hard-copy samples are so useful. They cost time upfront, but they often prevent expensive reprints or event-day disappointment later. If the sleeve must match a launch date, a day or two spent on sampling can save an entire campaign.
Production timelines also depend on material availability. Specialty stocks can carry longer procurement windows than common paperboard. Coatings or finishing steps can add their own queues. Shipping method matters too. Ground freight, air freight, and direct-to-event delivery each create different schedules. A realistic plan often lands in the 12-15 business day range after proof approval for straightforward jobs, but more complex work can run longer. That is normal, not a red flag.
One more thing: local shipping and distribution can matter as much as print speed. If the event is tied to a hard on-site setup deadline, build in margin. Even a perfect sleeve is useless if it arrives a day late. An event merch box sleeves material guide should therefore treat logistics as part of the product, not as an afterthought.
"The cleanest projects are the ones where the box dimensions, artwork, finish, and delivery date are aligned before production starts. Most avoidable problems happen before press, not on press."
If you are comparing suppliers, ask how they handle prepress checks and whether they flag dimension inconsistencies before the job enters production. Ask if they can provide a sample pack, a prototype, or a press proof. Those questions separate a transactional order from a managed packaging project. That distinction matters when the sleeve is carrying a brand-heavy event package.
Common Material Mistakes That Undercut Event Packaging
The most common mistake in an event merch box sleeves material guide is choosing by price alone. A cheap sleeve can become expensive in the wrong way if it wrinkles, cracks, or prints poorly. I have seen teams save a few cents per unit and lose far more in presentation value. The box may still function, but the brand loses polish the second someone touches it.
Another mistake is ignoring the box underneath. A sleeve is only as good as the base box dimensions. If the box varies from one batch to the next, the sleeve fit can go from snug to sloppy. If the insert height changes, the sleeve may no longer align with key graphics or opening points. The best event merch box sleeves material guide is always paired with accurate box specs and a realistic tolerance window.
Finish mismatch is another easy trap. A heavy gloss finish can feel too loud for a brand that wants restraint, while soft-touch can be too delicate for an item handled constantly at a crowded activation. In some cases, the finish choice affects scuff resistance more than the paper itself. That means the “best-looking” option in a sample room may not be the best option under event conditions. Honest testing beats assumptions every time.
Overdesign causes its own problems. Too much ink coverage, too many spot effects, and too many special steps can complicate production and slow the schedule. There is nothing wrong with ambitious design, but it still needs to respect what the substrate can handle. If the sleeve has broad solid areas, be ready for possible color variation and drying concerns. If there is foil or embossing, ask how that affects cost and turnaround. Otherwise, the project can get fussy in a hurry.
Sustainability messaging is another area where teams should slow down. If the sleeve is being sold as recyclable, FSC certified, or made from recycled materials, confirm exactly what that means for the specific board and coating. A claim that sounds good in a deck may need nuance in the real world. Some finishes work better with post-consumer waste content than others. Some board constructions are more straightforward to recycle than others. The point is not to complicate the message. The point is to keep it accurate.
There is also a tendency to confuse environmentally friendly with automatically biodegradable packaging. That is not always true. A sleeve may include recycled fiber and still be treated or coated in a way that changes end-of-life behavior. If the brand cares about this story, ask for documentation and local compliance language before final approval. An event merch box sleeves material guide should help teams avoid green claims they cannot support.
One practical safeguard is to test with real handling conditions. Put the sleeve on the box, stack several units, move them, and inspect the edges after a few minutes. Photograph them under the same light the event will use. It sounds basic because it is basic. Yet that simple test catches a surprising number of problems before they become expensive.
For teams working under sustainability targets, the safest path is often to combine a clearly specified board with minimal finishing and honest claim language. That does not mean the sleeve has to look plain. It means the design should let the material do some of the work. A restrained sleeve can feel more credible than a crowded one, especially when the event audience is paying close attention. The material can carry a lot of trust on its own if you let it.
Expert Tips and Next Steps for Ordering the Right Sleeve Stock
The best final step in an event merch box sleeves material guide is a checklist, not a guess. Confirm the box dimensions, the visual direction, the budget ceiling, the quantity, the shipping deadline, and whether the sleeve must survive mail handling or only onsite handout. Those six inputs eliminate a lot of wasteful back-and-forth. They also make quote comparisons much fairer.
Requesting a sample pack or prototype is one of the smartest moves a buyer can make. A screen can tell you the artwork looks good. It cannot tell you whether the stock feels stiff enough, whether the fold lines crack, or whether the finish fingerprints too easily. When you can compare samples under event lighting, the decision becomes clearer. That is especially useful if the project sits between two material options.
I also recommend building a simple decision matrix. Score durability, appearance, sustainability, unit price, and turnaround on a five-point scale. Then add a weight for what matters most to the brief. If the event is premium and visual, appearance and print quality may matter more than the absolute lowest cost. If the event is a sustainability activation, recycled content and verified claims may rank higher. The matrix keeps the team honest and gives procurement a defensible rationale.
Another useful tactic is to ask for quotes at two or three volume tiers. That often reveals a point where the sleeve price drops meaningfully without creating a production headache. Sometimes the gap between 1,000 and 5,000 units is dramatic. Sometimes it is not. Either way, you learn something valuable before you commit. A good event merch box sleeves material guide should always push the buyer toward that kind of comparison.
Do not forget the role of the base box material either. If the box is made from corrugated cardboard, the sleeve has to sit comfortably over it without fighting the flute or bulking at the edges. If the base is a rigid setup box, the sleeve can often be more precise and presentation-driven. Matching the sleeve stock to the structure below it is one of those quiet details that separates average packaging from memorable packaging.
There is also value in asking the supplier about change control. What happens if dimensions shift by 2 mm? What happens if artwork arrives late? What happens if the finish choice changes after the proof stage? You do not need a long contract to ask those questions. You just need clarity. That clarity is part of ordering smarter, and it is exactly why a strong event merch box sleeves material guide is worth having on hand before the order is placed.
Here is the simplest way to think about the final decision: choose the stock that supports the event goal, the handling reality, and the budget without forcing the design to fight the material. If the sleeve needs to look premium, go for consistency and clean print. If the sleeve needs to communicate honesty and sustainability, choose a stock that tells that story plainly. If the sleeve needs to survive a rough event environment, prioritize stiffness, scoring, and surface resilience. The best event merch box sleeves material guide does not just help you place an order. It helps you ship with confidence and avoid the kind of last-minute scramble that nobody needs.
Which event merch box sleeves material is best for premium merch?
Use smooth SBS or a similar paperboard when you want crisp color, sharp logos, and a polished retail-style presentation. A matte or soft-touch finish can add a more tactile, elevated feel without making the sleeve look shiny. If the artwork is simple and the event is image-led, the premium effect often comes more from print consistency than from extra thickness. If the sleeve is going to be touched a lot, a cleaner coating may beat a fancy finish that scuffs too easily.
How thick should event merch box sleeves material be?
The right thickness depends on box size, handling frequency, and whether the sleeve will be shipped or only handed out onsite. The sleeve should feel stiff enough to hold its shape, but it still needs to fold cleanly without cracking at the scores. Ask the supplier for a recommendation based on the final box dimensions rather than guessing from paper weight alone. In practice, the wrong caliper is often more expensive than the wrong color because it affects fit every single time.
Do kraft sleeves print as well as coated board sleeves?
Kraft can print beautifully for earthy, minimalist branding, but the base color will mute bright colors and shift some tones. Coated board usually delivers stronger contrast and more predictable color reproduction for photos, gradients, and fine detail. If brand accuracy matters, request a printed sample on the actual stock before approving the full run. That is the only honest way to see how the artwork behaves on the paper.
What drives event merch box sleeves pricing the most?
Material grade, print coverage, finish complexity, quantity, and setup work are usually the biggest cost drivers. Low quantities raise the unit cost because prepress, cutting, and setup expenses are spread across fewer sleeves. Special finishes and tight color requirements can increase pricing more than many buyers expect, so ask for itemized quotes. A good quote should show you where the money goes instead of hiding it in a single number.
How long does it take to produce custom box sleeves?
Timeline depends on proofing speed, material availability, finishing steps, and shipping distance, not just print time. A clean file and approved dieline usually move faster than a project with multiple revisions or late dimension changes. Build in extra time for samples if the sleeve must match a high-stakes event date or a branded launch. If your event date is fixed, work backward from it and add a buffer; that simple habit saves a lot of stress.


