Get PVC Zipper Garment Bags Packaging Insert Checklist
A garment bag can look sharp on a sales table for about three seconds. Then the insert bows, the zipper pull disappears under the header, the hanger notch tears, or the barcode lands behind a sleeve. Great. Now the packaging is doing the opposite of its job.
That is why a practical get PVC Zipper Garment bags packaging insert checklist belongs at the start of the project, not after the first bad sample. The bag, insert, zipper, garment, hanger, and carton all affect each other. Treat them as one pack system.
This checklist covers the three pieces buyers usually underestimate: the PVC zipper garment bag, the printed insert that sits inside or against it, and the order details needed before sampling or bulk production. A 16-inch by 24-inch sweater bag with a loose backer card behaves nothing like a 24-inch by 54-inch suit bag with a hanger opening, gusset, reinforced handle, and fixed insert pocket.
PVC Zipper Garment Bags are used for suits, dresses, uniforms, robes, sweaters, dancewear, travel sets, bedding-style garment kits, and retail apparel sets. Clear film lets shoppers see the product while protecting it from dust, moisture, warehouse handling, and repeated inspection. That last part matters. Retail packages get opened, squeezed, hung, scanned, repacked, and shoved back onto fixtures. Pretending they only need to look good empty is how weak specs happen.
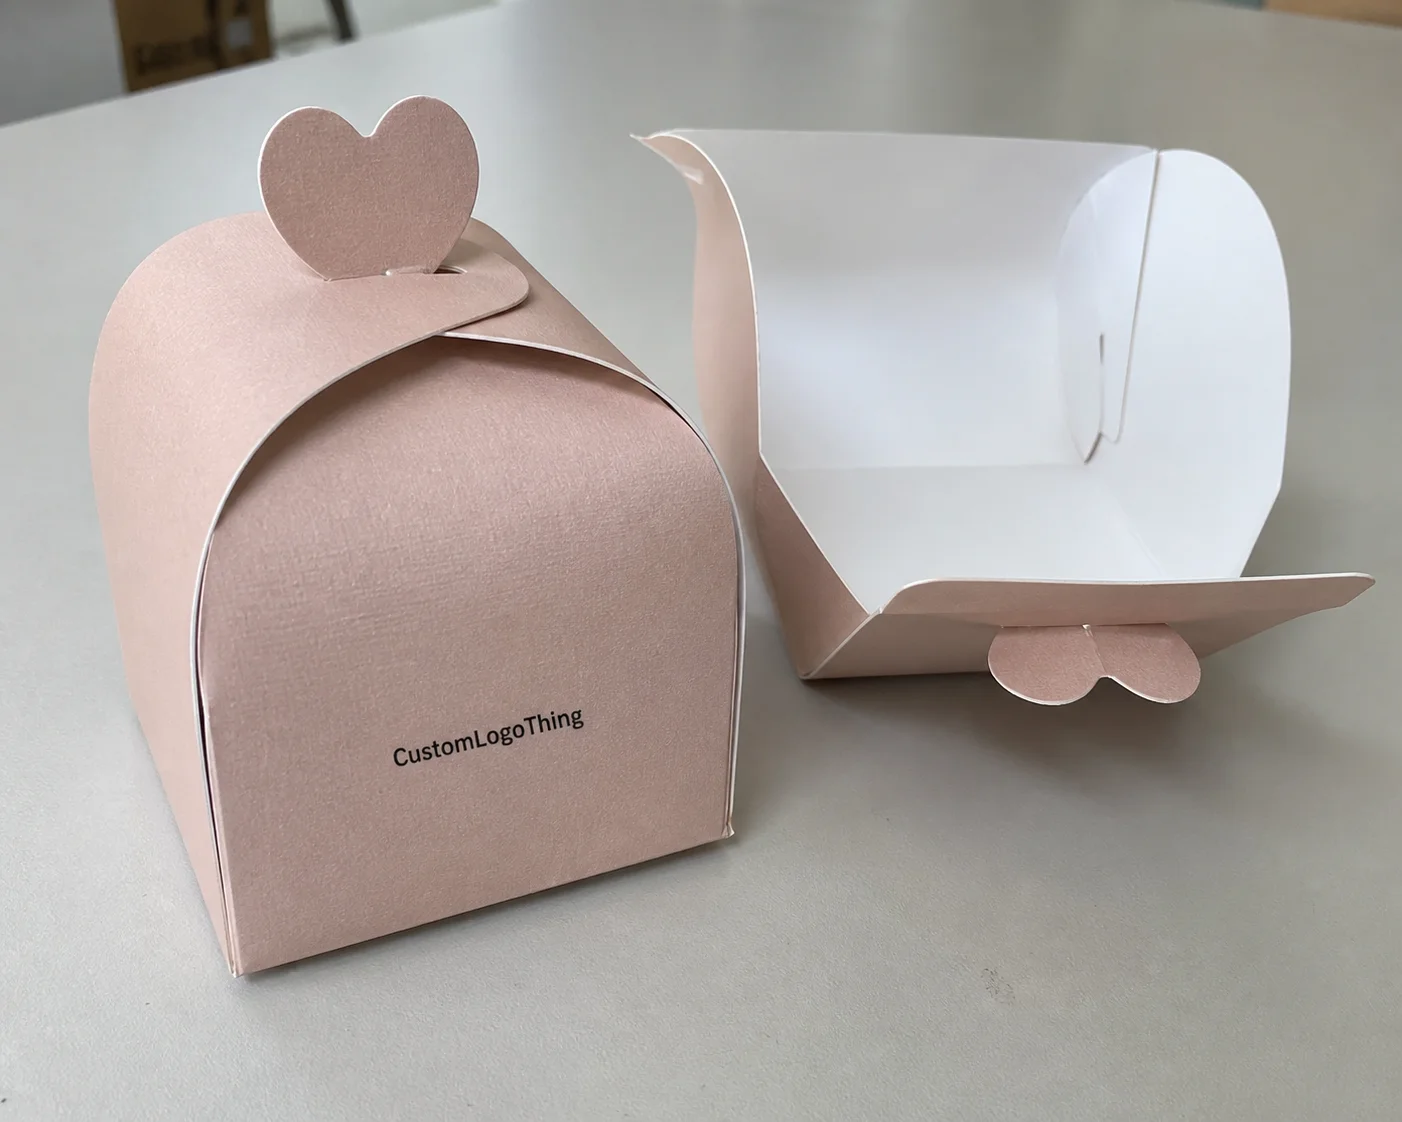
The insert is not filler. It supports the garment visually, carries product details, strengthens shelf presentation, and reduces fulfillment mistakes when size, color, barcode, care details, or set contents are printed clearly. For retail packaging and broader branded packaging, the insert often carries more selling weight than printing on the PVC itself.
Use the checklist as a working tool before requesting quotes, approving artwork, or signing off on a sample. It will help you confirm fit, film gauge, zipper construction, insert size, paperboard stock, print layout, pricing, lead time, and packing requirements without turning the order into a guessing contest.
How PVC Zipper Garment Bags and Inserts Work Together
Most PVC zipper garment bags start with flexible PVC film that is cut to size, folded or layered, sealed along the edges, fitted with a zipper closure, and finished with features such as a hanger opening, reinforced handle, gusset, vent holes, or printed logo. Basic construction. Plenty of places to mess it up.
A zipper placed 1 inch too close to the insert can make the pull hard to grab after packing. A hanger hole that looks centered on the dieline may hang crooked once a heavy garment shifts on the hanger. A beautiful insert can still fail if the board is too stiff for the bag or too thin to stay flat behind a folded sweater.
Film gauge is one of the first practical choices. Thinner PVC feels lightweight and economical. Heavier PVC gives the bag more body, better tear resistance, and a more premium hand feel when customers pick it up. Many apparel projects compare film in the rough range of 0.10 mm to 0.30 mm, although the right thickness depends on bag size, garment weight, reuse expectations, and budget. A light sweater pack does not need the same film as a long formalwear bag.
The zipper shapes the user experience more than buyers like to admit. A smooth zipper makes repeated opening easier for garments that may be inspected, tried on, repacked, or stored. A weak zipper can snag the film, strain the seam, or make the package feel cheap even if the insert artwork looks expensive. For reusable closet storage, travel sets, dance costumes, suits, or rental-style apparel, a larger puller is usually worth discussing.
Insert placement changes the build. An insert may sit loose inside the bag, slide into a dedicated pocket, sit behind the garment as a backer card, or fold over the top as a header card. Loose inserts are usually lower cost and faster to pack. Pocketed inserts control placement better, which helps if the barcode must scan from the same position every time or if size identification needs to stay visible on a display rack.
Print coordination matters because clear film creates visual overlap. A transparent bag with a large insert works best when every element has a specific job: logo on the bag, product story on the insert, barcode in a quiet area, and size callout where a packer or shopper can find it quickly. If the garment is dark, white ink backing or an opaque color block may be needed so text does not vanish.
Garment thickness, hanger style, fold method, and shipping position all influence final dimensions. A folded fleece robe needs more internal room than a thin dance costume, even if both garments measure similarly flat. The best early sample is packed with the real garment, hanger, tissue, accessory card, insert, and any small extras included in the final pack.
Key Specs to Confirm Before Requesting Samples
Start with dimensions, but measure the garment in its packed form. Flat pattern size is only a starting point. A sweater folded to 12 inches by 15 inches by 2 inches creates a different stress pattern than a dress hanging at 22 inches by 48 inches with a shaped hanger. Padded coats, robe sets, uniforms, and multi-piece kits can swell at corners, shoulders, belts, folded seams, or accessory pockets.
The core bag specifications should include width, length, side or bottom gusset, PVC gauge, zipper style, zipper color, puller type, hanger hole shape, handle requirement, vent holes, print location, and whether the bag needs to stand, hang, or lay flat. If the bag will hang, confirm the hanger opening width and reinforcement. If it will ship flat, confirm how many loaded bags fit per carton without crushing the insert.
Do not leave “standard zipper” on the spec sheet unless everyone agrees what that means. Confirm zipper tape width, zipper length, puller size, zipper color, and opening direction. For long garment bags, check whether the zipper needs to run the full length or only across a section. Shorter zippers can reduce cost, but they can also make packing awkward if the garment is bulky.
Insert specifications deserve their own approval line. Confirm finished insert size, paperboard thickness, coating, one-sided or two-sided printing, rounded or square corners, fold lines, barcode area, product window alignment, and whether the insert must be removable. Common insert stocks may include 250gsm to 400gsm paperboard. For many medium-size apparel packs, 300gsm or 350gsm gives a reasonable balance of stiffness, print quality, and cost.
Board grain direction is rarely discussed early enough. It should be. A large insert can curl or bow if the grain direction fights the way the card sits in the bag. Coating also changes behavior. Gloss can make colors pop but show scuffs. Matte feels calmer and photographs well, though dark matte areas can mark during packing. Soft-touch sounds nice until freight and abrasion get involved. Test it before pretending it is automatically premium.
Artwork needs extra attention because transparent PVC changes how printed colors read. A red logo printed directly on clear film may look strong over a white shirt and muddy over navy fabric. White ink backing, limited-color logos, or carefully placed opaque blocks can make branding more consistent. If the insert carries full-color graphics, check that the bag logo does not sit directly over dense copy.
Regulatory and safety details should be confirmed before final artwork. Depending on destination, retailer, and product type, buyers may need a suffocation warning, recycling mark, material callout, country-of-origin copy, retailer compliance label, barcode format, or age-related warning. For transport testing, standards from ISTA are often referenced when buyers need to validate packaging performance through distribution. For insert board sourcing, FSC certification may be relevant if a retailer or brand program requires it.
Shop-floor rule: do the fit check with the physical garment, real hanger, zipper location, and a mock insert. Flat artwork cannot tell you if the package opens cleanly, hangs straight, scans properly, or looks balanced once filled.
A strong PVC garment bag checklist includes every physical item in the pack. Tissue paper, spare buttons, hang tags, belts, care booklets, return cards, silica gel, or accessory pouches can affect insert placement and zipper clearance. Tiny items cause big layout problems when they slide into the wrong corner.
Cost, Pricing, and MOQ Factors That Change the Quote
Cost is driven by material, labor, print, packing, and freight volume. The main variables are PVC gauge, bag size, gusset depth, zipper quality, handle construction, print colors, insert material, insert print coverage, die-cutting, packing method, and final carton count. A clean one-color logo on clear PVC is not the same quote as a full retail presentation with a color zipper, reinforced seams, die-cut insert, and individually packed garment kits.
Larger bags do not scale evenly. Adding 2 inches to the width and 3 inches to the length may consume more film, change the sealing layout, increase carton size, and raise freight cost because garment bags are bulky even when lightweight. A 5,000-piece run of smaller sweater bags might price in a broad planning range around $0.45 to $0.90 per set depending on specs. Larger hanging garment bags with heavier PVC and printed inserts can move above $1.20 to $2.50 per set. These are planning ranges, not fixed quotes. Material markets, freight, labor, exchange rates, and finishing choices can push numbers around.
MOQ logic is practical, not mysterious. Custom PVC zipper garment bags require setup for film cutting, edge sealing, zipper application, printing screens or plates, insert printing, trimming, and packing labor. For many custom builds, buyers may see minimums around 1,000 to 3,000 pieces for simpler work and 5,000 pieces or more when custom film, special zippers, unusual sizing, or complex printing is involved.
| Build Type | Typical Specs | Best Use | Cost Impact |
|---|---|---|---|
| Economy storage bag | Light clear PVC, basic zipper, loose insert, one-color print | Wholesale apparel, uniforms, dust protection | Lowest unit cost and simpler packing |
| Retail presentation bag | Medium gauge PVC, color zipper, full-color insert, controlled barcode area | Retail garment kits, dancewear, sweaters, robes | Moderate cost with stronger shelf impact |
| Premium reusable bag | Heavier PVC, reinforced seams, larger puller, handle, thicker insert | Suits, dresses, travel sets, premium apparel | Higher material, labor, and freight cost |
Insert cost decisions deserve a sober look. Heavier board feels better and stays flatter, but it costs more and adds carton weight. Full-bleed color printing can look stronger for product packaging, yet a clean two-color insert may be enough for wholesale, storage, or back-of-house distribution. Buyers sometimes overspend on board thickness while under-specifying zipper quality. Customers touch the zipper first. That is not a small detail.
Printing method affects both cost and timing. Simple PVC logos may use screen printing or other direct print methods depending on quantity and artwork. Inserts are usually offset or digital printed depending on run size, color coverage, and finish. More colors, heavier ink coverage, special coatings, metallic inks, and die-cut shapes add setup time and spoilage allowance. If exact brand color is critical, ask how color will be controlled on both clear film and paperboard. They will not read the same.
For a usable quote, provide target quantity, packed garment dimensions, desired film thickness, zipper details, insert size, print colors, packing requirements, ship-to location, and any retailer compliance needs. If you are comparing this format with Custom Packaging Products such as poly mailers, folding cartons, or custom printed boxes, include freight volume in the comparison. A garment bag may be light, but carton cube can change landed cost quickly.
Process and Timeline From Artwork to Finished Bags
The normal workflow is straightforward: confirm specifications, prepare a quote, review dielines, submit artwork, approve a digital proof, produce a sample if needed, begin bulk production, inspect finished goods, pack cartons, and arrange shipping. Smooth orders usually come from complete information at the beginning, not heroic rushing at the end.
Timeline depends on complexity. Stock-style PVC zipper bags with a basic printed insert may move faster than a custom color zipper, unusual hanger opening, die-cut insert, heavy ink coverage, or reinforced handle. As a practical planning range, digital proofing may take 2 to 5 business days after artwork is submitted. Physical samples may take about 7 to 15 business days depending on construction. Bulk production may run 15 to 30 business days after approval. Freight is separate, and freight is where optimism goes to suffer.
The sample stage is not a beauty check. It confirms packed garment fit, zipper position, insert visibility, print registration, seam strength, barcode scanning, and whether the bag has enough room for normal handling without looking loose. Open and close the zipper several times. Hang the package. Lay it flat. Pack it into a carton. Scan the barcode through the PVC if that is how the final product will be handled.
Artwork proofing should be done on a dieline that shows bleed, safe areas, zipper placement, hanger hole location, insert trim, fold lines, barcode quiet zones, and transparent areas. If the insert has a folded header, mark the fold direction clearly. If the bag has a front logo, check whether it overlaps the garment, insert copy, zipper tape, or hanger area.
Production steps vary by equipment and print method, but the practical sequence is similar. PVC film is cut and sealed, zipper components are applied, print is dried or cured according to the chosen method, inserts are printed and trimmed, and components are counted into cartons. Coatings such as gloss, matte, or soft-touch may affect dry time, scuff resistance, and how the card slides against PVC.
Quality control should include more than counting cartons. Check finished bag dimensions against tolerance, zipper function, seam strength, hanger opening placement, print clarity, insert size, barcode scanability, board warping, color consistency, carton quantity, and visible dirt or film scratches. For reusable bags, cycle the zipper more than once. For hanging bags, test loaded weight. For retail bags, check the front view with the actual garment inside, not with an empty bag held up to a light table.
Do not approve production based only on a flat artwork file. The get pvc zipper garment bags Packaging Insert Checklist should be reviewed against a physical sample or at least a dimensional mockup, because the logo, insert, zipper, hanger, and garment all interact once the bag is filled.
Common Mistakes That Make Garment Bag Inserts Fail
Undersized bags cause more trouble than most people expect. If the garment barely fits, the zipper takes extra stress, seams wrinkle, and the insert may buckle or slide out of alignment during packing and transit. PVC has memory. If it is crushed around a tight fold or stiff insert corner, the crease may remain visible on the sales table.
Overbuilding the insert creates the opposite problem. A board that is too thick or too large can make the package feel stiff, increase freight weight, create corner pressure on the PVC, or make the garment harder to remove. For many medium-size bags, moving from 300gsm to 400gsm board may improve flatness, but it can also make carton packing less forgiving.
Artwork placement errors are common and avoidable. Logos printed too close to the zipper, barcodes hidden by folds, size labels blocked by fabric, and insert copy sitting behind dark garments all create customer-service problems. If store staff cannot scan or identify the product quickly, the package is not doing its job.
Hanger and fold style need early confirmation. A bag designed for a flat-folded garment may not work for a hanging suit, and a centered hanger hole can be wrong if the garment or hanger naturally shifts to one side. Even a half-inch shift can make the package hang crooked, especially with heavier coats or structured dresses.
Weak zipper choices can make the whole build feel underpowered. Low-quality zipper tape, tiny pullers, or mismatched closure length can frustrate customers who reuse the package for closet storage or travel. If the product is meant to be opened repeatedly, test the zipper like a customer would: quickly, one-handed, and not always gently.
Skipped carton planning is another quiet failure point. A well-made bag can arrive creased if cartons are too tight, too heavy, or packed without considering insert stiffness and PVC memory. If the insert has square corners, carton compression can push those corners into the film. Rounded corners add a small cost but may reduce pressure marks on clear PVC.
Another mistake: treating the insert as universal across sizes. One insert may work across small, medium, and large garments if the pack dimensions stay close. But if the large size adds bulk or changes fold position, the insert may sit too low, cover the garment awkwardly, or push against the zipper. Shared components save money only when they still fit the product.
Final Checks Before You Approve a Custom Order
Gather real packed-product measurements before approving anything. Use the actual garment, hanger, fold method, tissue, accessory card, care sheet, belt, spare button pouch, and any other included item so the bag is built around the true retail or shipping presentation. A spec based only on garment length is usually incomplete.
Create a simple approval packet. Include bag dimensions, PVC gauge, zipper color and length, insert material, insert size, artwork files, barcode placement, warning copy, carton packing count, required delivery window, and ship-to location. If your order connects with other Custom Packaging Products, align colors, logos, and product naming so the full packaging design stays consistent across the line.
Ask for two specification options if budget is flexible: one economical construction and one more premium construction. Comparing both makes tradeoffs visible. You may find that a slightly heavier PVC gauge is worth the price, while a full-bleed insert is not necessary. Or you may find that a better zipper does more for perceived quality than an extra print color. That happens often.
Check samples with real handling. Open and close the zipper several times, hang the bag, lay it flat, scan the barcode, read the insert through the PVC, and pack it into a carton. If the item will ship through parcel networks or mixed distribution channels, discuss whether additional carton testing is needed under recognized packaging standards.
Before placing the order, use the checklist to confirm fit, film, zipper, insert, artwork, price, lead time, and packing details in one clean pass. That final review usually takes less than 20 minutes. It can prevent weeks of rework, unclear quotes, delayed approvals, or a package that looks good empty but underbuilt once the garment is inside.
FAQ
What should be included in a PVC zipper garment bag insert checklist?
Include bag size, PVC gauge, zipper style, hanger opening, insert size, insert material, print colors, barcode placement, warning copy, packing method, quantity, and ship-to location. Also include packed garment dimensions because the bag should be sized around the finished presentation, not just flat garment measurements. A complete Get PVC Zipper Garment Bags packaging insert checklist should also identify whether the insert is loose, pocketed, folded, or fixed in position.
How do I choose the right PVC gauge for zipper garment bags?
Choose lighter gauge PVC for basic dust protection and economical packaging. Use heavier gauge PVC when the bag needs better structure, repeated use, stronger tear resistance, or a more premium retail feel. The right gauge also depends on garment weight, zipper stress, bag size, and whether the product will hang, ship flat, or be reused by the customer.
Should the packaging insert go inside the garment bag or in a separate pocket?
A loose insert is usually simpler and more economical. A dedicated pocket keeps branding, size information, or barcode placement more controlled. For retail displays, pocketed or fixed insert placement can reduce shifting; for storage, wholesale, or back-of-house use, a loose backer card may be enough.
What affects the cost of custom PVC zipper garment bags with inserts?
Cost is driven by bag dimensions, PVC thickness, zipper quality, print method, number of print colors, insert stock, insert print coverage, MOQ, packing requirements, and freight volume. Larger bags and heavier inserts can raise both material cost and shipping cost because they take more carton space.
How can I avoid delays when ordering PVC zipper garment bags packaging?
Provide complete specifications early, approve dielines carefully, confirm warning and barcode requirements, and test the sample with the actual garment before bulk production. Delays often happen when artwork, insert sizing, zipper placement, or compliance copy changes after quote or proof approval, so keep the checklist beside the proof until every line is approved.


