Have Custom Stickers Made Without Wasting Your Budget
Why Brands Have Custom Stickers Made Before They Scale
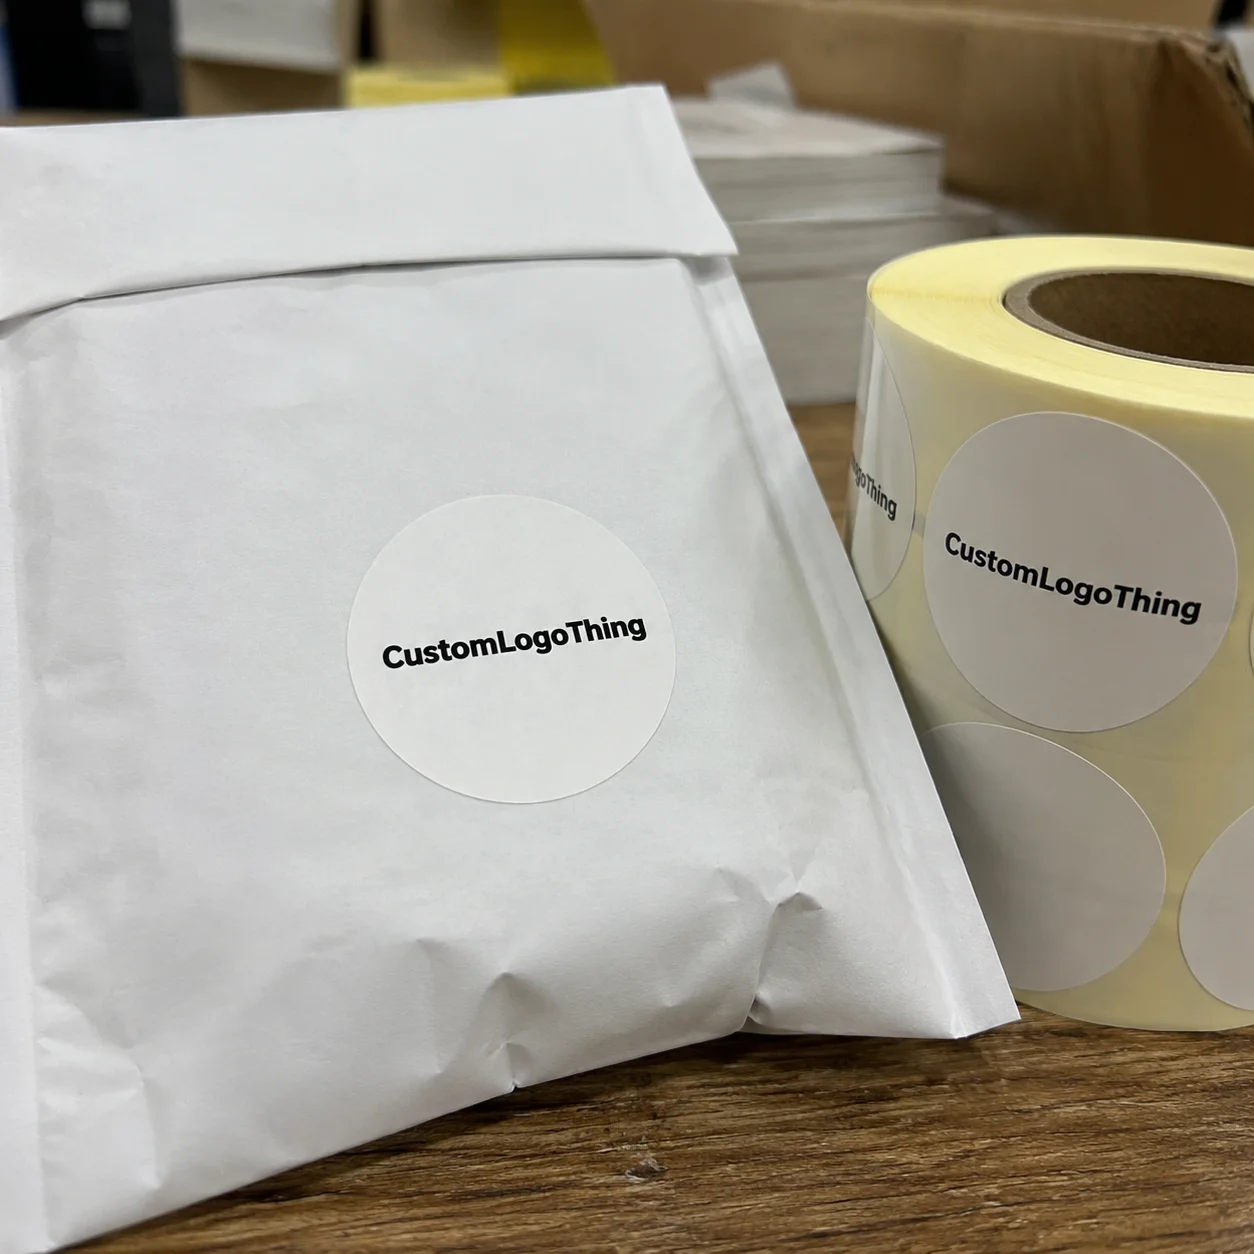
A small brand can spend real money on boxes, mailers, tissue, inserts, and product photography. Then the first thing the customer sees is a generic blank label, slightly crooked, doing its best to ruin the illusion. Painful. When you have custom stickers made, you are not buying sticky paper in isolation; you are buying a small packaging component that has to look good, stick properly, survive handling, and match the rest of the brand system.
Custom stickers are printed adhesive pieces made to a chosen size, shape, material, finish, and quantity. They show up on product packaging, jar lids, mailers, retail displays, sample kits, event giveaways, shipping cartons, and seasonal promos. Simple object. Lots of decisions. Funny how that works.
Stickers are one of the lowest-cost visible brand touchpoints in the packaging stack. That is why people underestimate them. A 2-inch round sticker can make a plain kraft box feel deliberate. A clear label on a jar can move a small-batch product closer to retail-ready. A die-cut logo sticker can turn an insert into something a customer keeps instead of tossing into the recycling bin after three seconds.
For brands testing new products, stickers sit in a useful middle ground between generic packaging and fully Custom Printed Boxes. You can run a seasonal flavor, limited launch, subscription box theme, or trade show campaign without committing to 5,000 printed cartons. If you already buy Custom Packaging Products, stickers can fill the gaps while the larger packaging program catches up.
Sticker and label language overlaps constantly. In strict production terms, stickers often handle decoration, sealing, branding, or promotion. Labels usually carry required information: ingredients, warnings, barcodes, batch numbers, compliance marks, or use instructions. In real buying conversations, people use both words for the same adhesive thing. Nobody should need a courtroom definition to order a logo seal.
The useful question is not “Do we need stickers?” It is “What does this sticker need to survive?” Surface, storage conditions, handling, design, application speed, and order quantity all affect the correct spec. Get those wrong and even a clean design can peel, curl, smear, or look cheap.
How Custom Sticker Production Steps Actually Work
The production flow is not mysterious, but it punishes skipped decisions. From a buyer’s point of view, the process usually runs like this: define the use case, choose material, prepare artwork, confirm size and shape, approve a proof, print, cut, finish, inspect, pack, and ship.
- Use case: packaging seal, product label, promo sticker, retail display, insert, outdoor decal, or event handout.
- Material: paper, polypropylene, vinyl, clear film, kraft paper, metallic stock, or specialty film.
- Artwork: vector logo, bleed, cut line, correct dimensions, brand colors, and readable text.
- Proof: final production check, not a casual design mood board.
- Production: print, cut, finish, inspect, pack, label cartons, and ship.
A proof matters. It confirms size, cut line, bleed, color placement, text position, finish, and whether the sticker will look right once trimmed. If the proof shows a typo and you approve it, the printer will reproduce that typo with remarkable loyalty. Machines are dependable like that.
Digital printing is common for short runs, multiple designs, variable artwork, and faster setup. It is practical for 100, 250, 500, or 1,000 pieces when a product is still being tested. Flexographic or offset-style production can make sense at higher quantities because setup cost gets spread across more units. That is often where roll labels, repeat product labels, and retail packaging orders become more efficient.
Cutting has its own choices. Standard circles, squares, rectangles, and ovals are usually faster and cheaper. Custom die-cut stickers follow the shape of a logo, character, product outline, or campaign graphic. They look more polished, but they may add setup time, tooling cost, or extra proofing depending on the cutting method.
Finishes change both appearance and performance. Matte feels quieter and more premium. Gloss makes colors pop but can glare under retail lighting. Soft-touch feels expensive, until it gets scuffed in a rough shipping environment. Holographic film, clear stock, metallic effects, spot UV, and lamination can all make sense when they support the design. Random finishes are just expensive confetti.
Most delays happen before anything prints. Missing bleed, wrong file formats, unclear cut lines, low-resolution logos, and spec changes after proof approval create the classic “why is this taking so long?” moment. Because production cannot read minds. Tragic, I know.
Sticker Materials, Adhesives, and Finishes That Matter
Material choice should start with the surface and environment, not with whatever looked nice in a sample photo. Paper stickers work well for dry indoor packaging, bakery boxes, candle boxes, thank-you seals, and short-term promotions. They are cost-effective and easy to print. Moisture is not their friend.
Polypropylene and vinyl are better for moisture resistance, refrigeration, bath products, drinkware, jars, and products that face more handling. Clear film creates a no-label look on glass or plastic, but it often needs white ink behind colors so the design does not disappear. Kraft paper gives a handmade or natural feel. Metallic stock can add a premium or promotional look, especially for limited releases.
Adhesive choice is not glamorous, yet it does the actual work. Permanent adhesive is for long-term sticking. Removable adhesive is for temporary use, windows, event decals, or packaging where clean removal matters. Freezer-grade adhesive is designed for cold storage and condensation. High-tack adhesive helps with rough cardboard, textured paper, low-energy plastics, and other surfaces that behave badly.
Practical rule: the sticker spec should match the surface, not the wishful thinking in the marketing meeting.
Cardboard, glass, plastic, metal, compostable packaging, textured mailers, and curved containers all behave differently. A sticker that holds perfectly on a smooth box may lift at the edges on a chilled bottle. A beautiful paper seal may wrinkle on an oily jar. A label on a flexible pouch may need a film face stock so it moves with the package instead of cracking.
Durability comes down to exposure. Moisture, sunlight, abrasion, oil, refrigeration, shipping friction, and repeated handling can all attack the sticker. Outdoor stickers need tougher face stock, stronger ink protection, and usually a laminate or UV-resistant coating. A bakery box seal does not need the same build as a bumper decal. Overbuilding wastes money. Underbuilding creates returns, complaints, and sad customer photos.
Finish tradeoffs are real. Gloss boosts color but can show glare. Matte reduces shine and feels refined but may mute bright colors. Lamination adds protection against scuffing and moisture, though it increases cost and thickness. Clear stock looks sleek, yet white ink planning becomes critical. If brand color consistency matters, provide CMYK values, Pantone references, or approved printed samples instead of saying “make it match the screen.” Screens lie for a living.
Sample testing is cheap insurance. Before You Order a large quantity, test one or two materials on the actual package for 24 to 72 hours. For refrigerated products, curved containers, textured mailers, bath products, or oily surfaces, test under real conditions. Put it in the fridge. Rub it. Ship a sample to yourself. Pretend the package has a hard life, because it probably will.
Custom Sticker Cost, MOQ, and Unit Pricing Drivers
Sticker pricing is driven by material, size, shape, finish, quantity, number of designs, artwork complexity, adhesive type, proofing needs, packaging format, and shipping speed. That is why “How much for stickers?” is not a useful quote request. It is like asking how much a vehicle costs while refusing to say whether you need a scooter or a delivery van.
Small runs have higher unit costs because setup, proofing, file handling, machine time, and packing are spread across fewer pieces. Larger runs usually lower the unit cost, but only if specs stay consistent. Five versions of 200 stickers each may cost more than one version of 1,000 because every design adds file handling, proofing, sorting, and sometimes separate packing.
Minimum order quantity depends on production method. Digital printing may allow low minimums such as 50, 100, or 250 pieces for simple stickers. Specialty materials, metallic effects, custom dies, roll labels, or complex finishes may require higher MOQs to make production efficient. A supplier pushing a higher MOQ is not always upselling. Sometimes the setup math is just rude.
| Sticker Format | Best Use | Typical Quantity Fit | Cost Notes |
|---|---|---|---|
| Sheets | Giveaways, events, small batches, manual packing | 50 to 1,000 pieces | Convenient and easy to store; often higher unit cost for tiny runs |
| Rolls | Product labeling, packing stations, dispensers, semi-automated use | 500 to 10,000+ pieces | Efficient for repeat labels; roll direction and core size may matter |
| Individually Cut | Inserts, merch, retail handouts, promo kits | 100 to 5,000 pieces | Better presentation; more handling and packing cost |
| Custom Die Cut | Logo shapes, character art, premium package branding | 250 to 5,000+ pieces | Polished look; may add tooling or setup depending on process |
Sheet stickers are convenient for giveaways, sample boxes, event teams, and small-batch packing. Roll stickers are usually better for product labeling, dispensers, hand application at a packing bench, or semi-automated lines. Individually cut pieces work well for inserts and merch because each sticker feels like a standalone item.
For a useful quote, provide the exact size, shape, quantity, material preference, adhesive type, finish, number of artwork versions, indoor or outdoor use, packaging surface, deadline, and delivery location. If you already buy Custom Labels & Tags, share what has worked before. A supplier can price faster when the spec is not a guessing contest.
Be careful with the cheapest unit price. A sticker that curls, peels, smears, or arrives late is not cheap. It is a tiny branded problem with adhesive on the back.
Process Timeline and Turnaround From Artwork to Delivery
Lead time has phases: spec confirmation, artwork review, proof creation, proof approval, production, finishing, quality control, packing, and shipping. Production time is not the same as delivery time. Buyers mix those up constantly, then wonder why a “five-day production” order is not sitting on their dock five calendar days after sending a blurry logo.
Simple paper or vinyl stickers with print-ready artwork and standard shapes can move quickly. Many basic jobs can be produced in a few business days after proof approval, depending on quantity and supplier capacity. Specialty orders with foil, holographic film, clear stock with white ink, custom cuts, unusual adhesives, or multiple SKUs take longer because there are more steps and more chances to catch issues.
Artwork is the buyer-controlled delay. Missing bleed, low-resolution logos, unclear dielines, text too close to the edge, color corrections, and size changes after proofing slow everything down. Late proof approval is another classic. If the proof sits in an inbox for three days, those days did not magically count as production time.
Shipping adds its own reality check. Ground transit, freight schedules, customs clearance, receiving delays, and holiday carrier congestion can affect the delivery date. If stickers are required before finished products can ship, build in a buffer. For launches, subscription box drops, retail resets, influencer mailers, and trade shows, one extra week is a reasonable cushion when the schedule allows it. Add more time for specialty stock, overseas production, or orders with several versions.
Packaging components deserve calendar space. If the sticker is required to ship your product, do not order it like a last-minute party favor.
For structured performance expectations around transit and handling, the International Safe Transit Association publishes testing resources widely used in packaging. Stickers are small, but they still live on packages that get rubbed, stacked, dropped, and handled. The package does not care that your launch deck looked pretty.
Common Ordering Mistakes That Make Stickers Look Cheap
Artwork mistakes are the fastest way to make a decent sticker look amateur. Low-resolution logos, screenshots, copied website graphics, missing bleed, no cut line, and text placed too close to the trim edge all cause problems. Vector files such as AI, EPS, or print-ready PDF are usually best because logos scale cleanly and edges stay sharp.
Bleed matters because cutting is physical. A typical bleed allowance is often around 0.0625 to 0.125 inch, depending on the supplier. If color stops exactly at the cut line, tiny shifts can leave an ugly white edge. Safe zones matter too. Keep small text and important details away from the trim line unless you enjoy living dangerously for no reason.
Size guessing is another expensive little habit. A 3-inch sticker on your monitor is not a 3-inch sticker on a jar, pouch, mailer, or retail carton. Print a paper mockup at 100% scale, cut it out, and place it on the actual package. Low-tech. Cheap. Weirdly effective. Imagine that.
Surface mismatch causes peeling, bubbling, wrinkling, and edge lift. Textured cardboard may need a stronger adhesive. Oily containers need testing. Cold products may need freezer-grade adhesive. Curved bottles need flexible material and the right label size so the edges do not fight the curve.
Color expectations need discipline. Screen colors are backlit; print colors are not. If brand color matters, provide CMYK values, Pantone references, or an approved physical sample. For sustainability claims or paper sourcing needs, ask about FSC-certified materials and chain-of-custody options. The Forest Stewardship Council is one common reference point for responsibly sourced paper products.
Overcomplicated design is the sneaky budget killer. Too many fonts, tiny copy, weak contrast, heavy gradients, and trendy effects can reduce readability and increase production complexity. A sticker is often viewed for one to three seconds. Make the logo clear. Make the message legible. Save the tiny manifesto for the insert card.
Then there is the approval mistake. People rush through proofs because the deadline is tight, then blame the printer when the typo prints perfectly. Review spelling, size, color callouts, cut line, quantity, finish, and delivery details before approving. Slow down for five minutes or pay for the reprint. Those are the glamorous options.
Next Steps Before You Request a Sticker Quote
Before asking for pricing, confirm the real use case. Where will the sticker go? What surface does it stick to? Is the product stored indoors, outdoors, refrigerated, frozen, oily, wet, or handled heavily? Will the sticker seal a box, label a jar, decorate a mailer, or act as a giveaway? These answers decide the spec.
- Use location: product, box, pouch, jar, mailer, retail display, insert, or shipping carton.
- Surface: glass, coated paperboard, kraft cardboard, plastic, metal, flexible film, or textured stock.
- Exposure: dry indoor use, refrigeration, water, oil, sunlight, abrasion, or outdoor conditions.
- Size and shape: measured on the actual package, not guessed from a screen.
- Quantity: total pieces plus number of artwork versions or SKUs.
- Format: sheets, rolls, or individually cut pieces.
- Deadline: desired delivery date, not just production date.
Gather files before contacting a supplier. Send vector logo files, final artwork, brand color values, dielines if available, and any previous sticker sample you liked or hated. If the sticker needs to coordinate with custom printed boxes, tissue, mailers, or retail packaging, say that upfront. Package branding works better when the pieces are planned together instead of forced to make friends later.
Test one or two sizes physically. Print paper mockups at actual scale and place them on the package. Check readability from arm’s length. Check whether the shape fights the container. Check whether the sticker blocks required information, barcode space, tamper seals, or opening instructions.
Decide how the stickers will be applied. Hand application at a small packing table is different from dispenser use on a faster line. Rolls need unwind direction, core size, and sometimes gap settings. Sheets are easier for flexible use. Individually cut stickers feel better for giveaways but take more handling.
Ask better supplier questions. “What material fits this surface?” beats “What is cheapest?” Ask what MOQ applies, what changes the unit cost, when proofing starts, whether samples are available, and what the actual production timeline looks like after proof approval. If you plan to scale, ask which spec can grow from 500 pieces to 10,000 without changing the look.
If you want to have custom stickers made Without Wasting Money, finalize the use case first. Then match the material, adhesive, finish, quantity, and format to that job. Good stickers are not complicated. They are just specific.
FAQ
How do I have custom stickers made for product packaging?
Start with the packaging surface, not the design file. Confirm whether the sticker goes on cardboard, glass, plastic, pouches, jars, or mailers. Then choose material and adhesive based on moisture, refrigeration, handling, oil, sunlight, or curved surfaces. Send print-ready artwork with bleed, cut lines, correct size, and brand color references so proofing does not turn into a tiny administrative swamp.
What file type is best when ordering custom stickers?
Vector files such as AI, EPS, or print-ready PDF are usually best because they scale cleanly and keep logos sharp. High-resolution PNG or TIFF files may work for simple artwork, but screenshots, social media images, and copied website logos usually print badly. If the sticker is die cut, include or request a clear cut line so the printer knows exactly where the shape should trim.
How much does it cost to have branded stickers printed?
Cost depends on size, quantity, material, adhesive, finish, shape, number of designs, proofing needs, and shipping speed. Higher quantities usually lower unit cost, but specialty materials, custom shapes, and premium finishes can raise the total order cost. For a useful quote, provide exact specs instead of asking for a generic price. Generic specs produce generic surprises. Nobody needs those.
How long does custom sticker production usually take?
Simple stickers with approved artwork and standard materials are usually faster than specialty finishes, unusual adhesives, custom cuts, or multi-SKU orders. The full timeline includes artwork review, proofing, approval, production, finishing, quality control, packing, and shipping. Proof approval is often the biggest buyer-controlled delay, so review size, spelling, colors, and cut lines quickly but carefully.
Should I order custom stickers on sheets, rolls, or individually cut pieces?
Sheets are convenient for small batches, events, giveaways, and manual application. Rolls are better for product labeling, larger quantities, dispenser use, or packing stations where speed matters. Individually cut stickers work well for inserts, merch, retail handouts, and promotional kits where each sticker needs to feel like its own item.


