Buyer Fit Snapshot
| Best fit | Craft Festival Packaging Kits That Stand Out projects where brand print, material claims, artwork control, MOQ, and repeat-order consistency need to be specified before quoting. |
|---|---|
| Quote inputs | Share finished size, material target, print colors, finish, packing count, annual reorder estimate, ship-to region, and any compliance wording. |
| Proofing check | Approve dieline scale, logo placement, barcode or warning zones, color tolerance, closure strength, and carton packing before bulk production. |
| Main risk | Vague material claims, crowded artwork, missing packing details, or unclear freight terms can make a low unit price expensive after revisions. |
Fast answer: Craft Festival Packaging Kits That Stand Out: Material, Print, Proofing, and Reorder Risk should be specified like a repeatable production item. The safest quote records material, print method, finish, artwork proof, packing count, and reorder notes in one written spec.
Production checks before approval
Compare the actual filled-product size with the drawing, then confirm tolerance on folds, seals, hang holes, label areas, and retail display edges. Reserve space for logos, QR codes, warning copy, and material claims before decorative graphics fill the panel.
Quote comparison points
Review material grade, print process, finish, sampling route, tooling charges, carton quantity, and freight assumptions side by side. A quote is only useful when the supplier can repeat the same color, closure quality, and packing count on the next order.
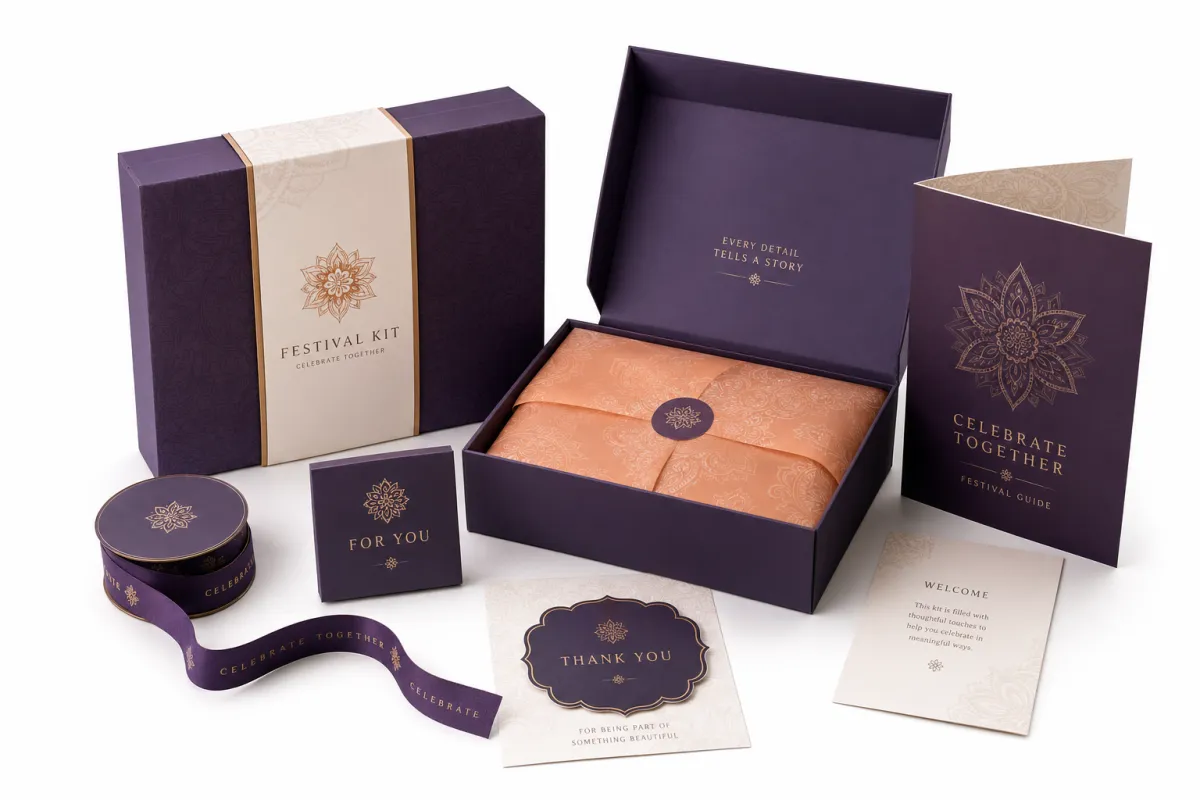
How to Craft Festival Packaging Kits That Stand Out
I remember a weekend food fair in Bristol, near the harbourside stalls by Wapping Wharf, where the most talked-about item at one booth was not the drink itself but the packaging around it. If you are figuring out how to craft festival packaging kits, that scene tells you almost everything You Need to Know: the kit gets touched, photographed, stacked, dropped, and handed back far more often than the product does. I watched one drinks brand place a 250ml sampler into a plain 350gsm C1S carton with a die-cut insert, and that modest pack ended up doing more selling than the banner behind the booth. People picked it up, turned it over, and remembered the brand. The banner just stood there looking decorative, which is honestly a little rude to the banner, but still true. The lesson in how to craft festival packaging kits is plain enough: the pack is often the first real conversation a brand has with a crowd.
That is why how to craft festival packaging kits is never only a design question. It is logistics, branding, and weather rolled into one. The kit has to protect the product, communicate the offer in three seconds, and survive tote bags, spilled ice, dusty walkways, and tired staff trying to move 400 units before sunset. Packaging that looks elegant in a studio can fall apart on hot pavement by lunch, especially if the event sits in 28 degree heat or under a white tent with poor airflow. I have seen it happen. The smug little prototype that looked like it belonged in a museum? It met festival reality and lost. That is why how to craft festival packaging kits has to start with conditions, not with decoration.
I have seen the strongest examples of how to craft festival packaging kits come from teams that treated the bundle like a miniature retail system. One client in Shenzhen called it “a booth in a box,” and the phrase stuck because it is accurate. The outer pack, insert, label, and carry piece can make a small brand look established without tacking on $2.00 of unnecessary extras. In one pilot run, a modular kit with a printed sleeve, a 1.5 mm greyboard insert, and a fold-flat tray added only $0.24 per unit at 5,000 pieces, which is exactly the kind of number that keeps procurement calm and creative teams honest. Honestly, I think that is the sweet spot: less theater, more utility. For teams learning how to craft festival packaging kits, the most useful question is often not “what can we add?” but “what can we remove and still win the handoff?”
"We stopped thinking about packaging as a wrapper and started thinking about it as part of the event experience. On a two-day sampling run in Manchester, sales jumped 18% because people could carry the kit for two hours without worrying about damage." - brand manager, sampling program review
How do you craft festival packaging kits that stand out?
The cleanest way to understand how to craft festival packaging kits is to treat them as coordinated bundles of containers, inserts, labels, and small extras made for fast-moving retail environments. A festival kit is not one carton. It is a working system that carries a product from pallet to booth to attendee handoff without looking fragile or improvised. I wish more people understood that before they start asking for gold foil on everything like it is a magic wand, especially when a single foil pass can add $0.08 to $0.16 per unit depending on the run size. The structural answer to how to craft festival packaging kits is usually quieter than the design answer, and far more useful.
That system has three jobs at once. It protects contents from compression, moisture, dust, and repeated handling. It carries the brand story through color, structure, and copy. It holds together during transport, which becomes harder than it sounds when you are loading 180 units into a van at 6:30 a.m. in Leeds and unloading them again onto hot pavement by 9:00 a.m. I have done that exact dance, and it is not glamorous. There is usually coffee involved, and not enough of it. If you are serious about how to craft festival packaging kits, you have to think like an operations lead as much as a designer.
Plenty of teams get the brief wrong. They think how to craft festival packaging kits means adding more print, more gloss, and more decorative inserts. My experience points the other way. The best kits remove noise until every component earns its place. If a folded card does not improve sales, handling, or protection, it is dead weight. And dead weight is expensive, which is the kind of surprise nobody wants after sign-off, especially if the carton is being produced in batches of 3,000 in Dongguan or Ningbo. In practice, how to craft festival packaging kits is often a lesson in restraint.
In practical terms, the winning formula usually blends product packaging and retail packaging logic. I like to ask five questions before sketching anything: What is being sold? How far will the attendee carry it? Will it be opened in the booth or later at home? Does it need to stack with twelve other units? What will make it recognizable in a crowded aisle where ten brands are competing for the same glance? Those answers shape the pack faster than any mood board can, and they are usually more useful than a mood board that takes three days to build. That is one reason how to craft festival packaging kits starts with behavior, not aesthetics.
When I visited a beverage client in Guangdong, their factory floor manager showed me two versions of the same kit, both made in a plant outside Foshan. The first looked elegant on screen and failed after a 90-minute truck ride because the lock tabs popped open. The second used the same artwork on a reinforced corrugated base, cost only $0.17 more per unit, and passed the abuse test immediately. That is the practical side of how to craft festival packaging kits: aesthetics matter, but structure decides whether the kit survives the day. Fancy is nice. Functional is the thing that actually gets you through the event. If you remember one thing about how to craft festival packaging kits, let it be that survival is a feature.
How Festival Packaging Kits Work Across the Event Journey
If you are studying how to craft festival packaging kits properly, map the journey first. I break it into four stages: prep table, booth display, attendee carry-out, and after-event reuse or disposal. Each stage stresses a different part of the pack, and each part has to be accounted for before you approve the dieline. Skip that step and you end up redesigning at the worst possible moment, usually after the boxes have already arrived at a site in Birmingham or Glasgow. I have watched that movie. It is not good. The most expensive mistakes in how to craft festival packaging kits usually happen before the first carton is even opened.
At the prep table, the priorities are countability and speed. Staff should be able to grab a finished kit in under 10 seconds, confirm the item count, and slide it into the display format without hunting for loose pieces. That is where pre-kitted bundles, labeled trays, and numbered inserts save time. In one client meeting for a 1,200-unit launch in Amsterdam, we shaved 22 minutes off hourly setup by switching from loose components to pre-assembled units with a single outer sleeve. Twenty-two minutes does not sound dramatic until you multiply it by an entire event day and a team of people who would very much like to stop untangling cardboard. For anyone mapping how to craft festival packaging kits, operational speed is not a side issue; it is part of the product.
On the booth floor, how to craft festival packaging kits turns into a visual merchandising exercise. The outer pack has to read from 1.5 to 2 meters away, because that is the distance most people scan from while walking. Bright contrast, a clear value proposition, and one strong focal point beat a cluttered surface with six logos every time. That is where package branding earns its keep. A tiny panel full of clever copy might make the design team happy, but the crowd is not standing still to appreciate your subtlety. At 4:30 p.m., with people holding paper cups and tote bags, they want one message, not a novel. In that sense, how to craft festival packaging kits is also a lesson in attention economics.
For carry-out, the details get physical. Handles must support weight without cutting into hands, closures must survive opening and re-closing, and the kit should fit into a tote, backpack, or under-seat storage. If the item is a sample trio, I often specify a 2 mm folded insert or a molded pulp tray so the pieces do not knock into each other during the walk to the next stage. I have seen products arrive at the next booth with one corner dented and one lid halfway open, which is a terrible look for something meant to feel considered. A 280g kraft carry handle can work for lighter sets, but only if the full load stays under 750 grams. Good festival packaging work pays attention to the moment between handoff and home.
How to craft festival packaging kits also depends on what happens after the sale. Some buyers keep the outer pack as a gift box, especially if the contents are premium or shareable. Others toss it the same day. That is why I recommend building a kit that still feels complete if the attendee keeps only the insert and label card. You want the memory to survive, not just the carton. If the packaging dies in the trash five feet from the booth, the brand story dies with it, and the recycling bin usually does not care whether the print budget was $500 or $5,000. In practical terms, how to craft festival packaging kits is partly about what remains after the music stops.
For testing standards, I lean on the same discipline I would use for shipping any other format. The ISTA test methods are a useful reference if your kit is going to be stacked, bounced, or trucked between venues. If your material spec includes paper fibers, I also like checking sourcing against FSC certification guidance so the sustainability claim is not just decorative language on the back panel. I have a soft spot for claims that can be verified, probably because I have spent too many meetings listening to people describe “eco vibes” as if that were a material spec. The difference between a verified FSC claim and a vague green promise is usually a certificate number, a chain-of-custody file, and a very boring but useful audit trail. That level of detail is part of how to craft festival packaging kits that can stand up to scrutiny.
- Outer pack: a carton, sleeve, rigid box, or pouch that controls first impression and handling.
- Inner protection: inserts, dividers, trays, or cushions that keep the product from rattling.
- Merchandising insert: a card or liner that explains the offer, flavor, set, or use case in a few seconds.
- Closure and carry: tabs, seals, handles, or re-close features that make the kit easy to transport.
- Takeaway element: a coupon, QR card, or sample note that extends the experience after the booth visit.
That framework sounds basic, yet it is exactly where many teams save money and lose performance. The whole point of how to craft festival packaging kits is to make the event easier for the customer and easier for staff at the same time. If one side improves while the other side gets slower, the design is not finished yet. It just looks finished in a deck, which is not the same thing at all, especially once the stock arrives in 15-business-day batches from a supplier in Kunshan or Ningbo. Good event packaging is boring in the best possible way.
Cost, Materials, and Pricing for Festival Packaging Kits
Cost is where how to craft festival packaging kits becomes real very quickly. The main drivers are material choice, print coverage, finishing, structural complexity, pack size, and minimum order quantities. A 4-color printed carton with a simple tuck flap and no coating will cost far less than a rigid set-up box with foil, soft-touch lamination, and a custom foam insert. I have had clients fall in love with finishes first and budgets second, which is a dangerous order of operations when a factory in Guangzhou is quoting a 7,500-piece run and the event opens in 41 days. If you want how to craft festival packaging kits to stay inside budget, structure should lead the conversation.
In my experience, a prototype might run $150 to $450 depending on tooling and sample method, while production can range from $0.18 per unit at 5,000 pieces for a simple paperboard sleeve to $2.40 or more for a multi-component rigid presentation kit. Assembly labor can add another $0.07 to $0.35 per unit, and freight can swing the budget by 12% to 28% if you are moving finished kits across borders. Those freight numbers are the kind that make finance people blink very slowly. If the route goes from Shenzhen to London via sea freight, you are usually looking at 18 to 26 days port-to-port, plus local clearance time. That is why how to craft festival packaging kits should always include transit math, not just artwork approvals.
When someone asks me how to craft festival packaging kits on a tight budget, I usually say this: simplify the structure before you cut the brand story. A single thoughtful feature, such as a printed inner flap or a reusable sleeve, often creates more perceived value than three extra decorative finishes. That is especially true for short-run activations where you need 800 to 2,000 units, not 80,000. Fancy finishes look expensive; smart structure feels expensive. A matte aqueous coating on 350gsm C1S artboard can carry more credibility than a crowded layout with three foils and no hierarchy. For how to craft festival packaging kits, value usually hides in the structure, not the gloss.
Here is a practical comparison I use in quoting sessions for Custom Packaging Products and related retail packaging formats. The numbers are not universal, because ink coverage, board grade, and labor rates vary by region, but they are close enough to guide a serious budget conversation. And yes, I know quotes can be annoying. I have never met a packaging brief that solved itself with optimism, especially when a supplier in Dongguan can quote a 12-business-day sample lead time while a plant in Leicester needs 15 business days for the same style. The budget side of how to craft festival packaging kits gets easier when you compare formats with real numbers instead of guesses.
| Format | Typical Material | Approx. Unit Cost at 5,000 | Best Use | Value Signal |
|---|---|---|---|---|
| Simple sleeve kit | 350gsm paperboard | $0.15 - $0.27 | Lightweight samples and small accessories | Clean and efficient |
| Foldable carton with insert | 400gsm paperboard + SBS insert | $0.31 - $0.62 | Giftable festival sets, snacks, minis | Balanced and polished |
| Corrugated presentation kit | E-flute corrugate + printed wrap | $0.58 - $1.18 | Heavier product bundles and transport-heavy events | Durable and credible |
| Rigid premium kit | Greyboard with wrap and insert | $1.38 - $2.35 | VIP drops, limited editions, press kits | High-end and memorable |
| Reusable pouch system | Woven or coated flexible material | $0.92 - $1.75 | Carry-forward sampling and multi-visit use | Practical and reusable |
I always advise clients to budget in five buckets: prototype cost, production cost, kitting labor, storage, and freight. Then add a 7% to 10% damage buffer. That buffer sounds conservative until you are standing beside a pallet where 38 cartons got edge-crushed in transit because the truck turned into a rutted festival access road near a field site in Kent or a temporary venue outside Berlin. How to craft festival packaging kits with no buffer is how teams end up reordering at rush rates, and rush rates have a nasty habit of making everybody grumpy. The budget is safer when the risk is already in the math.
Material choice changes both feel and performance. Paperboard is lightweight and prints beautifully. Corrugated adds crush resistance. Molded pulp helps when you need protective cavities and a lower-plastic story. Rigid board gives the strongest premium signal. Reusable pouches work if you want a consumer to carry the package home and use it again. The trick is matching the substrate to the event, not forcing one material to do everything. I have seen a gorgeous paperboard pack fail because it was asked to do the job of corrugate. That is like sending a bicycle to haul a refrigerator, and the bicycle usually loses. Good how to craft festival packaging kits practice starts with material honesty.
Too many brands overpay for finish effects while underinvesting in structure. A $0.06 spot UV hit is not worth much if the base carton opens in the bag. For how to craft festival packaging kits That Feel Premium, spend first on fit, then on closure, then on one visible design feature. That order usually produces better results than chasing five embellishments at once. If the box survives, the shine can actually do its job, and a simple 1.2 mm board wall can do more for perceived value than a dozen shiny extras. That is the kind of economy how to craft festival packaging kits needs when every penny is visible.
Step-by-Step Process and Timeline for Festival Packaging Kits
The smartest way I know how to craft festival packaging kits is to run the work in a sequence: brief, structure, artwork, sample, revise, produce, kit, ship, test. If you skip the sequence, you do not save time. You usually just move the delay from one department to another, which is how a 3-week job turns into a 6-week headache. I have seen teams try to “save a week” by approving art before the insert even existed. That week, predictably, disappeared into a hole. The sequence matters because how to craft festival packaging kits is a chain, not a single decision.
Start with the use case, not the art. I ask for the event location, expected foot traffic, average carry distance, temperature range, and whether the product will be sampled, sold, or gifted. A sunscreen kit at a coastal summer event in Brighton needs different materials than a chocolate sampler at an indoor winter market in Stockholm. That sounds obvious, yet I still see generic briefs that ignore heat, humidity, and UV exposure. A festival is not a quiet studio. It is basically a stress test with music, sunscreen, and a queue that moves 20 people at a time. If you are planning how to craft festival packaging kits, the environment should shape the brief before the design team opens Illustrator.
- Week 1: define the bundle, target price, and pack count. Decide whether the kit is for retail packaging, press gifting, or live sales.
- Week 2: build the structure and review a flat dieline or mockup. Check if the insert, tabs, and opening sequence make sense.
- Week 3: approve artwork and send a physical or digital sample. This is where how to craft festival packaging kits either gets easier or gets expensive.
- Weeks 4-5: revise, final-proof, and lock the production spec, including board caliper, print finish, and closure type.
- Weeks 6-7: manufacture, kitting, pack-out, and freight. Build in one extra day if the shipment crosses a port or major festival traffic corridor.
Delays usually happen in three places: proofing, material sourcing, and freight scheduling. Proofs stall when the team tries to sign off via scattered email threads. Sourcing stalls when the chosen paper stock has a 12-business-day lead time and nobody checked it. Freight stalls when the event date gets locked before the shipping lane is. I have seen all three happen in the same project, and that is how how to craft festival packaging kits turns into a panic exercise. The funny part, if you can call it funny, is that everyone acts surprised when the deadline they invented starts behaving like a deadline. Real planning for how to craft festival packaging kits includes slack for the things that will go wrong anyway.
Testing matters more than people think. One afternoon in a supplier warehouse in Shenzhen, we dropped a fully packed sample from 1.2 meters, closed it with the intended adhesive, and carried it around the yard for 15 minutes. The closure held. The printed panel scuffed. That was useful, because it told us to change the coating rather than the structure. A $220 sample test can save a $22,000 reprint, and that is one of those numbers that gets a room quiet very quickly. It is also a reminder that how to craft festival packaging kits should include abuse tests, not just desk reviews.
My rule is simple: do not approve production until the kit has passed a fit check, a carry check, and a booth check. Fit means the product sits correctly. Carry means a person can move it without discomfort. Booth means it reads clearly in a real display, not just on a render. That is the difference between beautiful packaging design and actually functional branded packaging. I would rather see an ugly pack that sells than a gorgeous one that falls apart before lunch, especially if the line will be assembled by temporary staff in a 9:00 a.m. opening window. The final filter in how to craft festival packaging kits is always live performance.
Common Mistakes When You Craft Festival Packaging Kits
Overdesign is the first trap in how to craft festival packaging kits. A team adds foil, embossing, a magnetic flap, a printed insert, a belly band, and a ribbon, then wonders why unit cost doubled and assembly time tripled. The most effective kits usually contain one memorable feature, not six competing ones. I say that as someone who loves good finishing. I just do not love paying for it when it does not earn its keep, especially not on a 2,500-unit run where each extra operation shows up in labor line by line. The best answer to how to craft festival packaging kits is often subtraction.
The second mistake is ignoring the environment. Festivals bring dust, humidity, spilled drinks, sun exposure, and repeated handling. I once saw a beautiful matte white carton turn gray by 2:00 p.m. because it was left on a wooden table near a food truck line in Cardiff. The material spec looked good in the studio and failed in the field. That is why how to craft festival packaging kits must include weather and handling in the brief. The weather does not care how elegant your mockup looked in the email thread. A pack that cannot tolerate the event conditions is not finished.
Another frequent failure is mismatched sizing. When the outer box is 4 mm too tight, staff force products into place, corners crush, and the whole assembly slows down. When the box is too loose, the contents shift, rattle, and make the product feel cheaper than it is. If you are using Custom Printed Boxes, insist on a physical sample with final product dimensions, not a guessed digital layout. “Close enough” is a phrase that has ruined many a good launch, and the correction fee from a plant in Suzhou or Foshan is never small. Precision matters a lot in how to craft festival packaging kits, because tiny errors become visible quickly.
I also see confusion around vendor coordination. One supplier prints the sleeve, another ships the insert, a third handles kitting, and nobody owns the final look. You end up with three shades of black, two different paper finishes, and a closure that fights the insert. The cleanest way to manage how to craft festival packaging kits across multiple vendors is to publish one spec sheet with exact board grade, PMS targets, tolerances, and pack-out instructions. Otherwise everyone is “almost aligned,” which is another phrase that should make you nervous, especially if one supplier is in Qingdao and another in Manchester. Strong coordination is part of the craft, not a bonus.
Assembly instructions matter too. If the box requires seven folds and two adhesive points, the instructions should say so clearly, preferably with numbered diagrams. I have watched event staff improvise assembly from memory, and the result was a pile of crooked lids and wasted time. A small instruction card can cut training time by 30% or more if the kit is complex enough. It is not glamorous, but neither is watching a line of people wait because a lid is fighting with a tab. For a 300-person activation, that wait can swallow a full 25-minute setup window. Good how to craft festival packaging kits work includes the people who will assemble the kit under pressure.
Here is the honest version: not every festival needs premium structure. Sometimes a folded carton, a clear label, and a sturdy outer shipper are enough. How to craft festival packaging kits is about matching form to use, not proving how much finishing your budget can absorb. That distinction saves money and usually improves the customer experience too. The crowd does not hand out points for overspending, and a $0.28 sleeve That Actually Works beats a $1.80 box that slows the booth down. If the answer to how to craft festival packaging kits creates friction, it is probably the wrong answer.
Expert Tips to Make Festival Packaging Kits Feel Premium
The easiest way to elevate how to craft festival packaging kits is to pick one design move and execute it with precision. One unexpected interior print, one tactile finish, or one custom insert can do more than filling every panel with decoration. I have seen a kraft outer shell with a printed cobalt interior look more premium than a fully laminated carton because the reveal felt intentional. That little moment of surprise is doing a lot of work, especially when the print budget is capped at $0.42 per unit and the whole run is 4,000 pieces. In other words, how to craft festival packaging kits well often means building one memorable moment rather than ten average ones.
Color hierarchy does a lot of heavy lifting in crowded spaces. Use one dominant color, one support color, and one small accent that draws the eye to the brand name or offer. When I worked with a snack brand at a trade event in Paris, we moved from a six-color layout to a three-color system and improved recognition from 10 meters away. That is package branding doing real work, not decorative theory. The difference was immediate, and a little embarrassing for the earlier layout, which had tried very hard and achieved very little. Strong color control is one of the quieter answers to how to craft festival packaging kits that people actually remember.
Typography matters even more than many marketers expect. On a noisy festival floor, people read first, admire second. If the type is too light, too condensed, or too small, the message disappears by 1.0 second. Strong hierarchy, a short claim, and one clear call to action usually beat a paragraph of copy. That is why how to craft festival packaging kits should always begin with legibility, not with visual clutter. Pretty type that cannot be read is basically expensive decoration, and expensive decoration does not move samples off the table. The fastest route to premium is clarity.
- Use a re-close feature: a tuck tab or sleeve keeps the pack useful after first opening.
- Make the sequence intuitive: open, reveal, remove, and carry should happen in one motion.
- Keep the insert visible: people trust product packaging more when the parts sit neatly and show purpose.
- Pre-kit off-site: packaged sets feel cleaner than loose pieces assembled under pressure.
- Print the essentials only: brand name, flavor or function, and a QR code are often enough.
Reusable outer sleeves are another smart move, especially when the attendee wants a keepsake. I have seen a rigid sleeve become a storage case for headphones, tickets, and receipts long after the event ended, including on trains from Rotterdam to Amsterdam. That kind of reuse increases perceived value without pushing the kit into luxury pricing. If you are serious about how to craft festival packaging kits that live longer than one transaction, build for a second use from the start. Otherwise it is just another nice-looking box with a very short life span. A second life is often what makes the first impression memorable.
Small operational tweaks can feel expensive to the designer but save money in the booth. Easy-open tabs reduce frustration. Bigger panel labels reduce mis-picks. Pre-sorted bundles reduce staff mistakes. A clear assembly order reduces training time for temporary hires, which matters when half the booth team is new and the event opens at 9:00 a.m. sharp. I have never seen a festival day become calmer because people had to guess how the box worked, and I have never seen an operations lead cheerfully accept a 14-step folding sequence at 8:55 a.m. If you want how to craft festival packaging kits to feel premium, make the experience calm.
Here is my opinion, and I will stand by it: premium does not always mean glossy. Sometimes premium means precise. A crisp fold, consistent color, tight insert, and calm structure make a brand look confident. That is the real lesson in how to craft festival packaging kits for current events, especially when the space is noisy and everyone else is trying to shout. Confidence reads better than excess, and a packaging run that holds its tolerances to within 1 mm usually reads as more expensive than it is. Precision is the premium signal that never feels forced.
Next Steps: Build and Test Your Festival Packaging Kit
If you want how to craft festival packaging kits to turn into a real project, start by locking three numbers: the event use case, the target unit cost, and the exact item list. Those three decisions shape everything else, from board grade to freight carton count. Without them, quotes arrive all over the map and design starts drifting. I have seen a supposedly simple kit turn into six contradictory estimates because nobody could agree on what actually needed to go inside, and the final cost landed 19% above the original assumption. Clarity is the cheapest part of how to craft festival packaging kits, and also the part people skip most often.
Then build a low-volume pilot. I like a pilot of 25 to 100 units because it is enough to expose fit issues, closure problems, and print misalignment without burning a full production run. Test the kit in real conditions: one staff member carrying it for 15 minutes, one table display under bright light, and one open-close cycle repeated at least 10 times. That kind of practical check is where how to craft festival packaging kits becomes less theoretical and more profitable. You learn what breaks before the crowd does it for you. A pilot does not need to be pretty; it needs to be honest.
Ask for feedback from three groups: booth staff, operations staff, and two or three target customers. Staff will tell you if the kit slows them down. Operations will tell you if the structure is hard to pack or ship. Customers will tell you whether it feels premium, confusing, or easy to carry. Those viewpoints rarely match, which is exactly why all three matter. I trust the person sweating behind the table as much as I trust the person holding the bag, because both of them know where the pain points are, whether the event is in Glasgow, Porto, or a field site near Frankfurt. That mix of views sharpens how to craft festival packaging kits better than any single opinion can.
After that, revise the spec sheet before you scale. Lock the board caliper, print method, finish, insert material, closure style, and assembly order. If you are still changing dimensions after the pilot, you are not ready for volume. Good how to craft festival packaging kits work is disciplined, not magical, and the brands that respect that process usually save the most money over time. The ones that skip it usually end up paying for all the mistakes they refused to test, sometimes twice when rush freight comes in from Shenzhen or Guangzhou. Discipline is dull until it saves the launch.
The best festival kits look simple because they were difficult to get right. They hide the debate, the testing, the supplier calls, and the sample failures. What the attendee sees is a neat, confident package. What the team gets is a kit that protects product, supports sales, and keeps the event running on schedule. If you remember nothing else, remember this: how to craft festival packaging kits is about solving four problems at once - brand, protection, speed, and carry comfort - and the strongest answers are usually the ones that survive a real booth floor in London, Bristol, or wherever the next crowd is standing. That is the part of how to craft festival packaging kits that separates a nice concept from a dependable result.
What should be inside festival packaging kits?
Include only the pieces that support the event goal: product protection, branding, quick handling, and easy takeaway. In most cases, a strong kit includes an outer pack, an insert or divider, a message card or label, and a closing or carrying element sized for the product and the crowd path. I always push clients to keep this lean, because every extra part has to earn its place, and a 250ml sample does not need the same architecture as a 1-liter bottle or a VIP press set. That same rule sits at the center of how to craft festival packaging kits without wasting material or time.
How much do festival packaging kits usually cost?
Cost depends on structure, materials, print coverage, order size, and whether assembly is done in-house or by a packaging partner. A simple paperboard sleeve might land near $0.15 to $0.27 per unit at 5,000 pieces, while premium kits can exceed $2.00 per unit once rigid board, inserts, and labor are included. Freight and damage buffer can change the story faster than people expect, especially if the run is moving from Guangdong to Europe in a 20-foot container. That is why how to craft festival packaging kits is as much a budgeting exercise as a design one.
How far in advance should I plan festival packaging kits?
Plan early enough to cover concepting, sampling, revisions, production, and freight, not just final artwork approval. A practical calendar should also include a testing window so you can catch fit, closure, or handling issues before the event goes live. If you leave testing until the week before launch, you are basically volunteering for stress, and most suppliers will still need 12 to 15 business days from proof approval to finished goods. Timelines are part of how to craft festival packaging kits, not something added at the end.
What materials work best for outdoor festival packaging?
Choose materials that handle heat, moisture, dust, and repeated handling without collapsing or smudging. Paperboard, corrugated, molded pulp, and certain reusable flexible formats can all work well when they are matched to the product weight, the weather, and the carry distance. I would rather use the right boring material than the wrong pretty one, especially if the event is outdoors in July and the table is under direct sun from 11:00 a.m. to 3:00 p.m. Outdoor conditions should shape how to craft festival packaging kits from the first sketch onward.
How do I make festival packaging kits feel premium without raising costs?
Use one or two high-impact design choices instead of adding expensive finishes everywhere. Clear labeling, strong structure, a smart opening sequence, and one tactile or visual surprise often create a premium feel more effectively than heavy decoration across the whole kit. Precision beats pile-on almost every time, and a well-drawn dieline in 350gsm C1S artboard can feel more expensive than a noisy box with three unneeded embellishments. That is the cleaner route for how to craft festival packaging kits that feel higher value without inflating the quote.

