Buyer Fit Snapshot
| Best fit | design protective shipping packaging buyer review for packaging buyers comparing material specs, print proof, MOQ, unit cost, freight, and repeat-order risk where brand print, material, artwork control, and repeat-order consistency matter. |
|---|---|
| Quote inputs | Share finished size, material target, print colors, finish, packing count, annual reorder estimate, and delivery region. |
| Proofing check | Approve dieline scale, logo placement, barcode or warning zones, color tolerance, and any recyclable or compostable wording before bulk production. |
| Main risk | Vague material claims, crowded artwork, or missing packing details can create delays even when the unit price looks attractive. |
Fast answer: Design Protective Shipping Packaging Buyer Review: Dieline, Finish, Proof, and Buyer Review should be specified like a repeatable production item. The safest quote includes material, print method, finish, artwork proof, carton packing, and reorder notes in one written spec.
What to confirm before approving the packaging proof
Check the product dimensions against the actual filled item, not only the sales mockup. Ask for tolerance on folds, seals, hang holes, label areas, and retail display edges. If the package carries a logo, QR code, warning copy, or legal claim, reserve that space before decorative graphics fill the panel.
How to compare quotes without losing quality
Compare board or film grade, print process, finish, sampling route, tooling charges, carton quantity, and freight assumptions side by side. A lower quote is only useful if the supplier can repeat the same color, closure quality, and packing count on the next order.
How to Design Protective Shipping Packaging That Works
Does a carton look bulletproof on the dock and still arrive split, crushed, or rattling at the customer’s door? I’ve watched that movie more times than I care to admit, and it usually means the design failed long before the truck pulled away. If you are trying to figure out how to design protective shipping packaging, stop treating foam as the universal fix and start controlling movement, impact, and pack-out behavior from the very beginning.
Most teams assume protective shipping packaging is just a thicker box with more filler. It is not. How to design protective shipping packaging is really a stack of tradeoffs: product risk, pack time, carrier abuse, freight charges, and what a return costs once customer support gets involved. None of that is glamorous. All of it is where margin quietly disappears.
This guide lays out a practical path for how to design protective shipping packaging for real SKUs, real routes, and real warehouse conditions. You will see the failure modes, fit logic, pricing ranges, test methods, and a launch workflow that still holds up after the first 500 shipments. It also shows how to design protective shipping packaging without turning every parcel into a freight bill with tape on it.
How to Design Protective Shipping Packaging
The blunt reality most teams miss
Most shipping claims come from movement, not from weak walls alone. I’ve seen cartons pass impact tests on paper and still fail because the product had room to bounce around inside. A ceramic mug packed in a large mailer with air pillows is the classic example: enough fill to avoid direct wall contact, but not enough restraint to stop the mug from pitching and spinning. Every bounce adds a little force, and those little forces add up fast.
That is why how to design protective shipping packaging begins with control, not volume. If the product moves, it fails more often than not. If it stays fixed in the intended orientation, moderate cushioning usually does the job. Think of the goal less as building a floating capsule and more as building a stable package system. For teams asking how to design protective shipping packaging, the first answer is simple: reduce movement before you increase material.
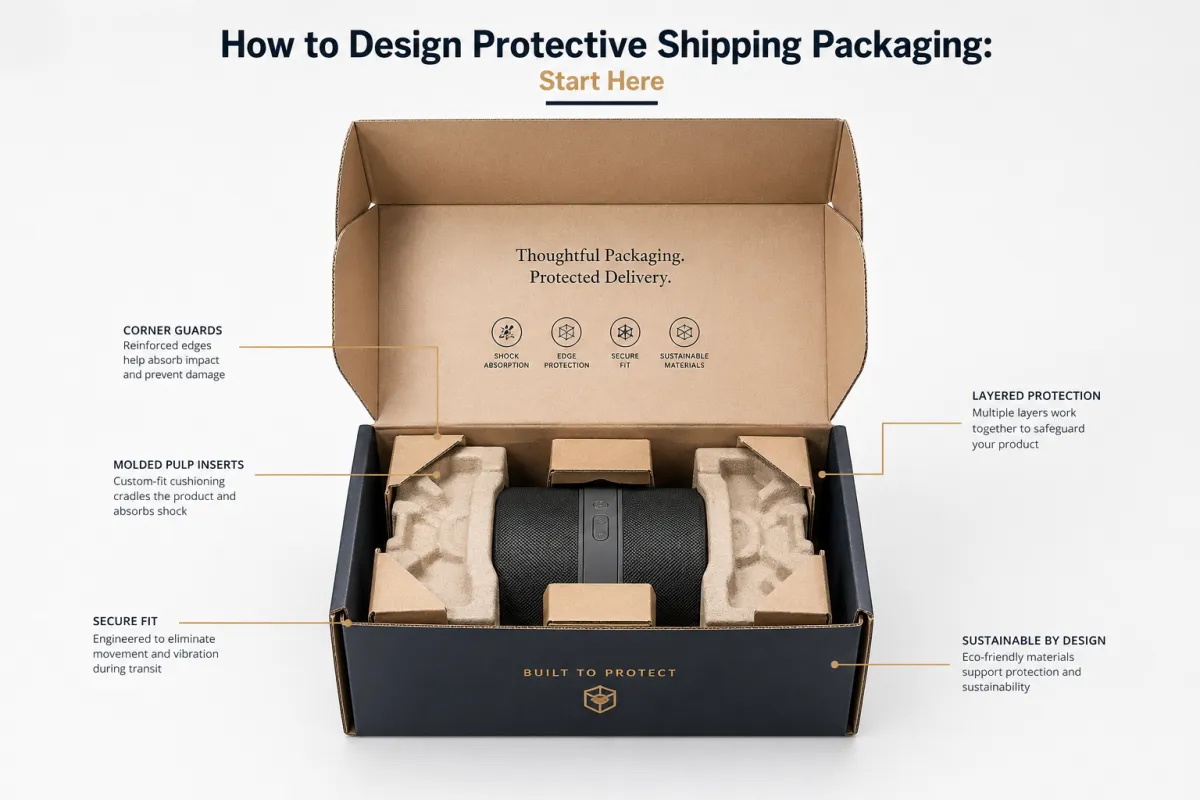
Protective shipping packaging is a system, not a single material choice. A usable spec usually includes these parts:
- Restraint: keeps the item from shifting, tilting, and rotating.
- Cushioning: absorbs shock from drops and rough handling.
- Container strength: resists load, compression, and puncture.
- Seals and edges: prevent tape, humidity, and opening failures.
- Marking and handling instructions: guide packer and carrier actions.
- Consistency controls: photos, checklists, and rework tolerance.
Once the packaging is treated as a system, the design process changes. You stop buying random materials and start checking whether each layer is doing a job. In practice, many teams spend too much on cushioning and ignore three weak spots: pack-out instructions, fit, and line speed. That is why how to design protective shipping packaging is really a process question disguised as a materials question.
If a buyer thinks this is overkill, say it plainly: protection without repeatability is decoration. A good packaging design lets a new packer follow the same sequence at 9:00 and 3:00. If two operators build two different solutions, your damage rate turns into a lottery, and nobody wants that kind of fun.
The baseline matters. For most operations, the best shipping spec is not the strongest box in the room. It is the package that protects consistently across carriers, at a cost that fits order economics, while still representing the brand properly. That means how to design protective shipping packaging is a balancing exercise, and the balance is measurable rather than fuzzy.
The balance has four real dimensions:
- Protection: avoid functional damage categories.
- Cost: unit cost, freight impact, and hidden failure costs.
- Labor: seconds per order and error risk.
- Brand message: premium feel, clean look, branded packaging cues.
The first three are math. The last is psychology and pricing. Ignore any one and the whole thing gets weird. If you are figuring out how to design protective shipping packaging, that tradeoff is the real starting line.
What Does Protective Shipping Packaging Need to Do?
Where packages actually fail
Shipping damage is mostly mechanical. Shock, vibration, compression, and puncture are the four main vectors. Shock happens when a parcel drops or gets jerked. Vibration happens in conveyors and line-haul movement. Compression happens during stacking, especially in trailers and rail. Puncture happens when something sharp gets inside the carton through holes, edges, or weak seams.
So how to design protective shipping packaging for your SKU means mapping which of those vectors is the highest risk. A small foam toothbrush set may need puncture shielding and moisture control before heavy cushioning. A 2kg metal tool may need high-compression stack resistance first. If the question is how to design protective Shipping Packaging That survives the real route, start with the dominant failure mode, not the most visible one.
Testing programs from ISTA and packaging.org are built to simulate these conditions: repeated handling, drop heights, vibration exposure, and stacking. If your package survives a realistic run, it is far less likely to fail later. If it only looks clean in the lab, the real world will expose the gap quickly.
How cushioning helps, and where it does not
Cushioning reduces peak force by extending impact time and distance, but it does not erase impact energy. The physics stays the same. If momentum transfers too fast, the shell breaks or the product deforms. Many SKUs do not need 100% void fill; they need controlled compression and immobilization. Teams often fill every empty space and call that safe. Usually it is just extra shipping mass and slower packing.
Picture a fragile bottle that can move if the carton is inverted. You can spend on 100mm of cheap air pillows, but if the bottle rotates around its center and strikes a corner repeatedly, it still cracks. A cut insert or molded cradle can lock that bottle and reduce movement by more than 70%, often with less total material than blanket fill. The smarter move is stopping movement first, then cushioning. That is one of the simplest answers to how to design protective shipping Packaging for Fragile goods.
Real-world comparison of common methods:
- Corrugated inserts: strong rigidity and defined restraint; best when geometry is regular.
- Molded pulp: solid point-to-point support, good for premium feel and many cosmetics/electronics cases.
- Foam (PE/EPE/EVA): excellent shock absorption, expensive and often less sustainable.
- Paper-based void fill: fast, lightweight, lower-cost, but variable under repeated compression.
- Air pillows: good for lightweight fill, risky in rough loops if pinholes and heat are present.
- Double-wall cartons: best for compression-heavy lanes, high stack, heavy freight, and repeated handling.
Different products, different physics
All SKUs do not fail the same way. Glass fails from shock at edges. Electronics fail from board-to-board impact, static, and compression points. Cosmetics often fail from heat, leakage, and puncture. Books fail from corner crushing and repeated bending. A book shipment can look sturdy and still crease under side load if the box is undersized or unsupported.
So in practical terms, how to design protective shipping packaging starts with the product family, not the cheapest box in the catalog. A one-size shelf approach to packaging is how avoidable returns keep showing up. If you are still asking how to design protective shipping packaging for mixed product lines, the answer is to separate the physics by SKU family, not by brand preference.
Transit testing is not optional for fragile or medium-risk SKUs. Start with internal drop and vibration checks, then run a controlled pilot route. A ten-box sample can reveal the weak point, but a 20-50 shipment pilot usually exposes labor and orientation failures. If a spec does not hold up in a field pass, the design is still incomplete.
That is the first hard rule: ship first, trust later is how returns get built into the model. Design and prove before volume. If you are learning how to design protective shipping packaging, this is the point where theory meets the warehouse floor.
Key Factors That Decide the Right Packaging Design
Start with the object, not the order
Product specs rule the first hour of planning. Weight, fragility, geometry, center of gravity, and accessory movement determine the starting design. An 800g perfume bottle and a 4kg cast-iron pan cannot use the same restraint strategy, even if both weigh less than a laptop. Surface finish matters too. Glossy glass, soft-touch paints, and thin shells need a different support approach than raw steel.
Ask these specific questions first:
- Can the product move inside the package, or is it fixed as one piece?
- Does the item have a weak corner, side, connector, seam, valve, or cap?
- Will movement transfer directly to a fragile sub-component?
- Is moisture or heat a likely issue for this route?
Teams that skip this stage usually find defects on the first returns. That problem is preventable. The first two days of any project should be spent auditing the actual product and its failure points. If you are serious about how to design protective shipping packaging, this audit is the part that saves the most money per hour.
Shipping conditions drive design intensity
Shipping method changes the spec fast. Parcels moved through parcel carriers usually see more sort-and-dispersion events than full pallet freight, though some lanes add less long-haul vibration. International routes can mean longer transit and wider climate exposure, especially humid corridors and extreme temperature swings. A container crossing an ocean can sit in a hot warehouse long enough to soften tape and adhesives.
Switching from domestic to international is not a route addition; it is a risk multiplier. Humidity can weaken carton flaps, labels can fail in wet zones, and humidity-sensitive accessories can pop loose. So yes, how to design protective shipping packaging cannot stay identical across regions. The same item may need different packaging design for parcel, pallet, and export lanes.
Distance matters in another way. Longer routes mean more handling events. More handling events mean more shock pulses. If the normal route includes 25-plus touches, the vibration and corner-stability assumptions have to change. That is why how to design protective shipping packaging for a 200-mile route can be a totally different problem than how to design protective shipping packaging for a six-week export lane.
Fulfillment flow determines what is actually feasible
Design is only as good as the team executing it. If the line can only support one-step packing, avoid insert systems that need two operators and a pile of extra parts. If table space is tight, oversized foam forms create chaos and slow the line. If staff are temporary or seasonal, visual instructions and tolerances need to stay simple.
In order fulfillment, seconds matter. If a premium packout adds 12 seconds but lowers the damage rate by 0.8%, compare that against unit economics. A slower line can still be worth it when damage refunds are large. If labor is already the binding constraint, simpler Custom Printed Boxes with pre-set separators may beat handcrafted inserts. That comparison belongs in every discussion of how to design protective shipping packaging because the warehouse has to build the spec, not just approve it.
That point leads back to economics: your best design is not always the one with the strongest spec; it is the one that performs at scale without creating new bottlenecks.
Brand, user expectations, and message
Branding can improve trust at delivery, especially in ecommerce. A premium perfume may need a clean branded unboxing with a clear structure, while a value household part can accept a simpler outer layer. That is not “cheap vs expensive.” It is expectation management. A low-cost replacement item in premium packaging creates confusion and complaint risk. A premium item in poor protection creates expensive damages and trust loss.
In other words, retail packaging and shipping protection should feel like one system. If you invest in package branding, protect that image by reducing chaos, loose components, and messy fill. A tidy, repeatable pack is a stronger sales signal than flashy wrapping. The question of how to design protective shipping packaging often becomes a question of how to protect the brand without inflating the bill.
Cost and Pricing for Protective Shipping Packaging
Break cost into the three buckets that matter
Most estimates fail because people compare only material unit price. That is bad accounting. The true cost has three buckets: materials, labor, and damage risk. You can buy a cheaper box and pay for it later in extra tape, longer pack times, and damaged returns. That is not savings.
Let’s be practical with ranges for 5,000 pieces, not hand-wavy estimates:
- Printed poly mailers + light fill: typically $0.18–$0.45 per unit.
- Stock single-wall corrugated shipper + paper fill: $0.35–$0.95.
- Upgraded 3-ply printed boxes: $0.90–$2.20.
- Custom molded pulp insert plus carton: $0.95–$3.50.
- Double-wall custom boxes with structured inserts: $2.20–$6.00.
- Premium rigid inserts for electronics: $1.20–$4.50.
These ranges are realistic for typical medium-volume digital quoting. Tooling, artwork complexity, and substrate grade can move numbers up or down. Small runs usually sit at the high end because tooling is spread across fewer units.
Labor adds a silent layer. If a package needs 20 extra seconds on a 30-second build, that is a 67% time increase. At $15/hour blended labor, that adds about $0.14 per order before damage or returns. If returns cost $35-$120 each depending on item value, labor quickly becomes the smaller lever. For that reason, how to design protective shipping packaging should always be compared on both line speed and defect rate.
Then comes damage cost. A 1.5% damage rate on 10,000 units of a $25 item is not a rounding error; it is painful, especially once reverse freight and support tickets enter the picture.
Compare options with total landed cost
Use this mental equation before you lock specs:
Total landed cost = packaging cost + labor cost + freight impact + expected damage cost + support/reverse handling cost.
That is the only metric worth using. Here is a comparison you can use in a planning meeting:
| Packaging Type | Typical Unit Cost (5k pcs) | Protection Focus | Best Use Case | Hidden Tradeoff |
|---|---|---|---|---|
| Poly mailer + thin poly edge padding | $0.18–$0.45 | Light puncture + abrasion control | Soft goods, apparel, small flat items | High movement risk without inserts |
| Stock corrugated shipper + paper void fill | $0.35–$0.95 | Moderate drop and compression damping | Books, accessories, low/medium fragility goods | Heavier packing labor and variable consistency |
| Custom corrugated insert in shipper | $0.95–$3.20 | Restraint, positional stability, reduced shock transfer | Glass, rigid cosmetics, compact electronics | Higher tooling and storage footprint |
| Molded pulp form + secondary bag | $1.10–$3.50 | Surface support and custom-shaped void control | Bottles, cosmetic containers, premium gadgets | Longer lead times, heavier inbound packaging |
| Double-wall carton + custom insert | $2.20–$6.00 | High compression, long-haul stack protection | High-value glassware, heavy tools, multi-unit cartons | Higher freight from size and dimensional weight |
Freight and storage costs are where many teams get hit
Dimensional weight kills budgets quietly. A larger carton can raise freight class even if the item is light. I regularly see how to design protective shipping packaging decisions fail because teams chase more void fill and push cartons into the next size bracket, adding 10-30% to freight quickly. Storage cost is the second hidden issue: oversized packaging takes floor space, and floor space is not free in fulfillment. If you are learning how to design protective shipping packaging for scale, freight math matters as much as drop performance.
Returns are a third trap. If average return resolution is $8 in freight + $15 labor + $3 CS touch + $20 product markdown, the protection plan just became a six-figure risk at scale.
Do not pick only by carton price. A $0.50 increase that drops damage from 2% to 0.5% almost always wins. If your Custom Packaging Products menu offers alternatives, compare them in a scorecard, not by catalog order.
How to Design Protective Shipping Packaging: Step-by-Step Process and Timeline
1) Product audit and threat mapping
Start with the item, not the carton. Measure length, width, height, weight, and center of gravity. Identify weak points: protruding corners, threaded parts, seals, spigots, glass bulbs, and removable components. Then define the worst-case shipping scenario for the route: rough domestic line, long distance, possible pallet stack, or multi-stop transit.
For this stage, write down acceptance thresholds. If a package tolerates one 30 cm edge drop without permanent deformation and no more than 1mm shock damage to the core product, good. If not, restraint comes first. Many teams move to materials too early and invent the process later. Knowing how to design protective shipping packaging starts with defining what failure actually looks like.
Use simple photos and one-page notes. Include dimensions in each axis and clear “do not bend” lines. A good audit reduces argument and speeds approval.
2) Build 2-3 prototype options
Never pick one design and lock it blindly. Build three variants: one low-cost, one balanced, one premium protection. Test each with the same inner item and the same process. If all three fail in the same way, redesign geometry instead of changing foam thickness.
For fragile SKUs, include at least two restraint philosophies:
- Braced insert strategy (fixed point support).
- Void-fill-only strategy (movement reduction only).
- Hybrid strategy (minimal insert plus controlled fill).
Then compare not just damages, but speed and consistency. A strong package with poor repeatability is usually not acceptable at scale. If an operator must decide between two options every box, line speed drops and defects rise. This is exactly where how to design protective shipping packaging becomes less about theory and more about what packers can actually repeat.
3) Real handling tests before volume
Testing is where decisions become objective. Run a realistic matrix:
- Drop: representative corner and face impacts.
- Vibration: route simulation or courier sort-cycle loop.
- Compression: stacked loading checks at expected pallet heights.
- Pilot shipments: 20-50 real orders into the actual flow.
Field trials beat showroom tests. A lab may pass a drop, but the driver’s dock bounce can still crack a weak joint. In practice, small pilot batches catch packaging sequence mistakes that no one spots at the sample table. If you need a practical answer to how to design protective shipping packaging that lasts beyond the test lab, the answer is to test in motion, not in theory.
“The first production launch is not a test; production is the test. If you need changes after 2,000 boxes, you will never recover those costs cleanly.”
That sounds blunt because the math is blunt.
4) Timeline planning for each complexity level
Timeline depends heavily on the spec:
- Stock-based solutions: 3-10 business days after sign-off and sample approval.
- Custom printed boxes: 2-6 weeks with dieline checks and approvals.
- Tooling-heavy custom inserts: often 4-10 weeks including sampling, revisions, and first article approval.
If there is no time for at least one revision cycle, you are choosing speed over reliability. That can be acceptable for low-value items with high tolerance. For premium goods, it is usually a false economy.
Plan a clear workflow: design intent, sampling, quality checks, SOP release, packer signoff, and reorder cycle. Teams either look disciplined here or improvised. If you want to know how to design protective shipping packaging without last-minute panic, timeline discipline is part of the answer.
5) Spec freeze and consistency controls
Once the design is approved, lock it with hard controls:
- Final dieline PDF with tolerances and materials.
- Pack-out instruction photos and step sequence.
- Incoming inspection criteria for incoming components.
- Reorder thresholds tied to damaged-pack and complaint rates.
Reorder timing is underrated. A lot of teams run stock to zero, rush replacements, and lose momentum. A proper plan for Custom Shipping Boxes and components prevents rushed, cheap substitutions that break the spec.
At this point, how to design protective shipping packaging stops being a meeting topic and becomes an operating system. If the process breaks, quality breaks.
Common Mistakes That Waste Money or Cause Damage
Big mistakes that look innocent
Mistake one: oversized boxes and lots of fill. Extra space is not protection. It is a playground. Products move, rotate, and impact again. If the package looks roomy, you are paying for air and hoping for the best. Anyone asking how to design protective shipping packaging should treat excess void space as a warning sign, not a win.
Mistake two: overpacking with too much cushioning. Too many layers can compress the product until a brittle part fails. Flexible packs are good; rigid overwrap is bad if the package can crush the SKU. For many cosmetic bottles, 50mm of air pillows everywhere can create side pressure and seam stress.
Mistake three: ignoring labor cost. I have seen strong protection concepts rejected because packing speed dropped by 35% and errors doubled. A design that saves 0.5% in damage but adds 3 QC escapes each shift is not a win.
Mistake four: assuming the first sample is enough. One prototype is a reference, not proof. Real transport is rougher than factory benches. If you skip pilot shipments, the return loop will teach you after customers pay.
Mistake five: forgetting returns. Packaging that cannot be opened cleanly, resealed, or reused for partial-return workflows creates post-sale frustration. Customers punish messy packaging experiences with tickets and poor ratings.
If lower return rates matter, include reverse logistics on day one. A good package protects forward and backward motion, especially for ecommerce shipping where customers may inspect quickly, not carefully. The best answer to how to design protective shipping packaging is not just better outbound protection; it is a better full-cycle customer experience.
Expert Tips and Next Steps for a Better Shipping Spec
Practical principles you can apply Monday
Design for the hardest lane first, not the easiest. If a package survives rough warehouse-to-port-to-dock conditions, it usually survives normal parcel lanes. That is simple logic with hard results. Build for risk, then trim where safe. If you are comparing options for how to design protective shipping packaging, this is the cleanest way to avoid underbuilding the spec.
Standardize a few proven box families. Too many SKUs with custom sizes means endless material handling and training complexity. A smaller matrix of stable formats lowers inventory errors and reduces average packaging prep time. I am not anti-customization. I am pro-repeatability.
Document the pack-out sequence with photos and measurements. A “this side up” photo in 1:1 scale costs less than one operator orientation mistake. Include orientation, cushion placement, and closure method on one page.
Run a pilot before full rollout. If your damage rate is under 0.5% and line speed is acceptable in pilot, scale. If not, adjust and pilot again. That is cheaper than emergency rework.
For premium or branded packaging goals, decide how much finish is worth. Custom branded packaging has value, but if the branding layer drives defects, simplify the print and improve restraints.
Build your decision on a scorecard. Put three options in writing: cost, speed, damage expectation, and aesthetic fit. Approve one. Not two. Not three. One.
Concrete next step: choose your target SKU, create three variants, estimate total landed cost, run 20 pilot shipments, and keep the version that protects while minimizing labor. That is the practical way to figure out how to design protective shipping packaging without inflating cost.
To simplify sourcing and reduce chaos, compare materials and carton options in your catalog via Custom Poly Mailers and the broader portfolio in Custom Packaging Products. Then align the choice with your test plan, not your favorites.
If you want a short memory aid: start with threat mapping, prototype three ways, test hard, and only then standardize. There is no shortcut. That is the full answer to how to design protective shipping packaging that still protects, still presents, and still respects your cost structure.
FAQ
How do you design protective shipping packaging for fragile products?
Map fragile points first, especially corners, joints, lids, and seams. Choose a restraint method that keeps those points from taking impact directly. Use inserts when position and orientation matter more than empty space, then verify with real handling plus a pilot shipment. If you are still deciding how to design protective shipping packaging for a glass or ceramic item, restraint usually beats added volume.
What is the best material for protective shipping packaging?
There is no universal best material. Weight, fragility, distance, and climate decide the answer. Corrugated inserts are often a solid middle ground; molded pulp is good for shaped retention; foam is still strong for shock in some heavy SKUs. The best choice balances protection with labor and budget.
How much does protective shipping packaging cost per order?
Basic solutions can stay in a low-cost range, but fragile or high-value products often need a higher specification. Compare materials, labor, freight, and damage returns together. Even a small increase per unit can be cheaper than repeated damage claims. That is why how to design protective shipping packaging should be judged by total landed cost, not carton price alone.
How long does it take to design shipping packaging?
Simple stock-based packaging can move in less than two weeks after approval. Tooling-heavy custom inserts or printed runs usually need several weeks. Most delays happen during test revisions. The fastest path to delay is skipping pilot validation and fixing failures after launch.
Should I use void fill, inserts, or a stronger box?
Use inserts when the product must be fixed in place. Use void fill when you mainly need shock absorption and minor movement control. Use stronger cartons when compression, puncture, or stacking is the main risk. In practice, many good designs use all three in balanced proportion. If you are learning how to design protective shipping packaging, start by asking which force will do the most damage, then build around that.