A Frosted Zipper Bag can look polished on its own, but the insert inside it decides whether the piece feels intentional or improvised. The jewelry Frosted Zipper Bags Packaging Insert checklist keeps the small decisions aligned: fit, contrast, material, and pack-out.
Frosted film softens contrast, so an insert that looks clean on screen can look dull or blurred in hand. For earrings, pendants, and small gift pieces, the card is often the first rigid element the customer notices, which makes size and print choices part of the package structure, not just decoration.
"Small insert jobs usually fail because the fit, contrast, or folding logic was left vague, and the problem only shows up after the bag is sealed."
For buyers coordinating multiple SKUs, the checklist reduces back-and-forth before artwork starts and helps keep Custom Packaging Products consistent across bags, cards, and display materials.
Why the jewelry frosted zipper bags packaging insert checklist matters
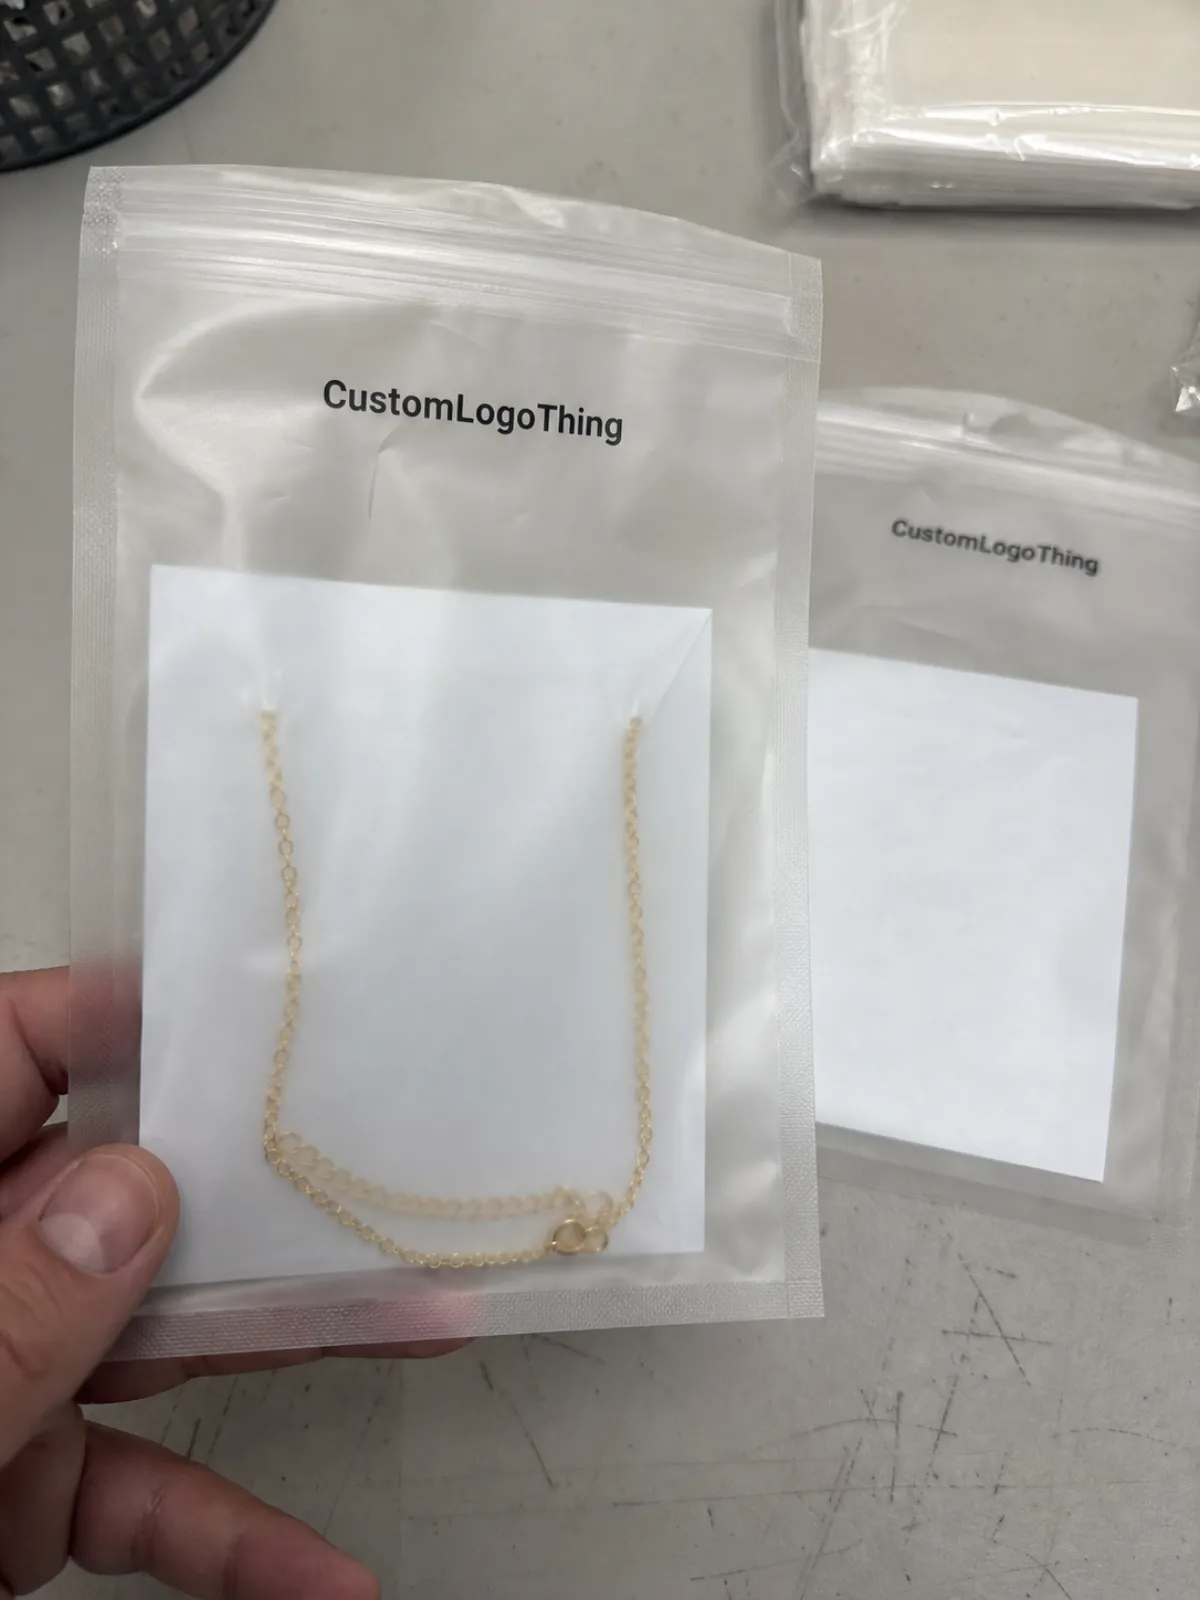
The insert does more than carry a logo. It gives the pouch structure, keeps delicate items from tangling, and creates a visual anchor inside a translucent package. A strong insert makes the bag feel deliberate; a weak one makes even a good pouch look unfinished.
Frosted plastic changes the visual math. Light is diffused, so thin type, pale ink, and fine line art can disappear. Slightly heavier fonts and stronger color usually read better at arm’s length, especially under retail lighting.
The checklist should begin before artwork: confirm usable interior dimensions, choose stock, set print method, define fold or score lines, and verify how the card sits in the bag. If those calls are vague, the design can still look fine in PDF form and fail on press.
There is also a practical side. A well-planned insert can carry product names, care instructions, SKU data, and barcodes, reducing the need for extra tags or labels. That can simplify hand-packing and lower clutter at the same time.
How the insert and zipper bag work together
Think of the insert as a small display panel. It sets the tone for how the buyer reads the product, separates delicate pieces, and helps a necklace or bracelet stay centered instead of drifting in the pouch.
Zipper closure affects fit more than many buyers expect. If the card is too tall, it presses into the seal and bows. If it is too short, it shifts around. The best spec leaves room for the zipper track, any fold, and the loading motion on the packing line.
Opacity and color treatment matter too. Frosted packaging softens whatever sits behind it, so line weight becomes functional. Very light ink, fine barcode bars, and small text can fade. Strong black, a deeper brand color, or a bolder sans serif often survives the diffusion better.
The insert can also carry operational information without cluttering the pouch exterior. SKU, care text, product size, and compliance language can move inside the bag, leaving the outside cleaner and easier to read.
When brands use custom printed boxes alongside frosted pouches, the insert should feel related, not copied. Matching type weight, spacing, and brand color logic keeps the system consistent across shelf display and unboxing.
Spec the size, stock, and print details that matter
Start with the usable interior size of the bag, not the outer dimensions on the supplier sheet. A zipper seam or rounded bottom can change the true fit by several millimeters, and that is enough to create buckling or awkward loading.
Stock choice shapes both appearance and handling. Lighter board lowers cost and bulk, but it can curl. Heavier stock lies flatter and feels more premium, though it raises unit cost and can slow pack-out. Matte or soft-touch finishes often read better in frosted packaging because they cut glare.
For many jewelry jobs, 14 pt to 18 pt paperboard is the practical range. If the insert carries only a logo and one line of copy, that is usually enough. If it also needs care instructions, a QR code, or a short product story, 18 pt to 24 pt board helps keep the card flat and readable. FSC-certified paper is worth requesting if sustainability claims matter; certification can be verified through FSC.
Printing details deserve the same discipline. Decide whether the insert is single-side or double-side printed, confirm bleed and safe zone, and set the smallest type size you will accept. On compact cards, anything below 6 pt is risky unless the font is open and the strokes are strong. If a barcode must scan, test it on the actual stock, not only in a PDF proof.
Finishing choices affect feel and function at once. Rounded corners reduce wear, score lines help with clean folds, and an aqueous coating protects the ink without making the surface too slick. Soft-touch lamination adds a premium hand feel, but it can mute very dark solids. None of these is universally right; they depend on the jewelry line, the bag size, and how much handling the insert will see.
| Insert option | Typical feel | Indicative price at 5,000 pcs | Best use | Main tradeoff |
|---|---|---|---|---|
| 14 pt uncoated board | Clean, light, functional | $0.06-$0.11 each | Simple logo card, low ink coverage | Less premium hand feel |
| 18 pt coated board | Crisper color, flatter profile | $0.09-$0.16 each | Most custom jewelry pouch inserts | Can show glare under bright light |
| 24 pt matte or soft-touch board | Heavier, more upscale | $0.16-$0.28 each | Premium gifting and retail sets | Higher cost and slightly bulkier pack-out |
| Specialty stock with metallic ink | High impact, brand-forward | $0.22-$0.42 each | Hero SKUs and seasonal launches | More setup time and tighter proofing |
Supplier quotes should list the same details line by line: dimensions, stock weight, finish, ink coverage, quantity, folding method, and shipping terms. Without that, the numbers are not comparable. A lower quote may exclude folding labor, proof charges, or freight, which changes the landed cost fast. If the insert must survive transit stress, ask whether the supplier has ISTA testing familiarity through ISTA logic.
Cost, pricing, and MOQ tradeoffs for insert orders
Insert pricing usually splits into setup and unit cost. Setup covers prepress, die cutting, file preparation, and proofing. Unit cost covers material, ink, finishing, and labor. On short runs, setup can dominate the quote.
Quantity changes the math quickly. At 1,000 pieces, a custom insert may land around $0.18-$0.45 each depending on stock and coverage. At 5,000 pieces, the same design can move closer to $0.08-$0.22 each. Larger orders spread setup costs across more units, which is why suppliers often show price breaks at 3,000, 5,000, and 10,000 pieces.
Minimum order pressure is real, especially when the design uses specialty inks, custom dies, or unusual folds. A supplier may accept a lower volume run, but the per-piece price usually reflects the extra handling. For a new jewelry line, a simpler first-order version is often better; once the size, branding, and loading method are stable, the finish can be upgraded.
The cleanest way to compare quotes is to lock the same spec across every vendor: dimensions, stock, print method, finish, packing method, and freight terms. Without that, the quotes are not truly competing. One supplier may include carton packing and an approved proof; another may charge separately for both.
Hidden costs matter more than most buyers expect. Rush fees can add 10% to 25%. Color matching may require extra proof rounds. Folding inserts by hand adds labor. Freight for heavier paperboard can shift landed cost more than the unit price suggests.
Process and turnaround: from dieline to packed cartons
The production path is predictable. First comes the dieline, then artwork approval, then the proof. If a sample is needed, it should happen before mass production. After approval, the printer runs the job, finishes it, folds or scores it, counts it, and carton-packs it for shipment.
Lead time usually expands in three places: revisions, strict color matching, and physical sample approval. A supplier who says production is 8 to 12 business days is not giving the full timeline if the project still needs proof changes after that.
Prepress readiness matters more than many teams expect. Final copy, correct logo files, accurate dimensions, and a settled barcode can shave time off the order. Missing files or vague measurements do the opposite.
Shipping and packing should be part of the timeline from the start. Inserts often need to arrive before the bags are filled, so the production window and packing window have to line up. If the inserts are tied to a launch, build in transit time, unpacking time, and a buffer for reproofing.
Common mistakes that cause reprints or slow launches
The most common mistake is sizing the insert to the bag’s outer dimensions instead of the real interior opening. On paper, the card fits. In the bag, it catches at the zipper area or has to be forced in.
Low-contrast design is another repeat problem. A pale logo on frosted plastic may look elegant in a PDF and disappear in the hand. Thin typography, weak black, and small copy all soften more than expected once they sit behind the pouch film.
Skipping a physical sample is risky. A mockup on screen will not show edge curl, ink density, fold memory, or the way the card sits once jewelry is loaded. The same design can feel sharp digitally and awkward in real life.
Operational misses are just as costly. Orders get delayed because a SKU changed after approval, compliance copy was still being edited, or no one ordered enough overage for damaged cartons.
- Measure the usable interior, not the outer bag size.
- Check color and contrast under store lighting.
- Approve a folded sample before release.
- Hold back enough overage for packing loss and QA rejects.
- Lock copy, barcode, and SKU data before proof approval.
It also helps to think like a packaging team that expects transit, not just a print buyer. Guidance from Packaging and processing resources and ISTA reminders both point to the same reality: a good-looking component still has to survive handling, stacking, and shipment.
Expert tips for cleaner approvals and next-step planning
Keep one master spec sheet. It should hold the insert size, stock, finish, ink build, carton count, and approved artwork version. That file becomes more valuable with every reorder because it keeps the next run from depending on memory or old email threads.
Review the insert in the real environment. Put it in the Frosted Zipper Bag, add the jewelry, and check it in daylight and under retail lighting. Then step back to arm’s length. If the logo still reads clearly there, the spec is probably sound.
When possible, ask for two samples: one for visual approval and one for fit testing. Presentation and function are not the same test. A card can look beautiful and still be awkward to load; it can fit perfectly and still feel visually flat.
Ordering a small overrun is also practical. A little extra inventory usually costs less than rushing a second print run after launch. That matters more if the inserts are tied to a store opening, wholesale ship date, or influencer release window.
Use the checklist at art proof, sample approval, and carton count. That routine saves time, reduces errors, and keeps branded packaging consistent as the line grows.
What stock works best for a jewelry frosted zipper bag insert?
Most buyers start with a lightweight coated or uncoated paperboard that stays flat without adding much bulk. If the insert needs a more premium feel, a heavier matte stock usually reads better through frosted plastic. A real sample with the actual jewelry piece inside the bag is the best test.
How do I size a frosted zipper bag insert so it fits correctly?
Measure the usable interior width and height of the bag, not the outside dimensions on the spec sheet. Leave room for the zipper seal, any fold lines, and a smooth loading motion. A printed sample is the best way to confirm the insert does not buckle or slide.
What affects the unit cost of custom insert packaging the most?
Quantity, stock weight, print coverage, and finishing usually have the biggest effect on unit price. Setup charges matter more on short runs, while larger orders spread those costs out. Folding, packing, freight, and color matching can also move the number more than buyers expect.
How long does turnaround usually take for custom insert orders?
Turnaround depends on artwork readiness, proof approval, and whether the supplier needs a sample sign-off. Clean files and final copy move faster than designs that need multiple revisions. It is smart to build in extra time for shipping and any reproofing.
What is the most common mistake in a jewelry insert checklist?
The most common miss is approving a design that looks good digitally but fails once it is folded and placed inside the bag. Low contrast, tight safe zones, and missing overage are also common causes of rework. A real-world fit test prevents most of those problems.

