Jewelry Unstructured Dad Hats material sample guide sounds narrow, but the buying decisions behind it are not. A swatch can feel relaxed and refined in the hand, then behave completely differently once it is cut, sewn, embroidered, packed, and worn for a full day. For jewelry brands, that difference matters because the cap is rarely judged alone. It sits beside packaging, product cards, and display materials that already signal taste and restraint.
"A swatch shows the direction. A sewn sample reveals the compromise."
Jewelry Unstructured Dad Hats Material Sample Guide: What a Swatch Reveals
The first mistake many buyers make is treating a swatch as if it were a finished cap in miniature. It is not. A swatch tells you about color, surface, and basic drape, but it cannot fully predict crown recovery, visor behavior, or how the fabric reacts to embroidery tension. Two fabrics can share the same weight on paper and still wear very differently. One may sit softly and fold cleanly; the other may look thin after washing or collapse around the front panel once a logo is stitched in.
That is why the best sample review starts with context. An unstructured dad hat works well for jewelry branding because it reads casual without feeling disposable. The softer crown can balance polished packaging, especially if the rest of the line uses matte card, brushed paper, or clean label design. But soft does not mean shapeless. If the front panel has no recovery, the embroidery area can buckle, and a small logo that should feel elegant begins to look tired.
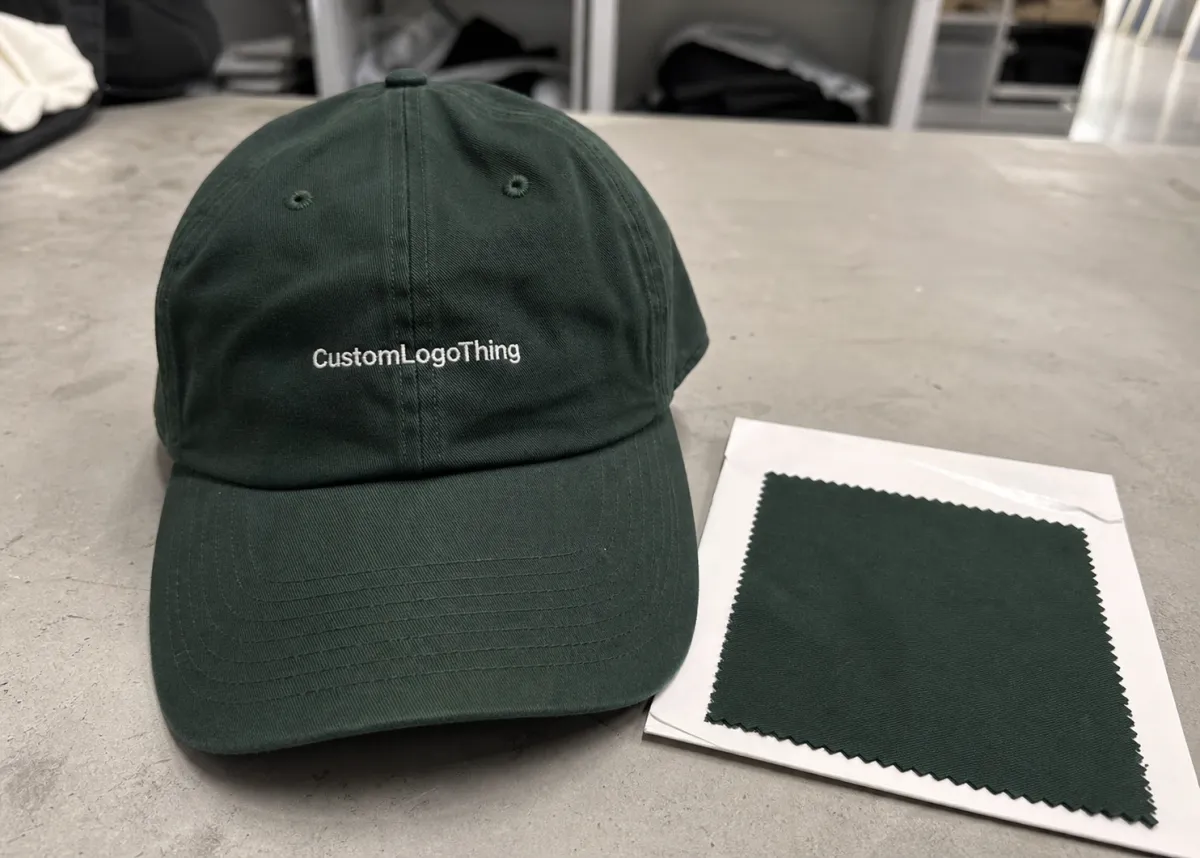
- Daylight check: inspect the swatch in indirect daylight to judge true color depth and surface texture.
- Retail light check: compare it under warm indoor lighting, where sheen and undertone shifts become easier to see.
- Hand test: squeeze, fold, and release the fabric to see how quickly it recovers.
- Use-case check: compare the sample against jewelry packaging, hangtags, and display props before approval.
The use-case check is where practical buying starts. A cap that looks good beside a velvet pouch may look too rough beside high-gloss packaging. A brushed cotton cap can harmonize with recycled board and minimal typography. A shinier cloth may fight the rest of the presentation, even if the color is technically correct. The sample should tell you whether the product belongs in the same visual family as the jewelry line.
Material names alone are not enough. Cotton twill, chino, canvas, washed cotton, and blends can all land in the same broad category of unstructured caps, yet each changes the reading of the hat. Cotton twill is usually familiar and easy to wear. Chino tends to look cleaner and smoother. Canvas feels firmer and more utilitarian. Brushed cotton softens quickly and can read more premium in hand, though it may show wear sooner if the finish is too aggressive. In the 6.5 to 8.5 ounce range, the finish often matters more than the number.
Fabric, Stitching, and Finish: What Changes the Hand Feel
Fabric is only the starting point. Stitching, seam placement, sweatband quality, and wash treatment shape the actual hand feel once the hat is assembled. Buyers often focus on outer cloth because it is visible, but the interior decides whether the cap feels deliberate or rushed. A tidy sweatband, even topstitching, and flat seam tape usually make a bigger difference than a subtle change in fabric weight.
That difference shows up fast during sampling. If the interior seam allowance is bulky, the cap can irritate the forehead even when the outer finish looks fine. If the sweatband is stiff, the cap may feel less breathable than expected. If the stitch density is inconsistent, the logo or panels can pucker after a few wears. None of those problems are dramatic in isolation. Together, they create the feeling that the cap is not quite finished.
Finishing methods also deserve a closer look. Garment wash gives a relaxed, broken-in feel, but it can flatten the crown and soften the edges of embroidery. Enzyme wash can smooth the surface without making the cap look dusty. Pigment dye adds depth and a slightly lived-in tone, though buyers should expect some variation from piece to piece. Light sanding can create a premium hand, but it also exposes weak sewing because every irregularity becomes easier to see.
For jewelry branding, the safest assumption is that presentation will be judged from close range. The hat may be photographed beside product packaging, carried at events, or displayed next to delicate items that already signal precision. In that setting, a cap with a relaxed crown but controlled shape usually performs better than one that appears collapsed or overwashed. The line between relaxed and sloppy is narrow, and sample review is where that line gets defined.
The visor and front panel support should be judged separately from the shell fabric. An unstructured cap still needs enough internal body to keep the front clean after handling. If the hat is too limp, the logo may distort when packed or worn. If it is too stiff, the look can turn more promotional than boutique. The right sample sits between those extremes: soft enough to feel easy, stable enough to hold a logo without strain.
Packaging belongs in this review too. A sample shipped in a clean corrugated mailer with plain kraft paper tells you more about the eventual customer experience than a hat tossed into loose plastic. If a brand uses FSC certified paper, recycled inserts, or biodegradable packaging, the sample should be handled within that same visual system. A good cap can still feel out of place if the surrounding materials send a different signal.
Pricing, MOQ, and Quote Drivers for Sample Sets
Sample pricing rises and falls with the amount of custom work, not just with the number of hats ordered. A basic stock-material sample with a simple logo and standard closure can stay relatively low. Add custom fabric, a special wash, woven labels, unique hardware, or dense embroidery, and the quote changes fast. That happens because the factory is not charging for the one hat alone. It is charging for setup time, material sourcing, and the risk of revising something that will later be repeated at scale.
Buyers sometimes expect sample costs to behave like bulk pricing on a small scale. They do not. A development sample may be inexpensive in isolation but expensive once the supplier has to open a new fabric run, digitize a complicated mark, or source a nonstandard closure. The cleanest quote separates the sample fee, digitizing, trims, shipping, and any revision round. That breakdown makes supplier comparisons more honest and exposes where the real cost sits.
| Sample Type | Typical Cost | Typical Lead Time | What It Helps You Judge |
|---|---|---|---|
| Stock-material fit sample | $25-$45 | 3-7 business days | Basic silhouette, closure, and crown balance |
| Decorated development sample | $45-$95 | 7-12 business days | Embroidery behavior, logo placement, and interior finish |
| Custom fabric or wash prototype | $90-$180 | 10-18 business days | Color depth, hand feel, and post-finish behavior |
| Pre-production approval sample | $60-$140 | 7-14 business days | Repeatability before bulk sewing starts |
MOQ is tied to that same complexity. Stock materials and standard trims can keep order minimums manageable, but custom dye lots, special thread colors, or unique closures can push minimums higher than the buyer expected. For a jewelry line that wants a restrained, premium look, the smartest move is often to approve one strong sample, freeze the spec, and avoid reopening small decisions that will multiply later in production. That approach is not glamorous, but it keeps unit cost and quality drift under control.
The price range also tells you something about what the supplier is willing to do carefully. A very low sample fee can mean stock materials and minimal revision support. A higher fee often buys more attention to embroidery setup, wash testing, or reworking the pattern to correct crown shape. The number itself is not a verdict. The work behind the number is what matters.
Sample Process and Timeline: From Request to Approval
Good sampling starts before the first cut. A spec pack should show size, front panel height, visor shape, closure style, logo placement, reference images, and the intended use. If the hat is meant for retail shelves, gifting, event staff, or social photography, say so. A sample that only needs to look good in a flat lay may pass one test and fail another if the intended use was never defined.
Before production begins, ask the supplier to confirm what is actually available. That sounds basic, but it prevents one of the most common sampling failures: silent substitution. A near-match fabric can look acceptable in a photo and wrong in person. A near-match thread can shift the tone of the logo enough to break the look. Catching those substitutions early saves time and avoids a false approval.
Typical timelines are straightforward. A stock-based sample may take 5 to 8 business days before shipping. Custom dye, special finishing, or a revision-heavy round can stretch the process to 12 to 20 business days, and that does not include transit or internal review. Buyers who approve in a rush often end up paying for a second round because the first one never had enough comparison data.
- Spec review: confirm dimensions, artwork, closure, and intended hand feel.
- Material confirmation: approve the exact fabric and trims, or approve a listed substitute.
- Patterning and cutting: check front panel height, visor proportion, and crown shape.
- Construction: inspect stitching, sweatband finish, lining, and closure details.
- Inspection and shipping: verify the sample is packed well enough to survive transit without distortion.
Transit matters more than most teams assume. A cap that arrives crushed can look misbuilt even if the sewing was correct. Industry transit guidance from ISTA is useful because distortion during shipping can hide or exaggerate shape problems. If the surrounding brand system uses paper inserts or outer wraps, FSC resources at fsc.org are a practical reference for sourcing paper-based materials that fit a more considered packaging program.
Once the sample arrives, do not review it from one angle and one light source. Put it on different head shapes, bend the visor, check the crown in daylight and indoor light, then compare it beside the jewelry packaging it will live with. A flat photo cannot show how the front panel behaves after ten minutes of wear, and it cannot reveal whether the logo stays balanced once the cap is handled.
Common Spec Mistakes That Skew Sample Comparisons
The most common error is comparing unlike samples as though they were identical. A washed sample and an unwashed sample will not feel the same, even if the fabric code is close. Shrink behavior, softness, and crown recovery all change after finishing. If one sample has been garment washed and the other has not, the comparison is not useful.
Embroidery specs cause a second wave of problems. Thread color, stitch count, backing, and placement all need to be fixed before approval. A logo that looks crisp in one sample can pucker in another if the stitch density is too heavy for the cloth. On a soft unstructured cap, the fabric itself has less structure to absorb the stress, so the digitizing has to be measured. Dense fills that work on a structured cap can be too aggressive here.
- Closure mismatch: strapback, buckle, slide buckle, and self-fabric ties each change comfort and perceived quality.
- Head shape bias: a good fit on one person says little about broader wearability.
- Screen-only color review: monitors hide sheen, undertone, and texture variation.
- Packaging mismatch: the hat can be technically correct and still feel wrong beside the rest of the jewelry line.
Testing on more than one head size is the simplest fix. Photograph the sample from front, side, and top views while it is worn. That reveals whether the crown sits cleanly or slouches in a way that looks accidental. It also helps uncover proportion issues that a hanger cannot show. A cap can look balanced on a table and then tilt badly once it is on a real head.
Comparing the sample beside the actual retail materials is just as important. A matte card insert, recycled hangtag, or rigid box can make a cap read more premium than it looked in isolation. The reverse is true as well. A slightly shiny cloth may feel out of place next to restrained, tactile packaging. That is not a moral failure of the hat. It is a sign that the product system is not yet coherent.
Expert Checks for Fit, Embroidery, and Retail Presentation
Once the obvious spec questions are answered, the more revealing checks begin. Study the crown collapse from several angles. An unstructured cap should feel relaxed, but the front panel still needs a clean line. If it caves too deeply, the logo loses authority. If it is too stiff, the hat can feel promotional instead of brand-led. The difference is subtle until the sample is worn, then it becomes obvious.
Embroidery needs a slightly severe inspection. Heavy fill can compress the fabric and create ripples around the logo. Light fill can make the mark look thin or unfinished. A good sample sits in the middle, where the stitch count supports the shape without overpowering the cloth. Run a finger lightly around the embroidery backing and the interior seam work. If the cap scratches, bulges, or feels uneven at that stage, those problems usually become more visible after a few wears.
Comfort finishes are not optional for a cap that will be judged beside jewelry packaging. The sweatband should lay flat. The closure should open and close without catching. Interior seams should not scrape. Those details sound small, but they define whether the product feels intentionally made or merely assembled. In retail, that difference is often what separates a cheap-looking sample from one that feels worth photographing.
Presentation should be checked in the full brand context. Photograph the sample beside jewelry boxes, hangtags, and display cards. Review the cap next to a pouch, a tray, and the materials that will travel with it. If your broader packaging uses kraft paper, recycled content, or biodegradable components, the hat should not clash with that language. A good sample does not just look correct. It belongs in the same visual sentence as the rest of the line.
Color drift is another practical concern. Fabric that looked perfect under studio lights can shift beside a glossy box or a warm-toned pouch. That is why the sample should be evaluated under more than one light source. A cap that is slightly too cool or slightly too flat may still pass on a screen, then miss the mark in the retail environment. Screens compress nuance; physical samples expose it.
Next Steps: Lock Specs and Move to Bulk Approval
Once the sample is approved, document every choice in one place. Keep the fabric code, finishing method, closure type, label placement, embroidery details, and packaging notes together. Memory is unreliable after the first round of approvals. Production needs instructions, not recollection. A strong spec sheet protects the look from drifting when the order scales.
If the bulk order will run on a different line, use a different wash, or draw from a new dye lot, ask for a pre-production sample before the full run begins. That extra step often catches small color shifts and fit changes before they become expensive. It is much cheaper to correct one sample than to explain why a whole production run misses the approved tone by a visible margin.
Review the final sample in daylight and indoor light, then confirm fit, logo clarity, hand feel, and retail presentation before the purchase order is signed. Share the same approval standard with design, procurement, and marketing so no one is grading the sample on a different scale. For a jewelry line, the cap has to work as part of the packaging system, the product story, and the shelf presence at once.
Handled that way, a jewelry Unstructured Dad Hats Material Sample guide becomes more than a sampling checklist. It turns into a practical method for judging softness, structure, and presentation without guessing. The right sample will not just look close. It will behave correctly under handling, hold its shape long enough to matter, and sit naturally beside the rest of the brand.
What should I ask for in a dad hat material sample for jewelry branding?
Ask for the fabric swatch, a sewn sample, and close-up photos of the embroidery and interior finish. Request the exact closure, sweatband, and label options you plan to use in production rather than a generic blank cap. Then compare the sample beside your jewelry packaging or display pieces so you can judge the whole presentation, not just the hat in isolation.
How do I compare unstructured dad hat fabrics without guessing?
Check hand feel, drape, recovery, and surface sheen under the same lighting. Fold and squeeze each swatch to see how fast it relaxes and whether it marks easily. Then look at how each fabric holds embroidery, because texture can either sharpen or blur fine logo detail.
What affects sample pricing and MOQ the most?
Custom fabric development, special washes, embroidery complexity, and nonstandard closures are the biggest drivers. MOQ often rises when the sample depends on custom dye lots, unique trims, or dedicated setup time. Confirm whether shipping, digitizing, and revision fees are included in the quote before you compare suppliers.
How long does the sample process usually take?
Stock-material samples can move quickly, while custom materials, washes, or artwork revisions usually add more time. The timeline should cover material confirmation, sampling, inspection, shipping, and buyer review. Leave room for a second round if the first sample reveals fit or color issues.
What should I approve before placing the bulk order?
Approve the exact fabric, color, closure, label, logo placement, and stitch details so the production run has no ambiguity. Make sure the hat fits well on real heads and still looks balanced from front, side, and top views. Confirm that the sample matches the final retail presentation you want for the jewelry line.
If you use the jewelry Unstructured Dad Hats Material Sample guide as a single approval standard, you give your team a better shot at landing the right mix of softness, structure, and presentation on the first production run.


