Pet Treat Brands Matte Poly Mailers Sample Order Guide
A 4-ounce pouch of dog treats can survive fulfillment without much drama if the primary packaging is sound. The harder question is whether the outer package makes the order feel considered, protected, and on-brand, or simply dropped into the cheapest bag available. This pet treat brands Matte Poly Mailers sample order guide is written for teams that want to check print quality, opacity, sizing, seal strength, and real packing behavior before committing to a larger custom run.
The outer mailer is often the first branded surface a customer handles. That first touch has more influence than many packaging budgets acknowledge, especially for treat brands selling through subscriptions, gifting programs, seasonal bundles, or direct-to-consumer refills. A Matte Poly Mailer does not need to shout. Its job is to arrive clean, protect the pouch, carry the brand clearly, and make the customer feel that the shipment belongs to the same standard as the product inside.
Matte film usually reads calmer than glossy film. It cuts glare in unboxing photos, softens strong colors, and tends to hide minor scuffs picked up during carrier handling. That makes it a useful fit for natural, wellness-positioned, ingredient-led, or premium pet treat lines where a high-shine shipping bag can feel out of step with the product story.
There is also a practical risk-control argument for sampling. One small sample order can reveal color drift, weak adhesive, barcode placement issues, poor opacity, a flap that lands awkwardly over the pouch, or a mailer that looks oversized once filled. Pet Treat Brands should never evaluate the mailer by itself on a conference table. The inner retail pouch, zipper track, gusset, oxygen absorber, insert card, invoice, and bundle count all change how the outer mailer performs.
A sample is not a courtesy step; it is a low-cost production check. A mailer can look fine on a spec sheet and still feel wrong in hand if the film is too thin, the finish is chalkier than expected, or the artwork loses contrast under warehouse lighting. The sample stage is where those problems are still inexpensive to fix.
What Matte Poly Mailers Do for Pet Treat Shipments
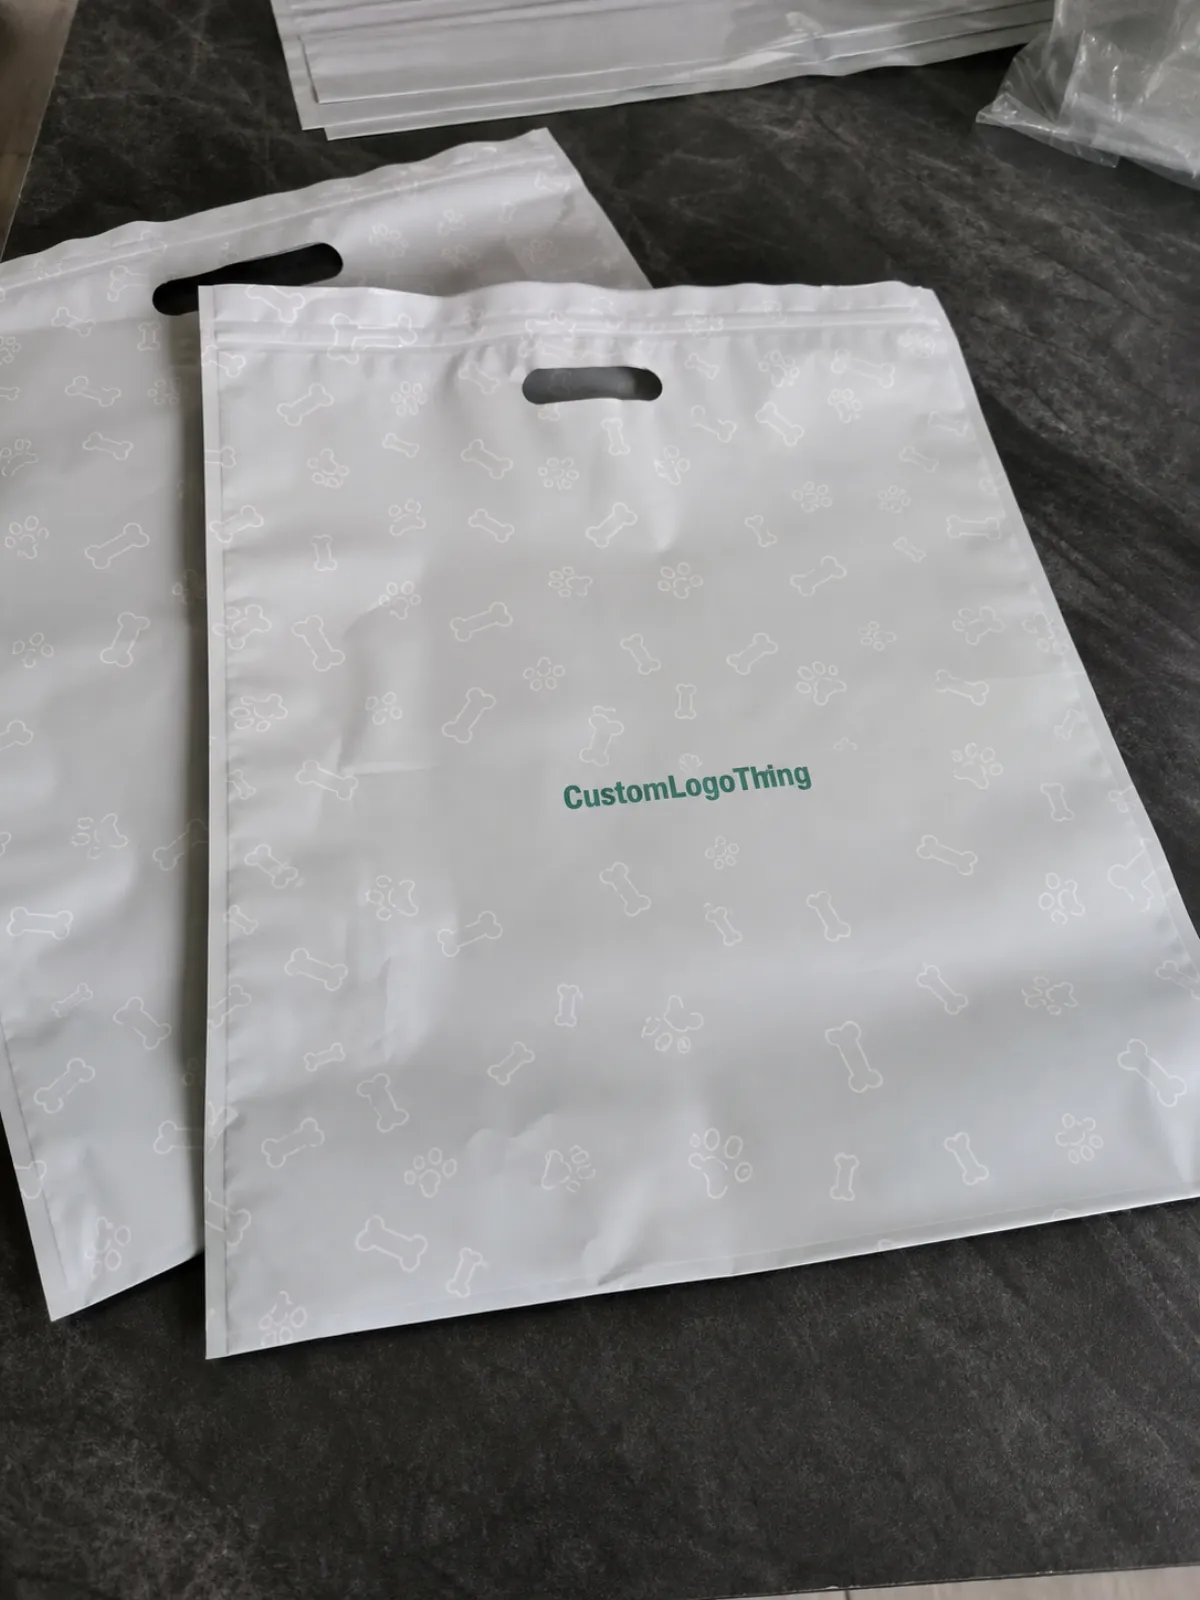
Matte Poly Mailers are lightweight polyethylene shipping bags with a low-glare exterior finish, self-seal adhesive closure, custom print options, and, depending on the build, tear strips or return strips. For pet treat brands, they are typically used as outer shipping packaging for sealed pouches, sample kits, influencer mailings, subscription refills, and lightweight bundles.
The value is mostly operational. Poly mailers resist moisture better than paper mailers, weigh less than boxes, and store flat in a warehouse or packing area. For DTC fulfillment, that combination can keep packing speed high while reducing unnecessary dimensional weight. A properly sized mailer often protects margin as much as presentation, because oversized cartons can push small orders into higher shipping brackets without improving the customer experience.
They do have limits. A matte poly mailer is a flexible shipping bag, not a crush-proof container. It is not the right outer package for heavy glass jars, rigid tins, brittle sample cups, or awkward multipacks unless the inner protection is doing the heavy work. If the line includes hard containers, sharp-edged inserts, or thick promotional cards, test the complete packed order, not the treat pouch alone.
| Feature | Matte Poly Mailer | Glossy Poly Mailer | Why Pet Brands Care |
|---|---|---|---|
| Appearance | Soft, low-glare finish | Shinier, more reflective surface | Matte usually reads more premium and photographs better indoors |
| Scuff visibility | Hides minor marks well | Shows rub marks more easily | Helpful for fulfillment centers, bins, conveyors, and mail sort handling |
| Brand tone | Calm, natural, restrained | Brighter, louder, more promotional | Useful for wellness, ingredient-led, and artisanal treat lines |
| Photo behavior | Less glare in customer photos | More reflection under mixed light | Useful for unboxing content and social sharing |
| Best use case | Premium direct-to-consumer shipping | Promotional or high-saturation artwork | Choose based on brand position, artwork, and fulfillment conditions |
For many buyers, the right starting point is a structured review of Custom Poly Mailers alongside the inner pouch format. Looking at both together gives a clearer view of fit, print area, and opening experience than treating the shipping bag as a separate afterthought.
Material, Finish, and Print Specifications to Confirm
Before a sample order moves forward, lock down the basic specification set: film type, thickness, finished dimensions, flap depth, adhesive style, opacity, surface texture, print method, and whether the bag needs a tear strip or return strip. These details sound mechanical because they are. They are also where most buyer regret starts.
Thickness deserves close attention. A lightweight apparel mailer that works well for socks may not hold up to stiff treat pouches with gusset corners, zipper tracks, or rigid hang holes. Custom Poly Mailers commonly fall around 60 to 100 microns, although exact ranges vary by construction and supplier. Pet treat shipments often sit better in the middle or upper part of that range if the pouch has firm edges or the order profile includes two or more bags.
Do not choose thickness by feel alone. A thicker film may feel reassuring, but it can increase cost and plastic use without solving the actual problem if the issue is poor fit or sharp inner packaging. On the other hand, going too thin to save a fraction of a cent can lead to corner stress, punctures, and customer complaints. The sample should be packed, sealed, bent lightly, and handled as a parcel, not just inspected flat.
Opacity is both cosmetic and security-related. The contents should not be visible through the bag, and the package should not telegraph order value or product type through the film. A matte white, dark, or solid-color build usually provides better concealment than a thin translucent construction. If the inner pouch is light-colored or has high-contrast artwork, check opacity with the exact pouch inside the sample.
Print method affects cost, timing, and appearance. Digital printing can work well for low-quantity sampling, pilot launches, and early design testing. Flexographic production often becomes more efficient once quantities rise and the artwork is stable. Gravure-style output can support larger repeat runs with strong consistency, though it is not offered for every mailer specification or order size. The aim is not to chase the most elaborate process; it is to match the print method to the quantity, artwork, color expectations, and approval timeline.
Matte film changes color behavior. Deep colors can soften, pale neutrals may look more muted, and fine contrast can lose some bite compared with glossy stock. That is a material effect, not necessarily a defect. For that reason, the sample should use the actual logo palette wherever possible, not a “close enough” substitute. The eye is forgiving on a backlit screen and far less forgiving when the mailer is sitting next to a finished retail pouch.
Food-adjacent packaging needs one more layer of discipline. The mailer is secondary packaging, not direct food-contact packaging, but customers still handle it as part of the product experience. Check for noticeable odor, ink rub-off, tacky coatings, poor seal cleanliness, and any finish that feels cheap beside the treat pouch. For standards-driven teams, practical references from groups such as the Institute of Packaging Professionals and transport-testing resources such as ISTA can help frame internal testing expectations.
Artwork should receive the same careful review as the material. Confirm bleed, safe zones, barcode-free sealing areas, logo scale, address label placement, QR code readability, and whether any claims on the outer mailer could create regulatory or customer-service problems. If the shipment includes FSC-certified paper inserts, curbside recyclable components, or other sustainability notes, document those claims clearly rather than assuming the sample itself communicates them.
Size Testing: How to Choose Mailers Before You Scale
Size is where packaging budgets quietly leak. A mailer that is one size too large uses more material, looks loose, and can make a premium product feel less intentional. A mailer that is too tight can split at the corners, slow the packing line, wrinkle the artwork, or force the adhesive flap into a stressed position that fails after sorting.
The correct measurement starts with the filled product, not the flat retail pouch. Treat bags gain depth from the product, gusset structure, zipper track, seal area, and any reseal feature. Add the actual insert, invoice, sticker sheet, sample card, or promotional piece that will ship with the order. Then close the mailer and judge the parcel as a customer would receive it.
Test at least three order profiles: one pouch, two pouches, and the common bundle with insert material. If subscription orders make up a large share of volume, include that packout as its own test. A mailer that looks polished around one pouch can look wasteful around a refill bundle, while a size chosen for bundles may crush or over-tighten a smaller order.
There is a useful difference between snug and strained. Snug feels polished and reduces movement inside the parcel. Strained creates packer friction, corner pressure, and seal risk. Loose fit gives the order room, but too much slack can make the shipment look careless and can cause the printed surface to crease unpredictably. For many pet treat brands, the best fit is enough clearance for clean insertion with minimal side movement once sealed.
Carrier handling should be part of the sample test. Bags are compressed, dragged, stacked, and rubbed against bins, conveyors, and other parcels. A sample review should not stop at a desk inspection. Mail a few units through the same carrier or service class used for customer orders and inspect the returned parcels. That small test can reveal adhesive lift, corner wear, print scuffing, or label adhesion issues that a clean sample never shows.
Ask for adjacent dimensions, not only the target size. One size above and one size below can quickly show whether the chosen build has enough tolerance for future pouch changes, seasonal inserts, or slightly bulkier promo kits. This matters because treat brands often adjust fill weights, topper samples, or insert cards faster than they revise shipping packaging.
If the brand is comparing several package formats, browsing broader Custom Packaging Products can help narrow the decision. The strongest mailer choice is usually the one selected after the actual product, insert set, and order mix are understood, not the one chosen from a size chart alone.
Pricing, MOQ, and Unit Cost Drivers for Custom Mailers
Pricing is shaped by several variables at once: size, thickness, opacity, color count, print coverage, adhesive features, print method, quantity, freight, and timeline. The useful buyer question is not “What does a mailer cost?” It is “What does this exact construction cost at this exact quantity with this artwork and delivery requirement?”
Sample pricing and production pricing behave differently. A blank sample may be inexpensive or pulled from existing stock if the size is standard. A printed sample costs more because proofing, setup, material matching, and press time enter the equation. Production MOQ exists for the same reason: setup time, film runs, print preparation, and quality checks have to be spread across enough units to make the order economical.
As a broad market observation, very simple stock or lightly customized poly mailers can land at a low per-unit cost in larger quantities, while short-run custom printed matte mailers may look expensive because setup dominates the order. Depending on specification, order size, and freight, buyers may see anything from a few cents per unit at scale to several times that for smaller custom runs. Treat those ranges as directional only; exact pricing requires artwork, size, material, and delivery details.
Common cost adders include dark flood coats, double-sided printing, high-opacity film, custom dimensions, return strips, specialty adhesives, rush production, and multiple artwork versions. None of these choices is automatically wrong. A full-coverage brand color may be worth the extra cost if it drives recognition and supports the unboxing experience. The problem is choosing expensive features by habit instead of tying them to a clear packaging goal.
| Cost Driver | Typical Impact | Buyer Takeaway |
|---|---|---|
| Quantity | Higher volume usually lowers unit price | Spread setup costs across more units when forecast and storage allow |
| Print coverage | Full-bleed designs cost more than simple logos | Use flood coats only when they strengthen the brand presentation |
| Thickness and opacity | Heavier film and stronger concealment increase material cost | Match film to product weight, pouch stiffness, and privacy needs |
| Lead time | Rush work can carry a premium | Build sample review into the launch calendar early |
| Freight | Shipping can change landed cost materially | Compare landed cost rather than unit price alone |
Always compare landed cost. Freight, storage space, packing labor, label waste, and rework from poor sizing can make the cheaper bag more expensive in operation. A mailer that saves two cents but slows each packout by several seconds can lose the savings quickly once order volume rises.
For clean quoting, send the target quantity, finished size, product weight, artwork file, desired finish, ship-to ZIP code, and any required delivery date. If the order is a sample order rather than a production run, state that clearly. It changes the quote structure, the available print options, and sometimes the recommended material. Brands using Wholesale Programs often get better long-term pricing logic when sample validation happens before the first volume commitment.
Sample Order Process, Timeline, and Production Steps
A clean sample process usually follows a practical sequence: inquiry, goals review, size recommendation, artwork check, sample confirmation, proof approval, sample production or blank sample pull, shipment, evaluation, revision if needed, and then production quote. It is not glamorous work. It is the difference between “looks fine” and “ready for a launch shipment.”
Timeline depends on the type of sample. In-stock blank samples can often move quickly because no custom printing is involved. Printed samples take longer because artwork proofing, material selection, setup, and curing or handling time may be part of the process. A realistic sample timeline can range from a few business days for simple blank size checks to several weeks for custom printed samples, especially if revisions, specialty materials, or long-distance freight are involved.
Prepress is worth patience. Files should be checked for resolution, color mode, bleed, safe zones, type size, line weight, barcode readability, and address label interaction. Small lettering that looks elegant on screen may fill in or disappear on matte film. Thin lines can lose definition. Low-contrast colors may become too quiet once printed on a muted surface. Fix those issues before production, not after cartons of finished mailers have arrived.
Treat the sample evaluation window like a small launch. Photograph the mailer in daylight and under indoor lighting. Pack real orders. Seal and reopen test units if the design includes a tear strip. Rub the printed surface lightly with clean paper or cloth to check obvious ink transfer. Press the sealed flap after several minutes and again after a few hours. If fulfillment uses thermal labels, test label adhesion on the actual matte surface.
Mailing tests should include the normal service class whenever possible. A parcel that survives a short internal handoff may behave differently after sorting, compression, and temperature swings. Inspect the returned mailer for flap lift, edge wear, punctures, ink scuffing, label curl, and whether the parcel still looks presentable enough for a first-time buyer.
Documentation is not optional if the sample leads to changes. A color adjustment, size tweak, film upgrade, flap change, or seal correction should be written into the approval record. Production should not begin from a casual verbal preference or a marked-up photo without confirmed specs. Clear documentation protects both the buyer and the supplier by anchoring the production run to the sample that was actually approved.
Teams that want to study completed packaging examples before moving ahead may find the brand library in Case Studies useful. Seeing outer packaging after it is packed, shipped, and opened can sharpen the internal discussion around fit, finish, and customer perception.
Next Steps Before You Approve a Production Run
Before approving production, gather one filled treat pouch, one typical insert set, the target shipment weight, preferred mailer dimensions, artwork, and a realistic first-run quantity. That gives the supplier enough information to recommend a construction tied to the actual order profile rather than an abstract size request.
Decide what the sample must prove. The goal might be color accuracy, matte texture, opacity, seal strength, size fit, pack speed, subscription bundle fit, or influencer kit presentation. If the team cannot agree on the main test objective, the sample may still be helpful, but the approval meeting often turns into a loose debate over taste rather than a practical packaging decision.
A simple scorecard helps. Rate fit, protection, finish, pack speed, and perceived brand value. Add notes for odor, label adhesion, scuffing, seal confidence, and whether the order still looks premium after mailing. This keeps the conversation grounded and prevents a minor color preference from overshadowing a serious closure or sizing problem.
“A good sample is the one that feels ordinary in the right way once it is packed, sealed, mailed, and opened.”
The best time to move from sample to production is when the mailer fits the common order profile, the artwork is approved, the landed cost aligns with margin, and the fulfillment team can pack it consistently. If one of those pieces is still uncertain, the sample has done its job by exposing the gap before volume locks it in.
For pet treat brands, the right outer package should support the product rather than compete with it. Use the sample stage to confirm the details that customers notice only when they go wrong: a weak seal, a see-through film, a scuffed logo, a loose fit, or a bag that feels cheaper than the treat pouch inside. Once the sample performs in real packing and mailing conditions, the production order becomes much easier to trust.
Can pet treat brands order matte poly mailers as samples before production?
Yes. Sample orders are the practical way to verify size, finish, print placement, opacity, and seal performance before a larger custom run. Printed samples usually take longer than blank size samples because proofing and setup are involved. For the most useful test, pack the sample with the actual filled treat pouch and any inserts.
What size matte poly mailer should a pet treat brand sample first?
Start with the most common order profile, such as one standard treat pouch or a two-pouch bundle. Measure the filled product depth, not just the flat retail pouch dimensions. If the order sits between sizes, request adjacent options so you can compare pack speed, slack, and closure tension.
How much do custom matte poly mailers cost for pet treat packaging?
Cost depends on size, film thickness, print coverage, color count, quantity, adhesive features, and shipping destination. Higher quantities usually reduce unit cost because setup and production handling are spread across more mailers. A useful quote should include material specs, print method, MOQ, estimated lead time, and freight.
Are matte poly mailers safe for shipping pet treats?
They are commonly used as outer shipping packaging for sealed pet treat pouches, sample packs, and lightweight bundles. The treats should already be inside appropriate primary food packaging; the mailer is not direct food-contact packaging. Brands should test odor, opacity, seal strength, puncture resistance, and label adhesion before production approval.
What should be included in a matte poly mailers sample order guide for pet brands?
Include product dimensions, filled pouch thickness, shipment weight, desired quantity, artwork files, finish preference, and target launch date. Add the main test goal, such as color accuracy, size validation, subscription bundle fit, or influencer kit presentation. Share any carrier, fulfillment, or storage constraints so the sample reflects real operating conditions.


