Buyer Fit Snapshot
| Best fit | Printed Belly Bands with Logo projects where brand print, material claims, artwork control, MOQ, and repeat-order consistency need to be specified before quoting. |
|---|---|
| Quote inputs | Share finished size, material target, print colors, finish, packing count, annual reorder estimate, ship-to region, and any compliance wording. |
| Proofing check | Approve dieline scale, logo placement, barcode or warning zones, color tolerance, closure strength, and carton packing before bulk production. |
| Main risk | Vague material claims, crowded artwork, missing packing details, or unclear freight terms can make a low unit price expensive after revisions. |
Fast answer: Printed Belly Bands with Logo: Material, Print, Proofing, and Reorder Risk should be specified like a repeatable production item. The safest quote records material, print method, finish, artwork proof, packing count, and reorder notes in one written spec.
Production checks before approval
Compare the actual filled-product size with the drawing, then confirm tolerance on folds, seals, hang holes, label areas, and retail display edges. Reserve space for logos, QR codes, warning copy, and material claims before decorative graphics fill the panel.
Quote comparison points
Review material grade, print process, finish, sampling route, tooling charges, carton quantity, and freight assumptions side by side. A quote is only useful when the supplier can repeat the same color, closure quality, and packing count on the next order.
Printed Belly Bands With Logo: A Smart Packaging Guide
A plain carton can carry a product well and still feel unfinished on shelf. That is where Printed Belly Bands with logo pull more weight than their size suggests: a narrow printed wrap can shift an ordinary package into something that reads as planned, branded, and ready for retail. The change is subtle in hand, but very visible once the pack is sitting beside competing items, and that is why many packaging teams keep coming back to this format.
The appeal is practical. A well-built band can hold the logo, a short product story, a campaign message, or a barcode on a strip of paperboard that costs far less than a new carton design. Brands moving across SKUs, limited runs, and seasonal updates often find that printed belly bands with logo deliver a stronger visual return than they expected. In my own packaging reviews, I’ve seen a simple band do more for shelf clarity than a much larger, busier print treatment that tried to say too much. The sections ahead cover how the format works, what drives pricing, how production flows, and where quality issues usually show up.
Printed Belly Bands With Logo: The Small Format That Changes Shelf Impact
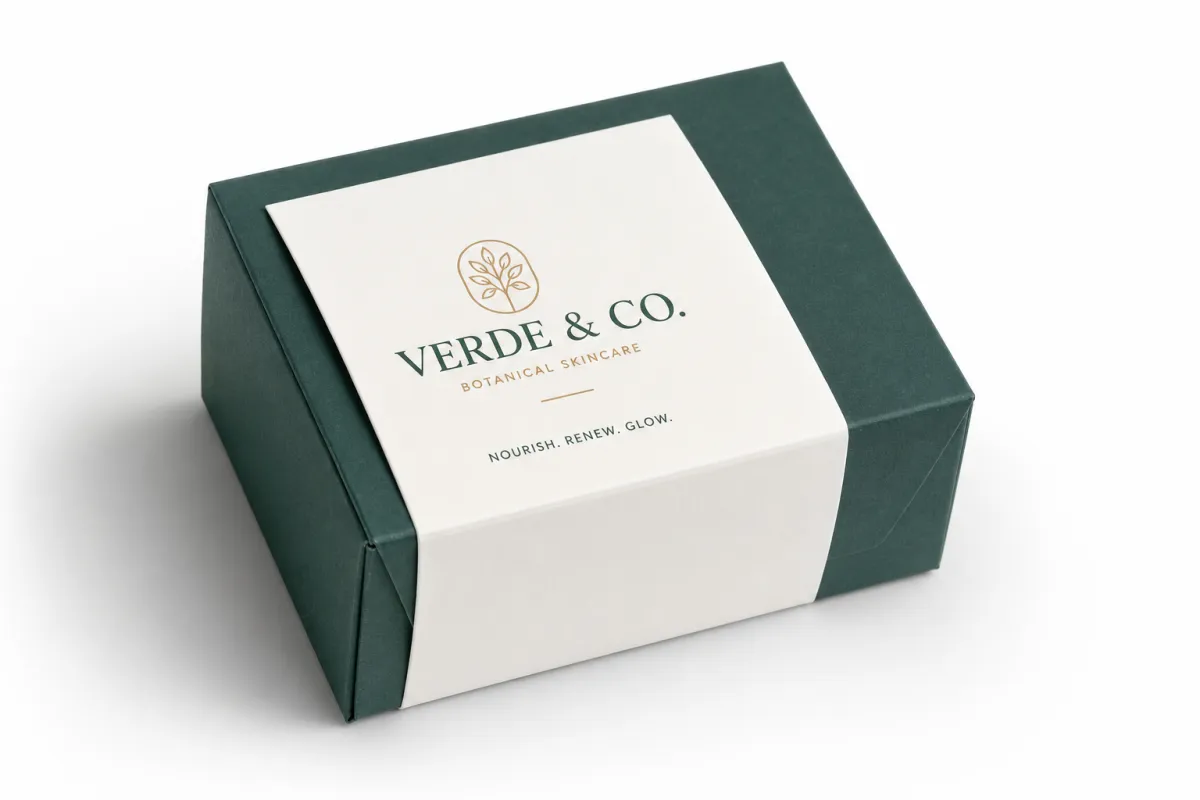
A belly band is a printed paper sleeve, wrap, or strip that sits around a box, tray, jar, bundle, or kit. It does not replace the primary package. It frames it. That distinction matters, because printed belly bands with logo are often chosen when the existing carton already does its job and the brand only needs a cleaner, more deliberate finish.
Packaging teams like this format for practical reasons. A full carton redesign can mean new tooling, extra proofing, and a longer approval chain. A belly band sidesteps much of that work. It can also change by SKU, flavor, promotion, or channel without altering the structural pack. That flexibility helps subscription kits, gift sets, cosmetics, candles, baked goods, stationery bundles, and seasonal retail displays that need a fresh look without a full packaging reset.
The psychology is easy to underestimate. A narrow band can kinda do the work of a campaign headline without forcing you to rebuild the carton. The eye reads it as a sign that someone paid attention. A plain carton can seem generic. Add printed belly bands with logo and the same carton starts to suggest a limited edition, a curated assortment, or a more premium presentation. The object itself barely changes. The framing does.
"A small printed element can carry more perceived value than a larger but unfocused package treatment. Buyers remember clarity faster than decoration."
That idea shows up often in packaging work. Belly bands are fast to update, easy to customize by SKU, and efficient when a full sleeve would be more than the product needs. They also create room for a disciplined message. One panel can hold the logo. Another can hold the product name. A third can carry a QR code, ingredient note, or campaign line. The brand stays visible without covering every surface.
Unboxing matters too. When the band is sized correctly and aligned well, the package feels tighter, cleaner, and more premium. When it is oversized or folded badly, it looks improvised. I’ve watched that single detail change how people described the product before they ever read the copy. That difference decides whether printed belly bands with logo feel like a brand asset or a rushed add-on.
For teams comparing formats, the real question is usually not whether a band can be printed. The better question is whether the package needs a full visual system or just a sharper first impression. In many cases, printed belly bands with logo are the lighter, faster answer.
How Printed Belly Bands With Logo Work Across Boxes, Kits, and Bundles
The structure is simple, but the details carry the result. A belly band is cut to wrap around the product with a visible front panel, an overlap area, and a closure method. That closure may be friction fit, a glue dot, removable adhesive, or a tuck-style lock, depending on presentation and handling requirements. The band should sit flat, stay aligned, and read as part of the package architecture rather than a loose strip of paper.
Printed belly bands with logo appear across retail cartons, gift boxes, bakery sleeves, soap bundles, candle packs, stationery sets, and subscription kits. They are especially useful where a brand wants repeatable branding across many items but does not want to create custom printed cartons for every variant. That kind of flexibility keeps the format relevant, especially for product lines that refresh often or need a seasonal skin without changing the box structure.
The band can carry more than many buyers expect, as long as the hierarchy stays clear. A typical band may include:
- Logo and brand mark
- Product name or collection name
- Variant cue such as flavor, scent, or size
- Barcode or QR code
- Short ingredient or usage callout
- Seasonal message or promotional offer
- Compliance or origin note, where needed
The trap is overfilling the strip. A strong layout gives the eye a clean path. For printed belly bands with logo, that usually means a dominant front face, a secondary information face, and a seam or overlap hidden where it is least visible. If the seam lands on the front, the package can feel awkward even when the print quality is excellent.
Orientation deserves more attention than it often gets. If the logo appears upside down to the person opening the box, or if the fold line cuts through a key element, the result feels off. Good artwork files anticipate the physical wrap. They show how the panel will sit around the package, where the fold lines fall, and how much overlap the closure needs. That kind of setup separates a thoughtful band from a generic one.
Finishing changes the tone as well. Matte stock feels restrained and modern. Gloss adds brightness and shelf pop. Foil, embossing, or spot varnish can push printed belly bands with logo toward a more premium presentation, though those effects need restraint. On a narrow format, too much finish quickly turns into visual noise instead of value.
Food-related and regulated products bring another layer. The band may need to carry ingredient, batch, or barcode information, yet it should never block the mandatory labeling on the base package. A belly band can support packaging communication. It should not compete with required information, and it should never be the only place a critical compliance message appears.
Printed Belly Bands With Logo Cost, Pricing, and MOQ Basics
Pricing for printed belly bands with logo usually comes down to a familiar mix of variables: quantity, size, stock, print coverage, color count, finishing, and whether the band needs a die-cut shape or a special locking feature. Straightforward jobs can be economical. Jobs with multiple finishes, short runs, or tight deadlines move upward in cost quickly.
Low-volume orders feel expensive because setup costs are spread across fewer pieces. That is common across custom print work. A 500-piece order may carry a much higher unit price than a 10,000-piece run even if the artwork is nearly identical. Press setup, proofing, make-ready, and trimming do not shrink at the same pace as the order size.
For reference, buyers often see pricing patterns like these for printed belly bands with logo, though the exact numbers depend on design complexity and supplier location:
| Quantity | Typical Stock | Common Price Range per Unit | Best Fit |
|---|---|---|---|
| 500-1,000 | Text or light cover stock, standard print | $0.35-$0.95 | Sampling, pilot runs, launch tests |
| 2,500-5,000 | 250-350 gsm paper or board | $0.18-$0.38 | Small campaigns, seasonal packaging |
| 10,000+ | Chosen for print economy and consistency | $0.08-$0.18 | Repeat retail programs, multi-SKU rollouts |
Those ranges only help if the quote is built correctly. A buyer should provide exact dimensions, artwork status, stock preference, finish expectations, quantity targets, and the application method. If the band is applied by hand, that affects width, overlap, and assembly speed. If a machine applies it, the tolerances tighten. That can sound fussy, but it is the difference between a clean run and a pile of bands that need trimming after the fact.
MOQ conversations are worth handling directly. Minimum order quantities often reflect press setup efficiency, sheet usage, and finishing constraints. Rather than asking only "What is the minimum?", ask where the cost breakpoints sit. Sometimes the jump from 1,000 to 2,500 pieces is small enough that the higher quantity produces a better unit cost and a steadier supply position. That matters especially for printed belly bands with logo used in recurring promotions.
Hidden costs can catch first-time buyers off guard. Common extras include design edits, rush fees, proof revisions, color matching, reprints after approval mistakes, and special handling for products that are fragile, humidity-sensitive, or likely to shift in transit. If the band must arrive already assembled around another component, packing labor can also influence the total.
A practical quote request should cover:
- Exact band dimensions, including overlap
- Paper or board preference
- Print method and color count
- Finish type, if any
- Quantity target and backup quantity
- Deadline and delivery location
- Whether the band is hand-applied or machine-applied
That level of detail makes pricing easier to compare and reduces the back-and-forth that slows custom print jobs. For printed belly bands with logo, clarity in the brief usually saves more money than hard bargaining. It also keeps everyone honest about what the quote actually includes, which is where a lot of packaging frustration starts.
Printed Belly Bands With Logo Production Process and Timeline
Production tends to follow a familiar path, even if the schedule does not. First comes the brief. Then the dieline or layout template. Then artwork placement, proofing, approval, printing, finishing, trimming, packing, and shipping. Straightforward jobs can move fast. More complex jobs can spend days in artwork changes alone.
The longest delays rarely come from the press. They come from indecision. Slow copy approvals, missing dielines, unresolved brand colors, or late-stage changes after proofing can all stretch the schedule. Printed belly bands with logo are small, but they still need the same discipline as larger custom packaging work. The smaller the format, the easier it is to miss a minor alignment problem that becomes obvious once the band wraps a real package.
Lead time also depends on finishing. A plain printed band usually moves faster than one with foil, embossing, die-cuts, or a specialty coating. Seasonal demand can add pressure too. If the order lands near a holiday peak or a major product launch, the schedule needs buffer time. For custom print, "fast" matters less than "predictable," because a late perfect order is still a late order.
Here is a practical timeline frame for printed belly bands with logo:
- Brief to dieline: 1-2 business days if dimensions are clear
- Artwork placement and proof: 1-3 business days
- Approval to production: 5-10 business days for simple jobs
- Finishing and trimming: 1-3 additional business days
- Shipping: depends on destination and service level
That is a frame of reference, not a promise. Complexity changes the schedule. So does transit distance. So does whether the supplier must source a specific stock. If the product launch date is fixed, the safer move is to build in a buffer rather than hope the job lands at the exact right moment. Nobody enjoys reworking a launch calendar because a paper stock took longer to arrive than expected.
There are a few straightforward ways to shorten turnaround Without Cutting Quality. Send vector logo files. Confirm dimensions early. Lock copy before proofing. Skip the habit of asking for one more change after the proof has been issued. Those small choices usually save more time than a rush fee ever will.
For buyers managing multiple SKUs, grouping work helps. If several versions of printed belly bands with logo share the same stock and finish, a supplier may streamline setup. That can improve consistency and reduce the chance of color drift between runs, which is especially useful when a brand wants one family of packs to feel related on shelf.
Step-by-Step Guide to Printed Belly Bands With Logo: Key Factors to Get Right
A good belly band begins with measurement, not design software. Measure the package at the exact point where the band will wrap. Include thickness, inserts, and any dimensional change after filling. A box that measures one way when flat can behave differently once it is packed, sealed, or filled with product. Many first-order mistakes begin there, and the mistake is usually invisible until the finished band arrives.
Printed belly bands with logo work best when the material matches the job instead of just the budget. A 250-350 gsm stock is common for many retail and gift applications, while heavier board can improve stiffness and presentation. Uncoated paper feels natural and tactile. Coated stock supports sharper image reproduction. If the band needs extra durability or some resistance to light moisture, the substrate and finish should be chosen with that in mind, not as an afterthought.
Before artwork is finalized, decide the branding hierarchy. What should a customer see first from arm's length? Usually that means the logo, followed by the product name, then one supporting detail such as flavor, scent, use case, or campaign message. Too many competing claims make the band feel crowded. On a narrow format, the eye needs room to read, and the copy needs to breathe.
The package system matters as a whole. A belly band that clashes with the carton color, typography, or closure method will feel separate rather than integrated. The most convincing printed belly bands with logo are the ones that feel designed with the box, not merely placed on top of it. That means considering the box tone, the band width, the fold direction, and where the seam will sit once assembled.
Here is a practical sequence that usually leads to a cleaner result:
- Measure the final wrapped point on a filled sample
- Choose stock based on feel, print quality, and handling needs
- Set the logo, product name, and support copy hierarchy
- Align the band with the box color and closure method
- Check a sample or digital proof on a real package before approval
That last step carries a lot of weight. A proof on screen can look perfect and still fail in physical use. Text may become too small. Contrast may disappear. The fold may land in the wrong place. The band may twist when it is applied by hand. A sample catches those issues before they spread across the full run, which is why experienced buyers rarely skip it.
One more point matters for teams that need sustainability claims to be accurate. If the band is meant to support an FSC-certified paper choice, confirm that the chain-of-custody language is correct and that the paper specification truly matches the claim. The same goes for recyclability messaging. The U.S. EPA's packaging and materials guidance is a useful reference when reviewing recovery and material choices, and FSC's standards overview helps when sourcing certified fiber: FSC and EPA recycling guidance.
For brands working with printed belly bands with logo, the material choice should match the message. A premium gift set does not need the same stock as a grocery bundle. A bakery sleeve does not need the same finish as a candle box. That may sound obvious, yet mismatched material decisions remain one of the fastest ways to make the band feel accidental. The best result is usually the one that looks simple because the choices were made carefully.
Common Mistakes That Make Belly Bands Look Cheap or Fail in Use
Sizing is the first problem to watch. A band that is too loose slides around and looks sloppy. A band that is too tight buckles, tears, or slows down assembly. Neither result is attractive, and both can create waste if the entire run is miscalculated. For printed belly bands with logo, a few millimeters matter more than most buyers expect.
Trying to say too much is another common mistake. Some bands are overloaded with claims, product details, promotional copy, and legal text until the design feels cramped. That is not a branding strategy. It is a layout issue. If the logo has to fight for space on a narrow strip, the band stops doing its core job.
Weak contrast causes trouble as well. A brand mark that disappears into a busy background will not help shelf impact, no matter how expensive the finish may be. Tiny type creates the same problem. A buyer may know the brand story, but a shopper in a retail aisle has only a second or two to read it. Good printed belly bands with logo favor clean hierarchy over decorative density.
Operational testing is where the honest answer shows up. A design can look polished in a PDF and still fail when staff must apply it by hand to 300 units in one shift. If the band has awkward fold behavior or a closure that slows the line, the format may need adjustment. That is not a design failure. It is useful information, and it usually saves money later.
Environmental wear deserves attention too. Humidity, friction, stacking pressure, and transit scuffing can damage an untested stock faster than many buyers expect. That matters for food, beverage, and gift items that pass through multiple handlers. A glossy finish may look great in a sample but show scratches in bulk shipping. A soft-touch finish can feel premium and still mark more easily than expected. These are tradeoffs, not absolutes.
From a quality-control standpoint, these points deserve a close look:
- Seam placement that interrupts the front panel
- Barcode placement that becomes unreadable after wrapping
- Paper grain that resists folding cleanly
- Artwork bleeds that were not built into the dieline
- Color shifts between proof and production
Most of these issues are preventable with a sample and a careful proof review. That is why experienced buyers treat printed belly bands with logo as a packaging system, not a simple print order. The band, the box, the closure, and the handling method all need to work together, or the finish will feel less polished than the artwork suggests.
Expert Tips and Next Steps for Printed Belly Bands With Logo
The strongest belly bands are not only decorative. They are a hierarchy tool. Let the logo lead, then support it with a product name, a variant cue, and one clear action or message. Once printed belly bands with logo are treated as an information system, design decisions become easier. Every extra element has to earn its place.
Use premium finishes where they will be seen first. A small foil detail on the front panel can deliver more visual value than coating the entire band. The same logic holds for spot varnish, texture, and metallic accents. On a compact format, restraint often looks more expensive than excess, which can feel a little counterintuitive until you see the samples side by side.
Test one SKU before a full rollout. That single step can show whether the band applies quickly, how it reads on shelf, and whether the finish holds up under handling. A pilot run helps most when comparing printed belly bands with logo across several product sizes or packaging shapes, because the results often differ more than expected.
If you are preparing a supplier brief, include the details that matter most:
- Exact dimensions and wrap point
- Paper or board preference
- Finish and color requirements
- Quantity and backup quantity
- Deadline and delivery address
- Application method: hand, glue, tape, or machine
- Vector logo files and approved copy
A complete brief makes pricing easier to compare. It also reduces the chance that a quote looks inexpensive only because it leaves something important out. For commercial packaging work, clarity beats guesswork every time. That is especially true for printed belly bands with logo, where one missing detail can change the entire cost picture.
From a packaging buyer's point of view, the smartest order sequence stays simple: measure the package, request two or three quotes, approve the proof, order a sample if the program matters, and launch with delivery buffer. That buffer protects against transit delays, proof revisions, and production hiccups that nobody wants to explain after a launch date has already been announced.
The most reliable takeaway is straightforward: before you place a full order, measure a filled sample, confirm where the seam will land, and approve the band on the actual package rather than only on screen. Those three checks catch most of the problems that make printed belly bands with logo feel off, and they give you a cleaner result without adding unnecessary complexity.
What products work best with printed belly bands with logo?
They work well on flat-sided cartons, gift sets, candles, soaps, bakery boxes, subscription kits, and bundled retail items. They are especially useful when you want a branded look without replacing the primary package.
How do I size printed belly bands with logo correctly?
Measure the package at the exact wrap point and include the product's full thickness, inserts, and any expected expansion. Add overlap for closure and confirm the fit on a filled sample before approving production.
What affects printed belly bands with logo pricing the most?
Quantity, material, print coverage, number of colors, finishing, die cuts, and rush timing usually have the biggest impact. Low-volume orders often cost more per unit because setup and proofing are spread across fewer pieces.
How long does production usually take for printed belly bands with logo?
Simple jobs can move quickly if artwork and dimensions are final, but revisions can add days or longer. Complex finishes, seasonal demand, and shipping distance can extend the overall lead time.
Should printed belly bands with logo be glued, taped, or left loose?
It depends on whether the band is mainly decorative, meant to hold the package closed, or needs to survive heavy handling. Loose bands are common for presentation, while adhesive or taped closures are better when shipping or tamper resistance matters.


