Get Printed Clear Zipper Bags Sample Approval Checklist Before You Buy
A clear zipper bag can look perfect in a mockup, then arrive with cloudy film, weak zipper tracks, or a logo sitting on the fold. A Get Printed Clear Zipper Bags sample approval checklist helps catch those issues before bulk production starts.
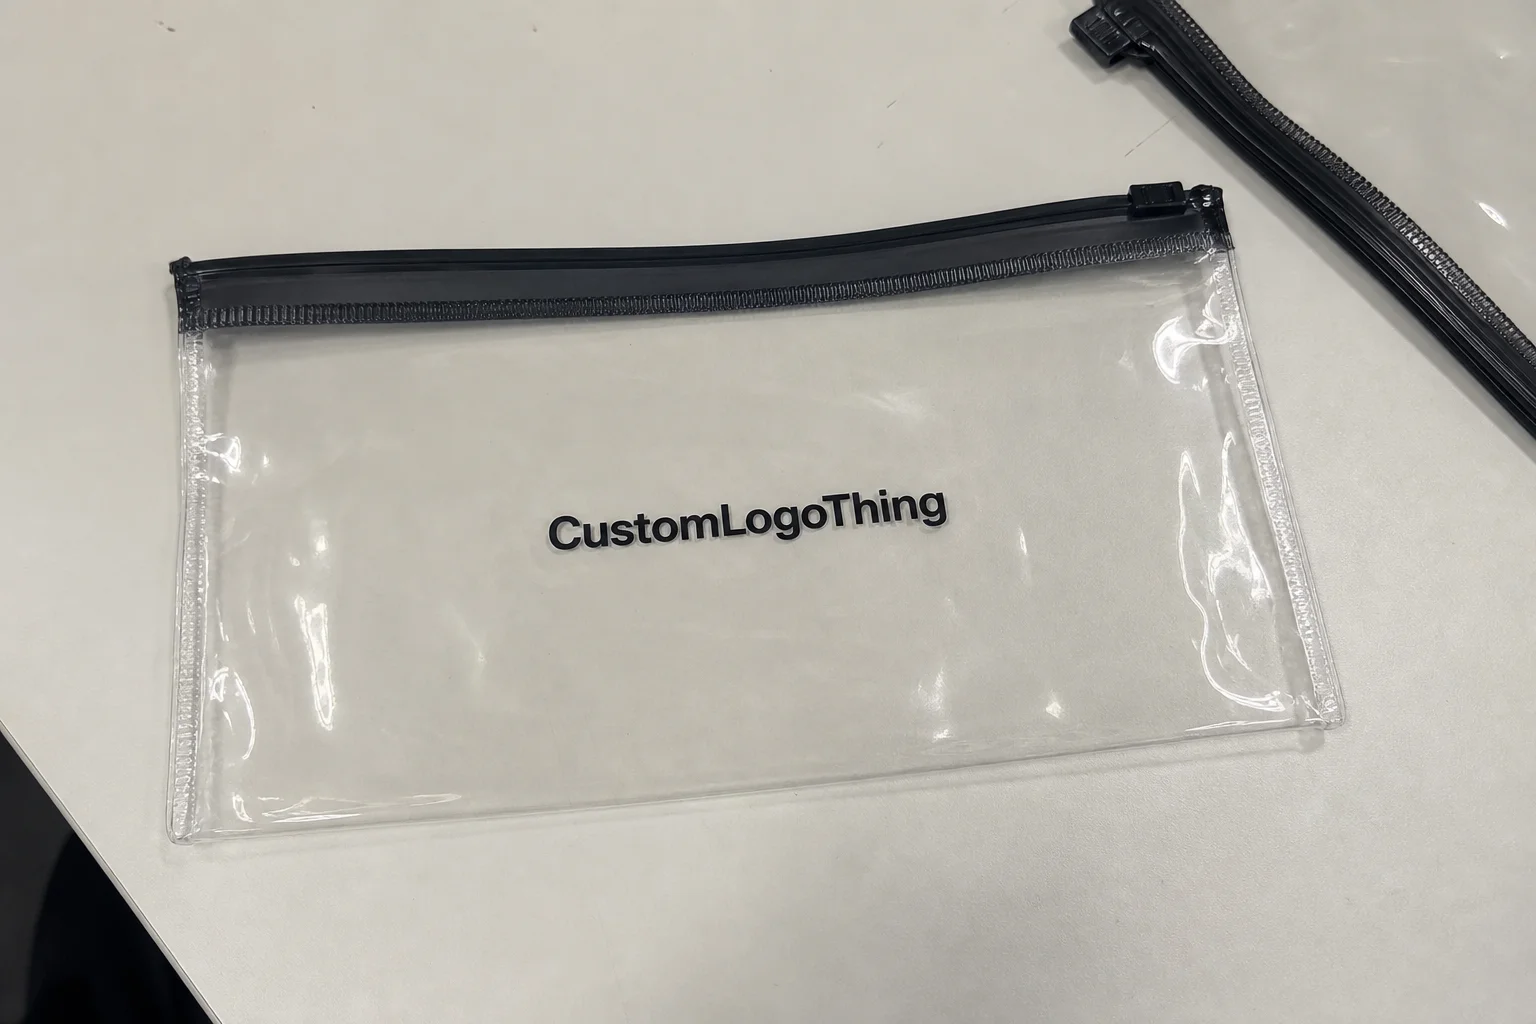
Sample approval means reviewing a physical or pre-production bag before manufacturing. For Printed Clear Zipper Bags, that review should cover material clarity, finished dimensions, print placement, ink adhesion, zipper function, seal strength, product fit, barcode scanability, and packing presentation. If the bag includes a bottom gusset, hang hole, tear notch, child-resistant zipper, or food-contact claim, inspect those details separately.
Clear bags are less forgiving than opaque packaging. Scratches, haze, dust, crooked artwork, and weak ink coverage are easy to see. White ink underbase also matters because the product behind the print changes how colors appear.
Practical rule: approve the proof for artwork position, but approve the sample for the actual bag. Those are not the same thing.
Use the checklist below to verify structure, film, print, zipper, cost assumptions, timeline, and supplier accuracy before approving production.
How Printed Clear Zipper Bag Sampling Works
Suppliers may offer several sample types. Each one answers a different question, so confirm what you are reviewing before you approve anything.
- Stock blank sample: an existing bag in a similar size or material. Good for checking hand feel, zipper style, approximate capacity, and general shape.
- Printed material swatch: a small film piece showing ink, opacity, finish, or color. Useful when artwork visibility on clear film is the main concern.
- Digital printed sample: a short-run concept sample. Good for visual review, but it may not match the final production print method.
- Pre-production sample: the closest version to the bulk order. It should match the specified material, thickness, size, zipper, print method, and finishing details.
- Production sample: a bag pulled from the live run. Useful for final quality control, but too late for preventing a bad setup.
Material choice affects clarity, feel, strength, and cost. PE is soft, flexible, and common for lightweight goods. CPP or OPP usually gives better clarity and a crisper look. PET laminates feel stiffer and more premium, with stronger print performance. Common zipper bag thicknesses often fall around 2 mil to 5 mil, but heavier products, sharper items, and retail display packaging may need more structure.
Zipper construction matters too. A standard press-to-close zipper is economical and familiar. A slider zipper costs more and adds bulk, but can improve user experience for repeated opening. Child-resistant zippers need additional testing and documentation. Hang holes, tear notches, rounded corners, and bottom gussets add manufacturing steps and cost.
Artwork should be ready before sampling starts. Send vector logo files, Pantone or CMYK references, barcode size, regulatory copy, print area, bleed, and a white ink layer if colors need to stand out on clear film. For food or regulated products, ask about food-contact documentation before the sample is made. The International Safe Transit Association is also worth knowing if filled bags ship through parcel networks and need transit testing.
The sample process also tests supplier communication. Your approval record should identify the exact sample version, date, material, print method, and specs being approved.
Key Specs to Check on the Sample
Start with the physical bag. Measure it flat with a ruler or caliper. Confirm finished width, finished height, bottom gusset depth, film thickness, zipper position, seal margins, tear notch location, hang hole placement, and corner shape. A 5 mm shift can move a logo into the zipper track or make the product fit poorly.
Inspect film clarity under bright neutral light against both white and dark backgrounds. Look for haze, yellow tint, roller marks, scratches, wrinkles, static dust, cloudy patches, or inconsistent gloss. Clear packaging should show the product cleanly.
Then review the print. Check logo sharpness, ink opacity, color registration, color consistency, edge alignment, and placement relative to the fold, zipper, gusset, and product window. Put the actual product inside the bag. A black logo can disappear against dark contents. A pastel logo may vanish against candy or cosmetics. Metallic products can make fine text harder to read because of glare.
Open and close the zipper 20 to 30 times. Check whether the tracks align, whether the zipper seals evenly across the full width, and whether an average customer can reseal it without effort. If the zipper pops open after filling, the bag is not ready for production.
Product-fit testing is essential. Gummies, hardware, apparel, cosmetics, powders, and sample kits all stress packaging differently. A bag that looks fine empty may bulge, crease, tip over, or distort once filled. Sharp corners may puncture thin PE. Powder can collect in zipper tracks. Apparel may create static and cling to clear film.
Check seal strength by gently pulling at side seals, bottom seals, and the area below the zipper. A good bag can flex, but seals should not split under normal filling, handling, or display conditions. If the product is heavy, oily, sharp, or shipped through parcel networks, ask what seal strength or drop testing the supplier recommends.
Review retail and compliance details before signoff. Test barcode scanability with a real scanner or reliable phone app at final printed size. Confirm suffocation warnings, recycling marks, batch code areas, hang display needs, and food-contact paperwork if the bag touches consumable products. For sustainability claims or paper hang tags paired with the bag, reference standards from groups like the Forest Stewardship Council when certification claims are involved.
Cost, Pricing, and MOQ Factors That Change the Sample
Sample cost depends on how close the sample is to real production. A blank bag pulled from inventory is inexpensive. A true pre-production sample with custom size tooling, print plates, zipper sourcing, and laminated film costs more because it requires setup.
| Sample Type | Typical Cost Range | Best For | Main Limitation |
|---|---|---|---|
| Stock blank sample | Free to $50 plus shipping | Checking size, feel, zipper style, and approximate capacity | May not match final film, print, or exact dimensions |
| Printed swatch | $25 to $150 | Reviewing ink opacity, color, and finish on clear film | Does not confirm bag structure or product fit |
| Digital printed concept sample | $75 to $250 | Visual review for artwork placement and shelf presentation | Print method may differ from production |
| True pre-production sample | $150 to $600+ | Final approval before bulk manufacturing | Costs more and can take longer |
MOQ changes with complexity. Simple Printed Clear Zipper Bags may start around 1,000 to 5,000 pieces, depending on size and print method. Custom sizes, custom zipper colors, premium laminates, slider closures, child-resistant features, or specialty finishes can push minimums to 10,000 pieces or more.
Unit cost drivers are predictable: thicker film, higher clarity material, laminated structures, more print colors, white ink layers, gussets, hang holes, tear notches, rounded corners, and special closures all add cost. A few cents per bag can become meaningful at 25,000 units.
Ask for quotes in clear line items. Confirm bag size, material, thickness, print colors, sample type, production quantity breaks, setup fees, plate fees, freight, duties, expected overrun or underrun policy, and estimated lead time after approval. If the sample fee is low, ask whether production uses the same film, print method, and zipper hardware.
Your checklist should include one blunt question: “Does the sample match the quoted material, thickness, closure, print method, and finish?” If the answer is no, you are not approving the final bag.
Process, Timeline, and Approval Steps From Proof to Production
Plan the schedule before launch pressure starts. Artwork review usually takes 1 to 3 business days if the files are usable. Digital proofing often takes 1 to 2 business days. Physical sample production can take 5 to 15 business days. Bulk production commonly runs 2 to 6 weeks after approval, depending on material, print method, quantity, and shipping plan.
Custom film, new size tooling, print plates, overseas freight, zipper sourcing, food-grade documentation, and peak season capacity can stretch the timeline. Changing size, material, zipper style, or print method can reset the sample clock.
- Submit specs: send dimensions, material target, thickness, quantity, zipper style, artwork, product use, and launch timing.
- Receive quote: confirm unit pricing, sample fee, setup charges, MOQ, freight, duties, and production lead time.
- Approve digital proof: check layout, print area, barcode size, legal copy, and white ink layers.
- Review sample: inspect the physical bag using measurable criteria.
- Request revisions: mark changes in millimeters, Pantone references, or exact spec language.
- Approve final sample in writing: include dated photos, final proof, quantity, tolerances, and packing instructions.
- Release production: pay the required deposit or balance only after the approval packet is complete.
Written approval should include approved sample photos, the dated proof, final artwork file name, bag size, film thickness, material structure, Pantone references, quantity, accepted tolerances, ship method, and carton packing details. If you need bags packed 500 per inner bag and 2,000 per carton, state that before production.
Build buffer time. Add 1 to 2 weeks for sample revisions if the packaging is new, retail-facing, food-contact, or tied to a hard launch date. A clear approval checklist keeps the process moving because everyone can see what passes, what needs revision, and what stops the order.
Common Sample Approval Mistakes Buyers Make
The first mistake is approving from photos only. Photos can help screen general layout, but they hide film haze, zipper feel, ink texture, and product fit. A bag can photograph well and still feel flimsy, cloudy, or hard to close.
The second mistake is reviewing an empty bag. Clear Zipper Bags change when filled. Powders settle into corners. Apparel creates bulk and static. Candy changes the color behind the artwork. Hardware tests puncture resistance. If you sell the product filled, approve the bag filled.
The third mistake is ignoring white ink. On clear film, CMYK or spot colors can look washed out without a white ink underbase. Your logo may be printed but barely visible.
The fourth mistake is approving color on a phone screen. Use Pantone targets, printed references, or a supplier-provided drawdown when color matters. Clear film, product color, and lighting can still shift the final appearance.
The fifth mistake is forgetting tolerances. Flexible packaging can vary slightly in size, print placement, seal width, and zipper position. Ask for acceptable tolerances before production. Common print placement tolerances may be around ±2 mm to ±5 mm, depending on the process and bag structure. Confirm the actual number with your supplier.
The sixth mistake is changing artwork after sample approval without requesting a revised proof. Small changes can shift placement, barcode readability, legal copy spacing, or the white ink layer. If the file changes, the approval record should change too.
The seventh mistake is skipping carton and packing instructions. Loose packing can scratch clear film. Overpacked cartons can crease gussets. Poor inner bag packing can create static, dust, or curled edges before the bags reach filling.
Expert Tips for Faster, Cleaner Sample Approval
Create a one-page approval checklist before requesting samples. Include dimensions, film type, thickness, print colors, zipper style, artwork position, test product, barcode size, compliance copy, and must-pass criteria.
Ask suppliers to label each sample with material, thickness, print method, sample date, and version number. Version control matters when multiple revisions are on your desk.
Test under real conditions. Fill the bag to the expected weight. Display it on a peg hook or shelf. Scan the barcode. Open and close the zipper repeatedly. Leave it packed for several days to check creasing, distortion, zipper stress, ink rub, or product oil transfer. If shipping matters, ask whether ASTM or ISTA-style transit testing makes sense for your filled cartons.
Use a simple decision system: pass, revise, or reject.
- Pass: all must-have specs are met, and only normal production tolerances remain.
- Revise: logo needs to move up 8 mm, barcode needs 2 mm more quiet zone, or ink opacity needs a stronger white layer.
- Reject: film is too hazy, zipper does not reseal, bag is the wrong size, or the print method does not match the quote.
Photograph issues with a ruler or marked reference. “Move logo up 8 mm from current sample” is more useful than “logo feels low.”
Keep approved samples as golden samples. Store one with your team and ask the supplier to retain one for production matching and QC. The checklist should say where the golden sample is stored and which version is approved.
Next Steps Before You Approve Production
Before releasing production, run the final check with the actual product inside the bag. Confirm dimensions, film clarity, zipper function, artwork placement, barcode scanning, seal strength, hang display performance, and packing instructions. Then compare the sample against the quote. If the quote says 3 mil PE with two-color print and the sample does not match, stop and clarify.
Request a final approval packet from the supplier. It should include the digital proof, physical sample photos, material spec sheet, quote, production timeline, payment terms, shipping plan, carton packing details, and any applicable food-contact or compliance documents. If the bag will be used for food, cosmetics, cannabis accessories, supplements, or children’s products, ask for the paperwork before paying the production deposit.
Use clear decision thresholds. Approve if the sample meets all must-have specs. Revise if only measurable artwork or placement changes are needed. Pause if film, zipper, size, or print method feels wrong. Those are structural issues, not tiny tweaks.
A good approval process makes problems visible while they are still fixable. One marked-up approval document is stronger than scattered emails, screenshots, and assumptions.
FAQs
What should be on a printed clear zipper bags sample approval checklist?
Include bag size, film thickness, material clarity, zipper function, print placement, ink opacity, color match, barcode scanability, seal strength, gusset shape, hang hole position, and product fit. Test the sample with the actual product inside and document revisions with measurements.
Do I need a physical sample before ordering custom clear zipper bags?
For repeat orders or simple stock bags, a digital proof may be enough if the specs are already proven. For new sizes, retail packaging, food products, premium branding, or tight launch deadlines, get a physical or pre-production sample. It is cheaper than discovering problems at 10,000 pieces.
How long does sample approval take for printed clear zipper pouches?
Most digital proofs take 1 to 2 business days after usable artwork is submitted. Physical samples usually take 5 to 15 business days, while true pre-production samples may take longer if custom tooling, print plates, or special materials are involved.
How much do custom printed clear zipper bag samples cost?
Blank samples are often free to $50 plus shipping, digitally printed samples commonly run $75 to $250, and true pre-production samples can run $150 to $600+ depending on size, material, and print setup. Ask whether the sample cost is refundable or credited toward the bulk order.
Can I approve printed clear zipper bags from photos only?
Photos can help review rough layout, zipper placement, and general appearance, but they are risky for final approval. A physical sample lets you check film clarity, feel, ink opacity, reseal performance, product fit, and shelf presentation in ways photos usually hide.


