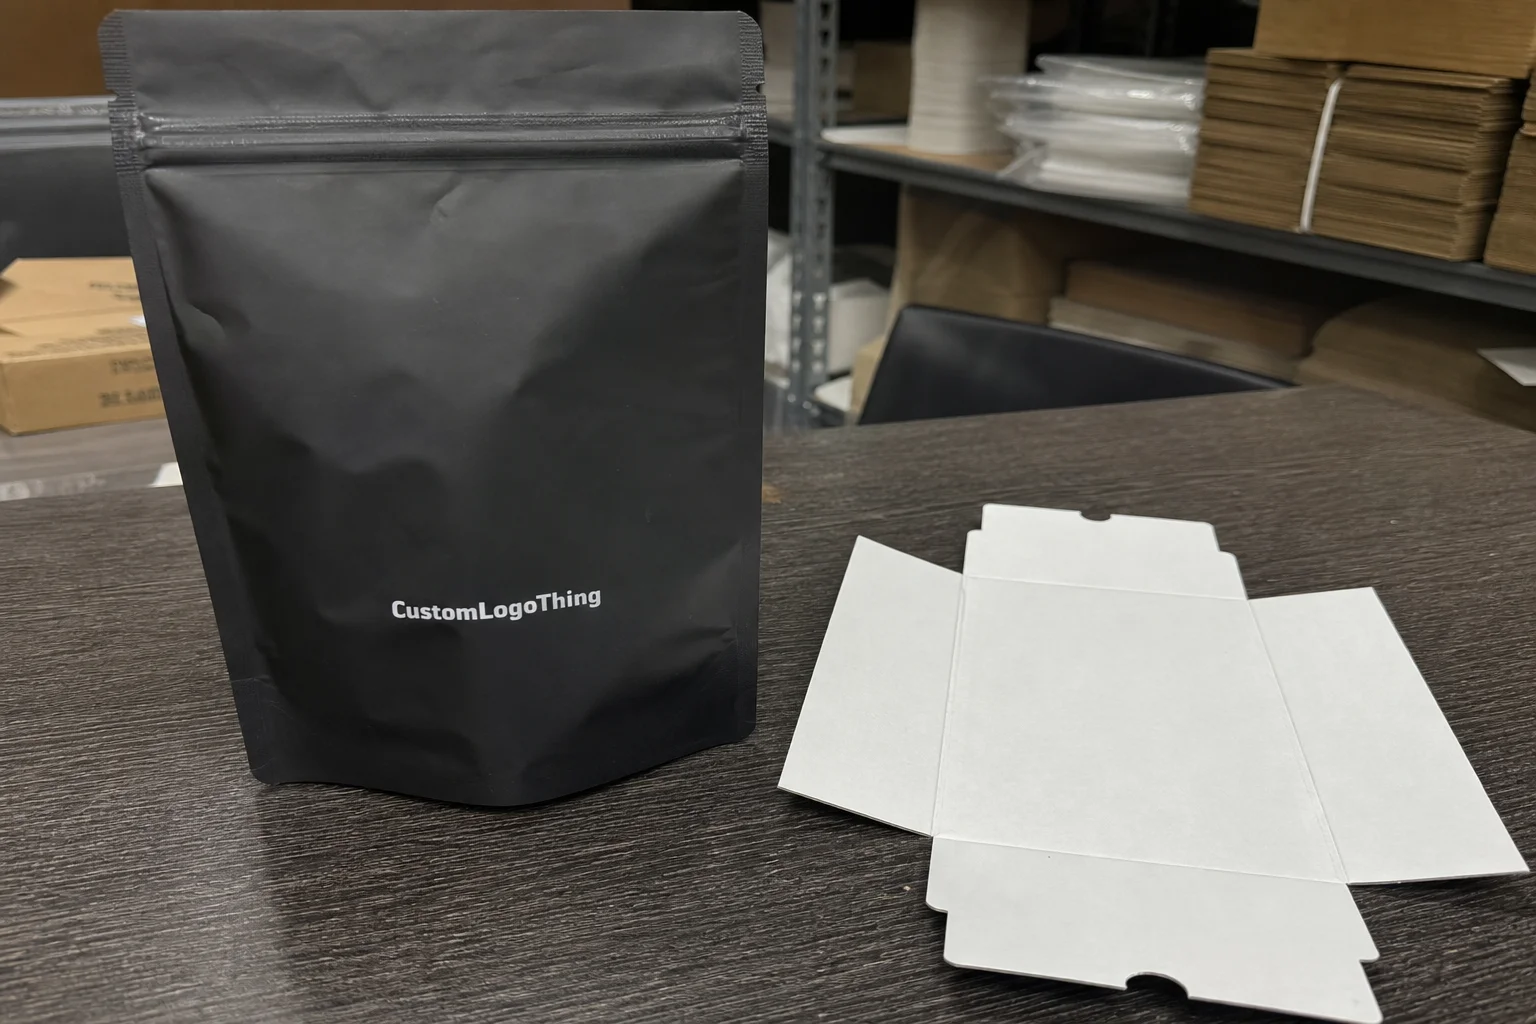
The pouch looks premium. The zipper snaps shut, the matte finish feels expensive, the print is clean, and then the insert card warps inside the bag, hides the product window, or makes the whole thing feel like a stiff little envelope. Fun, right? A Get Printed Matte Zipper Bags packaging insert checklist helps buyers lock the boring details before production, where mistakes get expensive.
Printed Matte Zipper Bags are resealable flexible pouches with a soft-touch, matte laminated, frosted, or low-sheen finish. They’re common for snacks, supplements, coffee, apparel accessories, beauty samples, pet treats, and regulated retail categories where shelf feel matters almost as much as shelf look. The insert is usually a card, folded leaflet, instruction sheet, coupon, compliance panel, or product support piece sitting inside the pouch with the product.
The catch is simple: the bag and insert are not separate decisions. Insert size, paper stock, orientation, zipper clearance, barcode placement, warning copy, fulfillment method, and packing sequence all affect how the final pouch looks and works. Matte films also show pressure marks, scuffs, trapped corners, and insert outlines more easily than glossy films. So yes, that tiny card can ruin expensive packaging. Packaging has a sense of humor like that.
Why Matte Zipper Bags Need a Packaging Insert Plan
A packaging insert plan is not just “add a thank-you card.” That is the cute version. The production version includes insert dimensions, paper weight, corner shape, fold style, product fit, pouch dimensions, zipper location, artwork safety margins, batch label zones, and who physically puts the insert into the bag.
From a packaging buyer’s point of view, the biggest mistake is treating the pouch as product packaging and the insert as marketing. Both are part of the same branded packaging system. If the insert blocks the clear window, fights the zipper track, or pushes the product into the front panel, the customer does not care that the card has a beautiful discount code. They see a bag that looks cheap.
Matte zipper pouches are less forgiving than standard gloss pouches. A 300 gsm insert with square corners may look harmless on a desk, but inside a 5-inch by 8-inch stand-up pouch it can press into the film, leave corner shadows, and make the pouch bow outward. A lighter 250 gsm card with rounded corners may solve the problem for small bags. For larger pouches, 350 gsm may be fine if the card has enough clearance and the product is soft.
Packaging rule worth following: test the real insert, real product, and real pouch together before approving bulk production. A flat PDF proof cannot tell you if a zipper closes cleanly around a rigid card.
A practical checklist gives your supplier enough detail to quote accurately, build the right dieline, and flag fit issues early. It also keeps your internal team from changing copy, insert stock, and packing method after proofs are approved. That is usually where the invoice starts getting spicy.
How the Bag, Zipper, Print, and Insert Work Together
A matte zipper bag has several working parts: front panel, back panel, bottom gusset if it stands up, zipper track, tear notch, top seal area, side seals, hang hole if needed, and sometimes a transparent or frosted window. The insert sits inside that structure, either behind the product, in front of it, wrapped around it, or attached to it.
Matte finish options vary more than buyers expect. A standard matte laminated film is usually the practical choice for many custom pouches. Soft-touch matte feels more premium but can scuff more easily and often costs more. Frosted clear film gives a muted product view. Kraft-look matte film works for natural or earthy package branding, though it is still a printed or laminated film unless the supplier specifies otherwise.
A spot gloss logo over a matte background can look sharp, but it adds setup and print-control requirements. If the brand depends on that contrast, approve it with the actual pouch material, not just a screen mockup. Matte surfaces change the way light hits ink.
Printing method matters too. Digital printing is useful for short runs, versioned artwork, and lower MOQs, often starting around a few hundred pieces depending on the supplier. Plate-based printing makes more sense for larger production, commonly several thousand pieces and up, because setup costs spread across more bags. Spot finishes, metallic inks, and tight Pantone matching can improve shelf impact, but each one adds another place for cost or delay to sneak in.
The zipper is the troublemaker. Insert cards should not push into the zipper track, block resealing, or make the top seal bulge. Leave clearance. Packaging is not origami therapy. For many small and mid-size pouches, leaving at least 0.25 to 0.5 inch between the top of the insert and the zipper area is a sane starting point, but this depends on film thickness, card stock, product thickness, and fill height.
Product visibility also changes the insert plan. A full opaque pouch can hide the insert completely. A clear window needs the insert positioned so customers can still see the actual product. A frosted window may need stronger contrast between the product and card. Card-backed displays can look tidy for apparel accessories, patches, small tools, or beauty samples, but only if the card stays flat after filling.
Compliance-heavy products need extra attention. Nutrition panels, ingredients, warning statements, batch labels, QR codes, and barcode scans must remain readable after the product and insert are inside. If the pouch curves after filling, a barcode near a gusset can fail scanning. Nobody wants to discover that at retail check-in.
Key Specs to Confirm Before Artwork Starts
Start with bag dimensions: width, height, bottom gusset depth, usable fill space, zipper location, and top seal allowance. Buyers often quote the outside size and forget the usable interior. That is how inserts start fighting the zipper. For example, a pouch listed as 6 inches by 9 inches may have less usable height after the zipper, seal, and bottom gusset are considered.
Next, define the insert. Confirm width, height, corner radius, fold style, paper thickness, print sides, and orientation. A loose flat card behaves differently than a folded instruction leaflet. A wrap-around insert behaves differently again. If the insert must stand upright behind a product, it may need heavier stock or a snugger width. If it sits loose in a filled pouch, a slightly smaller card is usually cleaner.
Material compatibility matters. Heavy cards can crease matte film. Sharp corners can poke. Glossy inserts can visually clash with soft-touch pouches when the brand goal is calm, natural, or premium. This is one of the most common misses in packaging design: each piece looks nice by itself, but the combined product packaging feels confused.
Artwork needs more than bleed and a logo. Ask for a dieline and mark the zipper interference zone, heat seal zones, gusset distortion area, transparent window boundaries, barcode quiet zones, batch label area, and safe zone for small text. On flexible packaging, small copy near a fold or seal can become unreadable fast. Keep critical text away from edges by at least 0.125 inch where possible, and more near gussets.
Color expectations need a reality check. Matte film can mute colors compared with glossy packaging. Black may look rich and premium, but dark matte pouches show scuffs faster. Bright brand colors may need a color proof or Pantone target if exact shade matters. A PDF on a backlit screen is not a color standard. Shocking, I know.
The insert copy should be final before artwork starts. That includes usage instructions, discount codes, QR codes, warranty details, recycling guidance, ingredients, warnings, and regulatory copy. If your team is still debating the wording, do not approve print-ready files. The Forest Stewardship Council can also be relevant if you want FSC-certified insert stock for a sustainability claim, but confirm chain-of-custody details with the printer before putting a logo on the card.
Finally, confirm fulfillment. Do bags arrive empty? Are inserts preloaded? Are products kitted into the pouches? Are inserts and bags bulk packed separately? That single choice changes labor, freight cartons, scuff risk, and quote accuracy.
Cost, MOQ, and Quote Factors for Printed Matte Pouches
Printed Matte Zipper pouch pricing depends on pouch size, film structure, matte finish type, print method, number of colors, zipper type, gusset, clear window, tear notch, hang hole, insert stock, and packing labor. No supplier prices these exactly the same, so treat ranges as planning numbers, not gospel.
Digital short runs may start around a few hundred to 1,000 pieces. These runs cost more per bag but reduce inventory risk and help early brands test sizes, flavors, scents, or SKUs. Larger custom film production often makes more sense from several thousand pieces and up because setup, plates, and film runs spread across more units. Cheap per unit can still be expensive if you bought the wrong size, wrong warning copy, or wrong insert stock.
Insert costs deserve their own line. A basic double-sided flat insert on 250 to 300 gsm card may be modest. Rounded corners, die cutting, folding, premium matte stock, thick 350 gsm paper, and manual insertion all add cost. If the supplier places one card into each pouch, labor may be priced per unit or included in a kitting charge. Ask. Do not assume. Assumptions are free until the invoice arrives.
| Option | Typical Use | Cost Impact | Buyer Tradeoff |
|---|---|---|---|
| Digital matte zipper pouches | Short runs, multiple SKUs, test launches | Higher unit cost, lower setup | Good flexibility, less inventory risk |
| Plate-based printed pouches | Larger runs, stable artwork | Setup or plate charges, lower unit cost at volume | Better for repeat production, less forgiving after copy changes |
| 250 gsm insert | Small pouches, light instructions, coupons | Lower paper cost | Less rigid, may feel less premium |
| 350 gsm insert | Retail display backing, premium cards | Higher paper and shipping weight | Sturdier, but can dent matte film if oversized |
| Supplier-preloaded inserts | Retail-ready packing, faster fulfillment | Added labor or kitting fee | Cleaner handoff, less control after arrival |
For a clean quote, send bag size, quantity, artwork status, film preference, matte style, zipper requirement, gusset depth, insert size, insert material, packing method, delivery location, and target deadline. Ask for line-item pricing: pouch, insert, setup, proof, tooling, packing, freight, and rush fees. One quote may include plates, proofs, insert printing, and packing. Another may conveniently forget half of that. Very generous of them.
If you are also comparing custom printed boxes, mailers, or labels, keep the same discipline across all Custom Packaging Products. Product packaging only works financially when specs are clear enough to compare apples to apples, not apples to “trust us, it’s included.”
Process and Timeline From Checklist to Finished Bags
A realistic workflow looks like this: confirm specs, request quote, review dieline, prepare artwork, approve proof, produce a sample or digital proof, print production, make bags, print inserts, pack, inspect, and ship. Simple on paper. Less simple when five people are still editing the warning copy.
Simple digital pouch projects can sometimes move in a few weeks after final artwork approval. Custom film, plate printing, soft-touch finishes, specialty windows, preloaded inserts, or multi-SKU packing can take several weeks depending on supplier queue and complexity. Rush options may exist, but rush packaging tends to punish vague instructions. Pay to move fast only after your specs are boringly complete.
Delays usually come from missing artwork files, unclear insert dimensions, unapproved barcodes, compliance copy changes, wrong product sample dimensions, and late decisions on matte finish. Barcodes deserve a real scan test. For distribution and shipping performance, standards from groups like ISTA can help frame package testing conversations, especially if pouches are packed into cartons for retail or ecommerce.
Proofing options vary. A PDF proof checks layout, copy, dieline position, and general artwork placement. A color proof gives more confidence on brand shades, especially on matte film. A physical sample checks pouch size, zipper feel, product fit, and insert behavior. A pre-production sample is smart for higher-risk orders, unusual product shapes, thick inserts, or retail programs where presentation matters.
Do not test the insert with printer paper and call it done. A 350 gsm card inside a filled pouch behaves differently from an 80 gsm office sheet. Powders settle. Gummies shift. Apparel compresses. Rigid accessories push corners into the film. The sample tells the truth, even when the spreadsheet was feeling confident.
Your supplier handoff should be one clean package: product dimensions, product weight, fill quantity, insert specs, brand files, dieline notes, barcode files, compliance copy, packing instructions, carton preferences, and ship-to details. A strong order checklist keeps that handoff from turning into a 47-email scavenger hunt.
Get Printed Matte Zipper Bags Packaging Insert Checklist
Use this step-by-step list before you request pricing, approve artwork, or send a deposit. It is not glamorous. It is useful. Useful saves money.
- Choose the pouch format. Decide between a flat pouch, stand-up pouch, bottom gusset pouch, three-side seal pouch, or shaped bag. Stand-up pouches need gusset planning. Flat pouches need tighter product thickness control.
- Measure the real product. Include width, height, thickness, weight, fill quantity, and how the product settles after handling. Marketing dimensions are not production dimensions.
- Define the insert purpose. Is it for instructions, branding, coupon code, compliance copy, product support, retail display backing, or an unboxing message? One insert cannot do everything well unless it is designed that way.
- Size the insert around the working parts. Leave clearance for the zipper, top seal, tear notch, side seals, gusset, window, and product. If the pouch cannot close flat, the insert is too ambitious.
- Choose paper stock and finish. Common insert stocks often run from 250 gsm to 350 gsm. Matte card inside a matte pouch usually feels cohesive, but thick stock can dent film if the fit is tight.
- Map artwork zones together. Plan the front hero panel, back details, clear window view, QR code, barcode, warning copy, batch label area, and insert face as one packaging design system.
- Request the dieline before final design. If dimensions are not final, design should not be final. Designing first and measuring later is a classic packaging tax.
- Confirm the packing method. Choose loose inserts, preloaded inserts, product kitting, or separate bulk delivery. Each option changes labor, cartons, scuffing, and lead time.
- Approve proofs carefully. Check spelling, barcode scans, legal copy, zipper clearance, color expectations, and real product fit. Then check them again with someone who has not stared at the file for three hours.
If you want the supplier to quote efficiently, include the checklist details in the same email as your artwork files and product dimensions. Separate emails, vague notes, and “same as last time” instructions create errors. Boring order packets win.
Common Mistakes That Make Matte Zipper Bags Look Cheap
The first mistake is using an insert that is too wide. It bows the pouch sides and makes the finished bag look overstuffed before the product is even inside. For small zipper pouches, reducing insert width by even 0.125 to 0.25 inch can improve the finished look.
The second mistake is placing important artwork too close to the zipper, tear notch, gusset fold, or heat seal. If the logo lands in a crease, nobody at retail will applaud your daring layout choice. Keep critical graphics and tiny text inside safe zones, and ask your supplier which areas distort during forming and sealing.
The third mistake is mixing finishes without a reason. A glossy insert inside a soft matte pouch can work if contrast is the goal. If the goal is natural, minimal, premium, or calm, it often feels off. Package branding should feel intentional, not assembled from whatever samples were on the desk.
Scuffing is another quiet problem. Matte packaging can mark during packing and shipping, especially when heavy inserts rub against the inside wall or bags are packed too tightly in cartons. If retail presentation matters, ask for carton packing details: bag count per inner bundle, orientation, dividers if needed, and whether finished bags are poly-bagged or bulk packed.
Skipping a product-fit test is still the champion mistake. Powders settle into the gusset. Gummies shift toward the bottom. Apparel compresses unevenly. Small rigid accessories push corners into the film. Inserts need to match product behavior, not just pouch size. Product packaging is physical. It does not care about the mockup.
Barcode readability also gets ignored. Curved pouches, gusset folds, and inserted cards can distort scan areas if placement is too low, too close to a side seal, or positioned where the product bulges. Test scans after filling. If a retailer requires specific barcode placement or label size, build that into the dieline before print.
Finally, do not compare suppliers only on unit price. Check film quality, zipper feel, print coverage, proofing, insert labor, freight, and whether setup charges are included. A low quote that excludes insert packing is not a deal. It is just incomplete math.
Build a Supplier-Ready Order Packet
Create a one-page spec sheet with pouch size, style, film type, matte finish, order quantity, zipper type, gusset depth, window shape, tear notch, hang hole, and any special packing requirements. Add insert details: size, paper stock, thickness, finish, print sides, fold style, corner shape, and whether the supplier should place inserts into each bag.
Attach artwork files or request dielines before designing if dimensions are not final. If you are coordinating pouches with custom printed boxes, labels, or ecommerce mailers, keep all brand colors and material finishes in one place so the full retail packaging system does not drift from piece to piece. You can also review broader Custom Packaging Products if the pouch is only one part of the launch.
Send real product dimensions and, when possible, a physical sample to test fit. Photos help, but samples stop dumb assumptions from becoming expensive production runs. Ask the supplier for three things: a line-item quote, estimated lead time after proof approval, and proofing options for color and fit.
Request carton packing details if you care about scuffing, retail presentation, or fulfillment speed. Matte bags deserve sane packing, not a box of chaos. Run the checklist before you approve artwork, pay deposits, or lock a launch date.
FAQs
What should be included in a printed matte zipper bags insert checklist?
Include pouch size, zipper clearance, insert size, paper stock, artwork zones, barcode placement, product dimensions, packing method, quantity, proof type, and lead time. Add compliance copy, QR codes, warning labels, and batch-label areas if your product category needs them. Also confirm whether inserts ship loose, preloaded into bags, or kitted with the product because that affects cost and timeline.
How thick should a packaging insert be for matte zipper pouches?
Common insert stocks often range from lightweight cards around 250 gsm to sturdier cards around 350 gsm, depending on bag size and product weight. Avoid oversized or overly rigid cards because they can bow the pouch, dent matte film, or interfere with the zipper. Test the exact insert stock inside the filled pouch before approving bulk production. The sample tells the truth.
Does a matte finish increase the cost of custom zipper bags?
Usually, yes. Matte laminated film, soft-touch finishes, and specialty matte effects can cost more than basic glossy film. The increase depends on quantity, film structure, print method, finish type, and whether you add windows, gussets, or spot gloss. Ask for matte and gloss pricing side by side if budget is tight, then decide where the premium feel is worth the spend.
How long does it take to get printed matte zipper bags with inserts?
Timing depends on print method, order quantity, proof approvals, insert printing, and whether the supplier is also inserting cards into each pouch. Simple short-run projects can move in a few weeks after final artwork approval, while larger custom runs or specialty finishes may take several weeks. Delays usually come from incomplete artwork, late copy changes, unclear insert specs, or skipped product-fit testing.
Can I use one insert size across multiple matte zipper bag sizes?
Sometimes, but only if the insert clears the zipper, seal area, gusset, and product in every bag size. One shared insert can lower print complexity and inventory headaches, but it may look awkward in smaller or larger pouches. Make physical mockups for each bag size before ordering. Guessing saves minutes and can waste a full production run.


