Buyer Fit Snapshot
| Best fit | Rigid Boxes Custom Printed projects where brand print, material claims, artwork control, MOQ, and repeat-order consistency need to be specified before quoting. |
|---|---|
| Quote inputs | Share finished size, material target, print colors, finish, packing count, annual reorder estimate, ship-to region, and any compliance wording. |
| Proofing check | Approve dieline scale, logo placement, barcode or warning zones, color tolerance, closure strength, and carton packing before bulk production. |
| Main risk | Vague material claims, crowded artwork, missing packing details, or unclear freight terms can make a low unit price expensive after revisions. |
Fast answer: Rigid Boxes Custom Printed: Material, Print, Proofing, and Reorder Risk should be specified like a repeatable production item. The safest quote records material, print method, finish, artwork proof, packing count, and reorder notes in one written spec.
Production checks before approval
Compare the actual filled-product size with the drawing, then confirm tolerance on folds, seals, hang holes, label areas, and retail display edges. Reserve space for logos, QR codes, warning copy, and material claims before decorative graphics fill the panel.
Quote comparison points
Review material grade, print process, finish, sampling route, tooling charges, carton quantity, and freight assumptions side by side. A quote is only useful when the supplier can repeat the same color, closure quality, and packing count on the next order.
Rigid boxes custom printed can shape a buyer's judgment in about three seconds, and I have watched that timing play out on retail floors in Chicago, Dallas, and London more times than I can count. A 1.8 mm chipboard shell wrapped in 157 gsm art paper, finished with matte lamination and a one-color foil logo, can make a $24 candle read like a $54 gift set. That gap is exactly why rigid boxes custom printed matter so much in branded packaging, luxury retail, and premium product presentation. The box is doing part of the selling before anyone even touches the product.
I once watched a cosmetics brand in Los Angeles switch from a folding carton to rigid boxes custom printed and get a stronger response from the same retail chain without changing the formula, SKU, or fragrance. Nothing about the product changed except the structure: a 2 mm board base, a soft-touch wrap, and a narrow silver foil line on the lid. The box did the talking, and the buyer listened. Packaging is not decoration alone; it is part of the pitch, and Custom Printed Boxes often deliver the first proof that a brand knows exactly what it is selling.
Suppliers vary wildly, so Custom Packaging Products is a sensible place to begin comparing options, especially if you are looking at runs from 500 pieces to 10,000 pieces. The harder part is not finding a vendor in Shenzhen, Dongguan, or Ningbo. It is understanding structure, pricing, and print limits before the order is placed. Rigid boxes custom printed are easy to buy and easy to specify badly. That mismatch is where budgets slip, timelines stretch from 12 to 20 business days, and finish quality starts to suffer because the box was approved on a mockup instead of a real spec.
What Are Rigid Boxes Custom Printed?
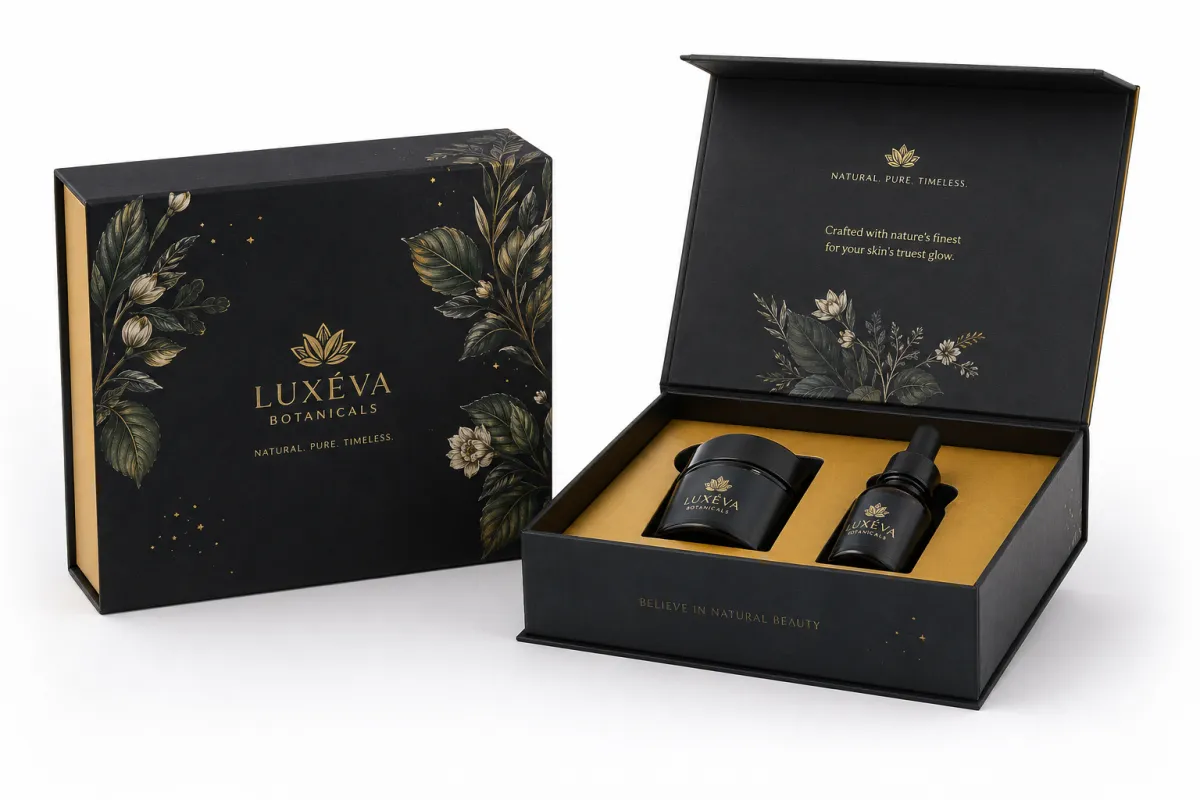
Many premium-looking packages are less complicated than they appear. In a Shenzhen workshop I visited in 2024, a row of rigid boxes custom printed looked almost architectural from the outside, yet the core was simple: thick chipboard wrapped in printed paper with tight corner folds and a seam tucked 8 to 12 mm from the back edge. The impression was expensive. The construction was practical. That contrast is part of the appeal, and it explains why buyers keep reaching for this format across gift packaging and retail packaging programs.
Rigid boxes custom printed are usually made from dense paperboard, often around 1.5 mm to 3 mm chipboard, then wrapped with printed or specialty paper and assembled into a fixed shape. Folding cartons arrive flat and save storage space. Rigid boxes custom printed hold their form from the moment they are opened. That structural difference is why they show up so often in luxury retail, gifts, subscription kits, and presentation packaging, especially for items weighing 120 g to 1.5 kg.
The cleanest way to think about it is simple: a folding carton is built to save space, while a rigid box is built to signal value. One prioritizes efficiency. Rigid boxes custom printed prioritize presentation, tactility, and brand memory. In package branding, that matters because customers often remember how the box felt long after they forget the exact wording on the front panel. I remember touching two nearly identical sample boxes at a buyer table in Milan and picking the heavier one first every time, even though I was trying to be objective.
I still remember a client meeting where a beauty brand brought two competitor boxes to the table in New York. One was a lightweight carton with rich print. The other was rigid boxes custom printed with a soft-touch wrap and a 0.5 mm foil line across the lid. The team kept handling the rigid sample because it felt more serious, even though the print coverage was less elaborate. That is the first-impression effect in plain sight, and it tends to win arguments faster than any slide deck because people react to weight, texture, and closure feel within seconds.
Rigid boxes custom printed also support repeatable shelf presentation. In retail packaging, a box that opens square, closes cleanly, and keeps its edges crisp tells a buyer that the brand pays attention. I have seen store managers in Toronto and Dubai notice the package before the product itself, especially in fragrance, watches, premium tea, confectionery, and limited-edition tech accessories. A sloppy edge can undo a lot of good design very quickly, which is annoying because the fix is often just better spec control and a 2 mm tighter tolerance on the wrap.
There is another reason buyers choose rigid Boxes Custom Printed: perceived protection. The shell suggests durability before anyone tests it. For sensitive products, a stronger outer box can reduce anxiety for both the brand and the customer, especially when EVA foam, molded pulp, or paperboard inserts sit inside. That psychological comfort matters more than people admit in meetings, particularly when the product value is above $40 and the return rate could be affected by shipping damage.
Not every project needs the same construction. A magnetic-closure gift box for a skincare set, a lift-off lid for a bottle set, and a drawer-style sleeve for a collector item all count as rigid boxes custom printed, but each solves a different problem. One may be built for display, another for unboxing drama, and another for long-term storage. I have always liked that flexibility because it lets the packaging strategy match the product strategy instead of forcing one shape to do all the work.
That is why I ask three questions before any supplier quote on rigid Boxes Custom Printed: How heavy is the product, usually in grams or ounces? How visible is the package at the point of sale, in a 1 m shelf view or a 30 cm countertop view? What feeling should the buyer have in the first five seconds? Those answers shape the rest of the spec. Skip them, and you end up designing by guesswork, which is a very expensive hobby when a reprint can add 15% to 25% to the budget.
How Rigid Boxes Custom Printed Are Made
The anatomy of rigid boxes custom printed is straightforward once you break it down. Most builds start with a chipboard core, a wrapped printed paper exterior, optional interior lining, and an insert that holds the item in place. Depending on the product, the closure might be magnetic, lift-off, sleeve-and-tray, or ribbon pull. The structure is simple; the control points are not, especially once you start specifying 350 gsm C1S artboard wraps, 2 mm board walls, and a 0.3 mm tolerance on the lid fit.
Production usually starts with a dieline and a structural spec. That step decides the outer dimensions, the wall thickness, the wrap allowance, the seam placement, and the insert shape. If the dieline is off by even 1 or 2 mm, rigid boxes custom printed can end up with loose corners, uneven lid fit, or a visible wrap shift on one side. I have seen a tiny seam drift in a Guangzhou run turn an otherwise premium box into something that looked slightly tired, and the fix always cost more than the caution would have.
After the dieline comes the artwork stage. This is where packaging design can go right or wrong quickly. Rigid boxes custom printed need image resolution high enough for close viewing, which usually means 300 dpi at final size, with CMYK values locked and bleed extended 3 mm to 5 mm past the trim. If a brand sends a logo built for web use, the corners will expose that mistake immediately on a real box. It is one of those moments that makes everyone stare at the proof in silence, because nobody wants to say that a 1200-pixel PNG is now the villain.
Offset printing is often the best choice for larger runs because it holds color and gradients well. Digital printing can make sense for shorter runs, sample programs, or quick market tests of 250 to 500 units. Accent finishes follow: foil stamping for metallic highlights, embossing for raised detail, debossing for pressed-in texture, and spot UV for selective gloss. Rigid boxes custom printed usually look strongest when one or two of these effects are used with discipline rather than all at once. I am not anti-flair, but I have definitely seen a design collapse under its own ambition at the proof stage.
At a supplier negotiation I sat through in Guangzhou, one buyer wanted foil, embossing, spot UV, and a metallic interior on the same lid. The quote climbed by 38 percent, from $1.26 to $1.74 per unit on a 4,000-piece run, and the box began to look crowded on screen. We cut the finish stack back to foil plus soft-touch lamination, and the final sample looked more expensive, not less. Restraint usually prints better. That is my honest opinion, and I have yet to regret it when the final carton lands in a warehouse in Rotterdam or Atlanta.
Assembly is where the physical details matter most. The paper wrap has to adhere evenly, adhesive performance has to stay stable across temperature and humidity swings, and fold tolerances need to stay tight around the corners. If the glue runs too wet or the wrap is too thin, the result can look wavy at the edges, which is painful on rigid boxes custom printed because crisp presentation is the whole point. I have had a sample come back with one lifted corner after a 2-hour humidity test and felt the same tiny frustration you feel when a shirt button is off by one stitch.
For projects that will move through distribution channels, testing matters too. I often point teams to the International Safe Transit Association because transit protocols help identify weak points before cartons hit a warehouse. A rigid box can look beautiful and still fail if the closure opens in drop testing or the insert shifts under vibration. Beauty and shipping performance have to coexist, even if they would rather ignore each other, especially on 18-inch drop tests and 4-hour vibration runs.
Typical production flow for rigid boxes custom printed looks like this:
- Dieline setup and dimensional confirmation.
- Artwork preparation, proofing, and color checks.
- Board cutting, wrap printing, and finish application.
- Hand or semi-automated assembly.
- Insert fitting, closure testing, and final inspection.
Lead time depends on complexity, but a normal project for rigid boxes custom printed often takes 12 to 15 business days from proof approval, then another 4 to 8 business days for shipping, depending on lane and season. If structural sampling is needed, add another 5 to 7 business days. Two or three revision rounds can stretch the calendar quickly. The box does not care about launch dates; the schedule has to be managed carefully, and that is usually the part nobody wants to hear during the kickoff call.
Sustainability comes up more often now, and for good reason. FSC-certified board and papers can be specified for rigid boxes custom printed, and that is worth confirming with any supplier that claims responsible sourcing. The FSC site at FSC is a useful reference point, especially if your brand sells into retail accounts in California, Germany, or the UK that request chain-of-custody documentation. I always ask for the certificate rather than the promise; paper claims can get fuzzy fast when people start speaking in broad strokes.
Rigid Boxes Custom Printed: Pricing and Material Factors
Pricing for rigid boxes custom printed is shaped by more than the shell itself. Size, board thickness, wrap paper choice, closure style, insert type, print method, and finish complexity all push the quote up or down. A 150 mm square box with a simple printed wrap costs very differently from a magnetic-closure set with foam insert, foil logo, and soft-touch lamination. I would love to say otherwise, but the quote sheet always tells the truth eventually, especially once freight from Shenzhen to Los Angeles is added.
Volume changes the math even more. Setup costs for rigid boxes custom printed do not disappear just because the order is small; they get spread across the quantity. That is why a 500-piece run can look expensive on a per-box basis while 5,000 pieces may feel far more manageable if the structure and artwork stay stable. This is one of those moments where the spreadsheet starts acting like a stern teacher, especially when a $280 setup fee is divided across only 500 units.
I once reviewed two quotes for the same skincare kit. At 2,000 units, the unit price was $1.84 for a 1.8 mm rigid box with 157 gsm art paper wrap, one-color interior print, and a paperboard insert. At 8,000 units, the same build dropped to $1.06. Nothing mysterious happened. Tooling and hand-labor costs were simply distributed over more units. That kind of price swing is exactly why I push brands to compare volumes before they fall in love with a single number.
Here is a practical comparison I use with buyers evaluating rigid boxes custom printed:
| Box Build | Typical Use | Relative Cost | What It Adds |
|---|---|---|---|
| Plain wrapped rigid box | Retail gifting, entry-level luxury packaging | Lower | Strong structure, clean shelf presence |
| Rigid box with foil logo | Premium product packaging, brand launches | Medium | Higher visual impact, sharper brand recall |
| Soft-touch rigid box with embossing | Cosmetics, fragrance, VIP sets | Higher | Tactile feel, more luxurious hand experience |
| Magnetic rigid box with insert | Gift sets, electronics accessories, collector items | Highest | Premium closure, stronger product protection |
That table is not theory. I have seen one client in Amsterdam move from the third line to the first because the market did not reward the extra finish spend on a 6,000-piece fragrance run. Another client in Seoul moved in the opposite direction and chose magnetic rigid boxes custom printed because the unboxing moment sat at the center of the brand pitch. The right answer depends on the buying context, not just the quote. In plain language: if the customer is paying for a reveal, the box needs to earn it.
Material choice matters more than many teams expect. Standard chipboard is cheaper than heavier board, but heavier board can improve rigidity and reduce flex on larger formats. Specialty papers such as textured stock, linen-finish wrap, or dyed paper can improve package branding, though they often raise the cost by $0.08 to $0.22 per unit and may require tighter handling during assembly. If the box has to hold a delicate item, the insert matters as much as the outer shell. I have seen a beautiful exterior fail because the insert was basically a polite suggestion instead of actual support.
There is also a tradeoff between plain print and premium decoration. A full-coverage printed wrap might help a brand tell a story, but if the design is crowded, the premium effect can disappear. In contrast, a single foil stamp on a deep black wrap can make rigid boxes custom printed feel more expensive than a busier, more expensive-looking layout. Negative space has value. So does quiet confidence, which is not always the instinct of a team that wants to show everything on a 200 mm wide lid.
For honest quoting, I ask suppliers to split the numbers by line item: shell, wrap print, finish, insert, tooling, sampling, and freight. That way, the buyer sees where the money is going. A unit price without detail can hide a $250 tooling charge or a separate $45 proof fee, and those extras are often what upset budgets late in the process. I have had to rescue more than one project from a suddenly suspicious miscellaneous line.
If a vendor gives you only a lump sum, request an itemized version before you compare options. I would rather see a quote at $1.32 with five clear cost lines than a mystery number at $1.19. One tells you how to control the spec; the other only tells you the total. In manufacturing terms, a transparent quote from Dongguan or Suzhou is far easier to evaluate than a one-line promise with no board thickness, no wrap spec, and no freight detail.
For brands shopping across Custom Packaging Products, the same logic applies: compare structure, finish, and freight separately, not just the final unit price. The cheapest rigid boxes custom printed are not always the cheapest landed solution once you add export cartons, damaged units, or rework from a color mismatch. That hidden cost is the kind that shows up after everyone has already congratulated themselves too early, usually in the second or third week after launch.
Step-by-Step: Ordering Rigid Boxes Custom Printed
The cleanest projects start with a one-page spec sheet. Before any artwork is finalized, define the product dimensions, the target unboxing experience, the protection requirement, and the quantity. For rigid boxes custom printed, a simple 86 mm by 86 mm by 35 mm fragrance box and a 260 mm by 180 mm by 90 mm gift set are completely different jobs, even if both look premium on paper and both land in the same warehouse in New Jersey.
Step 1: Lock the product and the fit. Measure the product, the accessory set, and any protective components first. If the item can move 4 mm inside the box, the insert has to compensate for that. This matters most for rigid boxes custom printed with glass, metal, or ceramic contents. A box can look immaculate and still fail if the inside lets the product rattle like loose coins in a coat pocket.
Step 2: Gather files and references. Provide vector logos, color targets, finish examples, and a clear note on whether the box needs inside printing. If you have brand standards, send them. If you only have a sample box from another vendor in Hong Kong or Taipei, send that too. The more specific the reference, the fewer surprises in rigid boxes custom printed. I have found that one clean reference beats ten vague adjectives every time.
Step 3: Review the proof like a printer. Check bleed, seam placement, barcode zone, logo scaling, fold lines, and any edge-to-edge artwork. A design can look polished on screen and still fail if the seam lands across a key icon. I have seen that happen on three separate projects, and each time the fix required a re-proof. Nobody enjoys saying, we need another round, but that is still better than approving a box with a logo bisected by a seam.
Step 4: Ask for a physical sample when the job is sensitive. If color fidelity, closure feel, or fit tolerance matters, a sample is worth the extra time. A digital proof cannot tell you how a 2 mm lid lift feels in the hand. For rigid boxes custom printed, that tactile check is often the difference between confidence and regret. I still remember one sample that looked perfect online and felt oddly loose in person; the fix was simple, but only because we caught it before production.
Step 5: Confirm the calendar and the freight plan. Production, packaging, and transit all sit on the same timeline. A supplier may promise 15 business days for the boxes, but if ocean freight adds 18 more and customs inspection adds 3, the real delivery window changes fast. Build buffer time before any launch, trade show, or seasonal promo. Shipping always seems optimistic right up until it is not.
One client of mine had a retail activation tied to a holiday display in Boston. The first proof was approved on time, but the buyer held the finish decision for nine days because the foil sample looked slightly warmer than the Pantone reference. That delay would have been harmless in February; in November, it was expensive. Rigid boxes custom printed reward decisions made early, and they punish indecision with alarming efficiency.
To keep the process moving, ask your supplier these six questions:
- What is the minimum order quantity for rigid boxes custom printed?
- How many business days are needed after proof approval?
- Are sampling and tooling included in the quote?
- What board thickness and wrap paper are being specified?
- Which finish steps are done in-house and which are outsourced?
- How will you package the cartons for export or domestic freight?
Those questions sound basic, but they expose weak spots quickly. A supplier that can answer clearly is usually easier to work with than one that leans on vague language and skips the details. Rigid boxes custom printed are too expensive to guess at, and I have never met a packaging budget that enjoyed being surprised, especially after a $3,500 freight bill lands late in the process.
Common Mistakes With Rigid Boxes Custom Printed
The most common mistake is designing too early. Teams fall in love with a visual before they know the exact dimensions, and then the artwork gets squeezed, stretched, or shifted to fit the box. I have watched logos land too close to the hinge line and product inserts miss the center by 3 mm because the structure was finalized late. Rigid boxes custom printed punish that kind of impatience, especially when the final board spec is 2.0 mm instead of the assumed 1.5 mm.
Another mistake is over-finishing. Yes, foil, embossing, spot UV, and specialty paper can all look impressive. No, they do not always belong on the same project. When every surface competes for attention, the box loses clarity. I have seen a simple two-color layout outperform a far more expensive design because the visual hierarchy was cleaner. The irony is hard to miss: the more someone spends trying to look premium, the more likely they are to make the box feel noisy.
Storage and shipping are often ignored until the pallet arrives. Rigid boxes custom printed occupy more cubic space than folding cartons, and that affects warehouse planning, freight rates, and receiving labor. If a box is 300 mm wide and 120 mm deep, the packing density is very different from a flat carton stack, and that difference shows up on the bill. I have sat through more than one budget review in Singapore where cubic volume suddenly mattered a lot more than it did during the concept phase.
Another problem is forgetting the product's journey. A box might look perfect on a showroom table but fail in a distribution environment if the corners crush or the insert loosens during transit. That is where testing matters. I like to align transit checks with the product route, and standards from groups such as ISTA help make those decisions less subjective. It is much better to discover a weak corner in a test lab than after someone has signed for a damaged carton and started frowning at you.
People also underestimate lead times for approvals. Proof review, sample evaluation, finish confirmation, and rework can add days very quickly. I once had a client assume the entire job would fit inside a 10-day window, but the proof alone went through four versions because the interior print color drifted under different lighting at a warehouse in Brooklyn. Rigid boxes custom printed are not the place to gamble on speed, no matter how enthusiastic the launch calendar looks.
Skipping a print-spec review is another costly habit. One supplier's bleed tolerance might be 2 mm, another's may be 3 mm, and their color matching process may differ even if both claim premium quality. Custom Printed Boxes should always be checked against the supplier's actual production method, not against a generic expectation. The wrong assumption costs more than the right question, particularly when a reprint can add 600 to 1,200 units to the waste pile.
Here is the pattern I see in expensive rework:
- The team approves artwork before confirming box dimensions.
- The first sample reveals a closure or insert issue.
- The finish stack gets expanded to fix the visual.
- The quote rises by 15% to 40%.
- The launch moves because the production calendar slips.
That sequence shows up often. The fix is not complicated, but it does require discipline. Rigid boxes custom printed perform best when the structure, budget, and timeline are aligned before production starts. Otherwise the job turns into a series of preventable negotiations, which is rarely anyone's idea of fun, especially when the schedule was already built around a specific retail ship date.
Expert Tips for Better Rigid Boxes Custom Printed
If you want the box to feel more premium without overspending, choose one hero finish and let it do the work. A foil logo on a matte wrap, for example, can create more impact than a crowded mix of embossing, spot UV, and metallic ink. I learned that the hard way during a cosmetics review in Paris where the premium version looked less focused than the simpler one. My view? Clean usually wins before clever does, particularly on a 4-color printed lid with a 2 mm border.
Design the unboxing sequence, not just the closed box. First the exterior should create anticipation. Then the interior should reveal the brand. Then the insert should cradle the product cleanly. Rigid boxes custom printed are strongest when they guide that sequence deliberately rather than leaving it to chance. I think of it like pacing in a 90-second brand film: if the reveal happens too soon or too late, the moment loses force.
One factory-floor lesson still guides my work. In southern China, an operator kept a rejected lid sample next to the approved one and pointed to the edge wrap. The approved box had a cleaner corner tuck by about 1.5 mm, and that tiny difference made the whole project feel sharper. Details that small matter because buyers notice them subconsciously. They may not know why the box feels right, but they absolutely register that it does.
"The box does not have to shout. It has to feel certain." A buyer said that to me during a fragrance review in Milan, and I have repeated it ever since because it explains premium packaging better than most sales pitches.
Ask for a structural sample if the box will carry a heavy item, a fragile item, or a product with a premium price tag. A 700 g candle set and a 120 g accessory kit should not use the same internal support. Rigid boxes custom printed can look identical on the outside while behaving very differently under load. I have been fooled by that before, and I do not recommend it, especially when the item ships 1,000 miles and crosses a sorting hub in Dallas.
Keep the artwork clear enough that the print process can shine. Strong typography, a controlled color palette, and one or two focal points often outperform busy graphics. That is especially true on retail packaging, where a shopper may view the box from 1 meter away for only a few seconds before deciding whether to pick it up. You do not need the design to shout across the aisle; you need it to earn a hand reaching for it.
Choose the Box style according to the buying moment. A gift set for a holiday shelf may justify a magnetic closure and a ribbon pull. A subscription launch may do better with a simpler sleeve and tray. A direct-to-consumer shipping box may need more protective internal structure than visual drama. Rigid boxes custom printed are not one-size-fits-all, and that is a good thing. It gives the brand room to be practical without becoming boring.
I also recommend checking sustainability claims carefully. If a supplier says the materials are FSC-certified, ask for the certificate and scope. If they mention recycled board, ask for the exact percentage and whether the wrap paper is also certified. Honest documentation builds trust faster than any glossy sales sheet, and it matters more if your retail accounts in California, the Netherlands, or Japan ask for proof. Packaging people can be charming, but paperwork still has to do its job.
One more practical tip: match the box finish to the product category. Soft-touch lamination works beautifully for skincare and fragrance because it invites touch. High-gloss varnish may suit confectionery or promotional kits better because it catches light on a shelf. Rigid boxes custom printed can be tailored to the category if the finish choice is made intentionally rather than by habit. I have seen the right finish make a modest product feel memorable and the wrong one make a beautiful product feel oddly off.
If you need a broader packaging range alongside rigid boxes custom printed, browse Custom Packaging Products and compare formats side by side. Sometimes the best answer is not a more expensive box; it is a different structure that still supports the brand story. That kind of lateral thinking saves money and, frankly, saves everyone from overcomplicating a project that should have been simple from the start, especially when the target landed cost needs to stay under $2.00 per unit.
Rigid Boxes Custom Printed: Next Steps and Checklist
Before you request final quotes, put together a one-page spec sheet. Include outer dimensions, product weight, insert needs, finish goals, quantity, and delivery target. That document saves time because suppliers can quote rigid boxes custom printed from a shared baseline instead of guessing at what premium means. I have seen how much smoother a project becomes when people stop describing the box with adjectives and start describing it with measurements.
Then collect at least three quotes and compare them on structure, print quality, lead time, and landed cost. Unit price alone can mislead you. A box that is $0.12 cheaper may become more expensive once sampling, freight, and reprint risk are added. I have seen that happen on both small and large programs. The lowest number on paper is not always the least painful number in the real world, especially if a 5,000-piece order ships in two cartons that need repacking.
Ask the supplier to confirm proof approval timing, sample timing, and reprint policy in writing. That is not distrust; it is process control. Rigid boxes custom printed involve several stages where small misunderstandings can become expensive delays. Writing the terms down early protects both sides. It also keeps everyone from having the same argument twice.
Build a final pre-order checklist with the practical items that get forgotten most often:
- Final dieline and artwork files.
- Color references and finish references.
- Insert dimensions and product weight.
- Shipping method and delivery address.
- Warehouse storage space for finished cartons.
- Approval sign-off from marketing, operations, and finance.
If you want a better chance of success, treat rigid boxes custom printed as a planning project, not a purchasing task. The best results usually come from brands that check details early, approve samples carefully, and respect the time needed for print, assembly, and shipping. That discipline is what separates average packaging from packaging that lifts the product, especially on launches with a 60-day runway.
From my side, the biggest wins have always come from straightforward decisions: a 1.8 mm or 2.0 mm board spec, a single premium finish, a measured insert design, and a realistic timeline of 12 to 15 business days plus freight. That combination gives rigid boxes custom printed room to do what they do best: create perceived value fast, without creating avoidable waste. I like that balance because it is practical, not performative.
So here is the takeaway I would actually use on a live project: lock the dieline first, approve one physical sample before mass production, keep the finish stack to one hero effect, and get freight plus reprint terms in writing. Do that, and rigid boxes custom printed will do the one job they are meant to do - make the product feel more valuable before it is even opened.
FAQs
How much do rigid boxes custom printed usually cost?
Price depends on size, board thickness, print method, and finish complexity more than on the shell alone. For example, a 3,000-piece run with 1.8 mm chipboard, a printed wrap, and a simple matte finish can land around $1.10 to $1.80 per unit, while foil, embossing, and a custom insert can move the number higher. Small quantities usually carry higher unit costs because setup and tooling are spread over fewer boxes, so ask for itemized quotes for printing, wrapping, inserts, and freight separately. I always tell buyers to compare the whole bill, not just the headline number, because that is where surprises hide.
What is the normal turnaround time for rigid boxes custom printed?
The timeline usually includes artwork setup, proofing, sampling, production, and shipping, so the process is longer than for simple cartons. A straightforward order might take 12 to 15 business days after proof approval, while special finishes and physical samples can add another 5 to 7 business days or more. I always tell buyers to build in extra buffer time before launches, trade shows, and seasonal promos because one round of revisions can shift the schedule quickly. If your calendar is tight, the box will absolutely notice.
Which print methods work best for rigid boxes custom printed?
Offset printing is strong for consistent color and larger runs, while digital can make sense for shorter runs or fast testing. Foil stamping, embossing, debossing, and spot UV work best as accent finishes when you want a premium look without crowding the design. The best method depends on the artwork, the quantity, and how much tactile detail you want on the final box. My view is simple: match the print method to the actual use case instead of chasing every finish available.
Can I order rigid boxes custom printed in small quantities?
Yes, but the unit price is usually higher because setup costs are less spread out. Some suppliers offer prototype runs or short-run digital options to help you test the market first, which is useful if you are launching a new fragrance, gift set, or limited-edition item. Ask about minimum order quantity before you design the box so your concept matches the budget from the start. That saves you from falling in love with a format that only makes sense at a much larger volume.
How can I make rigid boxes custom printed look premium without overspending?
Choose one standout finish instead of adding multiple expensive effects that compete with each other. Use strong typography, clean spacing, and one or two brand colors so the design feels intentional, then invest in structure and print accuracy first. In my experience, rigid boxes custom printed look most premium when the box is calm, well-built, and precise rather than overloaded with every finish available. A box that feels controlled usually reads as more expensive than one that is trying too hard.

