Buyer Fit Snapshot
| Best fit | Holiday Carton Graphics Sell projects where brand print, material claims, artwork control, MOQ, and repeat-order consistency need to be specified before quoting. |
|---|---|
| Quote inputs | Share finished size, material target, print colors, finish, packing count, annual reorder estimate, ship-to region, and any compliance wording. |
| Proofing check | Approve dieline scale, logo placement, barcode or warning zones, color tolerance, closure strength, and carton packing before bulk production. |
| Main risk | Vague material claims, crowded artwork, missing packing details, or unclear freight terms can make a low unit price expensive after revisions. |
Fast answer: Holiday Carton Graphics Sell: Board, Finish, Dieline, and Unit Cost should be specified like a repeatable production item. The safest quote records material, print method, finish, artwork proof, packing count, and reorder notes in one written spec.
Production checks before approval
Compare the actual filled-product size with the drawing, then confirm tolerance on folds, seals, hang holes, label areas, and retail display edges. Reserve space for logos, QR codes, warning copy, and material claims before decorative graphics fill the panel.
Quote comparison points
Review material grade, print process, finish, sampling route, tooling charges, carton quantity, and freight assumptions side by side. A quote is only useful when the supplier can repeat the same color, closure quality, and packing count on the next order.
A shopper usually gives a seasonal carton about 2 seconds and roughly 6 feet of distance before deciding whether it feels giftable, premium, or forgettable. I remember watching that exact judgment happen during a holiday reset in New Jersey, where one matte red carton with a 1.5 mm foil line outsold a louder pack that used three extra colors and a crowded snowflake pattern on a 42-inch shelf run. Honestly, that still makes me smile a little, because the louder design had every committee-approved trick in the book and still got outperformed by the quieter box. That is why tips for holiday carton graphics matter so much: the right carton has to sell fast, protect the brand, and survive real production without turning into a press-room headache, especially when the first print run is 5,000 pieces and the window to recover from mistakes is only 10 business days.
I have seen the same pattern on a factory floor in Shenzhen, during a client meeting over 18 SKUs in Dongguan, and in a supplier negotiation where the foil vendor wanted a minimum order that would have blown the budget by 22% on a $0.24 per unit target. The projects that win are rarely the flashiest. They are the ones where tips for holiday carton graphics are treated as a practical system: clear hierarchy, controlled seasonal cues, correct board choice, and a timeline that leaves room for proofing instead of panic. I have a soft spot for that kind of work, because it respects both the design and the people who actually have to make the box, usually on a line that is running 12-hour shifts to hit a late-October ship date. In other words, the strongest tips for holiday carton graphics are the ones that keep creativity tied to the converter, the press sheet, and the carton former.
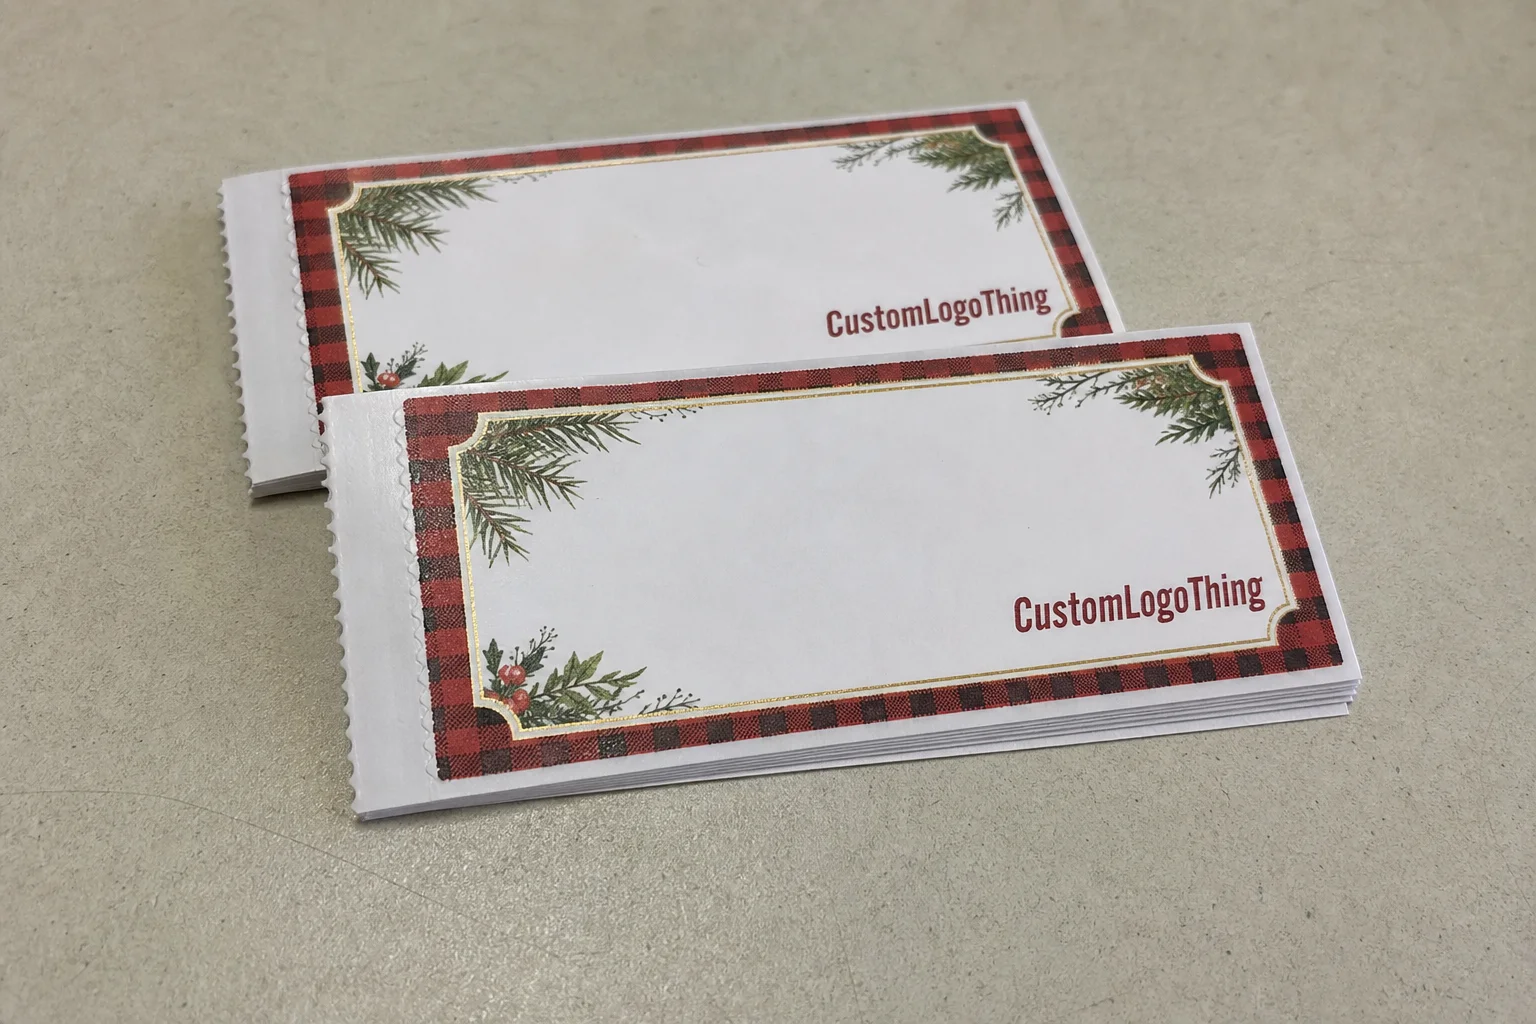
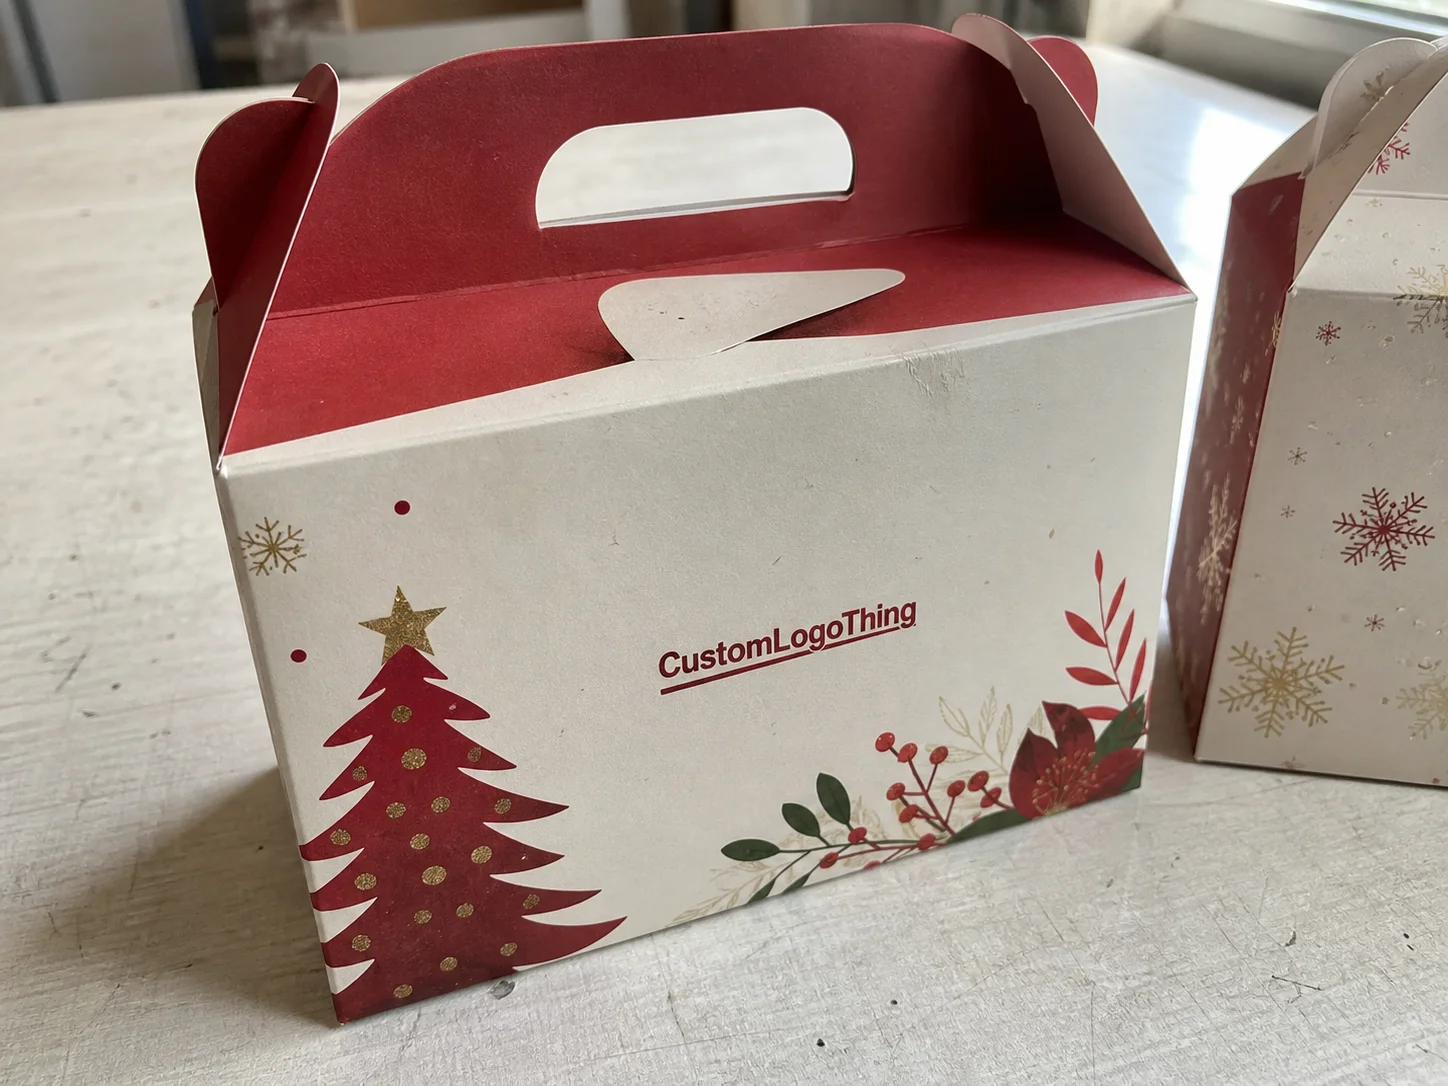
Holiday carton graphics are the mix of artwork, copy, finishes, and structural cues that turns a regular folding carton into a seasonal selling tool. If the design reads well on shelf, photographs well in e-commerce, and folds cleanly on the line, it is doing its job. If it only looks good on a designer's screen, it is not a finished package, and no amount of holiday cheer will fix that. The best tips for holiday carton graphics balance festive impact with brand memory and production reality, because all three need to survive the same box, whether the board is 350gsm C1S artboard from a mill in Zhejiang or a 24pt SBS sheet sourced through a converter in Ohio. That is also where seasonal packaging earns its keep: on the shelf, in the shipping case, and in the buyer's first glance.
What are the best tips for holiday carton graphics?

Most shoppers do not study packaging; they scan it. A merchandising manager once told me, "If the front panel does not read in 3 seconds, it is just decoration," and that line still holds up in aisle audits from Chicago to Dallas. The smallest change can carry outsized weight: a deeper red, a 2-point type adjustment, or a metallic accent on the brand mark can change how a carton feels from 8 feet away. That is the first reason tips for holiday carton graphics are worth taking seriously, especially on a carton that is only 5.75 inches wide and competing with 14 other SKUs in the same planogram.
Holiday graphics are not just snowflakes and ribbon motifs. They are a blend of color, typography, illustration, finish, and carton structure that signals seasonal relevance without making the product look like a one-off prop. A carton can be gift-ready, collectible, or simply warmer than the core SKU. The trick is choosing which signal matters most, because the wrong choice can make a $24 product look like a $4 clearance item. I have seen that happen during a Q4 review in Toronto, and nobody on the brand side looked thrilled when the shelf test came back with a 13% drop in perceived value. Practical tips for holiday carton graphics usually start by deciding which cue should carry the most weight: premium, festive, giftable, or familiar.
Many teams still treat holiday artwork like a poster instead of a retail object, and that is where the trouble starts. Posters have one face and no folds. Cartons have top flaps, side panels, barcode zones, glue areas, and a front panel that may only show 55% of the total printable area once the shelf lip and hang tab are factored in. Practical tips for holiday carton graphics start with the box, not the mood board, because the box is what the customer actually handles in a store that may be lit with 4,000K fluorescent tubes and crowded with motion from endcap traffic. The mood board may win applause in a meeting, but the carton has to win in the aisle under ugly store lighting, which is the great equalizer in packaging.
Here is the production reality. A carton that is 6.5 inches wide, printed on 350gsm C1S artboard, and finished with soft-touch lamination behaves very differently from a 250gsm recycled board with aqueous coating. One will drink color and mute fine lines; the other will keep a high-contrast design crisp but may expose scuffs faster in transit. If you want holiday graphics to sell, you have to design for the substrate, the shelf, and the shipping carton at the same time. I have spent enough time with press sheets in Guangzhou and Milwaukee to know that the paper is not passive; it is half the final look and can shift ink density by 6% to 10% depending on coat and caliper.
Honestly, I think the best seasonal cartons are the ones that make a buyer feel something without shouting for attention. A slight paper texture, a disciplined red accent, or a restrained gold line can feel more confident than a whole winter scene crammed into every panel. That is not just taste talking. That is one of the most useful tips for holiday carton graphics: calm design often looks more expensive than busy design, even before you get to the press room, and on a $0.30 per unit premium pack that difference can justify itself very quickly. For festive carton design, restraint usually photographs better too, which helps once the pack moves into e-commerce and social content.
One more practical point: holiday design should be legible after the box is flattened, stacked, and handled by people who are not thinking about your brand at all. In a corrugated shipper, the carton may sit beside others for hours before it ever reaches the shelf, and scuffing starts sooner than most mockups suggest. That is why I always ask teams to look at a prototype from a little distance, then again under harsh overhead light. It sounds old-school, but it catches problems that a render just will not.
How do holiday carton graphics work from concept to press?
The process usually begins with a brief, but the best briefs are not vague mood statements. They include target audience, retail channel, carton dimensions, brand rules, mandatory copy, and the sales goal for the seasonal SKU. If the goal is a 12% lift in gift purchase behavior, the design choices should look different from a line extension aimed at value buyers. That is where tips for holiday carton graphics become operational, not decorative, and I have sat through too many "make it feel festive" meetings in London and Atlanta that left everyone nodding and nobody actually designing. The brief should also name the finish strategy early, because spot UV, foil stamping, and soft-touch lamination all change the visual reading of seasonal packaging.
From there, concepting should be built around the dieline. I have seen teams spend 14 hours polishing a front-panel illustration only to discover that the side panel had to carry a legal disclosure in 6.5 pt type, which pushed the entire layout off balance. A proper carton concept maps out front, back, side, top, and bottom panels from the start, so the seasonal story can move across the box instead of being trapped on one face. That planning stage is where good teams save themselves from the usual late-stage scramble, especially when the packer in Monterrey is waiting for files by 4:00 p.m. local time. For folding carton graphics, that early layout work is not a nice extra; it is the thing that keeps the design from collapsing under real-world constraints.
Color management matters more than most people expect. A deep cranberry red on screen can land as a muddy burgundy on uncoated board, while a gold foil accent can swing from elegant to harsh depending on the overprint varnish. If the carton is traveling through distribution, I also check compression and drop assumptions using guidance from ISTA, because a finish that looks beautiful on a proof can crack or scuff after 40 miles of pallet movement and one bad dock transfer. The first time I saw a foil edge split along a fold in a test from a plant outside Suzhou, I muttered some very unprintable things about "premium" packaging, which, to be fair, was not entirely unfair.
Print method changes everything. Offset printing usually gives the most control over fine detail and tight registration, flexo can be efficient for larger runs with simpler art, and digital is often useful for short holiday runs or regional test markets. Finishing options like spot UV, foil, embossing, and matte lamination alter contrast and perceived value in ways that are very real on shelf. If you want practical tips for holiday carton graphics, do not separate the artwork from the press sheet; they are one decision. I have seen beautiful concepts fall apart because nobody asked how the ink would sit on the actual stock until it was too late, and a 350gsm C1S sheet from a converter in Taiwan can behave very differently from a recycled board sourced in Poland.
I still remember a supplier meeting in Guangdong where the printer laid three samples on the table: one on 300gsm SBS, one on 350gsm C1S, and one on kraft board with white ink. The same artwork looked expensive on SBS, slightly rustic on kraft, and unexpectedly flat on the C1S because the red ink density was 9% lower than the proof target. That was a reminder I have never forgotten: the board stock is not a background. It is part of the design. If anything, it is one of the biggest creative decisions hiding in plain sight, and it can change the perceived retail price by a full dollar in a gift set. Good tips for holiday carton graphics always account for that shift before the first proof gets signed.
Image planning and proofing
Prepress should not be treated like a checkbox. A press proof, a PDF proof, and a physical mockup can each reveal different problems, especially around barcode quiet zones, fold lines, and foil knockouts. If the design relies on a 1.2 mm border or a pale green type line, I want to see it in hand, under warehouse lighting, before anyone approves production. Those details are exactly where tips for holiday carton graphics either save money or create rework. I would rather spend an afternoon squinting at a mockup than spend a week explaining why a carton came back with a barcode that looked like it had been through a blender, especially when replacement plates cost $180 to $250 and the freight window is already tight.
Key factors behind effective holiday carton graphics
There are five variables I check first: audience, shelf context, brand hierarchy, seasonal color use, and production compatibility. If the buyer is looking for a gift, the box can be more expressive. If the pack sits next to a permanent SKU, the seasonal version should still look like family, not a costume. Strong tips for holiday carton graphics respect that balance, because shoppers notice drift faster than brands do. And once a line starts to look like it wandered in from another company, it is hard to get that trust back, even if the carton is printed perfectly on a 2024 Heidelberg press in New Jersey. That same logic applies to holiday packaging across categories, whether the product is chocolate, skincare, or a seasonal gift set.
Brand hierarchy is usually where seasonal cartons win or lose. The brand name needs to stay legible at 3 feet, the product descriptor needs a second line of support, and the holiday message should sit below both unless the line is explicitly seasonal. I once reviewed a carton where the holiday icon was larger than the logo by 18%, and the marketing team liked it until the shelf test showed a 14% drop in brand recall. That is not a design opinion; it is a retail problem. I remember saying, as politely as I could, that the box had become a very festive stranger in a store where the average shopper spent only 6.8 seconds in front of the bay. The best tips for holiday carton graphics keep the brand anchor visible before the seasonal cue gets any ideas about taking over.
Color can do a lot with very little. A limited palette of two core colors plus one seasonal accent often looks sharper than a full decorative scene with six inks and three metallic effects. In my experience, a restrained combination like forest green, warm white, and copper foil tends to feel more premium than a loud mix of red, silver, and blue unless the brand already owns that look. These are the kinds of tips for holiday carton graphics that sound simple but save the artwork from visual noise. Honestly, I think restraint is underrated because people confuse "more" with "better" all the time, and the invoice for excess usually arrives as a second proof round.
Typography deserves the same discipline. A serif headline may communicate tradition, while a condensed sans serif can signal modern gifting, but either one fails if the line spacing is too tight or the letterforms are reduced below 6 pt on a narrow side panel. I ask designers to proof type at 100% size on the actual dieline, not in a presentation deck. The mockup tells the truth in a way the monitor never will, especially on a 4.25-inch side panel with a 3 mm glue flap. A beautiful font that disappears in production is just expensive frustration dressed up as style, and holiday carton graphics almost always suffer first in the smallest text areas.
Material compatibility matters for sustainability and performance. FSC-certified board can support strong brand stories when the supply chain is documented correctly, and the chain-of-custody process is worth checking at FSC if the brand is making environmental claims. At the same time, some coatings and metallic effects perform better on clay-coated board than on recycled fibers. If the carton needs to be curbside recyclable, the finish choice may need to shift from lamination to aqueous coating or a lighter ink system. This is one area where tips for holiday carton graphics must stay honest: sustainability claims need material support, not just nice language, and a 92% PCR board spec means little if the label adhesive blocks recycling.
Another factor that people underestimate is how the carton will live online. The front panel might be photographed straight on, but a side panel, top flap, or embellishment edge may show up in product listings and social content. If the holiday graphic collapses in a thumbnail, the whole concept loses power before the shopper even touches the pack. I have watched a polished concept look marvelous on a studio table in Brooklyn and then turn strangely dull in a cropped e-commerce image at 800 by 800 pixels. That is not the camera's fault; that is a design system that forgot where it would actually be seen. These tips for holiday carton graphics are especially useful for teams that need one pack to perform in-store and on screen.
There is also a human factor that gets ignored. A carton that is easy to open, easy to restock, and easy to read is more likely to survive the season without complaints from store staff. That does not sound glamorous, but retail execution has a long memory. If associates hate handling the pack, the box may still sell, but it will not get handled carefully. I learned that the hard way on a confectionery program where a beautiful top flap folded back too aggressively and kept catching fingers at shelf reset. Pretty does not get a pass if the mechanics are annoying.
How to keep holiday cues controlled
Use one hero motif, not five. A single ribbon, star, or seasonal pattern repeated with variation across panels usually reads stronger than a catalog of icons. If the brand already has a strong asset, such as a hand-drawn emblem or a signature color band, build the holiday version around that anchor and let the seasonal story sit underneath it. That is one of the most reliable tips for holiday carton graphics I have seen across food, beauty, and confectionery work. The best cartons feel coordinated, not decorated by committee, and that usually shows up in the first 15 seconds of a shelf walk.
Step-by-step process and timeline for holiday carton graphics
A realistic schedule starts with the brief and ends with a signed proof, not with the first design concept. I usually map the work into six checkpoints: brief, concept approval, copy review, dieline layout, proofing, and final signoff. A smooth project can move from brief to approved press files in 12-15 business days, but only if every stakeholder responds inside a 24-hour window. That is not always the case, which is why tips for holiday carton graphics need timeline discipline as much as creative judgment. I have had projects stall because one missing logo file sat in somebody's inbox like a tiny hostage situation, and the press slot in Vietnam was gone by the time the file arrived. Seasonal packaging only works when the schedule is built for production, not for wishful thinking.
- Days 1-2: Gather SKU dimensions, brand guidelines, legal copy, barcode data, and finish targets.
- Days 3-5: Build 2-3 concept routes on the actual dieline, not a generic rectangle.
- Days 6-8: Review copy, claims, and seasonal messaging with marketing and legal.
- Days 9-11: Refine layout, trap settings, foil knockouts, and fold-safe zones.
- Days 12-13: Approve a digital proof and, if the budget allows, a physical sample.
- Days 14-15: Release final files and confirm the press slot.
The handoff points are where delays usually grow. Missing logo files in the wrong color space can add 2 days. Late legal text can add 3. A change in carton depth from 48 mm to 52 mm may force the entire layout to shift, because the panel ratios change. I have seen a project miss a ship date by one week because the barcode zone was approved on a mockup, then rejected by the print team after a packaging engineer measured the quiet area with a digital caliper. Good tips for holiday carton graphics protect the schedule by treating those details as fixed inputs, not suggestions. The box does not care that the holiday campaign launch date is very important to leadership.
Milestone discipline helps the whole room. A client meeting at the 30% stage should answer concept direction, not finish discussion. The 60% stage should settle copy and structural fit. The 90% stage should be about proof corrections only. Once teams start debating colors at final proof, the project is already late. I have said this in too many production calls to count: if everyone wants to be creative at the end, the press crew pays for it. That crew has enough problems already without a surprise "let's try one more red," especially when the press is booked for 1,200 cartons an hour across a 9-hour shift.
Think about the physical path of the carton as well. If the package will be assembled at a contract packer, packed in cases, and shipped across multiple zones, the design must survive folding, gluing, handling, and temperature change. That is why I ask for samples and run them through a basic drop-and-stack review before final signoff. Holiday cartons are still cartons. They may be festive, but they are also working packaging, and that reality belongs inside the timeline. A pretty box that falls apart in transit is just a waste of good ink, and a 2-meter drop in a warehouse in Illinois will not care how charming the illustration was.
One more practical note: give prepress time to check overprint settings and trapping. Holiday designs often use darker colors, metallic accents, and subtle type contrasts, and those are exactly the kinds of combinations that reveal registration issues if nobody checks them early. A clean timeline is not glamorous, but it is one of the best tips for holiday carton graphics I can offer because it keeps the creative decisions from being swallowed by avoidable production errors, especially when the printer is working from a 0.25 mm trap tolerance and a proof approved in a different time zone.
Holiday carton graphics cost and pricing: what changes the budget
Cost is driven by a few repeatable levers: number of colors, special finishes, carton size, run length, and setup complexity. A one-color seasonal overprint on a standard folding carton may land around $0.15 per unit at 5,000 pieces if the board is already in house and the artwork stays simple. Add a second ink, spot UV, and a tighter registration tolerance, and that can move closer to $0.24 per unit. Add foil and embossing, and the number may rise to $0.32 or more depending on board choice, tooling, and press time. Those figures are not fixed rates, but they are realistic enough to guide a budget conversation, especially for a line being quoted out of a plant in Shenzhen or a converter in New Jersey. In practical terms, these tips for holiday carton graphics help teams balance visual impact with unit economics.
| Option | Typical Unit Range at 5,000 Pieces | Best For | Main Tradeoff |
|---|---|---|---|
| Seasonal overprint, 1 color | $0.15-$0.20 | Value SKUs, fast turns, simple brand refreshes | Less visual depth on shelf |
| 2-color print with spot UV | $0.22-$0.26 | Mid-tier gifts, stronger contrast, better premium cues | Higher proofing and registration sensitivity |
| Foil, embossing, and soft-touch lamination | $0.30-$0.38 | Premium gifting, limited editions, high-margin bundles | More tooling, more setup, more lead time |
The smartest budget conversations separate must-have elements from optional upgrades. A strong logo treatment, a readable holiday headline, and a clean panel hierarchy usually belong in the must-have column. Foil borders, embossed snowflakes, and specialty varnish may be optional if they push the carton beyond target margin. I have sat in meetings where a brand saved 11% by removing one decorative foil layer and shifting that spend into a better substrate, usually moving from 280gsm to 350gsm C1S artboard for a more convincing hand feel. That is the kind of trade-off that keeps tips for holiday carton graphics grounded in actual economics. It is not thrilling, but it is effective, and the finance team will stop looking like they swallowed a lemon.
Run length changes the math quickly. At 25,000 pieces, setup costs spread out, and some finishes become more reasonable. At 2,500 pieces, the same artwork can feel expensive because the die, plates, and proofing costs are concentrated across a small lot. If the line only needs a short seasonal test, digital print may be the better route even if the unit price is higher, because the total cash outlay is lower. Price Per Unit matters, but total seasonal value matters more. A short run that proves a concept can be a very good deal if it saves you from overcommitting to the wrong design, especially for a regional trial in the Northeast or the Pacific Northwest.
I also advise teams to price the carton against expected sell-through, not just against procurement targets. If a premium holiday pack lifts gift conversion by 8% and reduces markdowns by 5%, a 3-cent increase in unit cost can make perfect sense. The mistake is treating design as a decoration line item. Holiday packaging is a sales asset, and the budget should reflect that reality. That is one of the more practical tips for holiday carton graphics, even if it does not sound glamorous in a budget review. A buyer in Minneapolis usually understands this once the numbers are tied back to gross margin per facing.
There is also the hidden cost of rework, and that is where sloppy approval habits get expensive fast. If a missing claim forces a second round of proofing, or if a finish choice fails the press check, the cost is not just materials. It is schedule loss, team time, and usually a fair amount of grumbling. I have seen a "small" late-stage tweak turn into a stack of revised files, another sample request, and one very tired production manager. Nobody wants that chain reaction in the middle of Q4, especially when the replacement proof has to fly from Chicago to Miami in 48 hours.
Common mistakes that weaken holiday carton graphics
The most common mistake is clutter. Too many ornaments, too many textures, too many messages. I once reviewed a carton that tried to say "giftable," "limited edition," "sustainable," and "family favorite" on one front panel, all in different font weights, while the shelf label at the retail chain was only 1.25 inches tall. The result was not festive. It was noisy, and the shelf test proved it by showing a 17% lower first-look dwell time. If you want tips for holiday carton graphics that actually help sell, start by removing at least one thing from the layout. Usually, if you remove two, the design gets even better. A cleaner seasonal packaging system almost always outperforms an overstuffed one.
Unreadable type is another failure point. A script font can look elegant at 120% on a presentation slide and collapse into thin, uncertain strokes at 100% on a 45 mm side panel. Small legal text, barcode spacing, and recycling marks are especially vulnerable. I ask teams to print a black-and-white laser proof and view it from 4 feet away; if the brand still reads, the hierarchy is probably sound. If it does not, the design needs work before anyone opens a press file. The laser proof is not glamorous, but neither is a customer standing in an aisle trying to decode your type choices under a 3,000-lumen store fixture.
Ignoring panel hierarchy is expensive. The front face is not the only selling surface. In e-commerce, a side panel might show up in cropped imagery; in retail, a top flap can be visible on a shelf stack; and in a warehouse, the carton may be scanned by human eyes long before a customer sees it. Good tips for holiday carton graphics account for those secondary views, because today's carton rarely lives in one position only. If you treat the top panel like dead space, that dead space will eventually haunt you in a product photo or a wholesale catalog shot from Atlanta.
Another mistake is using finishes that fight the material. A heavy foil design on a soft recycled board can crack at the fold line. A high-gloss spot UV layer on a dark background may look sharp in studio light but turn fingerprint-prone under retail handling. I learned that lesson during a client meeting in Los Angeles where a sample box showed scuffing after only 20 rubs across a corrugated mailer. That kind of issue never shows up in a render, which is why physical mockups matter. A renderer can be charmingly deceptive; a sample is brutally honest, especially when it comes off a press running at 6,000 sheets an hour.
Press proofs are not optional if the pack has metallics, gradients, or subtle contrast. Screen brightness can hide a lot. On one holiday confectionery run, a deep green background swallowed the product name in the first proof because the type was only 8% lighter than the board tone. We fixed it with a 10-point contrast shift and a tighter white keyline. Small change, big difference. That is the rhythm of real packaging work, and it is why tips for holiday carton graphics keep returning to proofing. Proofing is not a formality; it is the difference between "looks nice on screen" and "actually works in the store," especially when the box has to read from 7 feet away in a crowded endcap.
"The best holiday carton is the one that still makes sense after the print room, the shipping lane, and the store associate have all handled it." That was a line from a packaging manager I worked with on a private-label gift program in Pennsylvania, and it still feels accurate to me.
A quieter mistake, but one I see all the time, is forgetting the emotional tone of the brand. A playful snack brand can get away with a cheeky holiday illustration. A luxury skincare carton usually needs more breathing room and a more refined finish. If you push the seasonal energy too far, the pack stops feeling like an extension of the brand and starts feeling like a costume. That is not what most teams want, even if they do not always say it out loud, particularly when the product price sits above $38 and the shopper expects restraint.
There is also the mistake of assuming every market wants the same seasonal language. A Design That Feels charming in one region can feel overly literal in another. I have seen a snow-heavy carton perform well in one retail chain and then stall in a market where buyers preferred warmer, less nostalgic cues. That does not mean seasonal graphics should be bland; it means the references need to fit the audience and the channel. The smartest teams test a few versions before they print a whole run, even if the test is just an internal mock shelf. It saves embarrassment and, more often than not, a fair bit of money.
What are the best tips for holiday carton graphics?
If I had to boil this down to one idea, it would be restraint. A single focal concept, repeated with discipline across the carton, usually outperforms a crowded seasonal collage. You can make a box feel special with one bold color shift, one premium finish, or one smart illustration system. You do not need all three unless the price point and shelf context justify it. That is one of the most useful tips for holiday carton graphics I can offer after years of seeing good concepts get buried under excess. I have watched a lot of promising cartons get overworked right up to the point where they stopped feeling confident, especially in category reviews where five stakeholders all wanted one more decoration.
Build a reusable seasonal design system. That means one logo placement rule, one accent palette, one illustration family, and one type hierarchy that can adapt across flavors, sizes, or gift sets. A master dieline and a controlled asset library can save days on future launches because the team is not rebuilding the logic each time. I have seen brands cut artwork revisions by nearly 30% once they stopped improvising every seasonal carton from scratch. The work gets calmer, the files get cleaner, and nobody has to spend a Friday night hunting for the "final_final_v7" folder, which is usually hiding in a shared drive named "Misc" on someone in Portland's laptop.
Keep the brand anchor visible. If the core mark is a circle seal, a wordmark, or a signature color band, protect it and let the seasonal story orbit around it. A holiday carton does not need to shout to feel festive. Sometimes a 15% warmer palette, a narrower foil line, and a more generous margin do more than a full illustration scene ever could. Those subtle moves are often the difference between "seasonal" and "busy," and tips for holiday carton graphics should point toward the first and away from the second. I personally think that subtlety is harder, which is exactly why it works on a shelf with 24 competing facings.
My recommended next steps are straightforward. First, audit your existing dielines and note which SKUs already have structural room for seasonal copy or a finish upgrade. Second, gather the logo files, photography, legal text, and board specs before the design team opens software. Third, confirm the production window early, because holiday cartons usually need approval before the rest of the seasonal campaign is even fully locked. If you wait until the artwork feels finished before checking press capacity, you are already late. That is a painful lesson, but it is one I wish fewer teams had to learn the hard way, especially when a plant in Vietnam or Mexico needs a frozen file 3 weeks before launch.
For brands that want to move quickly Without Wasting Money, the path is simple: review the carton structure, brief the artwork with real numbers, and proof the pack before you print. That sequence protects quality, budget, and shelf impact in equal measure. If you apply these tips for holiday carton graphics with discipline, you get more than a festive box. You get a package that helps sell through, protects the brand, and still looks like itself after the holidays are over. And if the box survives the season without making the production team groan, I count that as a small victory, especially after a 15,000-unit run shipped through Newark in December.
I also tell teams not to chase novelty just for the sake of it. A holiday carton that feels thoughtfully edited will age better across a season than one built around every trend in the room. If you are unsure which direction to take, start by asking what the box needs to say in 3 seconds, then remove anything that does not help answer that question. That simple filter has rescued more projects than any fancy deck ever has, whether the pack is headed to a chain in Boston or a boutique in San Diego. These tips for holiday carton graphics are simple on paper, but they are exactly what keeps a seasonal release looking polished instead of crowded.
One final takeaway: treat the carton as a sales tool first and a seasonal canvas second. If the brand name is easy to read, the holiday cue is controlled, and the structure survives the press and the shelf, the design is doing real work. That is the standard I use on every holiday program, and it is the clearest way to judge whether the graphics will actually earn their keep once the orders start moving.
What makes holiday carton graphics effective on shelf?
They create instant hierarchy, so the brand name, seasonal message, and product benefit are easy to scan in about 3 seconds from roughly 6 feet away. They use holiday cues in a controlled way, which helps the carton feel festive without turning it into visual noise. They also match the shelf environment, so contrast and finishing choices stand out next to competing packs with similar price points, whether the board is 350gsm C1S or a lighter recycled stock. I think that last part gets missed more often than it should, and it is one of the most practical tips for holiday carton graphics I can share.
How much do holiday carton graphics usually cost?
Costs rise with more print colors, special finishes, custom tooling, and smaller run sizes. A simple seasonal overprint can be around $0.15 per unit at 5,000 pieces, while foil and embossing can push the number toward $0.32 or higher. Teams can usually control pricing by simplifying embellishments and planning earlier. If the budget is tight, I would start by trimming finish complexity before touching the core brand hierarchy, especially if the pack is only being shipped into two regions. Those tips for holiday carton graphics usually protect margin without dulling the shelf presence.
How long does a holiday carton graphics project take?
A smooth project needs time for concepting, copy approval, proofing, and revisions before press. A realistic schedule is often 12-15 business days from proof approval if every stakeholder responds quickly. The timeline gets tighter when structural changes, legal review, or multiple SKUs are involved. My honest advice: build in a little breathing room, because something always needs one more check, and a 48-hour delay can be enough to lose a press slot in Q4. Good tips for holiday carton graphics always assume at least one round of surprises.
Which finishes work best for seasonal carton graphics?
Foil, embossing, spot UV, and soft-touch coatings can each signal premium value in different ways. The best finish depends on the audience, the product price point, and how much shine the brand can support. Always verify that the finish works with the board stock and does not hurt readability or folding performance. A finish that looks fancy but cracks at the crease is just a very expensive annoyance, and a sample from a converter in Dongguan will usually expose that problem fast. For that reason, tips for holiday carton graphics should always include finish testing before final approval.
How do I keep holiday carton graphics on brand across multiple SKUs?
Start with a shared visual system, such as one color story, one typography rule, or one repeating motif. Keep the brand anchor consistent while allowing limited variation for flavor, scent, size, or product tier. Use a master dieline and a controlled asset library so every SKU looks related, even when the seasonal artwork changes. That approach keeps the family resemblance strong, which shoppers notice even if they cannot explain why, especially across a 6-SKU gift set in a single retail bay. It is also one of the most dependable tips for holiday carton graphics when you are managing a larger seasonal range.