A toy cuffed knit beanies Digital Proof Checklist matters because the proof stage is where avoidable production mistakes show up first: a logo that sits too low on the cuff, text that disappears in knit texture, or a color that looked fine on screen but turns muddy in yarn. Those are not cosmetic problems. They are order problems.
Cuffed Knit Beanies behave differently from flat apparel. The fold changes the visible imprint area, knit texture limits fine detail, and the decoration method sets hard boundaries on what can be reproduced cleanly. A digital proof can look polished and still be wrong for the finished hat, so the buyer has to treat it as a production control step, not a sales image.
For buyers, the proof should confirm the art file, placement, size, color callouts, decoration method, quantity, and ship-to details before anything gets stitched, knitted, or sewn. If the order includes hang tags, inserts, or retail cartons, those need the same scrutiny. For distribution programs, it also helps to ask whether outer packaging follows ISTA transit testing standards and whether paper components can be specified as FSC-certified.
Why the digital proof catches knit mistakes early
The first mistake buyers make is treating a knit beanie like a flat print surface. It is not. The cuff removes visible space once it folds, and yarn texture changes how small elements read. A logo that looks centered and roomy in a mockup can end up crowded or undersized once it is translated to a cuffed knit construction.
That is why the proof should focus on production risk, not presentation polish. The only useful question is whether the finished hat will match the intended placement and branding cleanly enough for the use case. If the design is too detailed, the lettering is too small, or the cuff height was guessed instead of measured, the proof is doing its job by exposing the issue early.
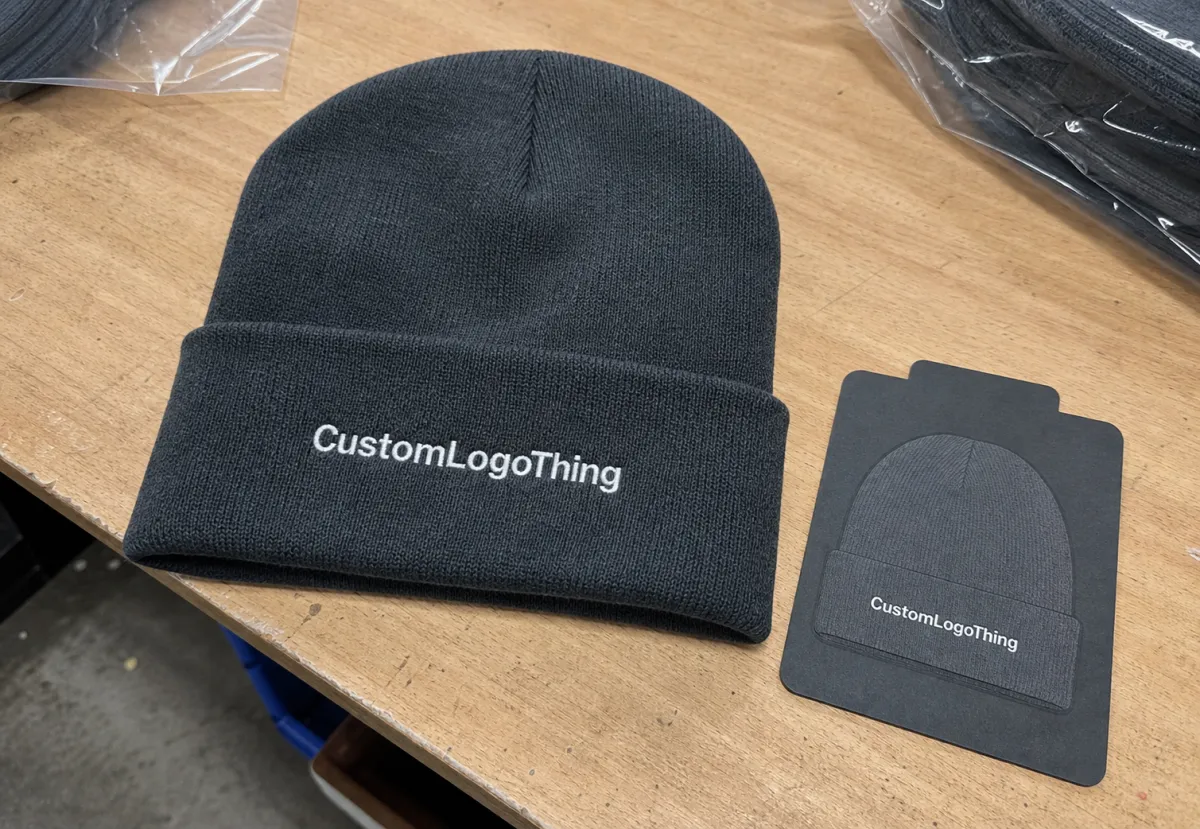
A logo can be centered on a screen and still land too low on the actual beanie once the cuff folds.
The proof is not there to promise pixel-perfect results. Yarn shade, stitch density, knit tension, and the decoration method all affect the final look. That is normal manufacturing behavior. The useful proof is the one that makes those limits visible before production starts.
- Artwork: Is the logo vector-ready, legible, and simplified enough for knit texture or embroidery?
- Placement: Does the logo fit inside the visible cuff area after folding?
- Method: Is the decoration embroidery, woven patch, knit-in art, or a sewn label?
- Order details: Do quantity, color, and ship-to information all match the purchase record?
Digital proofs are strong for layout and weak for material truth. They can show proportion and general color direction, but they cannot fully simulate yarn sheen, pile, or stitch pull. For color-sensitive programs, that distinction is the difference between controlled approval and a future complaint.
How the proof review process and timeline works
The workflow is usually simple: submit artwork, receive a digital proof, review it, send revisions if needed, then approve the final version for production. The delays usually happen in the gaps between those steps. A missing logo file, vague placement instruction, or feedback that says “make it pop more” can easily add a day or two without solving anything.
A proper proof should show the hat from the relevant views, include placement notes and size callouts, and identify the decoration method. If there is embroidery, a woven patch, or a label, the proof should make that unmistakable. A customer should never have to infer how the design will be built.
Typical timing looks like this:
- Artwork intake: Same day if files are complete; longer if cleanup or vector conversion is needed.
- First proof: Often 1-3 business days for custom knit work once the art is ready.
- Revision round: Another 1-2 business days if the feedback is specific and complete.
- Final approval: Production starts after written sign-off.
That schedule is realistic for clean jobs. It is not realistic for projects that are still deciding logo direction, cuff height, or decoration method. Rushed work can still move quickly, but only if the buyer has already made the design calls. Otherwise the proof stage becomes a decision meeting, and decision meetings are expensive.
The fastest approvals come from complete feedback. One message that covers size, placement, spelling, color, and method is worth more than three separate notes sent hours apart. Fragmented feedback does not just slow the process; it creates opportunities for one revision to undo another.
Cost, pricing, MOQ, and revision math
Pricing for Cuffed Knit Beanies usually comes from a handful of inputs: the blank hat, decoration method, setup or digitizing, sampling, revision work, shipping, and quantity. Buyers often focus on the headline unit price because it is easy to compare, but that number hides the real cost structure.
Low minimums almost always raise the unit price. That is not a penalty; it is basic math. When setup work and proofing are spread across 48 pieces instead of 500, each item carries more overhead. A small run with custom details can be perfectly sensible, but it should be priced like a small run, not like a bulk reorder.
| Option | Typical setup | Typical unit add | Best fit | Main watch-out |
|---|---|---|---|---|
| Embroidery on cuff | $35-$75 digitizing or setup | $1.25-$2.75 | Simple logos, clean lettering, stronger brand feel | Fine lines and tiny text can blur on knit texture |
| Woven patch | $50-$100 | $1.00-$2.50 | Detailed art with better edge control | Patch size still has to fit the cuff without crowding |
| Direct knit-in graphic | $75-$150+ | $0.80-$2.00 | Bold 1-2 color graphics and repeat programs | Not friendly to tiny detail or heavy color changes |
| Woven label or sewn-on tag | $25-$60 | $0.60-$1.40 | Subtle branding, merch lines, understated retail looks | Does not replace a logo that needs front visibility |
Those are practical ranges, not guarantees. A 72-piece order and a 500-piece order do not behave the same way. At smaller volumes, a finished unit can land around $8.50-$13.00 depending on decoration method and artwork complexity. At larger volumes, the cost can drop because the setup is absorbed across more units. The exact number depends on how much art work is needed, how many colors are involved, and whether the design is simple enough to keep the process lean.
Revisions can add cost too. Extra cleanup, an additional mockup round, a placement change, or a switch in decoration method after the first review may add $15-$40 in art work, sometimes more if the logo file is messy. A line-item quote is the easiest way to see real pricing. If one supplier bundles revisions and another does not, the lower quote can become the higher one after the first correction.
Artwork, placement, and size checks that matter on a cuffed knit
This is where most of the risk hides. Knit beanie artwork should be simpler than artwork for a screen-printed tee or a flat woven patch. Vectors are preferred. Fonts should be outlined. Thin strokes need enough weight to survive texture and shrinkage. As a practical threshold, anything under about 0.20 inch, or 5 mm, starts getting unreliable on a knit surface, especially if the design has delicate internal gaps.
The cuff changes the visible field, so placement should always be measured from the folded state, not from the flat hat. A 2.0-inch cuff and a 2.75-inch cuff do not present the same area. If the proof does not show where the fold lands, the buyer is left to imagine the finished position. That is where errors start.
Before approval, check these details carefully:
- Logo width: Compare the logo to the visible cuff width, not the full cap width.
- Seam distance: Keep key elements away from seams so they do not distort or disappear.
- Text size: Avoid tiny copy unless the wording is short and the method supports it.
- Contrast: Make sure the logo does not vanish against the yarn color.
- Decoration method: Confirm whether the proof reflects embroidery, woven patch, woven label, or knit-in construction.
Color is another place where expectations need to stay realistic. Pantone references help, but yarn does not behave like coated paper or a screen swatch. A proof may show the closest mock color rather than an exact production shade. If the logo is color-critical, ask which reference is being matched first: thread, yarn, or print simulation.
Decoration method also changes how much detail is safe. Embroidery handles bold shapes and clear lettering well, but microscopic script can look rough once stitched. Woven patches improve edge control and detail retention, though they still need enough room to read cleanly. Direct knit-in graphics are excellent for simple, graphic designs and unforgiving for anything fussy.
Step-by-step approval checklist before production starts
If fewer mistakes are the goal, approve the proof in the same order a production team would check a spec sheet. Random review works badly. Structured review catches the issues while they are still cheap to fix.
- Confirm the product style. Verify the exact beanie style, cuff structure, and size.
- Check quantity and color. Match the order count, beanie color, and any secondary yarn or thread colors.
- Review the artwork file. Check spelling, logo shape, font treatment, and vector cleanup.
- Measure the placement. Confirm the logo sits correctly on the folded cuff and away from the seam.
- Verify the decoration method. Embroidery, woven patch, woven label, and knit-in graphics do not produce the same result.
- Check shipping details. Confirm the ship-to address, contact name, and any split shipment instructions.
- Lock the approval in writing. Save the final proof, the approved specs, and the order confirmation together.
A second reviewer helps on larger orders. One person usually catches the art issues. Another catches the boring details that become costly later, such as the wrong quantity, the wrong destination, or a note that never made it into the record. Those mistakes feel small right up until they delay a shipment.
Do not approve vague changes. “Looks fine” is not enough if placement or sizing is still uncertain. If the proof needs edits, ask for a revised version and confirm that the earlier comments were fully addressed. A file history is useful only if everyone is looking at the same final version.
For repeat orders, archive the approved proof with a spec sheet that records cuff height, logo placement, thread or yarn colors, and decoration method. Reorders fail when people trust memory more than documentation. Memory is helpful; it is not a production control system.
Common proof mistakes that trigger delays or reprints
The same issues appear over and over. They are not dramatic. They are just costly.
First: approving low-resolution art because the mockup looks acceptable. Usually it is not. If a supplier has to stretch a tiny JPG into a proof, the final decoration often suffers. Vector art is still the cleanest starting point for embroidery, patches, and knit patterns.
Second: forgetting that the cuff changes the visible area. A logo centered on a flat image can end up too low once the cuff folds. Measured placement is better than eyeballing every time.
Third: assuming screen color and yarn color will match. They will not. Screen color is light-based; yarn is material-based. Different mediums, different limits.
Fourth: sending feedback in fragments. One email for size, another for color, another for shipping creates avoidable confusion. A single clean response is faster and more reliable.
Fifth: letting SKU confusion creep in. One file references one cuff height, another references a different style code, and the proof ends up attached to the wrong beanie. That is how orders drift without anyone realizing it until the factory is already working from bad information.
Rush orders magnify every one of these mistakes. Tight timelines do not leave much room for uncertainty. They can still work, but only if the art is already clean and the buyer is using the proof to confirm decisions, not to make them.
Expert sign-off moves and next steps for a clean order
Before approving, lock the end use. Retail, promotional giveaway, school merch, and seasonal gift packaging all put different pressure on the design. A retail line usually needs stronger branding and cleaner finishing. A giveaway can tolerate a simpler logo. A school or team order usually values readability at a distance more than decorative complexity.
Then build one final approval sheet with the core fields: art file, placement image, quantity, unit price, lead time, decoration method, and shipping destination. That single page does more than a long email thread because it forces the buyer to reconcile the choices before production starts.
For repeat orders, verify cuff height, color reference, and decoration method one last time. Those details drift if nobody writes them down. The next run should not depend on someone remembering what “the blue one with the small logo” meant six months ago.
Sometimes a digital proof is enough. Sometimes it is not. If the logo is detailed, the color is strict, or the order is large enough that a mistake would hurt, a physical sample or pre-production mockup is the safer move. That is not overthinking. It is buying down risk before production starts.
Used well, this checklist keeps the job moving for the right reasons: the artwork is clean, the cuff placement is measured, the method is realistic, and the order record is complete. The best approval is the one that prevents the reprint nobody wants to explain later.
For broader production planning, our Manufacturing Capabilities page gives a clearer view of finishing options and process control behind the order.
FAQ
What should be on a toy cuffed knit beanies digital proof checklist?
Start with the product style, cuff height, size, quantity, and decoration method. Then confirm logo placement, artwork spelling, color references, and any shipping instructions. The file should not be approved until every revision note is resolved in writing.
How accurate is a digital proof for cuffed knit beanies?
It is accurate for layout, placement, and artwork structure, but it is not an exact match for yarn color or stitch texture. Small details can shift once knit tension, cuff folding, and decoration method are applied. For color-critical jobs, ask for Pantone references or a physical sample.
Why does the cuff change the proof on knit beanies?
The cuff reduces the visible decoration area and changes the position once the hat is folded. A logo that looks centered on a flat mockup can sit too low or too close to a seam on the finished hat. Cuff height should be measured before final approval.
How many proof revisions are normal before production?
One or two rounds is common when the artwork is ready and the specs are clear. More rounds usually mean the buyer is still deciding on placement, size, or artwork cleanup. Every extra round can affect lead time and sometimes cost.
What causes the biggest delays in proof approval for knit beanies?
Missing vector art, unclear logo placement, and incomplete feedback are the most common causes. Quantity changes and color changes after the first proof also slow things down. A complete checklist keeps approval moving.


