Toy embroidered Beanies Bulk Order Planning tends to go wrong in the same three places: the knit structure, the stitch density, and the size of the decoration relative to the cuff. The artwork usually gets the most attention, but the beanie itself decides whether the design stays crisp or gets swallowed by stretch and texture.
That distinction matters because a knit cap is not a flat canvas. A small toy face, animal outline, or mascot mark can look perfect in a digital proof and still lose definition once it is sewn into ribbed fabric. Buyers who skip this reality usually end up with a sample that looks “close enough” on screen and disappointing in hand.
The better approach is practical rather than decorative. Decide who will wear the beanies, where they will be sold or handed out, and how much detail the embroidery must carry. A school program, winter retail line, gift bundle, and promotional pack all call for different construction choices, packaging, and timing.
That early sorting stage saves money later. It also prevents the common mistake of asking the supplier to rescue an overcomplicated design after proofing has already started.
Why Toy Embroidered Beanies Bulk Order Planning Starts Early
For embroidered knitwear, planning begins with fabric behavior. A toy motif that reads clearly on a mockup can distort when the beanie stretches over a head, especially if the decoration sits near a fold or a heavily worked part of the knit. Flat artwork logic does not carry over cleanly to a soft, elastic product.
The cuff is one of the most important variables. A deeper cuff gives the embroidery a steadier surface and keeps the design farther from the most flexible area of the beanie. A shallow cuff gives less room to work with, so the same motif may land too close to the edge and look cramped. Ribbing matters too: tighter rib structures generally hold stitches better, while loose or chunky knits can soften the outline and make small details wander.
Timing creates another pressure point. Toy-themed headwear is often tied to holidays, school events, or short retail windows. A delay in proofing, one extra sample round, and a shipping hold can consume the margin quickly. A basic beanie order can tolerate that. A seasonal program usually cannot.
Good order planning starts by naming the real use case:
- Gift channel: prioritize color contrast, soft backing, and a friendly front view.
- School event: keep the decoration durable, easy to sort, and simple to reproduce.
- Retail shelf: make the toy image legible at arm's length and stable in packaging.
- Promo bundle: keep the unit cost controlled and the pack-out easy to warehouse.
That framing changes the rest of the quote. It affects embroidery scale, thread count, placement, and whether the package needs a hang tag or a simple barcode label. It also changes how much detail is worth preserving. The strongest programs are usually the simplest ones. If the toy graphic needs explanation, the design is probably too busy for a small knit surface.
“If the toy face does not read at two feet, it will probably not read on a peg wall either.”
Choose the Beanie Construction and Embroidery Placement
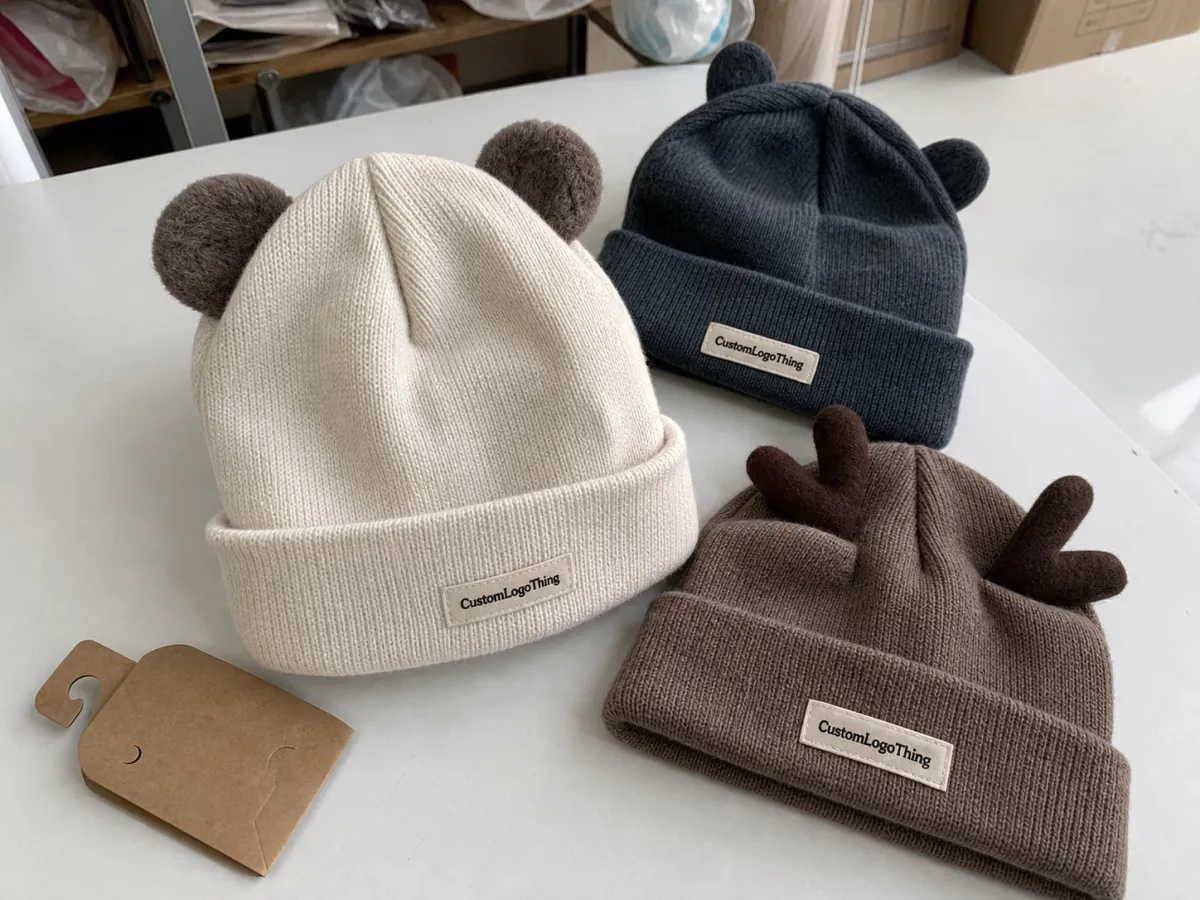
The beanie style sets the limits before digitizing even starts. A cuffed knit beanie is usually the easiest choice for toy embroidery because the cuff creates a stable zone with less stretch. A slouch knit gives a looser look, but the decoration sits on a softer surface and can shift slightly in wear. A ribbed knit sits somewhere in the middle, offering structure but less visual width than some buyers expect.
Placement is about more than visibility. It also affects how the fabric behaves while being worn. Front cuff embroidery is the safest default for a small toy icon or mascot mark because the viewer sees it immediately and the underlying area is relatively stable. Side placement can work for minimal branding. Crown placement can look clean in product photography, but it leaves less room for detail and usually needs more careful digitizing.
Small toy graphics should be simplified for stitch work. Dense fills can make a cute drawing feel heavy. Thin outlines, selective fills, and a few strong features often produce a better result than trying to stitch every line in the original illustration. Tiny pupils, whiskers, or interior facial details are the first things to disappear if they are too small. They should either be enlarged or removed before the run is approved.
Backing matters if the beanies will be worn by children or used as gift items. A soft backing is easier on the skin, and loose thread tails or hard stabilizer can create complaints after the first wear. Decorative extras look nice in a catalog photo, but they add risk if they can detach or scratch.
A simple comparison helps narrow the choice:
| Beanie style | Best use | Embroidery risk | Typical buyer note |
|---|---|---|---|
| Cuffed knit | Most toy motifs, retail, school events | Low | Most stable surface for a clean logo or mascot |
| Slouch knit | Lifestyle look, casual promos | Medium | More style-driven, but the design can drift in wear |
| Ribbed knit | Simple icons, colder-weather programs | Low to medium | Good structure, but detail should stay restrained |
A useful reality check is to mock the motif at its finished size and see whether it still reads at roughly 2 to 2.5 inches wide. If the design falls apart at that scale, the supplier will likely need to simplify it before production begins.
Specify Artwork, Colors, and Sample Requirements
Vector art is the best starting point for toy embroidered beanies Bulk Order Planning. It gives the digitizer control over stitch direction, density, and edge finish. Raster files can still be used in many cases, but the risk rises if the art contains thin lines, gradients, or tiny facial features. On knit, those details rarely survive untouched.
Before the proof stage, define the part of the toy graphic that must remain unmistakable. Is the silhouette the key feature? The face? The brand mark? Buyers often assume the whole illustration carries equal weight. In embroidery, it usually does not. One strong feature often works better than several weak ones trying to compete for space.
Color count has a direct effect on both cost and consistency. More thread changes mean more machine time and more chances for variation. For many toy motifs, two to four thread colors is the practical range. Beyond that, there should be a clear reason. Extra color does not automatically improve the design, and it can make the result feel busier instead of better.
If the art is detailed, ask for both a digital proof and a physical sew-out. A screen proof can hide problems that show up immediately on knit fabric. The sew-out shows whether the outline closes correctly, whether the eyes remain balanced, and whether the stitch density causes the fabric to buckle. That check is especially useful on small mascots and toy faces, where a tiny misalignment changes the expression.
Approval should be written in plain language. Avoid vague sign-off notes. Approve specifics instead:
- Placement: measured from the cuff edge or centerline.
- Thread shades: matched against a physical thread chart or swatch.
- Stitch density: enough coverage without hardening the knit.
- Logo size: final width and height, not an estimate.
- Backing and finish: soft enough for the intended wearer.
The approval stage is where small problems become expensive if nobody slows down. A revised proof based on bad markup can push the schedule back a week and introduce more inconsistency than the first version. One clear master file is easier to manage than several half-correct comments spread across emails and chats.
If the order is moving through multiple reviewers, keep comments tied to the actual sample and the exact version number. That sounds dull. It prevents the most common production error: approving one thing in principle and another thing in practice.
Pricing, MOQ, and Unit Cost Drivers
Buyers often ask for a single price first. That is normal, but it rarely tells the full story. For bulk embroidered beanie orders, the useful way to compare quotes is to separate blank cost, digitizing, embroidery setup, packaging, inspection, and freight. Those are the parts that explain why one supplier looks cheap at first glance and more expensive after everything is added together.
Quantity usually creates the biggest shift. A 100-piece order carries setup overhead very differently from a 500-piece order, and 1,000 pieces often unlocks a lower unit cost if the artwork stays simple. The savings can flatten if the design requires dense fill stitches, multiple thread changes, or manual correction during sewing.
Planning ranges for a standard cuffed knit beanie with a toy-style embroidered motif often look like this. They are not fixed quotes, but they are useful for budgeting:
| Quantity | Typical unit range | What usually changes |
|---|---|---|
| 100 units | $6.20-$9.50 | Setup costs are spread across fewer pieces |
| 250 units | $4.80-$7.10 | Better absorption of digitizing and sample work |
| 500 units | $3.60-$5.40 | Often the first meaningful scale break |
| 1,000 units | $2.90-$4.20 | Efficiency improves if artwork stays simple |
Packaging can move the number more than many buyers expect. Woven labels, FSC-certified paper hang tags, polybags, belly bands, or barcode stickers each add cost and handling time. A small packaging change can outweigh a small thread upgrade. That surprises people until they see the assembly steps broken out line by line.
MOQ should be treated as a planning tier, not just a gate. Some suppliers can quote 100, 250, 500, and 1,000 pieces, which makes the volume decision clearer. Ask for setup, sample, and freight as separate lines. If the sample is “free” but shipping is not, the landed cost may not be as friendly as the quote suggests.
For orders that will move through distribution centers, carton quality matters. A beanie order can survive production and still fail in transit if the boxes crush or the pack-out shifts. Technical shipping expectations from ISTA are useful here because they focus attention on handling, compression, and packaging strength rather than just the product itself.
Production Steps and Lead Time from Proof to Delivery
A clean production timeline should be written out before the order is placed. For knit caps, the usual sequence is artwork review, digitizing, proof approval, sample sew-out, bulk production, quality control, packing, and shipping. If any of those steps are left implied, the calendar becomes guesswork.
Lead time is often limited by approval rather than sewing. Multiple stakeholders may want to weigh in on thread color, toy shape, backing, and packaging at the same time. That slows everything down before production even starts. A short approval chain is worth more than most people realize.
Typical planning ranges look like this:
- Digitizing and proofing: 1 to 3 business days for a straightforward design.
- Sample sew-out and review: 3 to 7 business days, depending on revision count.
- Bulk production: often 10 to 15 business days after approval for standard runs.
- Freight and customs: a few days to a few weeks, depending on route and destination.
Those are planning ranges, not promises. A one-color icon on a cuffed beanie can move more quickly than a multi-color toy face on a slouch knit. Holiday queues can also shift the schedule overnight, which is why buyers should ask exactly when bulk production starts: after deposit, after proof approval, or only after sample sign-off.
If the order has to be split across several destinations, allow extra time for labeling and carton segregation. That detail gets ignored often, and it is one of the easiest ways to lose a launch window. A beanie run that is finished on time can still arrive awkwardly if the carton plan was written too late.
Packaging checks deserve attention too. A supplier should be able to say how they inspect final packing, whether they use any transit testing, and how they handle insert cards or hang tags. None of that is excessive. It is the kind of detail that prevents dented cartons, torn polybags, and rework at the receiving dock.
If the retail story needs a sustainability angle, ask whether the paper parts can come from FSC-certified material. That is a modest line item, but it can keep the packaging story consistent across product and documentation.
How to Vet a Supplier Before You Commit
The fastest way to evaluate a supplier is to ask for work that looks like your own. Flat embroidery examples are not enough. You want knit embroidery samples, because toy graphics on beanies behave differently from logos on woven caps or jackets. Stretch fabric changes stitch geometry, and a supplier who understands that usually makes fewer mistakes in production.
Ask how the run is documented. The best suppliers can show thread match records, placement rules, QC checkpoints, and inspection notes without turning the conversation into a sales presentation. You do not need a long speech. You need signs that the process is repeatable.
Response speed matters too. A supplier who can turn comments into a corrected proof in a day or two often saves more time than a lower-priced vendor who takes three rounds to answer a simple question. Slow communication tends to become slow production. That pattern is common enough to treat as a warning sign.
Use a short checklist during vendor comparison:
- Can they show recent knit embroidery work with similar detail?
- Can they explain how they reduce distortion on stretch fabric?
- Do they separate digitizing, sampling, and bulk charges clearly?
- Can they handle labeling, packaging, and assortment rules?
- Do they have a QC step before shipment?
For repeat orders, ask whether the supplier can keep the artwork and production settings on file in a way that supports replenishment. That matters more than a polished quote. Consistency is the real test. A supplier who can repeat the same toy face on the second run is more useful than one who only performs well on the sample.
Standards and traceability deserve a place in the conversation as well. It helps to know whether the supplier aligns with transit checks similar to ISTA handling expectations and whether they can document packaging materials if a retailer asks for proof of responsible sourcing. Those details sound minor until a buyer has to answer for damage claims or packaging compliance.
The best vendor is often the one that points out a weak design before you approve it. That honesty is more valuable than optimistic promises. If a toy graphic needs simplification, you want to hear it early.
Actionable Next Steps for a Clean Bulk Order
The simplest way to keep the order moving is to start with a one-page brief. Include quantity, target date, beanie style, embroidery location, thread colors, packaging needs, and ship-to details. That brief is not paperwork for its own sake. It is the fastest route to comparable quotes.
Send the artwork in the highest usable format. A vector file plus a reference image is ideal. The reference should show the intended size of the toy graphic on the actual beanie, not floating on a blank artboard. That one detail reduces guesswork during digitizing and speeds up the first proof.
Ask for several volume tiers and make sure setup, sample, and freight are listed separately. A single total may be convenient, but it hides the cost structure. Separate lines make it much easier to decide whether the next volume break is worth the extra inventory.
Before sign-off, get the following in writing:
- Final quantity and color mix.
- Approved proof version or sample reference.
- Exact placement and size of the embroidery.
- Thread palette and backing choice.
- Packing format and carton count.
- Target ship date and delivery window.
A written recap can feel tedious, but it prevents errors. It also protects the order when a teammate changes midstream or when someone remembers a “small” detail that was never actually approved. Most production mistakes are not dramatic. They are the result of one unclear note that gets repeated as if it were fact.
That is the practical value of toy embroidered Beanies Bulk Order Planning: fewer assumptions, fewer emergency corrections, and a cleaner path from quote to shelf. The process works best when the product, the channel, and the deadline stay visible from the start.
Keep the discussion grounded in the actual beanie, the actual art, and the actual shipping plan. That is how the order stays controlled instead of turning into a string of late approvals and avoidable cost creep.
FAQ
How many pieces count as a bulk order for toy-themed embroidered beanies?
Most suppliers treat bulk as the first tier that lowers unit cost, which often begins around 100 to 300 pieces. Ask for pricing at 100, 250, 500, and 1,000 units so you can see where the best cost per piece lands for your design.
What artwork should I send for a toy embroidered beanie bulk order?
Send vector art when possible, the thread colors if you already have them, and a reference image that shows the design at finished size on the beanie. If the toy graphic includes tiny details, ask the supplier to identify which parts may need simplification before digitizing.
How long does production usually take after approval?
Lead time depends on proofing, sample approval, and queue position, but approval is often the biggest variable. A straightforward run may move through digitizing, sampling, bulk production, inspection, and shipping in a few weeks, while more complex designs usually need extra time.
Can I mix colors or styles in one embroidered beanie order?
Yes, but mixing colors or constructions can affect MOQ and may add setup time if each version needs a separate embroidery run. Ask whether the supplier can combine variants under one purchase order or whether each colorway needs its own minimum.
What drives unit cost the most on toy embroidered beanies?
The biggest drivers are quantity, embroidery complexity, thread changes, packaging, and shipping method. Dense toy artwork with multiple colors usually costs more than a simple one-color icon because it adds machine time and setup steps.

