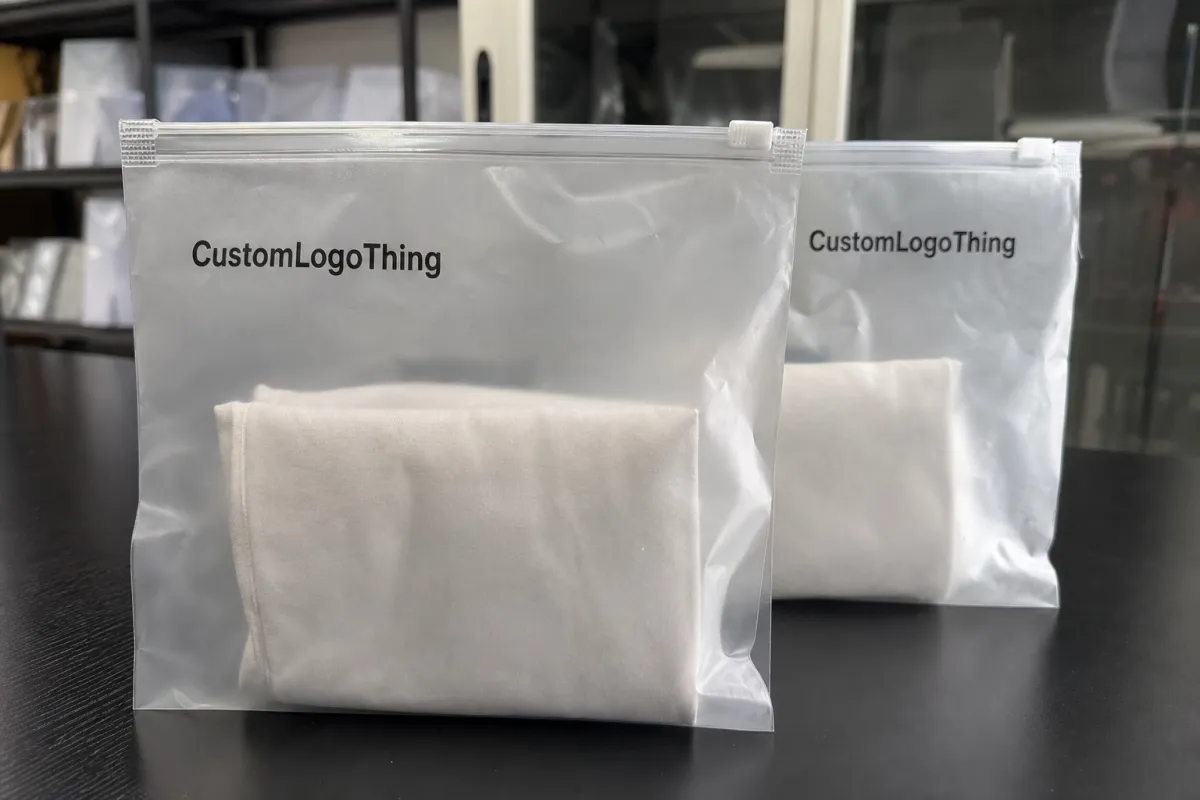
Use the toy Frosted Zipper Bags Packaging Insert checklist before asking for quotes. Frosted film looks neat on a shelf, but it also exposes weak layout choices fast. Copy that seems crisp on a screen can turn soft under store lighting, especially if the type is thin or the contrast is low. The bag protects the product; the insert has to explain it, sell it, and survive handling without looking improvised.
That matters because a toy package usually gets only a moment of attention. A parent wants the age grade, contents, and safety language almost immediately. A buyer wants to know whether the item is shelf-ready, and an associate wants the barcode and SKU to read cleanly without rescanning. The insert is doing more than filling space. It carries the information that keeps the package from feeling unfinished or underdesigned.
There is also a practical side that gets missed in early planning. If the checklist is vague, suppliers quote different assumptions, samples come back in different formats, and the buyer ends up comparing products that are not actually equivalent. That is how small packaging jobs become expensive ones.
What the checklist covers
A useful checklist starts with the details that affect production, not the details that sound polished in a presentation. Bag dimensions, insert size, print method, stock selection, approval sequence, and barcode placement all belong on the first pass. Those items determine whether the job is easy to run or whether every proof creates a new question.
For toy packaging, the checklist should confirm five core items before anyone prices the work: the frosted zipper bag dimensions, the insert trim size, the copy deck, the print finish, and the sign-off path. If any of those shift later, the quote changes too. More often than not, the “same” project becomes two or three different projects once the spec is written down properly.
A complete insert usually includes:
- Product name and SKU
- Age grade and warning language
- Barcode and quiet zone
- Assembly notes or simple use instructions
- Brand message or short selling line
- Country of origin and required legal copy
That list is enough for many toy sets. More copy is not automatically better. If the insert starts carrying everything, the hierarchy disappears and the package begins to feel crowded. In packaging, clarity usually beats density.
If the insert only works after someone explains it twice, it is not doing its job.
The checklist should also answer a quieter question: what is the insert supposed to do after the package is opened? Sometimes it is purely informational. Sometimes it doubles as a branding card. Sometimes it needs to be reused as a reference sheet. That decision affects stock weight, fold format, and how much space the design should leave around the text.
How the insert and bag work together
The bag keeps the product contained. The zipper keeps the contents secure. The insert carries hierarchy and explanation. Those functions sound separate, but buyers often treat them as independent line items. They are not. The visual result depends on how the film, card, and copy interact as one package.
Frosted film changes contrast. It softens bright color, dulls weak type, and makes decorative backgrounds harder to read. That means the most stylish layout is not always the best one. On this material, simple wins more often than ornate. A strong title, a readable barcode zone, and enough open space usually outperform a busy composition with clever but fragile typography.
Placement matters as much as art. A loose sheet, a folded card, a hang-tag style insert, and back-to-back printing all solve slightly different problems. Lightweight toy accessories can get by with a simple sheet if the bag is large enough and the copy is short. Heavier sets, bilingual instructions, or retail packages with more compliance text usually need a stiffer insert so the card does not curl or ride up against the zipper.
Measure the folded footprint, not just the flat bag size. That sounds basic, yet it is one of the most common causes of packaging frustration. An insert sized only to the outer dimensions can look undersized once it is folded and placed inside a frosted bag. The result is empty visual space, corner buckling, or a package that feels loosely assembled even when it technically fits.
Retail and e-commerce also ask for different behavior. Retail packaging needs fast scanning and shelf impact. E-commerce usually needs more resilience, less glare-sensitive design, and copy that survives a longer chain of handling. The same toy can need two slightly different packaging logics depending on where it is sold.
For terminology and standards, packaging.org is a useful reference point when a team needs a shared vocabulary. If the package will travel through parcel networks or distribution centers, a discussion around ISTA test standards is sensible too. Transit damage does not care how attractive the proof looked.
One practical observation: frosted film is less forgiving than many teams expect. A barcode that looks crisp in a PDF can print faint on a semi-opaque surface. Pale gray type can disappear. Fine rules can vanish when the package is held at an angle. Sample review is not a formality here; it is the moment when the packaging tells the truth.
Spec choices that change the final build
Every spec choice affects both appearance and cost. Sometimes it affects production speed too. Bag width and height, zipper style, film thickness, insert trim size, fold format, paper stock, and finishing all matter. Miss one dimension and the supplier will still make something, just not always the thing you expected.
Paper choice deserves more attention than it usually gets. Lighter stock is cheaper and easier to fold, but it can feel flimsy beside a premium-looking frosted bag. Heavier stock holds shape better and presents more cleanly on a hook, though it adds cost and may become awkward if the insert has to sit close to the zipper opening. For most toy packaging, coated stock improves color saturation, while matte stock reduces glare and often reads better in store conditions.
Print configuration changes the build as well. One side or two. One color or full color. Static artwork or multiple SKU versions. QR code or plain URL. These decisions affect prepress, proofing, and sometimes the approval schedule. Barcode placement deserves special attention because the quiet zone is not decorative space. Crowding it with art is one of the fastest ways to create scanning problems.
Compliance content can force the layout more than the design team expects. Age grading, choking hazard language, country-of-origin text, distributor information, and SKU identifiers need room to breathe. If the package includes regulated language, do not bury it in a corner and hope it gets overlooked. It will not. It will be found by someone whose job is to find it.
Material specs should be written plainly. If you want FSC paper, say so early. If the frosted bag needs a specific thickness, state it in mils or microns, not just “nice quality.” If the zipper should be resealable and durable enough for repeated handling, say that too. Vague descriptions sound flexible, but they usually create expensive clarification rounds later.
| Insert Style | Best For | Typical Unit Cost at 5,000 | Main Tradeoff |
|---|---|---|---|
| Loose sheet | Simple toy sets, short copy, fast assembly | $0.05-$0.09 | Lowest cost, but it can shift or curl |
| Folded card | Retail packaging with more warnings and brand copy | $0.07-$0.14 | Better stiffness, slightly higher print and folding cost |
| Hang-tag style insert | Peg-hook display and barcode-forward presentation | $0.10-$0.20 | Tidy presentation, but more finishing work |
| Back-to-back print | Multi-SKU packs, bilingual copy, longer instructions | $0.08-$0.16 | More room, but alignment must be controlled |
Those figures are planning ranges, not promises. Still, they show how quickly the build changes once you move from a plain sheet to a more structured retail insert. If the toy line also uses custom printed boxes, keep the visual system aligned across all pack formats so the range feels deliberate rather than fragmented. Matching structure matters more than matching ornament.
One last spec point: do not assume “eco” claims mean the same thing from every vendor. Ask for actual documentation if the job requires chain-of-custody proof, recycled content verification, or certified paper. A clear file trail saves awkward conversations later.
Cost, MOQ, and unit price triggers
Cost is shaped by more than quantity. It is shaped by how many times the supplier has to stop, reset, inspect, or hand-handle the order. For toy inserts and Frosted Zipper Bags, the main pricing triggers are quantity, bag size, film thickness, insert size, paper stock, print coverage, finishing, and labor. A quote with those variables hidden is rarely a quote worth trusting.
MOQ follows the same logic. Lower MOQ usually means a higher unit price, fewer print options, and less room to absorb setup costs. A run of 500 might be possible, but the per-unit rate can rise sharply. At 3,000 or 5,000 units, the cost curve often settles into something more sensible. For first-time custom packaging, the opening run is where setup charges show themselves most clearly.
It helps to ask for four separate numbers:
- Unit cost
- Setup or tooling cost
- Sample cost
- Freight or shipping
That breakdown makes comparison possible. It also exposes padded pricing. A supplier with a lower unit rate but a heavy setup charge may end up costing more overall. Another supplier may look slightly expensive on the unit line and still be the better choice if revisions, proofing, and packing are cleaner.
Watch the common price jumpers:
- Special folds or die cuts
- Metallic ink or spot UV
- Multiple insert versions for different toy SKUs
- Extra proofreading or color-matching rounds
- Separate sorting or kitting by style
Sample freight can be easy to overlook. A domestic proof shipment may be small, but international air freight can move the budget more than expected on a low-volume order. Reprint risk matters too. If the product line may change within a few months, a spec that locks you into expensive retooling is a poor fit.
For larger programs, ask the supplier to separate bag pricing, insert pricing, and assembly pricing. That keeps the conversation clean and makes reorders easier to manage later. It also helps identify where the real cost sits if one element changes.
Process and lead time
Most orderly packaging jobs move through the same sequence: brief, artwork, dieline, proof, sample, production, inspection, and shipping. Skip one of those steps and the schedule usually pays for it later. Packaging has a habit of revealing problems late, often after everyone has already planned around the wrong date.
The biggest lead-time risks are ordinary rather than dramatic: unclear copy, missing barcode data, late legal approvals, and too many revisions. Every extra revision adds time. Not just in design, but in proofing, sampling, and production start. For a seasonal toy launch, a few lost days can mean missing the shelf window entirely.
A realistic timeline for a straightforward custom run often looks like this:
- 1-3 business days for brief and artwork cleanup
- 2-4 business days for dieline and digital proofing
- 3-7 business days for sample approval, depending on the build
- 10-18 business days for production after proof approval
- 3-12 business days for freight, depending on route and service level
Those ranges are useful because they force the schedule to be discussed in real terms. “About two weeks” is not a schedule. A supplier should be able to name a proof date, a sample date, a production window, and a shipping estimate. If they cannot, the quote may be cheap for a reason.
Sample approval pays for itself when the material is frosted. It catches problems that digital files hide. A barcode that reads cleanly on a monitor can print too lightly on semi-opaque film. A line that seems fine in a PDF can disappear under store lighting. A sample is the cheapest place to find those issues.
A fast quote is not a fast delivery date. If the supplier cannot name milestones, they are selling optimism.
If the package will go through distribution centers or parcel handling, ask whether transit testing should be part of the plan. The right standard depends on the route and the product weight, but the conversation is worth having before the order is placed. Damage discovered after launch is far more expensive than a test.
Common mistakes
The same mistakes appear repeatedly. Weak contrast. Tiny warnings. Too much copy. Thin decorative type on frosted film. Teams often try to make the insert feel premium by adding more visual texture, but premium packaging usually reads as clear, deliberate, and calm rather than busy.
Another common error is measuring only the bag and forgetting the folded insert. The result is an insert that crowds the zipper, bends at the corner, or leaves a noticeable amount of empty space. Fit is not a cosmetic detail. It changes how the package feels in hand and how it reads on a hook.
There is also a budget trap: approving a polished sample that cannot scale to the intended MOQ or production method. A sample may be hand-trimmed, hand-aligned, or built on a different stock than the final run. If the supplier does not explain what changes at scale, the sample is not validation. It is a preview.
Compliance misses can be expensive. Forgetting age grading, choking warnings, country-of-origin text, or a correct SKU can mean relabeling, returns, or customer-service complaints. Even a small barcode error can cause more trouble than a visible design flaw because it tends to be discovered after the goods are already packed.
Other failure points show up often enough to deserve a checklist line of their own:
- Text too small to read at arm’s length
- Low-contrast color on frosted film
- Barcode too close to a fold or seal
- Copy changed after proof approval
- Layout built for a flat sheet, not a folded insert
Strong retail packaging is usually the result of subtraction. Remove the noise, keep the necessary information, and make the hierarchy obvious. That approach is less dramatic than a crowded design, but it holds up better in production and on shelf.
Expert tips and next steps for a clean supplier brief
A cleaner quote starts with a cleaner brief. Gather the product specs, copy, barcode data, safety language, and target quantity before sending anything out. The less a supplier has to infer, the fewer rounds of correction usually follow. Guesswork is expensive because it spreads across proofing, sampling, and production.
A strong supplier brief should include:
- Bag width, height, and zipper style
- Insert trim size and fold format
- Print sides, ink colors, and finish
- Required legal text and age grade
- Barcode artwork and SKU list
- Delivery date you actually need
Ask every vendor to confirm the same variables in writing. If one quote assumes matte stock and another assumes gloss, the numbers are not comparable. That matters even more if the packaging program spans multiple toy lines or seasons. Keeping the spec discipline consistent across product packaging, retail packaging, and inserts makes the whole range easier to manage.
For new toy lines or products that may change after the first sell-through, a sample or short run is usually the safer start. The unit cost may be a little higher. The risk is lower. That trade is often smarter than locking into a large quantity before the layout has been tested on real material.
The toy Frosted Zipper Bags Packaging Insert checklist should stay open until the proof is signed. That is the moment when the artwork, the material, the barcode, and the legal copy finally agree. After that, the job becomes far easier to control.
For related builds, review our Custom Packaging Products and apply the same spec discipline across each SKU. The less room there is for assumptions, the fewer surprises appear in pricing, proofs, and delivery.
Frequently Asked Questions
What should be on a toy frosted zipper bags packaging insert checklist?
Start with product name, SKU, age grade, warning text, barcode, and country-of-origin copy. Add any assembly notes, care instructions, and retail handling details the buyer needs. Before the art file goes to proof, confirm the legal text and brand information so the insert does not stall on a preventable correction.
How do I size the insert for frosted zipper bags?
Measure the folded bag opening, not just the flat bag size on paper. Leave safe margins so the card does not curl, buckle, or crowd the zipper edge. Test the insert against the frosted film under normal store lighting, because what looks fine on a monitor can turn muddy once it is behind plastic.
Is a printed insert better than printing directly on the bag?
An insert works well when the message may change often or needs faster updates. Direct printing is better when branding is fixed and you want a more permanent look. The better choice usually depends on setup cost, reorder flexibility, and how many SKUs the line will carry.
What affects the quote and MOQ the most for toy inserts?
Quantity, print colors, stock choice, finish, and trim size usually move the unit price first. Multiple SKU versions, special folds, and extra finishing steps can raise both MOQ and setup cost. Ask suppliers to separate unit cost from tooling, sample, and freight so the quote is readable instead of decorative.
How long does production usually take after proof approval?
Simple reorder jobs can move faster once the artwork is locked and approved. New custom runs usually need more time for proofing, sampling, and production. Add freight time and a buffer for revisions if the toy line is seasonal or launch-driven. That extra margin is often the difference between an orderly release and a rushed one.


