Wine Club Frosted Zipper Bags Packaging Insert Checklist is a long phrase for a simple reality: premium packaging fails most often at the seam between design and assembly. A bag can look elegant in a proof, an insert can look crisp on screen, and the final packout can still miss the mark if the usable opening is tighter than expected, the zipper track steals margin, or the print contrast disappears into the frosted film.
That gap matters because wine club packaging is judged fast. The member opens the mailer, scans the card, notices the zipper action, and forms an opinion before the bottle is even out. If the insert curls, shifts, or reads faintly through translucent plastic, the package feels cheaper than it should. The opposite is also true: when dimensions, stock, and artwork are aligned, the whole set reads as intentional without needing extra decoration.
A buyer-side checklist keeps that alignment from drifting. It defines the bag dimensions, zipper style, insert format, print method, quantity, ship-to details, and approval file in one place before the quote goes out. For frosted materials, that discipline is even more useful than it is for opaque retail packaging because the film shows mistakes instead of hiding them.
Wine Club Frosted Zipper Bags Packaging Insert Checklist: What It Covers
A useful checklist starts with the basics, then gets specific. Finished width, height, gusset depth, usable opening width, zipper location, film gauge, and print coverage all belong on the same sheet. So do insert stock, page count, fold style, and the exact version of the copy deck. The reason is practical: each of those choices changes how the package looks and how it packs.
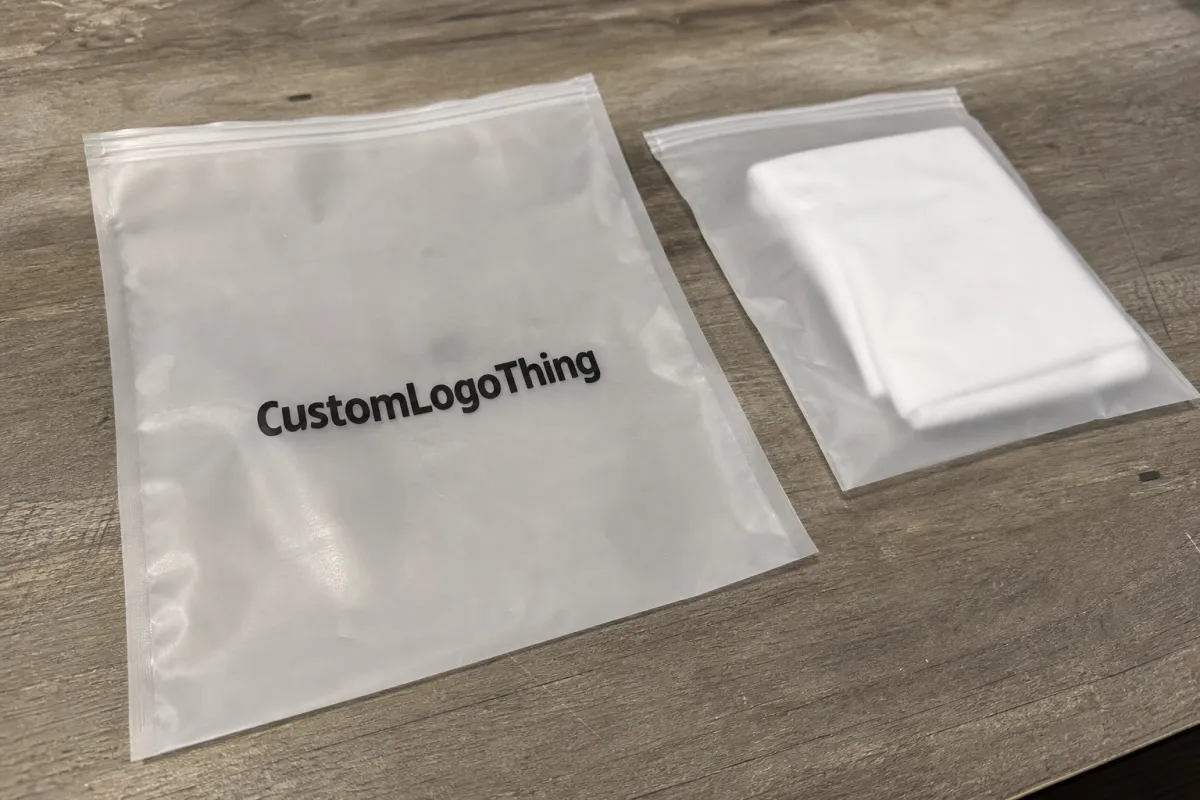
For Frosted Zipper Bags, the film itself deserves attention. A lightly frosted polypropylene or polyethylene bag will hold color better than a heavy haze, but even a modest frost softens detail. Dark inks tend to survive that softening better than pale tints, though too much coverage can make the package feel dense. In production, the sweet spot is usually a strong visual hierarchy rather than a crowded design trying to compensate for low contrast.
The insert needs its own logic. A flat card is easier to insert quickly, but it can drift inside the bag. A bi-fold or tri-fold holds more information and often feels more editorial, yet it needs a clear fold direction and enough margin to avoid edge wear or text loss near the crease. If the insert includes tasting notes, membership instructions, or a QR code, the order of that content should be decided before layout begins. Otherwise the final sheet gets crowded and the most important message shrinks.
One overlooked field is how the order will be packed. Loose inserts and pre-kitted sets are not the same job. A vendor quoting only the printed pieces may not be pricing insertion labor, carton labeling, or the extra handling that comes with mixed quantities. That distinction matters more than it sounds. A quote that leaves out packout can look attractive until the invoice lands.
Practical rule: one approved checklist should control the bag, the insert, the artwork, and the destination. If those four items do not match, the quote is incomplete even if the number looks right.
For a clean handoff, include these fields:
- Bag size: finished dimensions, gusset depth, and usable opening width.
- Closure details: zipper type, track position, and seal strength.
- Material specs: film gauge, frost level, and any finish applied to the insert.
- Insert specs: paper or card stock, fold style, page count, and trim size.
- Print specs: color count, Pantone targets, coverage area, and version number.
- Logistics: carton count, labeling, ship-to location, and required delivery window.
Keep this separate from any custom printed boxes or shipper cartons in the same program. Mixing component specs usually creates accountability problems, especially when one team is managing membership mailers and another is managing retail packaging. The best packaging systems are not necessarily simpler; they are clearer.
How the Bag, Zipper, and Insert Work Together
The bag controls the insert more than most buyers expect. If the usable interior width is tight, a slightly oversized card will buckle. If the zipper track sits low or intrudes into the top margin, a good headline can end up hidden behind the closure. Even the gusset matters because it changes how the insert bows once it is inside the bag. A few millimeters is enough to shift the visual line and make a polished package look rushed.
Frosted film changes the reading distance. On a monitor, a pale gray headline may feel restrained and modern. Under translucent film, it can become weak. Thin serif type, low-contrast gradients, and soft brand colors often lose too much definition. In contrast, dense black or deep wine-colored copy usually holds shape better, but only if the layout leaves enough white space to breathe. More ink is not a substitute for better hierarchy.
The zipper is part of the customer experience, not just a closure. A smooth pull and aligned track signal quality the moment the package is opened. A stiff zipper, one that snags or closes unevenly, changes how the whole bag is perceived. That may sound minor, yet packaging is full of these microscopic judgments. A member may not know why the bag feels premium, but they usually know when it does not.
Insert format also affects production speed. A flat insert can be packed quickly, but it can rotate or settle at an angle. A folded insert takes a little more preparation, yet it often creates a stronger reveal and supports more copy. For wine clubs, that can be useful if the insert needs to carry tasting notes, shipment details, a seasonal welcome message, or a QR code pointing to release information. The right choice depends less on page count than on how the message needs to unfold.
For buyers who want a more technical lens, packaging should be treated like a small transport system. The ISTA approach is useful because it keeps the conversation grounded in handling, vibration, and drop risk, not only print quality. Not every order needs formal lab testing, but the mindset is worth copying. If the bag and insert will be bundled, shipped separately, or packed under time pressure, the interaction details deserve the same scrutiny as the artwork.
Cost, Pricing, and MOQ Drivers to Compare
Pricing is rarely driven by one line item. Bag dimensions, film thickness, zipper style, frost level, insert stock, color count, setup, proofing, freight, and kitting labor all pull the final number in different directions. A buyer may ask for a quote on the bag alone and then discover the insert, assembly, and shipping together cost more than the print itself. That is common, not unusual.
MOQ pressure works the same way. Smaller runs are almost always more expensive per unit because the supplier still has to prepare the files, set up the press, review proofs, and manage waste. Larger runs lower the unit price, but they also increase storage risk. If the club changes tasting notes, updates a membership tier, or revises a seasonal campaign, old inserts can become dead inventory very quickly. That tradeoff is real, especially for recurring programs with short messaging cycles.
Comparing quotes only works if every vendor is pricing the same spec. If one quote includes kitting and another ships loose components, the comparison is false even if the headline price looks lower. The same is true for freight. A low product number can hide a high landed cost once delivery, carton count, and receiving requirements are added back in.
The ranges below are directional, not guarantees. They reflect common order behavior around a 5,000-unit run, but the actual pricing can move fast when print coverage, stock choice, or delivery terms change.
| Quote item | Typical driver | Common range at 5,000 units | Buyer takeaway |
|---|---|---|---|
| Frosted zipper bag only | Size, gauge, zipper style, print coverage | $0.18-$0.42 each | Useful for apples-to-apples pricing, but not the full landed cost. |
| Printed insert only | Stock weight, sides printed, color count | $0.06-$0.21 each | Fold style and copy length can move this more than buyers expect. |
| Kitted bag + insert | Labor, count accuracy, packout method | $0.28-$0.62 each | Best when fulfillment wants ready-to-ship units, not loose pieces. |
| Setup and proofing | Artwork prep, revision rounds, mockup needs | $75-$300 per job | Often omitted from headline quotes, then added later. |
| Freight and delivery | Carton count, destination, urgency | $90-$450+ | Always price the delivery lane, not only the product line. |
If the insert uses FSC-certified paper, ask for documentation instead of assuming the claim is included automatically. The FSC framework is about chain-of-custody proof, not just a logo on a spec sheet. For programs with sustainability claims, that paperwork matters as much as paper weight.
Packaging sustainability also deserves a more grounded conversation than many sales decks give it. The EPA’s recycling guidance at epa.gov/recycle can help teams compare material choices without overstating what a single component does. In practice, the better question is not “Is this eco-friendly?” but “What claim can the pack actually support, and what will operations be able to maintain at scale?”
Process, Timeline, and Lead Time Planning
A clean timeline starts with a settled brief. Specs collection, art review, proof approval, production, inspection, packing, and freight booking should be sequenced before the order is released. A surprising number of delays come from teams working in parallel without a shared cutoff date. The packaging vendor is not usually the problem; the problem is that the target keeps moving while the file is already in motion.
The slowest steps are predictable. Missing dieline information, late copy edits, uncertain quantity splits, and vague packout instructions all add time. A designer can adjust a headline. A production team cannot infer the final insert size if the usable opening was never confirmed. Once the file is live, every unresolved detail becomes a delay multiplier.
For straightforward custom runs, 12-15 business days from proof approval to shipment is a realistic planning baseline. Complex print, multiple insert versions, or bag-and-insert kitting can push that longer. Rush jobs can move faster, but only if the artwork is clean, the spec is settled, and the supplier is not waiting on decisions that should have been made before the PO.
Lead time should include buffer. Wine club launches, holiday mailings, and seasonal renewals leave very little room for rework. A delayed proof can push receiving past the mailing window, and a receiving miss is more expensive than a packaging miss because it affects customer timing, not just production. By the time the boxes arrive too late, the issue has already crossed from print quality into member experience.
That is why packaging planning and fulfillment planning need to share one calendar. If the bag, insert, and any supporting cartons are being finalized together, one owner and one approval deadline usually work better than a chain of partial sign-offs. The calendar should be strict enough to protect the launch, but flexible enough to absorb one or two meaningful revisions without restarting the whole order.
Step-by-Step Checklist Before You Place an Order
Start by confirming the bag. Measure the finished sample if one exists. Do not rely on memory, and do not assume last season’s spec still applies. Frosted bags often look similar across versions, but a slightly different opening width or zipper placement can change the usable space enough to matter in packout.
Then lock the insert. Define trim size, stock weight, fold direction, number of panels, and message hierarchy. If the insert has to carry tasting notes, membership terms, or a promotional code, decide what must be read first. Copy should be built around that order instead of cramming every message onto the same visual plane.
Request a proof package that shows the components together. A bag-only proof and an insert-only proof are not enough if the final unit must fit and read as one system. Ask for artwork, Pantone or color targets, copy deck, and a mockup showing how the insert sits inside the bag. That is where most fit issues show up early, and early is the only cheap time to solve them.
Compare quotes only after the spec is fixed. One vendor may be pricing loose components while another includes insertion and carton labeling. One may quote freight while the other excludes it. The lowest number is rarely the best number unless the scope is actually identical.
A practical order checklist looks like this:
- Confirm finished bag dimensions and zipper type.
- Approve insert size, stock, and fold direction.
- Review artwork version, color targets, and copy accuracy.
- Verify whether the order ships loose or kitted.
- Check carton labeling, destination, and delivery window.
- Sign off on one final production sheet before release.
That last line is not paperwork for its own sake. The final production sheet should confirm that the quantity, artwork version, insert count, and receiving location all match. If one file says 5,000 units and another says 4,800, the order will drift somewhere between proof and shipment. A single source of truth prevents that kind of quiet mismatch.
If the bag is part of a broader packaging family, keep the visual logic consistent across the program. Even when custom printed boxes or shipper cartons come from another supplier, the type treatment, color approach, and information hierarchy should feel connected. Good package branding rarely comes from one hero item. It comes from a system that behaves the same way in every format.
Common Mistakes That Trigger Reprints or Delays
The first and most expensive mistake is using a remembered dimension instead of a measured one. A few millimeters can cause bunching, a skewed headline, or an insert that catches on the zipper. Frosted material makes that worse because it exposes the shape issue instead of softening it away.
Low-contrast artwork is the second major failure point. Pale gray copy, delicate fonts, and washed-out gradients often disappear once they are printed through translucent film. A design that looks restrained on a screen can read as weak in hand. If the message matters, use stronger contrast and more breathing room. The package does not need to shout, but it does need to speak clearly.
The insert is frequently treated as the easy part. That assumption causes more trouble than it should. If the fold is wrong, the paper weight is too stiff, or the trim size is off, the insert may sit crooked, snag the zipper track, or wrinkle after packing. The customer notices all of that before they notice the brand architecture. Packaging can be beautiful and still fail if the component that carries the message is poorly matched to the container.
Version confusion creates another slow burn. Multiple email threads, file names like final-final-v4, and undocumented copy edits are a direct path to reprints. Once several people are commenting on different proofs, no one can say with confidence which file is live. The fix is boring but effective: one checklist, one approver, one release sheet.
There is also the logistics mistake that gets overlooked because it is not glamorous. Orders get split to the wrong warehouse, sent to the wrong receiving dock, or kitted against the wrong shipment window. Even a perfect print run can fail operationally if the delivery instructions are fuzzy. For wine club programs, shipping details are not a footnote; they are part of the product.
Expert Tips and Next Steps for a Cleaner Buy
Keep a master spec sheet for every reorder. That document should show what changed from the last run, not just what is being ordered now. It makes procurement easier, but it also helps quality control catch drift in paper weight, frost finish, or quantity. Reorders tend to fail in small ways, and small changes are easier to spot when the baseline is visible.
Ask for a combined mockup that shows the insert inside the frosted zipper bag. Separate proofs are useful, but they miss the interaction between fold direction, opening width, and visual balance. The combined view is where awkward oversize cards, weak contrast, and tight closures show themselves. If the package has to feel premium, the final assembly should be tested as an assembly.
Request two pricing scenarios: target volume and the next tier up. That comparison shows where the unit cost actually moves. Sometimes a modest increase in quantity cuts enough out of the per-unit cost to justify the larger run. Other times, the inventory risk outweighs the savings and the lower quantity is the better business choice.
Build a launch calendar that includes proof approval, production release, freight booking, and receiving at the fulfillment site. Keep that separate from the wine club Frosted Zipper Bags packaging insert checklist, but let the two documents talk to each other. One controls the scope, the other controls the timing.
Think carefully before splitting the bag and insert across multiple suppliers. One vendor can simplify coordination and reduce blame-shifting if something changes midstream. Separate vendors may provide better specialization or pricing, but only if the internal team has enough bandwidth to manage the handoff. There is no universal answer. The better choice depends on change frequency, shipment timing, and how much room your staff has for packaging oversight.
For faster quoting, send the checklist with the RFQ. That one move usually cuts down the clarifying questions, improves apples-to-apples comparison, and shortens the path to a usable proof. It also forces the quote to reflect the real job, not a loose interpretation of it. In packaging, that difference is often worth more than a small discount.
Done well, the wine club Frosted Zipper Bags packaging insert checklist protects more than print quality. It protects timing, budget, and the impression the member gets when the package is opened. The best versions are not loud. They are clear, measured, and easy to assemble without guesswork.
What should a wine club frosted zipper bag insert checklist include?
It should cover bag dimensions, zipper type, frost level, insert stock, fold style, print version, quantity, and delivery details. If the insert carries tasting notes or membership language, include that copy file too so the production team is not working from memory.
How do frosted zipper bag dimensions affect insert sizing?
The insert needs enough clearance to slide in cleanly, but not so much extra space that it shifts and looks untidy. Measure the finished bag, not just the spec sheet, because zipper tracks and gussets can reduce the usable interior size more than expected.
What pricing details matter most when comparing quotes?
Compare unit cost, setup fees, proof charges, freight, and any insertion or kitting labor. A low headline price can hide a higher landed cost if one quote includes assembly and another does not. Use the same spec for every supplier before comparing numbers.
How long does production usually take for custom frosted zipper bag inserts?
A straightforward run often takes 12-15 business days after proof approval, though complex print, multiple insert versions, or kitting can extend that. Add buffer time for approvals and shipping if the order is tied to a club launch or a seasonal mailing date.
What are the most common mistakes in wine club bag packaging insert orders?
The most common problems are wrong dimensions, weak contrast, and copy changes made after the proof was approved. Late revisions to quantity, shipping destination, or packout instructions also trigger delays, especially when several people are working from different files.

