Buyer guide for custom woven beanie labels
On a cuffed beanie, a woven label can look perfect in a flat PDF and still fail in the hand once the knit stretches, folds, and relaxes. That is why a beer Woven Label Beanies material sample guide matters: it shows whether the artwork stays readable at real size, whether the edge feels fine against skin, and whether the label still looks intentional after it is sewn into a soft, moving fabric.
Beer Woven Label Beanies Material Sample Guide: What the Sample Should Prove
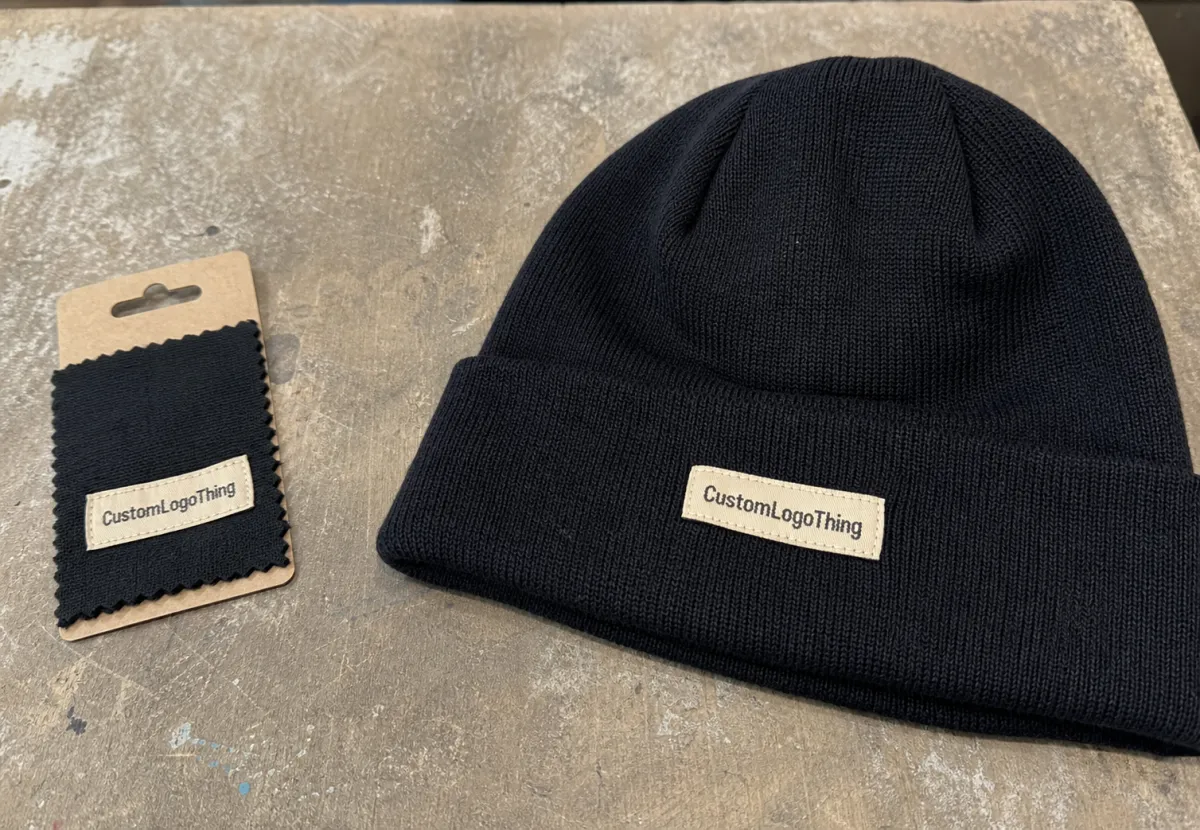
The part many buyers miss is that a woven label is not judged on the screen; it is judged on a cuff, under light, while the beanie is being worn, pulled on, and washed. A clean digital proof can hide the very things that cause trouble later, like thin letters closing up, a border that feels scratchy, or contrast that disappears against a dark knit. This beer woven label Beanies Material Sample guide is really about proving three things at once: legibility at the actual size, comfort against the skin, and behavior under stretch.
In practice, the sample should answer a simple question: does this label still look like your brand once it is attached to a flexible textile? If the answer is yes, the buyer has something real to approve, not just artwork optimism. That is especially true for cuffed beanies, where the front panel often compresses the label slightly and the knit relaxes differently from one hat to the next.
A woven label that looks crisp on paper can read very differently once it is sewn onto a ribbed cuff. The sample is there to show the truth before production turns that truth into thousands of pieces.
For buyers, the useful mindset is not “Does the mockup look good?” but “Can this construction survive wear, wash, and repeat ordering?” That is where a sample earns its keep.
How the Sample Process Works From Art File to Approval
The cleanest sampling flow starts with a vector art file, because crisp linework and controlled color separation are much easier to translate into woven thread than a low-resolution image. From there, the supplier usually asks for label size, placement, color count, weave style, and a target beanie type so the sample can reflect the real use case. If the trim package includes more than one item, keep the label brief aligned with your Custom Labels & Tags order so every piece of the branding system feels like it belongs together.
- Send the artwork. A clean vector file lets the factory clean up tiny details before they become thread problems.
- Lock the size. A 45 x 20 mm label reads very differently from a 60 x 25 mm label, even with the same art.
- Choose the weave. Damask-style detail, satin sheen, or a flatter weave all change how much the logo pops.
- Confirm the finish. Cut edge, folded edge, sew-in backing, or patch shape each affect comfort and durability.
- Review the strike-off. The sample should show thread detail, edge behavior, and the real color relationship.
- Approve in writing. Written approval keeps the production team from guessing which version won.
The best sample is not always a standalone label on a white card. If possible, ask for the actual knit base or a close fabric match, because the handfeel changes once the label is stitched to a beanie cuff. A label that looks balanced on paper may feel too stiff on a soft knit, while a label that seems a little subtle in isolation may look perfect once it is on a dark ribbed hat.
Buyers sometimes try to skip the physical stage and approve from photos. That can work for very simple artwork, but it is a weak move if the design has small type, fine borders, or multiple color separations. A sample should reduce guesswork, not shift it to a later stage.
Material, Weave, and Finish Factors That Change the Final Look
Most beanie label buyers care first about the graphic, but the real outcome is shaped by material and construction choices. Polyester thread is still common because it holds detail well and stands up to washing, yet recycled materials are increasingly used when brands want a lower-impact story and the artwork does not rely on ultra-fine type. A tighter weave usually improves sharpness, but it can also make the label feel denser; a looser weave can feel softer, but tiny details may blur sooner.
Thread and weave density
If the logo has hairline strokes or small lettering, the sample should show whether the weave can actually support that detail. For many buyers, the safe line is to avoid text that shrinks below about 4 to 5 mm in finished height, especially on a dark knit where the contrast is already doing some of the heavy lifting. Damask-style weaving often gives the cleanest edge definition for logo marks, while a satin-like face can create a smoother visual read if the design is simple and bold.
Edge treatment and backing
Finish decisions matter just as much as the face of the label. A cut edge can be fine on some applications, but folded or sewn-in finishes usually feel cleaner on a beanie cuff because the user’s forehead or temple may touch the edge. A backing can also change how the label lies against the knit. If the label shifts or curls after a few wears, the sample should reveal that quickly.
Placement and size
Placement is not just a design choice; it is a material choice because it affects how the label moves with the garment. A wider front label may stabilize better on the cuff, while a smaller side label may preserve stretch and softness. The right size often depends on the hat’s gauge, the cuff height, and how much visual contrast the brand wants from a distance. A strong sample should help the buyer see those tradeoffs instead of guessing.
- Front-center labels need the best balance of softness and legibility.
- Side-seam labels can often handle a little more structure.
- Folded cuff beanies usually need lower-profile edges so the label does not feel bulky.
For buyers building a more complete trim package, the woven label sample should be considered alongside the rest of the brand presentation, not in isolation. If the beanies ship with hangtags, care cards, or retail sleeves, the material palette should feel consistent from label to packaging.
Cost, MOQ, and Quote Inputs You Need Up Front
Sample fees and production pricing are not the same thing, and it helps to separate them early. A sample charge may cover setup, artwork cleanup, thread matching, and the physical strike-off, while production pricing is driven by volume and the real finishing required for the full run. Some suppliers credit the sample fee back after approval; others keep it separate. The quote should spell that out plainly so the budget does not get blurred later.
For woven beanie labels, the main cost drivers are usually color count, label size, weave complexity, fold style, backing, and order quantity. MOQ is often the biggest factor in the unit price, because setup time gets spread across the run. As a rough buying range, a woven label sewn into a beanie program might land around $0.09-$0.28 per unit at higher quantities, while a smaller first run can sit closer to $0.18-$0.40 per unit depending on complexity and attachment method.
A clean request packet keeps the quote honest. Send the artwork, target quantity, placement, exact label dimensions, and the sample type you want. If the buyer is vague, the estimate tends to grow extra padding because the supplier has to cover the unknowns.
| Sample Option | Typical Use | Indicative Cost | Usual Turnaround | What It Proves |
|---|---|---|---|---|
| Digital proof | Artwork layout only | Often included | Same day to 2 days | Placement, spelling, proportions |
| Woven strike-off | Thread detail review | $20-$60 | 3-7 business days | Legibility, color balance, edge behavior |
| Sewn sample on knit beanie | Final approval check | $45-$120 | 5-10 business days | Comfort, stretch, placement, real wear feel |
If you are still comparing label formats, the broader Custom Labels & Tags page is useful for aligning your branded trims before the sample run starts. That way, the woven label is designed as part of a system, not as a one-off add-on.
Production Steps and Lead Time After Sample Approval
Once the sample is approved, the schedule usually becomes more predictable, but only if the spec is locked. A normal path is artwork freeze, loom setup, weaving, finishing, attachment confirmation, packing, and shipment. For many buyers, the sample cycle itself takes 5-10 business days, and the production run often needs another 12-18 business days after approval, though larger or more detailed orders can take longer.
Delay usually starts with late changes. A small revision to the logo, a color shift, or a placement tweak can trigger another strike-off, and that second round often matters more than people expect. If the sample was approved on a white background but the actual beanie is black or heather gray, the contrast can still change the visual read enough to justify another check.
Packaging for the sample shipment deserves attention too. Ask for the sample pack in corrugated cardboard with kraft paper inserts if the pieces need separation or scratch protection. If the brand wants a more responsible outer pack, specify FSC certified paper where possible, or note whether recycled materials and post-consumer waste content are acceptable. Biodegradable packaging can be a good fit for some e-commerce kits, but only if it still protects the sample in transit.
For shipping discipline, buyers who care about transit damage can borrow the same thinking used in packaging logistics. The ISTA site is a useful reference for transit-testing language, while the FSC site explains paper sourcing and chain-of-custody basics in a straightforward way. Those references help when procurement, brand, and operations teams need to agree on what a “safe” sample pack actually means.
Planning lead time in two blocks works best: sample time and production time. If the beanies are tied to a launch, retail calendar, or event handout, count both blocks before you promise a ship date to anyone else.
Common Sampling Mistakes That Make Beanie Labels Look Off
The most common mistake is approving only a digital mockup. Screen art can hide weak detail, smooth over edge issues, and make the contrast look stronger than it will in thread. Once woven, the logo may lose a little sharpness simply because textiles do not behave like ink on paper.
- Too much detail. Tiny text and thin borders disappear first, especially on a small cuff label.
- Too many colors. Extra thread colors raise cost and can muddy the read if the palette is too busy.
- No wear test. A label that looks good on day one may distort after a few pulls or washes.
- Ignoring comfort. A stiff edge is easy to miss on a desk and annoying on the forehead.
- Skipping placement notes. A 5 mm shift can matter more than many buyers expect on a centered front label.
Wash and abrasion checks are worth a little time, even for short-run seasonal product. Buyers do not need a laboratory in order to catch obvious issues. A gentle home-laundry cycle, air drying, and a close look at curling, puckering, or color bleed will tell you a lot. If a brand wants a more structured durability discussion, ASTM-style wash and abrasion thinking is a useful frame, even if the project is not being certified against a formal textile test.
If the sample is only judged flat on a table, you are probably missing the part that matters most: how the label behaves once the beanie is worn, folded, and washed.
Another mistake is choosing the cheapest option before checking legibility. Saving a few cents is pointless if the logo turns muddy or the label feels rough. On a beanie, the user touches the label more often than many buyers realize, so comfort and clarity need to hold together.
Expert Next Steps for Ordering the Right Sample Set
If the project has any design risk at all, order a small comparison set instead of a single sample. One version can be tuned for detail, one for softness, and one for cost. That side-by-side view is often more useful than a dozen emails because the team can handle the label, stretch the knit, and decide with their own hands which tradeoff is acceptable.
- Ask for a detail-focused sample. This confirms the smallest text and the tightest lines.
- Ask for a comfort-focused sample. This checks edge feel, backing, and cuff placement.
- Ask for a cost-focused sample. This shows what happens if the weave is simplified.
- Review all samples on real beanies. Natural light and actual wear reveal more than a desk review.
- Do a simple wash check. One cycle can expose curling, shrinkage, or color shift before production.
It also helps to review the samples in three settings: under daylight, under indoor retail lighting, and while the beanie is actually on the head. A label that reads fine on a table may disappear in low store light or feel awkward once the cuff is folded and worn. That is normal, and it is exactly why the sample exists.
Once the winning version is clear, save the approved sample photos, the size note, the placement mark, and the thread color record with the spec sheet. If you ever reorder, that packet becomes the source of truth instead of memory. That is the real value of a beer Woven Label Beanies material sample guide: it turns a visual idea into a repeatable production spec you can trust on the next run.
What should I check first in a beer woven label beanies material sample?
Start with legibility at the actual label size, because tiny letters and thin lines are usually the first details to soften in woven construction. Then check edge feel, backing, and how the label sits against the cuff, since comfort matters as much as the visual read. Finally, compare the sample on a real beanie rather than in isolation, because knit stretch changes the way the label appears.
How do woven label materials affect comfort on a beanie?
A smoother weave and cleaner edge finish usually feel better against skin, especially on folded cuff beanies that sit close to the forehead. A thicker or denser label can feel more durable, but it may also feel stiffer, so the sample should show that tradeoff clearly. The best choice depends on placement, because a side-seam label can tolerate more structure than a front-center label on a soft knit hat.
What is a normal sample turnaround for beer woven label beanies?
Turnaround depends on artwork readiness, label complexity, and whether the supplier is producing a simple strike-off or a fully sewn sample. The fastest path is usually a clean, final file with clear size and color instructions, because revisions are what extend the schedule. Ask for the sample timeline in writing so the approval date can be tied to production and shipping dates with less risk of surprise delays.
How many samples do I need before approving production?
One sample is often not enough when the label has small text or a specific handfeel requirement, because a side-by-side comparison reveals more than a single proof. A strong approval set usually includes at least one detail-focused option and one comfort-focused option, so the team can compare priorities honestly. If the project is tied to retail or event timing, approving a smaller comparison set early is better than waiting for a perfect but delayed version.
What makes a beer woven label beanies quote more expensive?
Higher cost usually comes from more colors, finer weave detail, larger label size, and special finishing such as folding, backing, or custom cut shapes. Low order quantities can raise the unit price because setup time is spread over fewer pieces, which is why MOQ matters so much in the quote. If the quote includes multiple sample rounds or revisions, ask whether those charges are separate from production so the budget is easy to track, and keep the beer Woven Label Beanies Material Sample guide with your approved spec so future quotes stay consistent.


