A candle logo patch Beanies Material Sample guide is less about picking the prettiest option and more about finding out what survives contact with real knitwear. A logo can look clean on a screen, then wrinkle, lift, or feel annoyingly stiff once it is sewn onto a stretchy cuff. That gap between mockup and reality is where a lot of avoidable waste starts.
Buyers who handle samples well save time, money, and a decent amount of back-and-forth with production teams. A good review does not stop at color. It checks texture, edge quality, placement, flexibility, and whether the beanie still wears like a beanie after the patch is attached. If the spec is fuzzy, every later step becomes a guessing game. Factories hate guessing. So do buyers who are paying for it.
What the sample reveals before production starts
The sample is the first honest version of the product. A patch that looks premium on a flat proof can behave very differently on rib knit, jersey knit, or a thick cuff that already wants to spring back into shape. That is why a candle Logo Patch Beanies material sample guide matters: it turns a design decision into something you can hold, bend, and inspect under normal light instead of studio lighting and wishful thinking.
A digital proof tells you the artwork direction is in the right neighborhood. A material swatch tells you how the surface feels. A sewn sample tells you the whole story, including thread tension, patch placement, and whether the beanie still sits comfortably after the logo is attached. Those are separate checks. Treating them like the same thing is how people end up approving a product they have not really seen.
Start with the edges. Then inspect the face of the patch. Then look at the beanie body around it. If the corners lift, if the outline softens where it should be crisp, or if the backing shows through a lighter knit, the sample is doing its job by warning you early. That is the cheapest place to find problems. Not after bulk knitting starts.
If the sample feels a little off in your hand, it will usually feel more off on someone’s head.
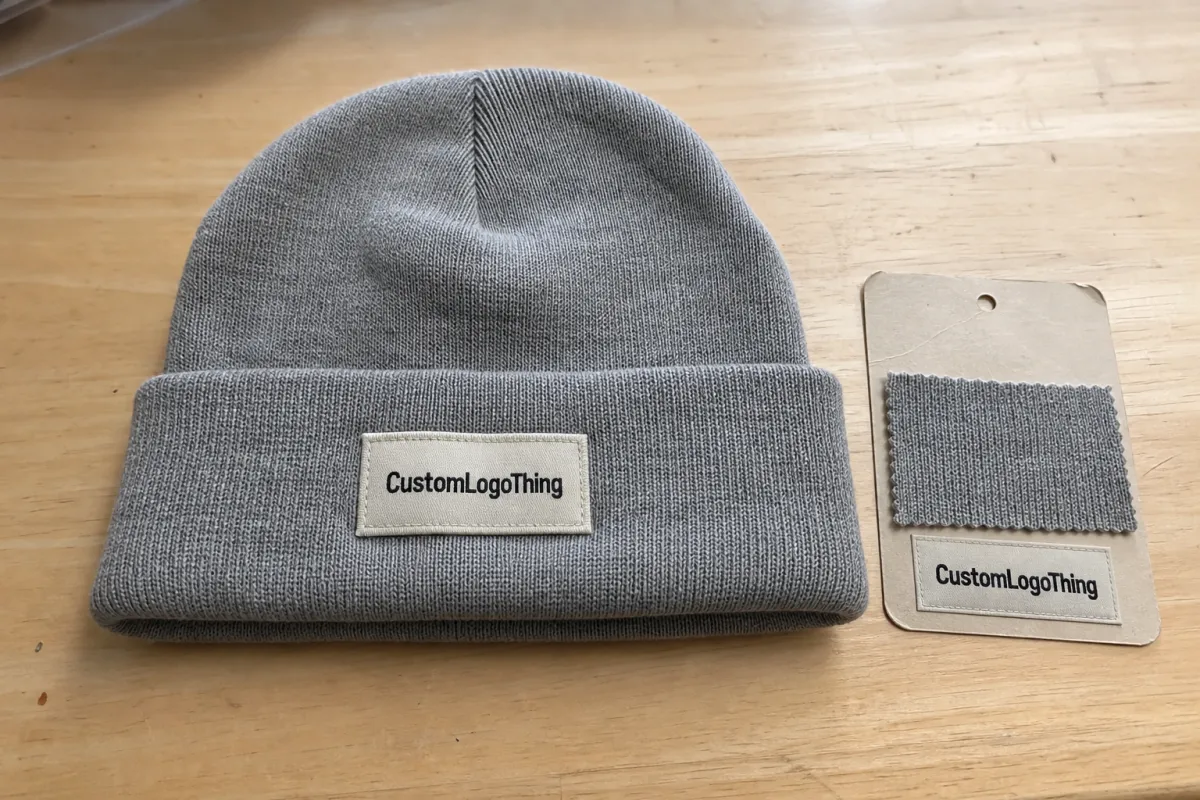
I also like to check how the sample is packed, because presentation and protection tend to reveal the same level of discipline. A clean sample carton in corrugated cardboard, wrapped in kraft paper or a simple recycled sleeve, says the supplier is thinking about shipping, not just sewing. If your program calls for FSC certified board, recycled materials, or even biodegradable packaging, ask for it during sampling. Changing pack-out after approval is a classic time sink.
How logo patches behave on different beanie knits
Not every beanie surface accepts a patch the same way. Dense rib knit usually gives the cleanest result because the surface is stable and the logo sits flatter. Jersey knit can also work, but it may show more distortion if the beanie is soft or lightly constructed. Waffle knit adds texture and warmth, yet that texture can swallow fine details and make thin type look smaller than expected. Chunky-gauge beanies are the hardest to control, because the thicker yarns and deeper stitch relief can make a patch feel smaller, heavier, or slightly off-center once it is sewn in.
That matters because knit stretch changes how the patch reads after the beanie is folded, pulled low over the ears, or cuffed for retail display. Buyers should inspect the sample in at least three positions: laid flat, folded as worn, and gently stretched across the opening. If the logo only looks right in one of those positions, the design is not really approved yet.
Size is another place where people guess too confidently. A cuff patch around 45 to 60 mm wide is often enough for clear branding on standard adult beanies, while a larger crown placement can overwhelm a thick knit fast. Rounded corners usually wear better than sharp square corners. They feel softer against the head and resist edge lift more reliably. If the patch lands near a seam or crown decrease, leave extra room. Stitch lines and shaping lines can pull the piece slightly off center, even when the artwork is perfect.
Yarn finish changes the visual weight too. Brushed knits soften the edge of the logo, while tighter stitches give a crisper read. That is why the best review is never just a bench review. The hat needs to be worn. A patch that looks balanced on the table can sit awkwardly once it is on a head form and folded the way customers will actually use it.
Patch material choices: silicone, leather, woven, and embroidery
Most buyers compare six patch families: molded silicone, soft PVC, faux leather, genuine leather, woven labels, and embroidered patches. Each one trades off detail, comfort, price, and visual weight. There is no universal winner. A patch that looks sharp on a rigid product can feel clumsy on a soft winter hat.
| Material | Hand Feel | Detail Level | Typical Cost Signal | Best Use Case |
|---|---|---|---|---|
| Molded silicone | Flexible, slightly grippy | Very good for bold shapes | Mid-range; tooling can raise sample cost | Outdoor look, durable branding |
| Soft PVC | Softer than rigid plastic | Strong for logos with clear blocks | Mid-range; color count affects price | Promotional programs, clean contrast |
| Faux leather | Warm, familiar, slightly structured | Good for debossed marks | Often moderate; finish affects quote | Retail beanies, lifestyle branding |
| Genuine leather | Natural, premium, more rigid | Best for simple marks | Usually higher; material variance matters | Higher-end collections, limited runs |
| Woven label | Lightest feel | Excellent for fine lines and small type | Lower sample burden, efficient in volume | Soft hand feel, subtle branding |
| Embroidery patch | Textured, traditional, low-profile if designed well | Good for simple logos, weaker for tiny text | Depends on stitch count and thread colors | Classic retail look, heritage brands |
There is always a tradeoff between sharp detail and softness. Raised dimensional effects can look expensive, but if the patch stands too proud of the knit, it may feel stiff at the forehead or catch when the beanie is folded into a carton. Woven labels usually feel the lightest. Debossed faux leather often gives a clean, understated face with less bulk. Silicone sits in the middle: modern and durable, but only if the shape stays controlled and the logo is not oversized.
Finishes change the mood fast. Matte surfaces usually read outdoor-friendly and grounded. Glossy finishes and high-contrast embossing feel louder and more promotional. If your logo uses tiny type or thin lines, ask the supplier to confirm the minimum readable stroke width before approval. On knit goods, that detail matters more than it would on paper packaging. Tiny letters love to vanish at the worst possible moment.
Attachment also changes how a material behaves. Sew-on patches are the safest on knit because they distribute stress evenly. Heat-activated backing can work, but it needs careful temperature control and the right fabric. On a stretchy beanie, too much heat can distort the knit or make the patch edge feel rigid. Adhesive-backed options are usually more useful for temporary placement or sample marking than for a finished retail product. If a supplier pushes a convenient bonding method too hard, ask why.
Packaging supports the same impression. A beanie wrapped in kraft paper with a simple recycled insert feels very different from one packed in shiny film, even if the hat itself is identical. If the final program uses retail shippers or inner cartons, ask whether the supplier can work within FSC certified board or post-consumer waste targets. For transit testing, the standard expectations used by groups like ISTA are a useful reference point for drops, vibration, and compression. Samples should survive those stresses too, or they are only pretty on arrival day.
Cost, pricing, and MOQ factors that move the quote
Sample cost and production cost are not the same thing. A one-off sample often includes artwork cleanup, setup, hand assembly, color matching, and more attention than bulk units ever will. That is why a single sample can land around $35-$150 or higher before freight, even if the final unit price settles much lower. Custom tooling, specialty finishes, and multiple revision rounds push that number up quickly.
Production pricing usually comes down to a few repeat offenders: patch material, number of colors, size, attachment method, packaging, and revision count. A woven patch with two colors and a standard sew-on finish will price differently than a molded silicone patch with a custom backing and a special matte surface. Lower minimum order quantities almost always mean higher per-unit cost, because the setup is spread across fewer pieces. Larger runs can reduce unit pricing, but only if the spec is already stable.
For many suppliers, MOQ may sit anywhere from 100 to 500 pieces depending on the patch type, knit color, and whether tooling is required. That is not a law of nature. It is just the point where their labor and setup math stops being painful. If a quote looks unusually cheap, check what has been stripped out. Sometimes the answer is packaging. Sometimes it is a finish you will miss later. Sometimes it is simply that nobody priced the sample work honestly.
| Quote Factor | Lower-Cost Choice | Higher-Cost Choice | Buyer Impact |
|---|---|---|---|
| Patch material | Woven label, basic embroidery | Silicone, genuine leather, custom PVC | Changes tooling, finish, and hand feel |
| Artwork complexity | 1-2 colors, bold shapes | Multiple colors, tiny type, fine lines | Affects readability and setup time |
| Attachment | Standard sew-on | Special backing, mixed methods | Can alter comfort and production speed |
| MOQ | Higher volume, tighter spec | Very low minimums | Lower MOQ usually raises unit cost |
| Revisions | One proof round | Multiple design changes | Adds labor and timeline risk |
Ask direct questions before you approve anything. What is included in the sample fee? Is artwork cleanup billed separately? How many revisions are covered? Is freight included? Does rush service change both sample and production pricing? Those answers matter because a quote that looks cheap up front can become expensive once the hidden pieces are added back in.
If sustainability claims are part of the product story, ask for proof on the packaging side too. FSC certification can apply to cartons and inserts, not the beanie itself. That distinction matters. Recycled materials, kraft paper, and biodegradable packaging are useful specifications, but only if they are written into the quote before sampling starts. Otherwise everyone remembers a different version of the plan.
Process and turnaround from sample request to sign-off
A clean process is simple enough to describe without a flowchart: send artwork and usage notes, receive a digital proof, approve the material direction, build the physical sample, then review and request changes if needed. The real delay is rarely the sewing machine. It is usually the back-and-forth over placement, finish, and tiny details that were never specified clearly at the start.
- Send vector artwork, preferred placement, target beanie color, and packaging notes.
- Approve a digital mockup that shows patch size and location on the knit.
- Confirm material direction and backing style before physical sampling starts.
- Review the sewn sample under daylight and indoor lighting.
- Request one revision round if the result is close but not final.
- Lock the spec and save the approved sample as a production reference.
Timing depends on complexity, but a straightforward sample often takes 7-12 business days after proof approval. Add more time if the patch needs custom tooling, specialty finishes, or serious artwork cleanup. Silicone, molded PVC, and some leather looks can take longer because the factory may need a mold or finish test before moving forward. Bulk production can still move quickly once the sample is approved, but only if the buyer returns feedback fast and keeps the sign-off loop tight.
Slow internal feedback is the usual schedule killer. If marketing, merchandising, and procurement all want a say, set a review deadline before the sample ships. Otherwise the slot goes cold, the launch date slips, and everybody starts pretending the delay was “unexpected.” It usually was not.
Common mistakes that make beanie samples misleading
Photo approval is the biggest trap. Lighting, screen brightness, and image compression can hide texture differences and make two samples look close when they are not. A buyer approves a patch on a phone, opens the shipment later, and discovers the color is warmer, the edge is rougher, or the logo sits higher than expected. That is not bad luck. That is bad review practice.
The second mistake is judging the patch without wearing the beanie. A sample that looks sharp on a table can pucker once it is stretched over a head form, and a logo that seems the right size in a flat lay can look oversized once the cuff is folded. Always test the hat the way customers will use it: cuff folded, cuff unfolded, pulled low, and packed the way it will ship.
The third mistake is forgetting the retail presentation. If the beanie will sit on a shelf with a hang tag, inside a folded band, or inside a mailer, the logo has to read clearly from that angle too. I have seen buyers approve a great-looking sample, then notice later that the patch disappears when the beanie is folded for packing. That is not a production defect. It is a missing spec.
Handling checks matter as well. Raised or soft-touch materials can scuff sooner than expected if they rub against a carton seam, zipper, or another sample in transit. A simple friction check helps: rub the patch lightly with clean fingers, then compare it under the same light. If the finish dulls fast, the material may still be usable, but you should know that before mass production starts.
Wash and flex behavior deserve attention too, even if the first order is small. A sample that has only been handled once has not really been tested. Light steam, repeated folding, and a short wear test can expose edge curl, backing stiffness, or thread distortion before the bulk run locks in the same mistake. Nobody wants to find out a patch looks great only until the first cold morning.
Expert tips and next steps after the sample arrives
The most reliable approval method is boring, which is usually a compliment. Score the sample on four criteria: visual accuracy, hand feel, durability, and brand fit. Put a number next to each one, keep the notes short, and share the sheet with everyone who has approval authority. That keeps the conversation anchored to the actual sample instead of drifting into taste debates.
- Visual accuracy: Compare the sample to the approved artwork under daylight and indoor light.
- Hand feel: Stretch the beanie, fold it, and check whether the patch feels stiff or intrusive.
- Durability: Inspect edges, corners, and attachment points after light handling.
- Brand fit: Decide whether the material, finish, and size match the product tier.
If the first sample is close but not right, ask for one or two alternates instead of restarting from scratch. A small change in backing, finish, or patch thickness often solves the problem without forcing a full redesign. That is usually cheaper than chasing a brand-new concept while the calendar keeps moving.
Document the final dimensions, confirm color references, note acceptable tolerances, and save a physical reference sample in a labeled pouch. That one piece becomes the anchor for future runs. It is also the fastest way to keep reorder quality consistent when a different person is handling procurement six months later.
For the best result, keep the final spec practical. Use the sample to lock the patch size, material, attachment method, and pack-out. If your program includes corrugated cardboard cartons, kraft paper wraps, FSC certified board, recycled materials, or biodegradable packaging, write those notes into the production file beside the logo spec. Good records prevent expensive “we thought that was standard” conversations.
That is really the point of a candle Logo Patch Beanies Material Sample guide: not to make the process fancier, just to make the decision solid enough that production can repeat it without drama.
What should I inspect first in a candle logo patch beanie sample?
Check edge quality, stitch density, and whether the patch sits flat on the knit without lifting at the corners. Then stretch the beanie as it would be worn so you can see whether the logo puckers, twists, or becomes hard to read.
Which patch material usually feels best on soft beanies?
Soft-touch options such as woven labels, low-profile embroidery, and flexible silicone usually feel lighter on knit. Heavier materials can still work well, but they need the right size, placement, and backing so they do not feel bulky.
How much do beanie material samples usually cost?
Sample pricing often includes setup, hand assembly, and artwork handling, so it is usually higher than the eventual bulk unit cost. Special materials, extra revisions, and rush shipping can raise the sample total, so ask for an itemized quote.
How long does the sample and approval process usually take?
A simple sample can move quickly, but specialty materials, artwork revisions, and color matching usually add time. The biggest schedule risk is delayed feedback, so set an internal review deadline before the sample ships.
What should I do if the sample color or finish looks off?
Compare the sample under daylight and indoor lighting, then check it against your approved artwork and brand references. Ask for a revised material swatch, finish change, or backing adjustment before you approve the production spec.
Handled properly, a candle Logo Patch Beanies material sample guide turns into a practical control point, not another round of guesswork. That is what keeps the product consistent, the reorders cleaner, and the launch from getting silly for no good reason.


